I guess you are familiar with the tool “Microsoft Clarity” and that you know what custom tags are too.
If you don’t know what Microsoft Clarity is, here is a quick intro for you;
It’s a digital experience optimization and analytics tool that makes it easy to measure user experience metrics like rage clicks, dead clicks, javascript errors, etc.
The tool has the following features;
- Session recordings playback
- Heatmaps (click and scroll map)
- Integration with Google Analytics, etc.
One cool thing about Clarity implementation is the ease and simplicity of installation. Out of the box, it gives you a lot of actionable insights.
Custom Tags In Microsoft Clarity
According to Microsoft definitions;
Clarity’s custom tags are customizable filters that allow you to analyze recordings and heatmaps in different directions. You can easily create custom tags and share them across your team. You can pass additional information through custom tags.
- Custom tags are not retroactive.
- There are no limits on the number of custom tags on a project.
- It is applied after the Clarity tracking script has loaded on the page.
- The custom tag and its value can’t be longer than 255 characters.
- A single page can have no more than 128 tags. Any other tags will be ignored.
- The tags can be any alphanumeric value.
Here is what the code snippet that applies a custom tag looks like
clarity("set", "key", "value");
- Key- is the name of the tag.
- Value – is the value the tag should assume at the point of application.
“Custom Tags” is a critical feature of Microsoft Clarity, frequently highlighted in DumbData’s Microsoft Clarity Checklist PDF and audit worksheet.
Let’s explore some innovative ways to leverage this functionality for your clients or organization.
List Of Innovative Ways To Use Custom Tags In Microsoft Clarity.
- Page title
- Conversion action
- Conversion type
- Content Grouping
- User ID
- GA4 client ID
- Piwik Pro User ID
- Experiment ID
- Transaction ID
- Error Type
Page Title:
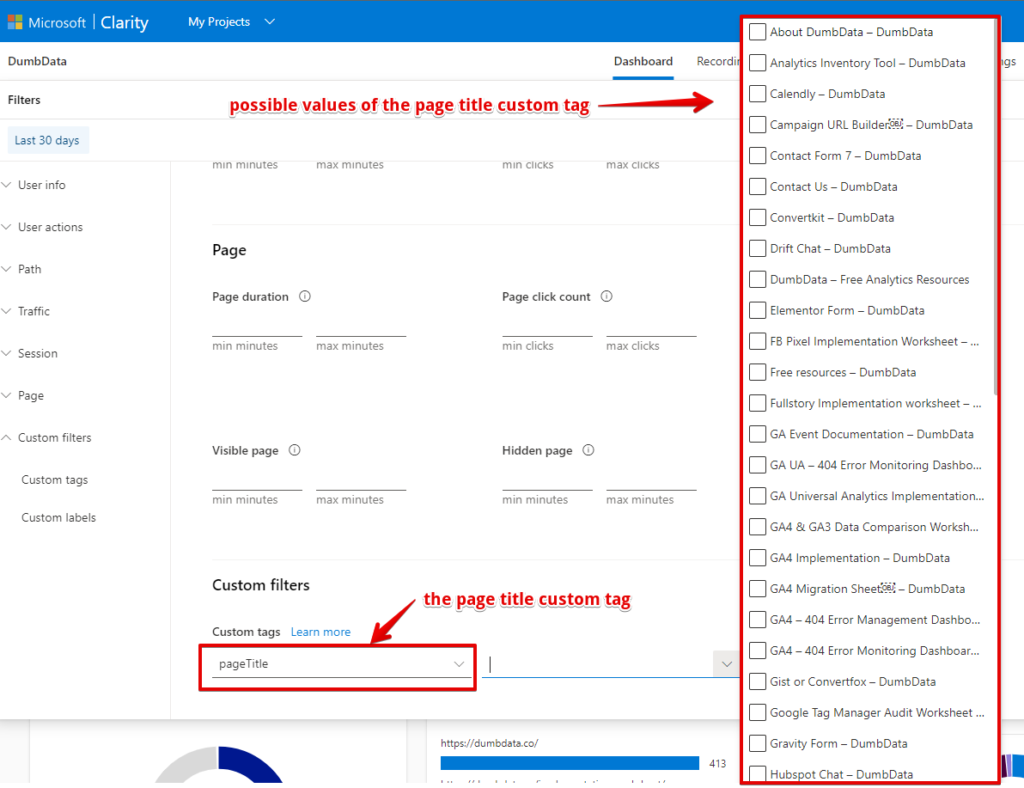
You might be wondering why the page title? The answer is that you can’t filter by page titles in Microsoft Clarity.
Your best option will be page URLs, but query parameters cause duplication of pages, so the best way to consolidate these pages is by applying the page title custom tag.
The page title can also be helpful when trying to analyze 404 errors. Since the 404 error page is accessible through different broken links but has a static page title, which can help identify 404 errors happening on the website.
Here is the GTM javascript that captures the user page title;
document.title

Here is what your custom tag script should be.
<script type="text/javascript">
clarity("set", "pageTitle", "{{your page title variable}}");
</script>
Here is what the outcome in Microsoft Clarity will be.
Conversion Action:
Microsoft Clarity can only track purchase conversions if you integrate it with Shopify.
For conversions like lead submission, click to make a phone call, etc. You won’t be able to create a segment of converted users and watch their session recordings, view their heat mapping behaviour, or other user experience insights about this user bucket.
So how do you achieve this? The answer is custom tags
On the DumbData website, we use Google Tag Manager to fire the custom tag snippet every time a conversion happens on the website.
Which we then use in Clarity to create a segment of converted users.
Here is the snippet for doing this, don’t change anything here. (NOTHING NEEDS TO BE TOUCHED)
<script type="text/javascript">
clarity("set", "conversionAction", "yes");
</script>
Here is how it appears in Microsoft Clarity.

Conversion Type:
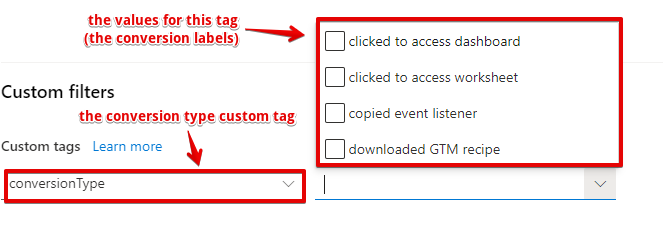
The only difference between conversion type and conversion action is that you’ll include the conversion name in the conversion type custom tag.
With the introduction of “Smart Events“, a Microsoft Clarity event tracking feature, you can use custom tags to provide more context to the action that occurred and track the action as a “Smart Event.” You can learn about everything you want to know about Microsoft Clarity event tracking here.
Here is what the script should be
<script type="text/javascript">
clarity("set", "conversionType", "name of the conversion");
</script>
With this custom tag, you can easily segment and filter your data based on a particular conversion event.
Here is how it should appear in Microsoft Clarity
Content Grouping:
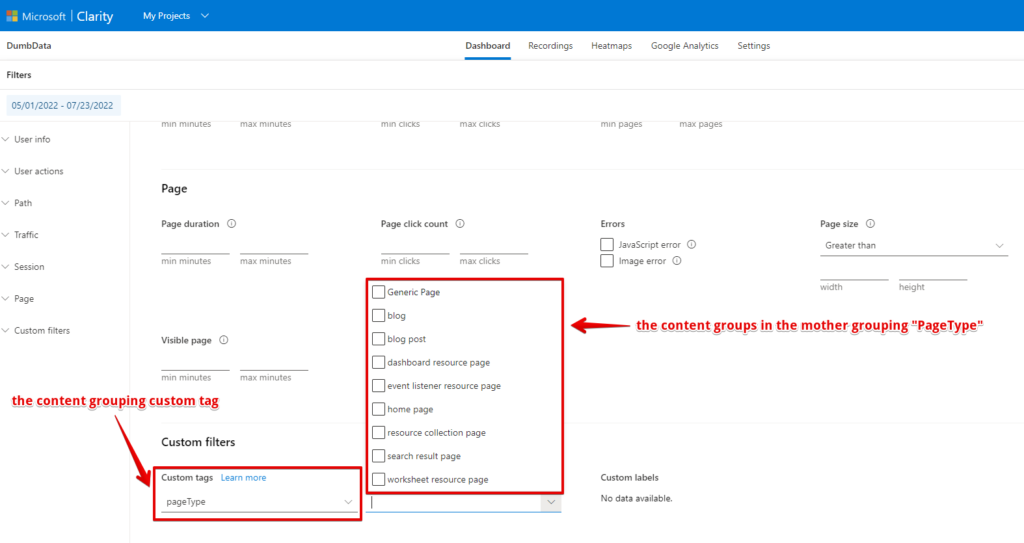
Yes, you can use it for content grouping as you do in Google Analytics, and you can have multiple content groups;
- Page Type (product page, the home page, search result page, blog post, collection, checkout, cart, etc.)
- For heavy content websites, you can also use the “Article Category” (analytics, marketing news, attribution, data analysis, etc.) or “Content Format” (video, article, podcasts, etc.)
- Collection group (shoes, bags, shirts, etc.)
Here is the Datola step-by-step guide on setting this up in Google Tag Manager.
On the DumbData Microsoft Clarity project, we used pageType as the name for the mother grouping, while the following in the screenshot below as the types of the content group we have on the website.
Here is what your custom tag script should be
<script type="text/javascript">
clarity("set", "pageType", "{{your content group}}");
</script>
It should appear in Microsoft Clarity like this
User ID
If your website has a login system, you should utilize this measurement strategy, but why should you do this?
The user ID custom tag allows you to filter to a specific user journey.
Also, you can watch the session recordings or view the heatmapping behaviour of that specific user.
Your custom tag snippet should be like this.
<script type="text/javascript">
clarity("set", "userID", "{{your User ID variable}}");
</script>

GA4 client ID
I don’t recommend this, but rather the integration of Microsoft Clarity with Google Analytics, and this is because a user client ID can change if the cookie gets cleared, unlike the user ID.
Note, there is a big but.
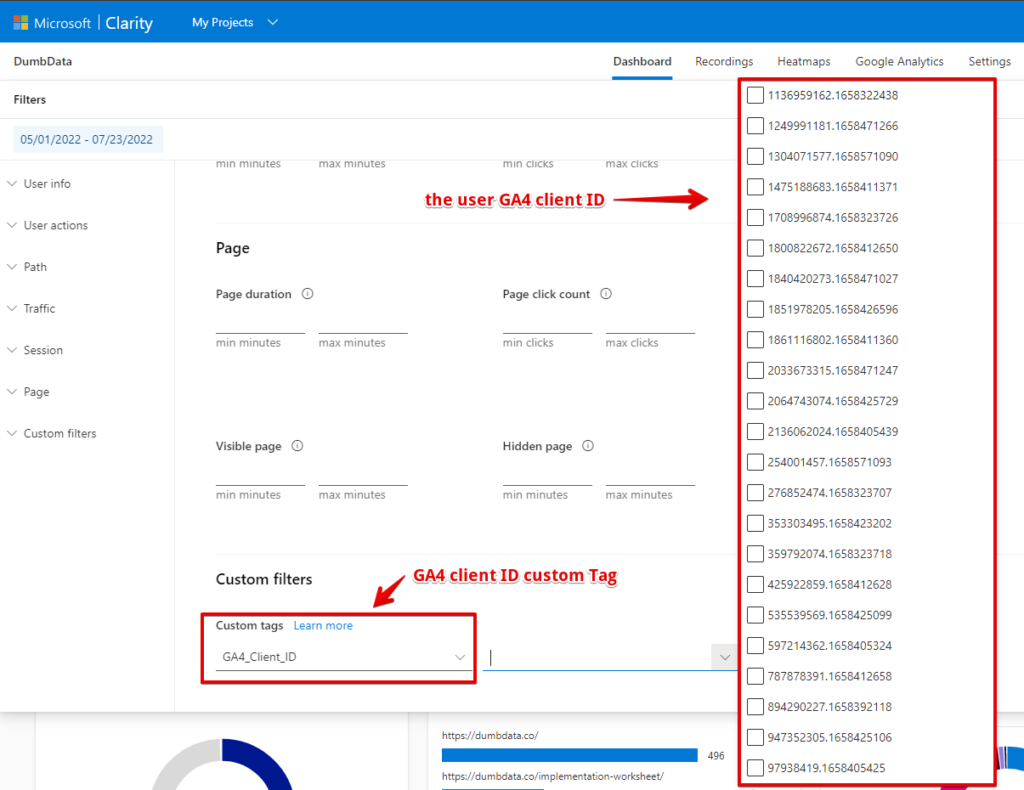
If you don’t have a login system on your website, you can also leverage this as your way of segmenting a specific user journey with the GA4 or Universal Analytics client ID,
We did that on the DumbData Clarity project (though we still have our Google Analytics integration).
Simo Ahava has a great article on how to get the GA4 client ID.
While for your custom tag, you can use this.
<script type="text/javascript">
clarity("set", "GA4_Client_ID", "{{GA4 Client ID}}");
</script>
And the data should flow into Microsoft Clarity like this
Piwik Pro Visitor ID
Just like the GA4 client ID custom tag, the differences are;
- You’ll need to have Piwik Pro analytics installed on your website
- Capture the Piwik Pro’s visitor ID of the user
Here is the javascript code that gets the visitor ID, and you’ve to use it as a custom javascript variable in Google Tag Manager.
function() {
try {
var piwikpro_visitor_id;
_paq.push([ function () { piwikpro_visitor_id = this.getVisitorId(); }]);
return piwikpro_visitor_id;
}
catch (e)
{
return e.message;
}
}
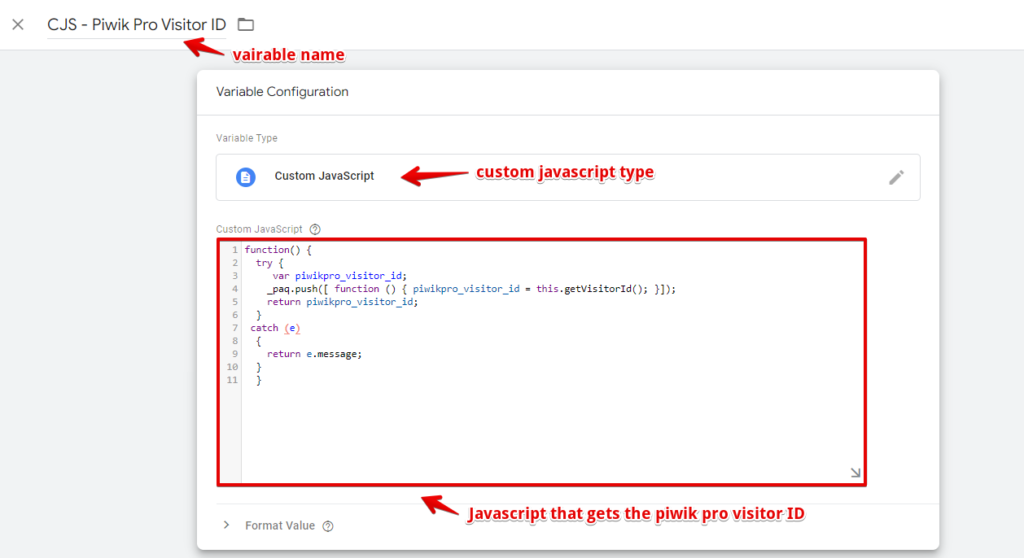
The custom tag code snippet should be fired on the window-loaded event when the Piwik Pro tracking script has loaded.
Here is what your code snippet will be;
<script type="text/javascript">
clarity("set", "PiwikProID", "{{Piwik Pro Visitor ID}}");
</script>
And here is how it appears in Microsoft Clarity
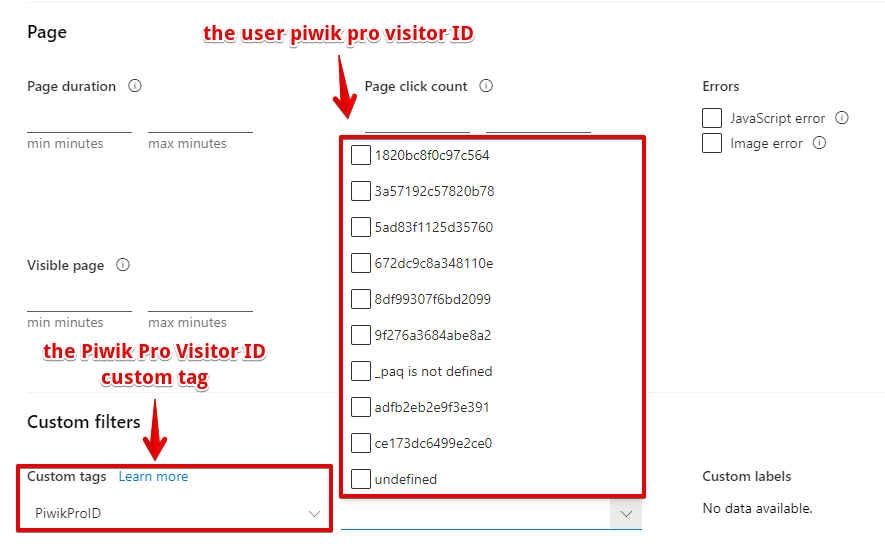
Overall we recommend integrating your Piwik Pro Analytics with Microsoft Clarity over custom tags because this allows you to watch a session recording of any behaviour in Piwik Pro.
Experiment ID:
CRO experts will love this. If you AB test or experiment, you should leverage this, as this helps you analyze your experimentation campaign.
You can watch experiment session recordings of users when they saw the experiment, their heatmapping behaviour, plus insights like rage clicks, dead clicks, javascript errors, quick backs, etc.
Here is what your custom tag snippet should be
<script type="text/javascript">
clarity("set", "ExperimentID", "{{the experiment id}}");
</script>
Transaction ID:
Have you been in a situation where you’d like to see the session recording for a particular transaction ID?
Then custom tag is the only way you can seamlessly do this.
You’ll have to fire the transaction ID custom tag when a purchase happens on the website.
Here is the what snippet should be.
<script type="text/javascript">
clarity("set", "TransactionID", "{{order id variable}}");
</script>
And here is what it looks like in the Clarity UI
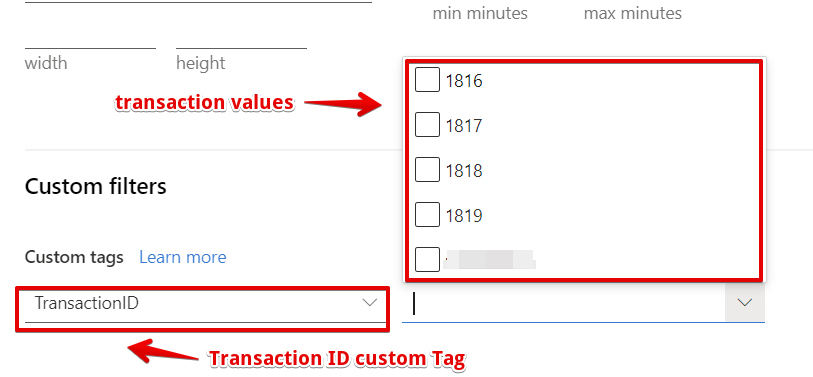
For a deeper understanding of eCommerce tracking in Microsoft Clarity, you can read this detailed article or download the free Microsoft Clarity eCommerce + Purchase Tracking Template here.
This template allows you to track up to nine (9) eCommerce actions and collect other relevant eCommerce data points.
Additionally, it simplifies the process by saving time and simplifying implementation, making it both fast and efficient.
Error Type:
The error type custom tag will be helpful for user experience optimization.
For errors that Microsoft Clarity can’t identify by default, examples are;
- 404 Errors
- Form submission failures, etc.
With the error type tag, you’ll be able to identify and name the error in a context that is understandable by all.
You can use this code snippet for the custom tag, but we’ve to speak with your developer to fire a dataLayer when some of these error occurs.
<script>
window.dataLayer = window.dataLayer || [];
window.dataLayer.push({
 'event': 'errorOccurred',
 'errorType': 'name of the error' //don't send in all errors, only important ones
 });
</script>
But for 404 errors and form submission errors, you can use Google Tag Manager to track these errors.
Your custom tag snippet should be like this
<script type="text/javascript">
clarity("set", "errorType", "Error Name");
</script>
And here is how you’ll use it for analysis
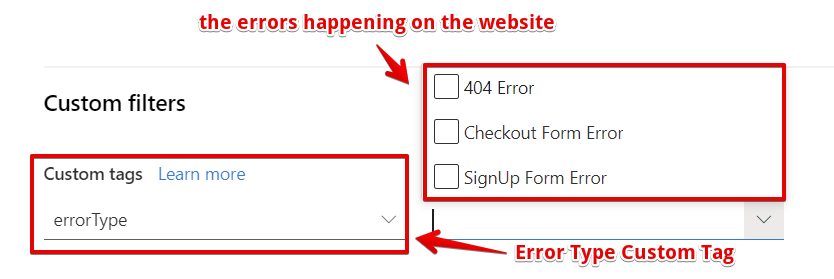
There is a Microsoft Clarity setup template you can download here for FREE, and it comes with many advanced settings.
With this template you get to;
- Deploy the Microsoft Clarity script with ease.
- 5+ custom tags for effective segmentation in Microsoft Clarity. These include the page title, e-commerce action, conversion action, conversion type, order ID, page type, and the Piwik Pro visitor ID.
- Get Access to the Microsoft Clarity playback session URL
Conclusion
Now that you’ve learnt some of the innovative ways to use custom tags in Microsoft Clarity, I’ll like to know what ways you have previously used custom tags, or intend to use them.
You can also read my thorough guide on Microsoft Clarity custom tags and subscribe to our newsletter, where we rarely send email updates unless we have something helpful, like the release of tools, which you can find on the “Tools & Templates” page, new measurement techniques or new resources, etc.


