


A comprehensive guide to understanding the concept of “Custom Tag”, how to add them (using Google Tag Manager, Piwik Pro or hard coded), find them, and use them in Microsoft Clarity, with practical application examples included.
This article will provide concise yet informative content about “Custom Tags” in Microsoft Clarity, a free digital experience optimisation software owned by Microsoft. Its notable features include session recording, heat mapping solutions, and recent AI advancements known as “Co-pilot“.
We previously published an article on “Custom Tags,” which explained what Clarity is and highlighted some of the innovative capabilities of Microsoft Clarity. However, creating another article focusing on aspects not covered in the previous blog post will be helpful to the community who wishes to understand the concept of this clarity feature fully.
In this blog post, you will learn about what “Custom Tags” is, how to set them up in Google Tag Manager, Piwik Pro, or by hard coding, where to locate them, how to utilise them effectively, delete them, and understand the distinctions between Custom Tags and the event tracking capability within Microsoft Clarity. We will also discuss their similarities and provide valuable insights about this feature in Microsoft Clarity.
What Are Microsoft Clarity “Custom Tags”
“Custom tags” in Clarity offer configurable filters that enable you to analyse recordings and heatmaps from diverse perspectives. Moreover, these tags can be effortlessly created and shared among your team, allowing for the transmission of additional information.
Here are key aspects to consider regarding custom tags in Clarity:
- Custom tags are not retroactive; they start recording data for the custom tag from the time of application.
- In a Microsoft Clarity project, you can use an unlimited number of custom tags.
- Custom tags are applied after the Clarity tracking script loads on the page.
- The name and value of a custom tag must not exceed 255 characters.
- A single page can accommodate up to 128 tags; Clarity will disregard any additional custom tags applied after the limit.
- Custom tags can comprise alphanumeric values.
- When you add a tag to your website code, it takes approximately 30 minutes to 2 hours for the update to reflect in your project.
Below is the code snippet you need to implement a custom tag. It consists of key-value pairs:
clarity("set", "key", "value");– Key: Specifies the tag’s name.
– Value: Defines the value that the tag should hold upon application.
Locating “Custom Tags” in Microsoft Clarity
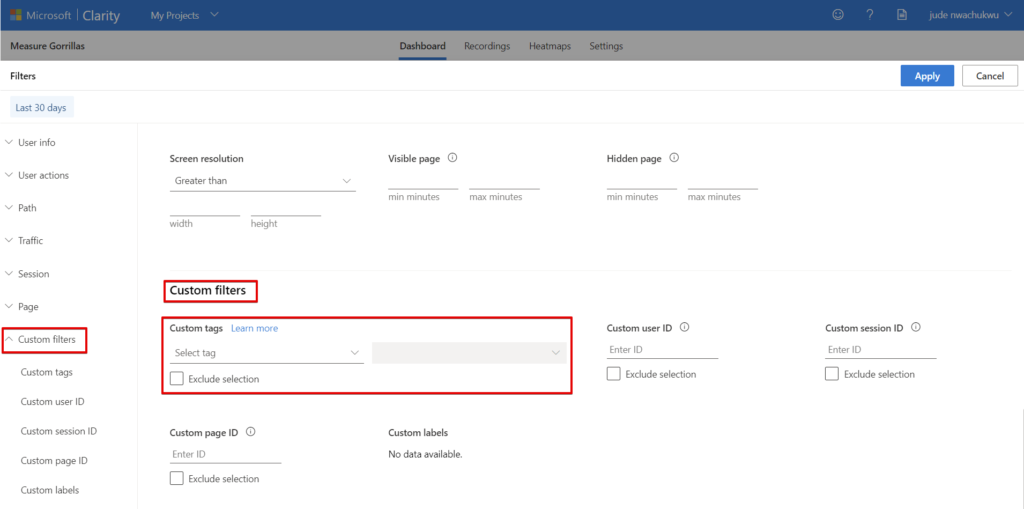
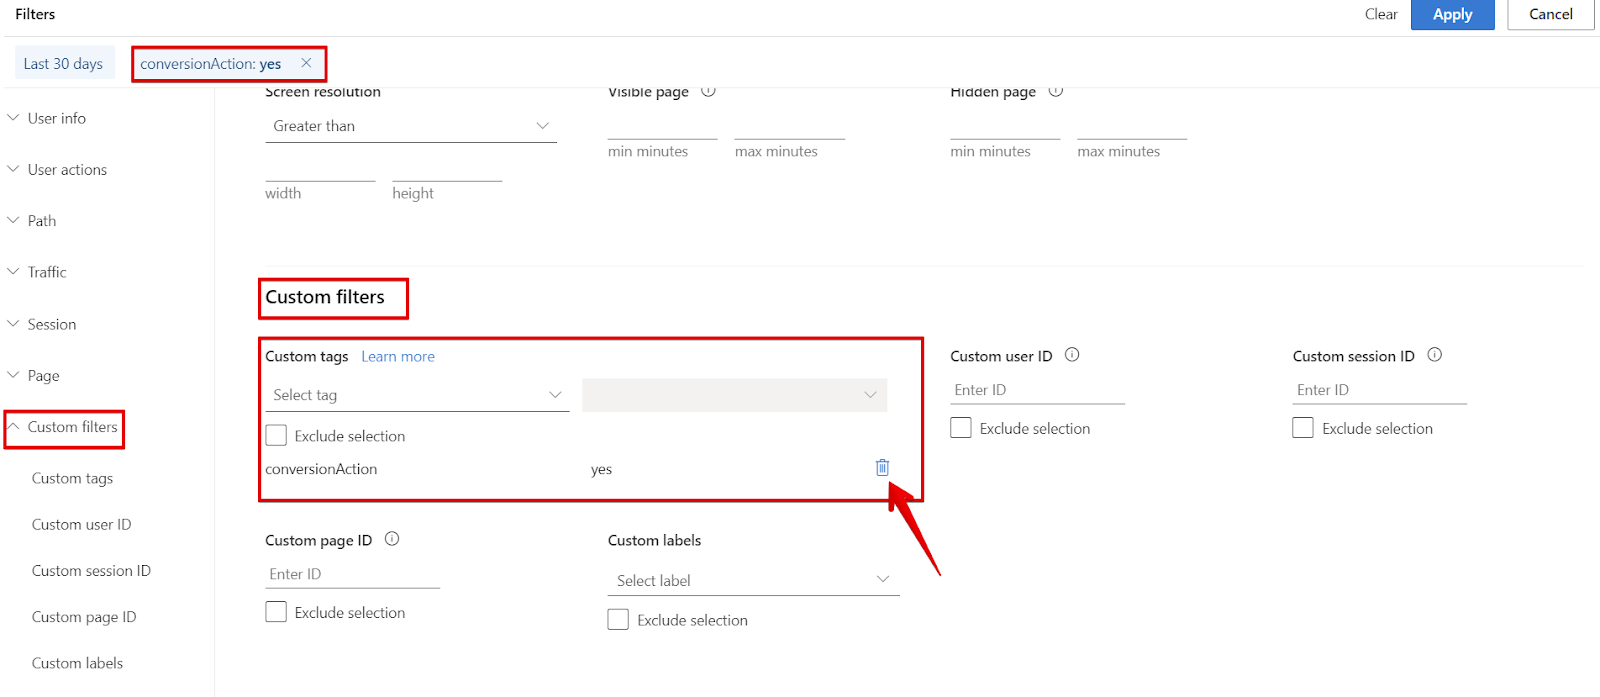
Once you have implemented “Custom Tags,” you can utilise them for data analysis by segmenting the data in Microsoft Clarity based on the values of the “Custom Tag” in the session filters panel. So, where precisely can you locate them within Microsoft Clarity? Well, you can find them in the “Filters” panel by following these steps:
- Open the filters modal popup.
- Click or scroll to the “Custom Filters” section.
- Select your custom tags and specific values you want to be included or excluded in your segment.

Scrolling down or clicking the left “Custom Filters” tab, takes you to the “Custom Filters” section, where you’ll be able to see the Custom Tags added to the project.
When you click on the “Custom Tags” dropdown field to choose a tag, you will see various custom tags you’ve previously applied for the specific date range to which your data filter currently corresponds.
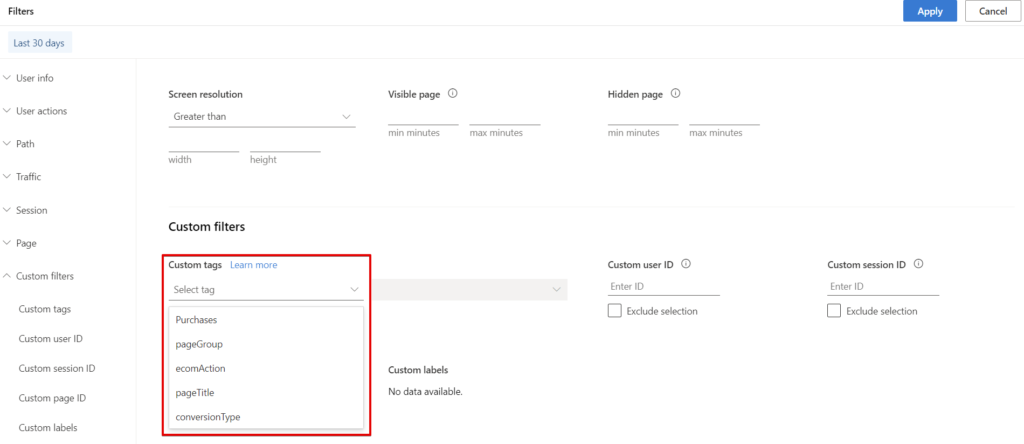
Selecting a key, gives the option of selecting the values you’ll like to segment your data by.
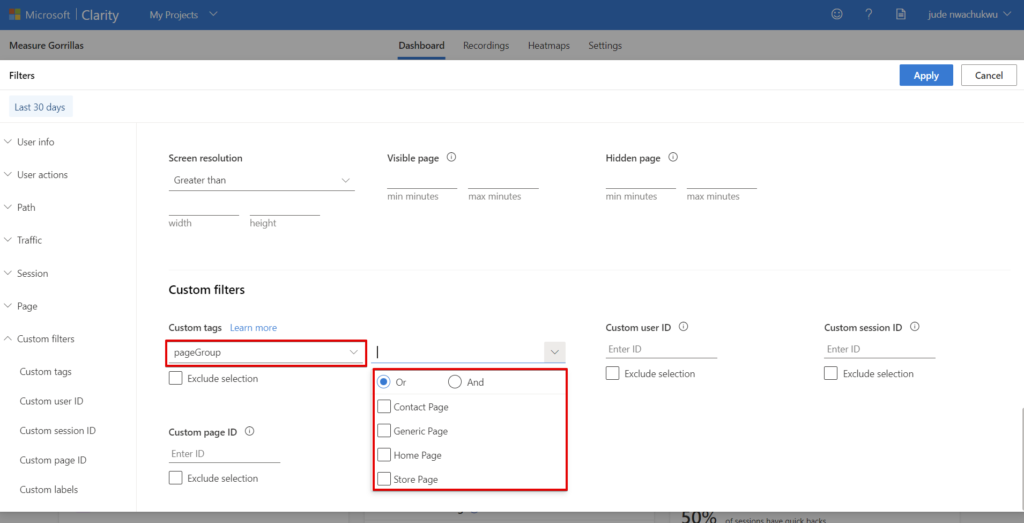
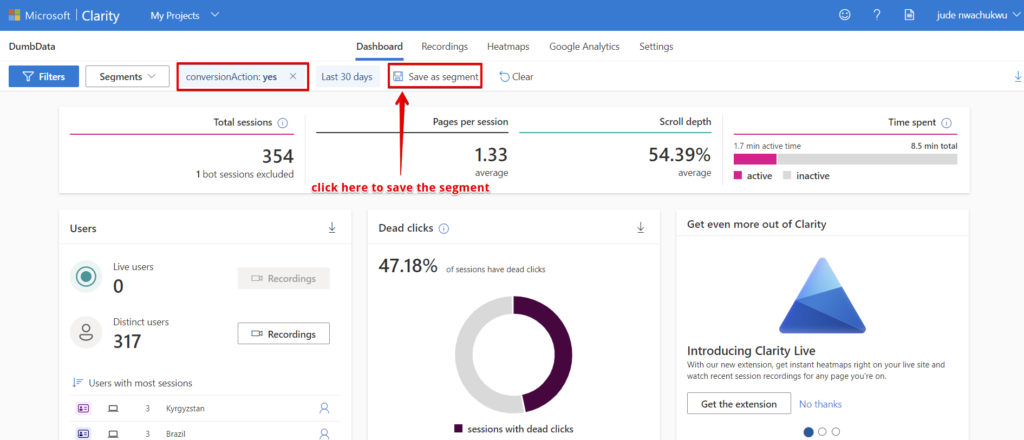
You can further save the filter as a segment, by clicking the “Save as segment” option.
The next question would be, how do you set it up or add a custom tag to your Clarity project?
Setting Up Microsoft Clarity’s Custom Tag: Step-By-Step Approach
The instrumentation process does not take place within the Microsoft Clarity user interface (UI). The UI is used primarily for data analysis and segmentation.
In this section, I will explain how to set up custom tags using Google Tag Manager (I will cover two approaches here), Piwik Pro Tag Manager, and the hard-coded method. The method involving tag management solutions like GTM and Piwik Pro TMS should also apply to other TMS platforms.
Setting Up Custom Tags Using Google Tag Manager (Including the Hard Code Method)
There are two methods available for setting up Microsoft Clarity custom tags in Google Tag Manager, and in this section, we will cover each approach. We will also provide guidance on manually setting it up without a Tag Management Solution (TMS) if you do not have one for your website.
Method 1: Using Custom HTML Tag Type
This method is suitable if you have used custom HTML or the Microsoft Clarity official custom tag template in Google Tag Manager to install your Clarity tracking script.
To set it up, you must only configure and trigger the “Custom Tag” javascript code after initialising the Microsoft Clarity tracking script in the web browser, which means that you fire the tag after the Microsoft Clarity tracking script.
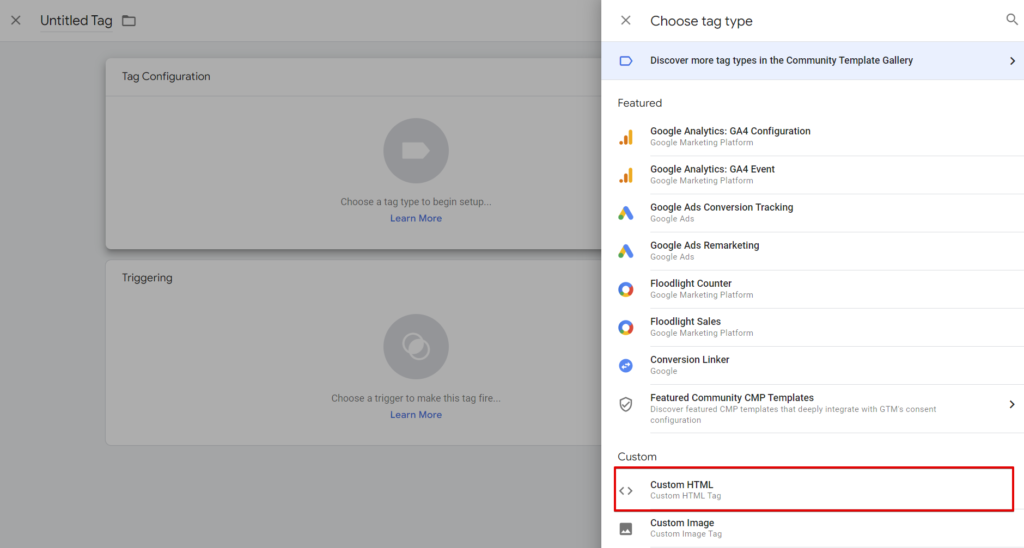
To proceed, you first need to determine the key and the type of value your custom tag will hold. Will it be a static or dynamic value? Then, create a custom HTML tag type by navigating to “Tags,” clicking the “New” button, and selecting “Custom HTML” as the tag type.
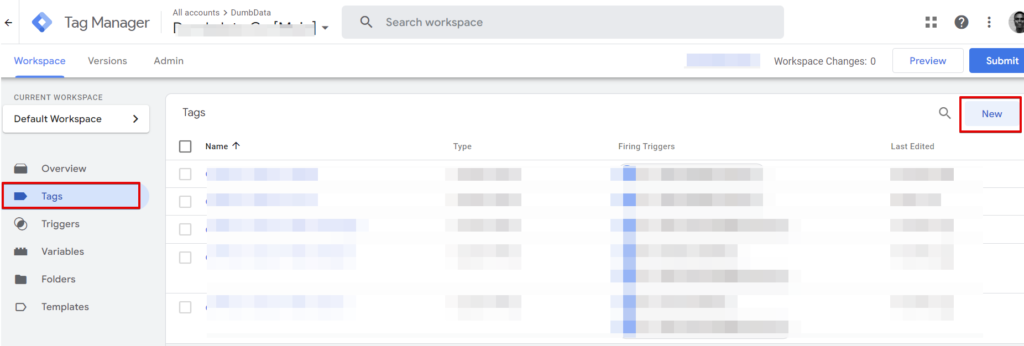
Choose the custom HTML tag type.
Let’s assume you are creating a custom tag for “pageType.” In this case, your “key” will be “pageType,” while the “value” will be a dynamic variable that provides the page category based on the page the user is currently viewing.
Here is an example of such a setup. You may also choose to include a “pageTitle” label, which can get created using a similar code provided below, where one javascript code applies two “custom tags”, which are “pageType” and “pageTitle“.
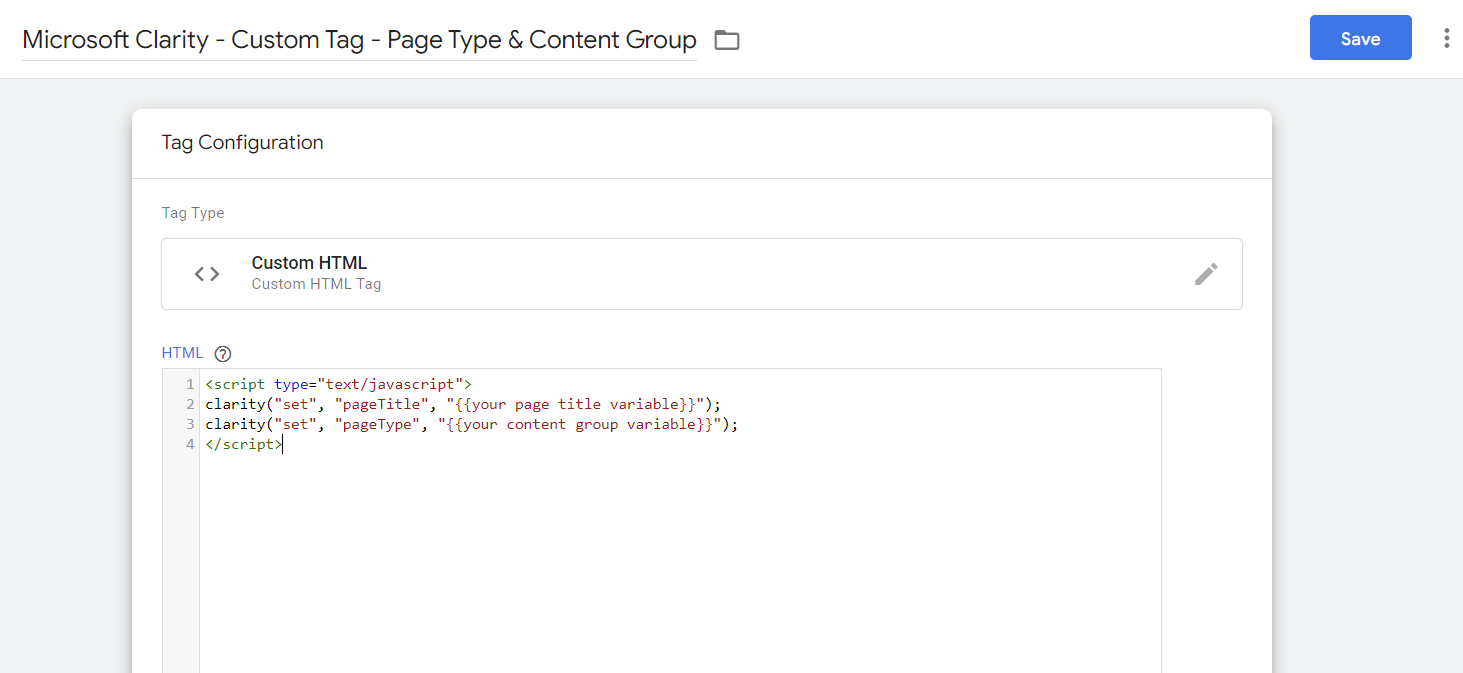
<script type="text/javascript">
clarity("set", "pageType", "{{your content group}}");
clarity("set", "pageTitle", "{{your page title variable}}");
</script>
For websites without Tag Management Solutions (TMS), you can manually trigger this code below the Microsoft Clarity tracking script when the data you want to collect is available and ready to be retrieved and used.
Suppose you want to explore more innovative ways to utilise “Custom Tags” in Microsoft Clarity. In that case, I recommend referring to this linked article that showcases ten (10) innovative ways to use Microsoft Clarity “Custom Tags.” It includes practical examples that have not been discussed on the internet before.
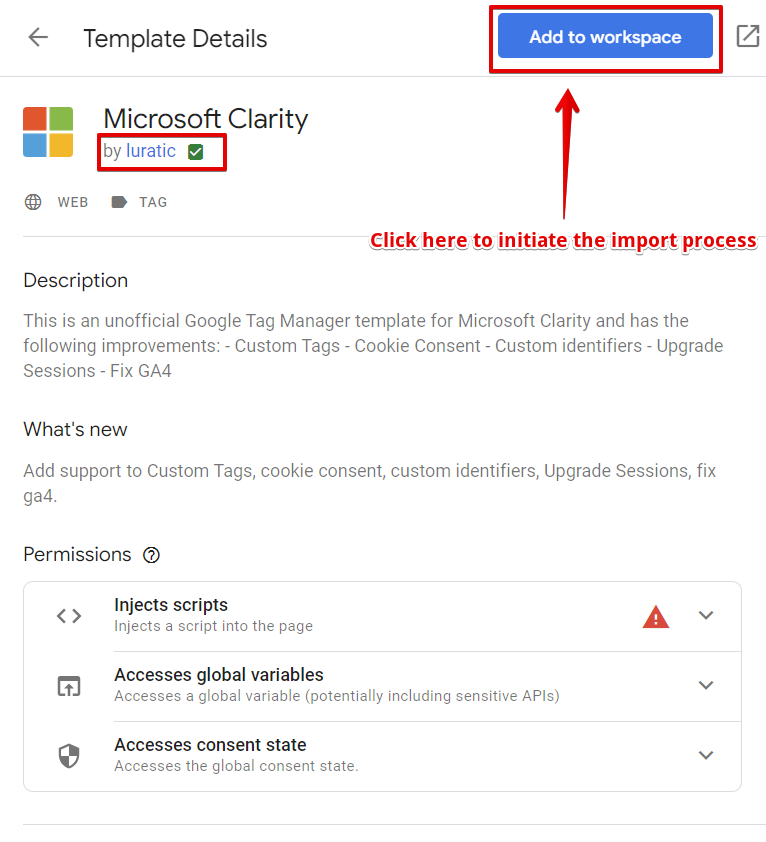
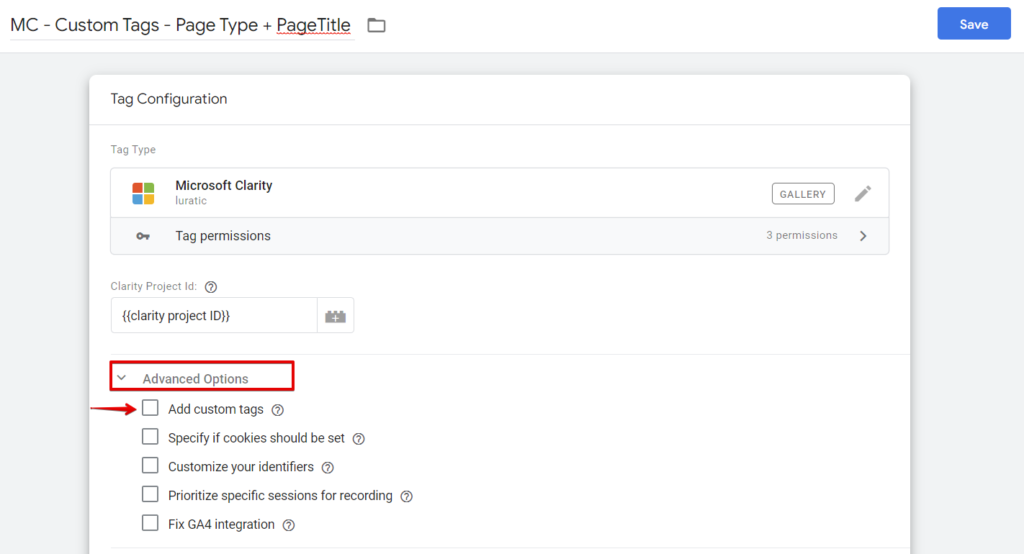
Method 2: Using Luratic Microsoft Clarity Template
This method is suitable if you have previously used the “Luratic” custom tag template for your Microsoft Clarity installation. This template provides advanced features of Microsoft Clarity without requiring you to directly modify the code, as described in the previous section.
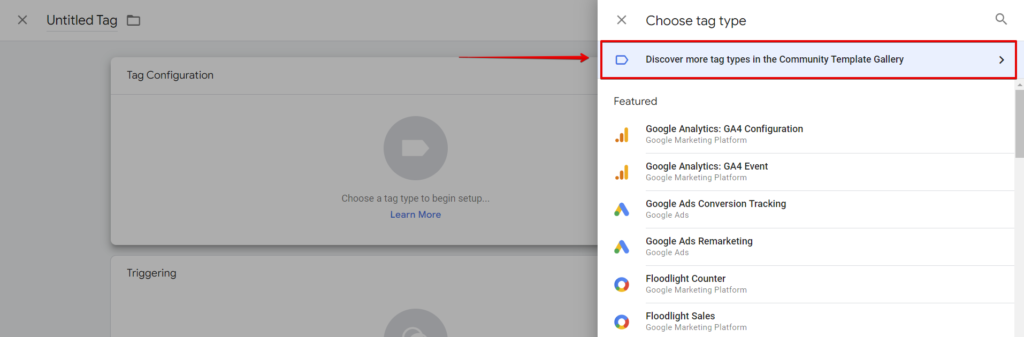
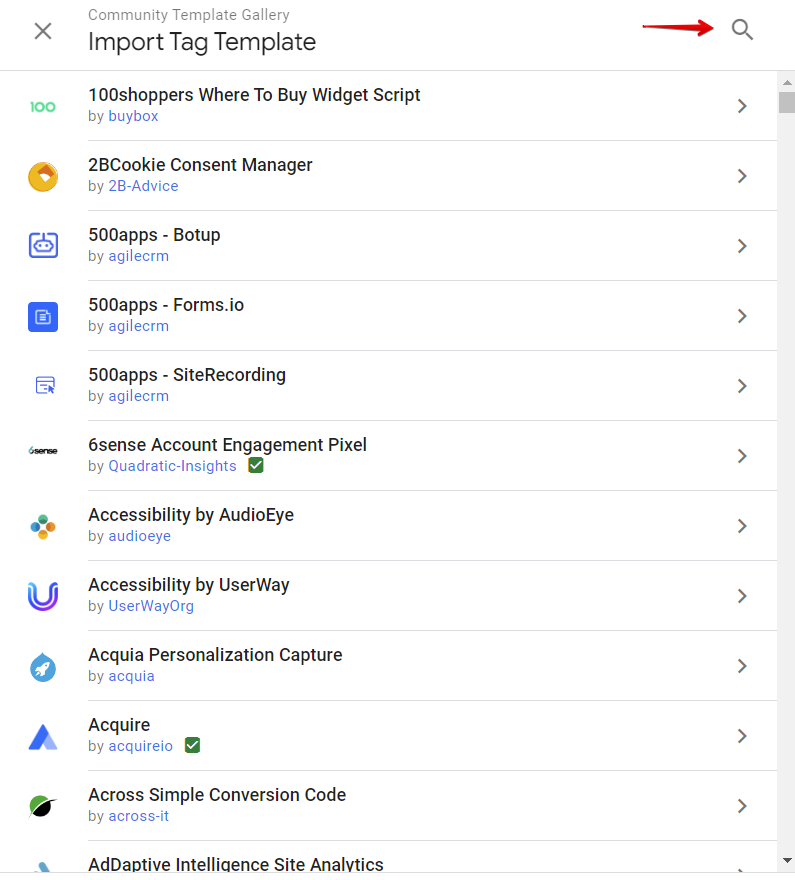
If you have not added this template before, you can do so by accessing the “Community Template Gallery” through the “Choose tag type” panel.
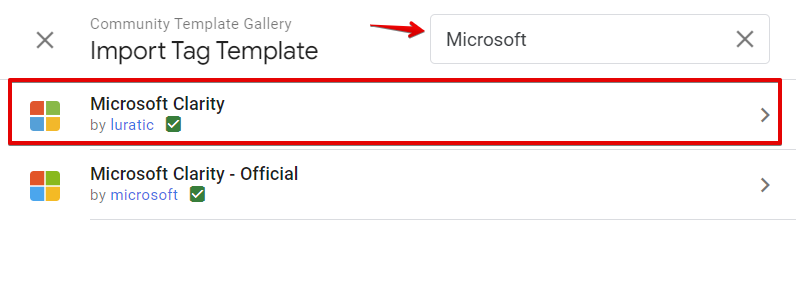
Click the search icon to find the Microsoft Clarity template by Luratic.
Search for “Microsoft” and select the template provided by “Luratic.”
Click the “Add to Workspace” button to add the template to your GTM container.
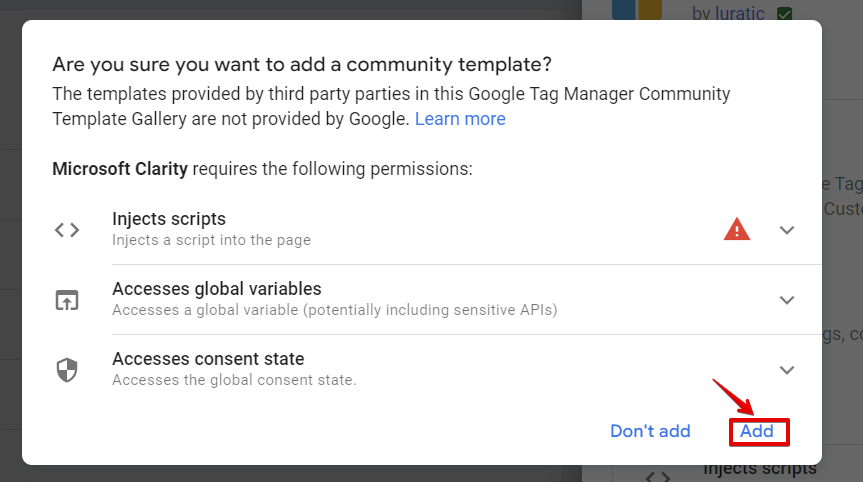
Proceed by selecting “Add.”
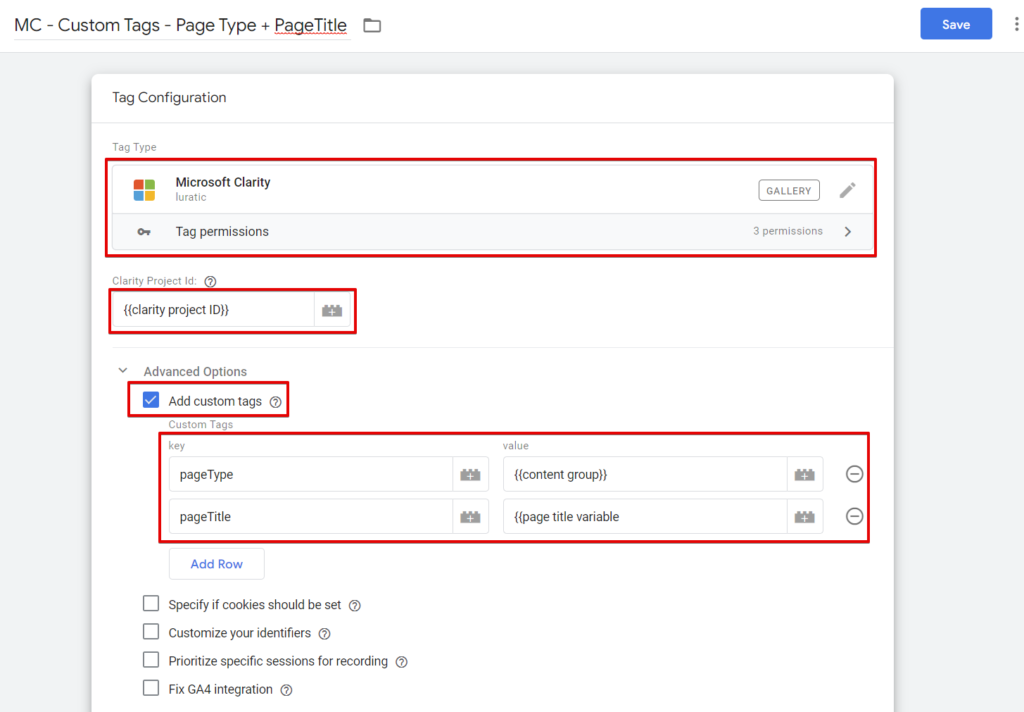
You must then add the “Clarity Project ID” and checkmark the “Add Custom Tags” checkbox. This will open a field where you can enter your “Custom Tags” keys and their respective values.
For custom tags that do not occur when the page loads but are fired separately when the Microsoft Clarity tag is triggered, you will need to handle them separately. However, for the “pageType” and “pageTitle” cases, you can include them in the base tag, as demonstrated in the setup below.
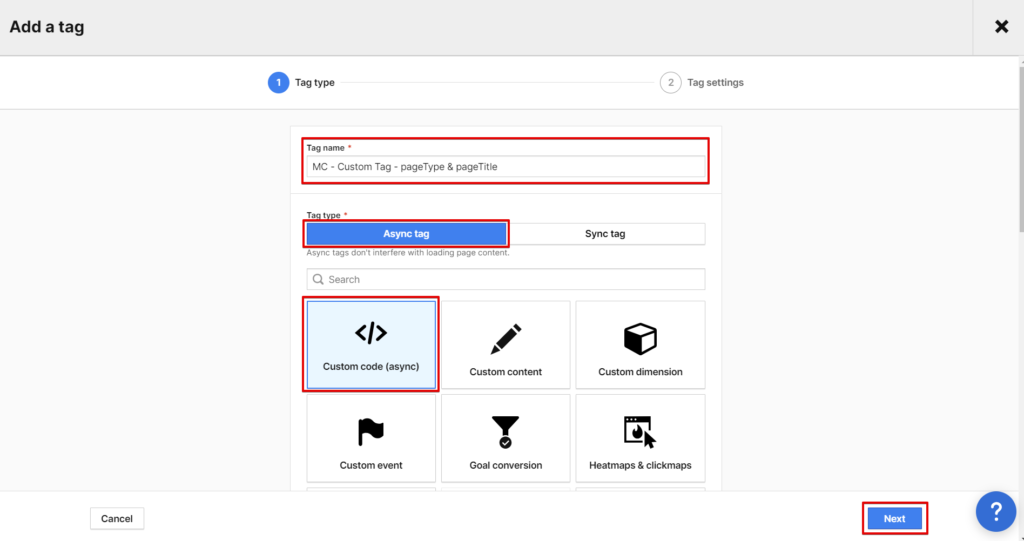
Using Piwik Pro to Set Up Custom Tags
In Piwik Pro Tag Manager Suite, there is no native Microsoft Clarity tag available. Therefore, we will utilise the “Custom Code (Async)” tag type.
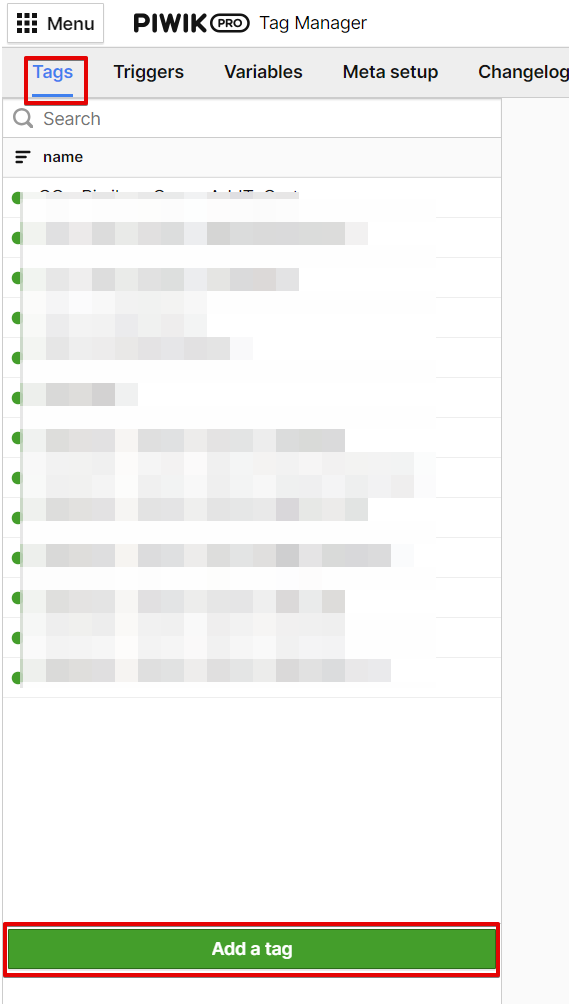
Navigate to the Tag Manager suites.
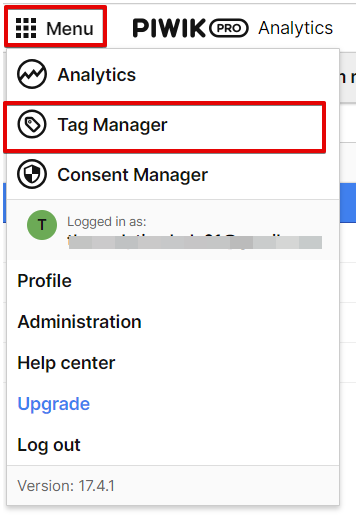
To do this, access the Piwik Pro tag manager suite and, in the tags section, click the green “Add a tag” button.
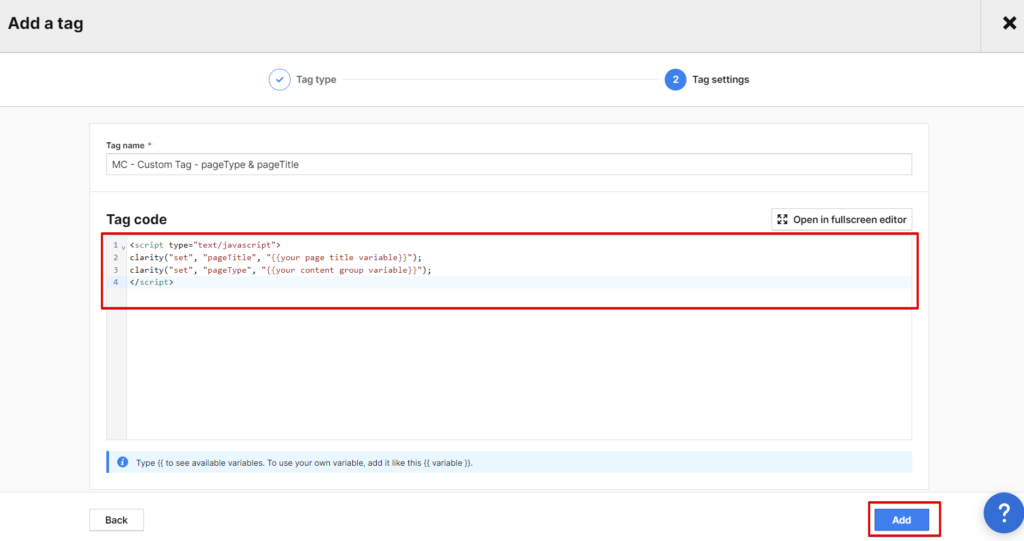
Ensure you are on the “Async tag” tag type and select the “Custom Code” tag type. Give your tag a name and click the next button.
You will insert your “Custom Tags” JavaScript code in the tag code field. Configure the required privacy settings and proceed to attach a trigger to your tag.
Where Can You Use Them in Microsoft Clarity (With Practical Applications)
It is important to note that custom tags in Microsoft Clarity are not retroactive. When you add a custom tag in your website code or Tag Manager (GTM or Piwik Pro), it will be updated in your project within a timeframe of 30 minutes to 2 hours.
Custom tags can be applied and utilised for data segmentation within Microsoft Clarity in the following areas:
- Dashboards
- Recordings
- Heatmaps
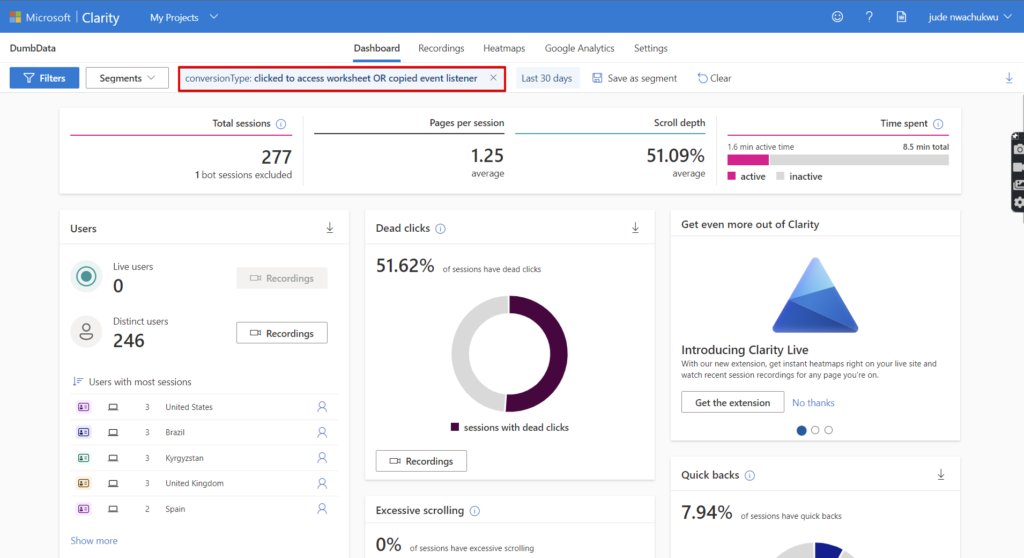
1. Dashboards:
In the “Insights” or Dashboards section, you can apply custom tags to your segments to obtain diverse information regarding various performance metrics and dimensions related to the specific segment you are examining.
For example, you can gather data on sessions, scroll depth, and click interactions of users who performed a conversion action during a website session and compare it with website visitors who did not convert.
The example below uses custom tags to filter the data of sessions where a user did either one of the conversion actions used in the filter configuration.
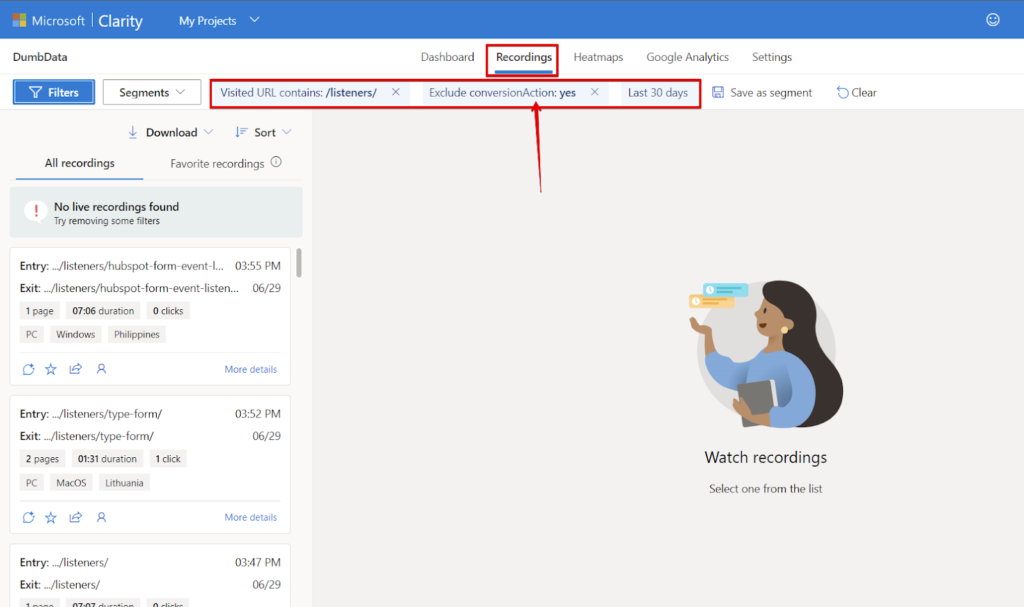
2. Recordings:
Custom tags can be used in session recordings to segment data by including or excluding users who performed a specific action, viewed a particular page during their session, utilised a specific feature on your website, or failed to complete a crucial step. This segmentation level enables you to gain insights into user behaviour quickly.
A real-life example could be segmenting users who visited a checkout page but did not complete a purchase. Watching the session recordings will help you further investigate the reasons behind purchase abandonment.
In the image below, I am trying to watch session recordings of users that visited the listener page but didn’t convert, which means copying the listener code.
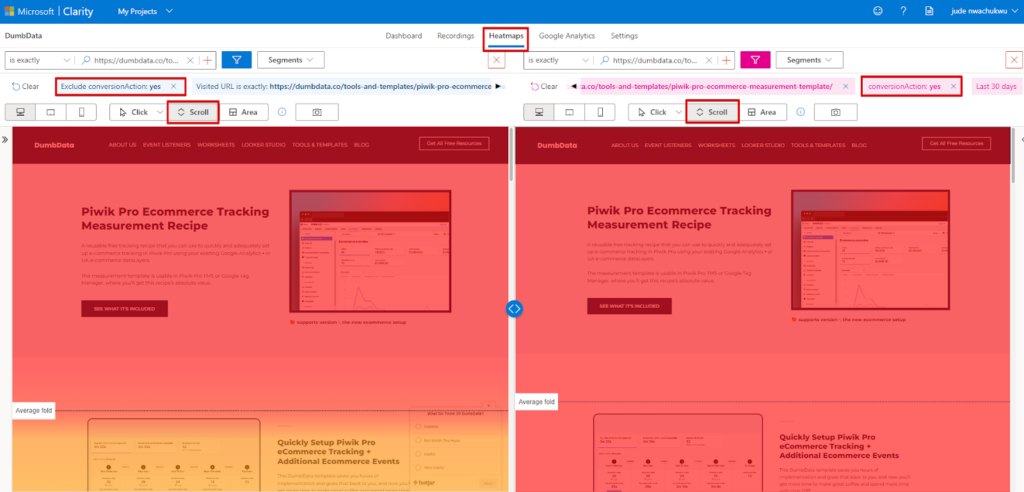
3. Heatmaps:
In the Heatmap report, custom tags can be used with the comparison feature to identify how users with a specific custom tag engaged with a page differently from those who did not have the tag applied (note that this is page-based).
For instance, you can examine how a guest visitor interacted with a webpage compared to a logged-in user on the same page.
Another example would be to determine if users who converted on a particular page scrolled to view important information compared to non-converters. This can provide insights into the impact of users not scrolling on conversion rates.
Additionally, you can analyse user interactions with different placements of the “Add to Cart” button on a product page to determine which placement was most commonly used by website visitors or even use it to analyse the behaviour of two different AB test exp[eriment traffic.
In the image below, I am comparing the scrolling behaviour of visitors who converted and those who did not convert on the webpage with the conversion action.
How Are “Custom Tags” Similar and Different From Events?
Understanding that “Custom Tags” in Microsoft Clarity differ from Events is essential. Unlike Events, “Custom Tags” allow you to report on the frequency of their occurrence, view attribution data associated with these tags, and analyse their distribution across different data dimensions such as device, browser, and geographic information.
While there are similarities between “Custom Tags” and Events in terms of flexibility and customisation of collected values, they can collect data about an action, user attribute or page attribute, etc. Both “Custom Tags” and Events enable data collection tailored to specific business measurement needs and can be used to enhance analysis.
With a well-defined strategy, measurement plan, and innovative approach, you can leverage “Custom Tags” to not just only add more useful information about a page visit but also help enrich the Clarity Events data that you’re collecting and use them to optimise your customer experience and business conversions.
Microsoft Clarity now supports “Event tracking”, a feature called “Smart Events. You can learn everything about the Microsoft Clarity event tracking feature in this article, which is based on an experiment with “smart events”.
How Can You Delete “Custom Tags”
If you no longer wish to use a particular custom tag, you can’t delete it from within Microsoft Clarity. This can be done in the platform where you implemented it, such as Google Tag Manager.
However, suppose you have added the custom tag to your filters and want to remove it from your Microsoft Clarity “Filters” configuration without clearing the entire filter.
In that case, you can delete it directly under the “Custom Tags” field in the “Custom Filters” section of the Microsoft Clarity “Filters” modal.
And It’s a Wrap.
In conclusion, we have explored the powerful capabilities of “Custom Tags” in Microsoft Clarity. Throughout this article, we have delved into the definition of “Custom Tags,” where to find them in the Microsoft Clarity product interface, and the various implementation methods using Google Tag Manager, Piwik Pro Tag Manager, or direct website coding.
We have also examined the distinctions between “Custom Tags” and events, as well as the similarities they share. Furthermore, we have identified the specific reports within Microsoft Clarity where “Custom Tags” can be applied, with practical examples to help make you innovative.
To effectively utilise “Custom Tags,” it is crucial to identify your business’s unique measurement requirements and understand how they contribute to optimising your customer’s digital experience and website conversions.
When incorporating “Custom Tags” in Microsoft Clarity, familiarising yourself with their capabilities and limitations is essential.
In summary, “Custom Tags” provide a versatile approach to gathering targeted data and tracking specific data points that are relevant to your optimisation objectives. By harnessing the power of “Custom Tags,” you can gain deeper insights into user behaviour and optimise your website or business accordingly.


