


Welcome to the third and potentially final part of our series, where we delve into the integration of Piwik Pro consent manager with various Consent Management Platforms (CMPs) in cases where a native integration is not available. Today’s focus will be Piwik Pro integration with “CookieFirst”.
In the initial episode, we explored the utilization of the Osano consent manager as a customized consent banner for your Piwik Pro consent manager and tag manager. In the subsequent episode, we delved into integrating it with CookieYes consent management platform. Both series provided comprehensive guidance on the necessary steps to integrate these third-party consent tools with Piwik Pro seamlessly.
If you’ve exhausted all your Google searches, explored the Piwik Pro integration page, and still haven’t found the instructions for integrating CookieFirst with Piwik Pro, there’s no need to panic. Fortunately, you’ve stumbled upon the right solution.
This blog post will present a JavaScript code solution that simplifies the entire process for you. This integration does not require additional configuration within the Piwik Pro tag manager or CookieFirst.
Additionally, we will explain the importance of the hierarchy in which you implement the Piwik Pro tracking code, CookieFirst consent banner script, and the integration code. This hierarchy is crucial for complying with privacy guidelines, avoiding installation errors, and facilitating a seamless integration experience.
This blog presents a solution that simplifies the integration of your CookieFirst Consent Management Platform (CMP) with Piwik Pro Consent Manager. By implementing this solution, you can effectively manage user privacy and have control over the deployment of Piwik Pro analytics and other third-party tags/pixels on users’ browsers.
Furthermore, this solution enhances the functionality of the consent report in Piwik Pro Analytics. It provides valuable insights into the consent interaction reports, enabling you to analyze and understand the specific types of consent granted by users through your CookieFirst privacy banner.
Importantly, this solution applies to all instances, regardless of whether you use Google Tag Manager. The critical factor for successful implementation lies in ensuring the proper hierarchy of instrumentation.
Hierarchy of Instrumentation
The proper implementation hierarchy of Piwik Pro and the CookieFirst CMP script is crucial for the effective functioning of this solution and for avoiding any potential errors.
In the following sections, we have outlined various scenarios of CookieFirst and Piwik Pro instrumentation. These scenarios encompass situations where we’ve used or not used Google Tag Manager for deploying the CookieFirst consent banner script or/and Piwik Pro tracking script.
Instances Where Google Tag Manager Isn’t Used for Installing CookieFirst or Piwik Pro
To ensure a seamless integration without any complications, please follow these hierarchical steps:
- Place the CookieFirst consent banner script above the Piwik Pro tracking script.
- Immediately after the Piwik Pro tracking script, insert the provided JavaScript integration code from this blog.
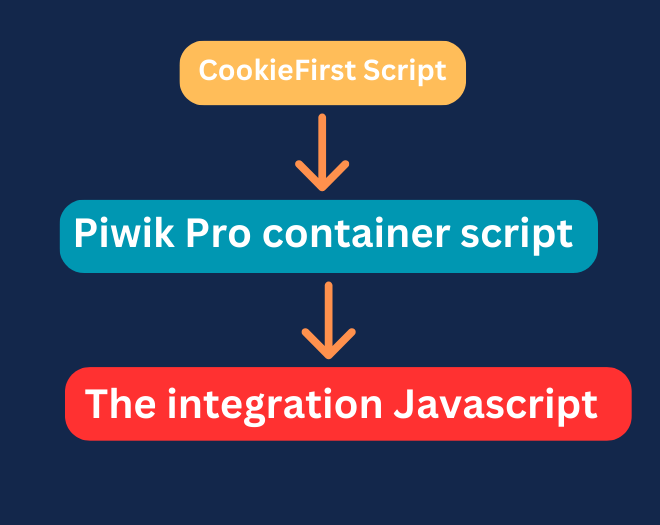
By adhering to this order, you can ensure smooth collaboration between the CookieFirst and Piwik Pro scripts.
Instances Where Google Tag Manager Is Used for Installing CookieFirst or/and Piwik Pro
Here is an alternative hierarchy for scenarios involving using Google Tag Manager (GTM) at any point of the CookieFirst consent banner script and Piwik Pro instrumentation. This hierarchy ensures proper instrumentation and seamless integration between the two tools:
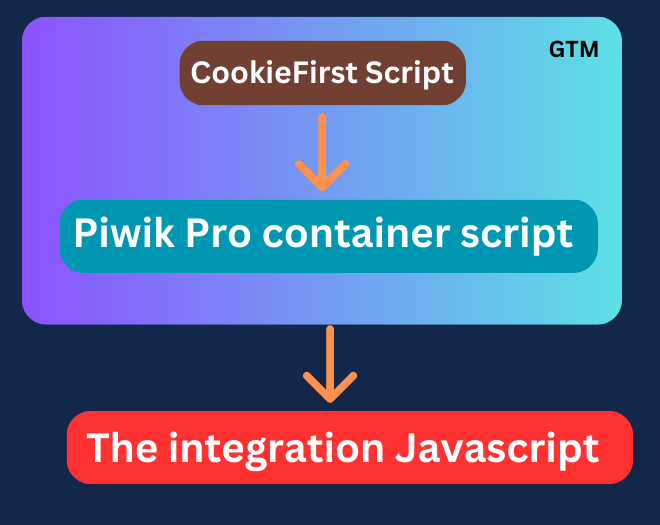
- Place the GTM container script at the top of your website’s code to ensure it loads first.
- If you’ve implemented the Piwik Pro container through GTM, ensure the CookieFirst script gets fired before it. You can achieve this by configuring tag sequencing or utilizing the tag priority feature in GTM.
- Install the JavaScript code provided in this blog immediately after the GTM container code. This code will facilitate the integration between CookieFirst and Piwik Pro.
- However, if Piwik Pro is installed directly on your website, without GTM, it should be deployed first. Subsequently, place the JavaScript code shared in this blog below the Piwik Pro tracking script.
Here is another hierarchy for scenarios where only CookieFirst is deployed on the website using Google Tag Manager
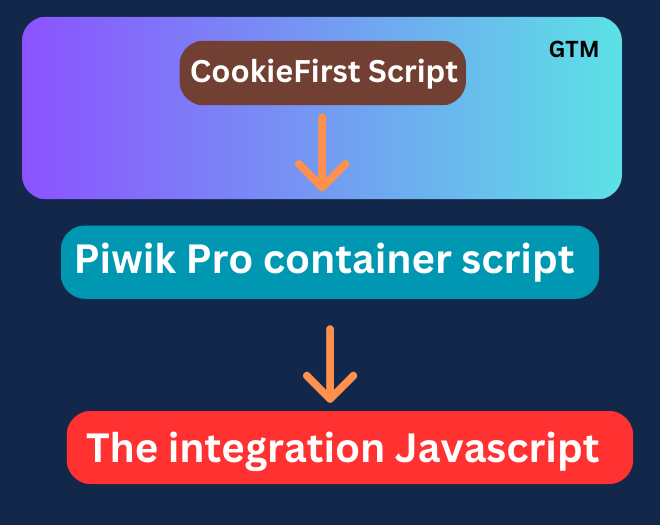
By following any of the above hierarchical instrumentation approaches, you’ll get a functioning and efficient integration of the CookieFirst consent banner and Piwik Pro, enabling effective data collection management and privacy control on your website.
The Code That Integrates CookieFirst and Piwik Pro
I am giving credit to ChatGPT, as it assisted in developing the JavaScript code that facilitated the seamless integration between CookieFirst and Piwik Pro. The process involved a combination of human manual efforts, including rigorous testing, meticulous manual editing, and careful code structuring. Thus, it is crucial to acknowledge this tool’s significant contribution throughout the development journey.
The code uses the CookieFirst consent API to check the consent settings within the CookieFirst banner to determine the status of various consent types, including Analytics, Necessary, Advertising, and Functional. It then proceeds to remap these statuses to align with the corresponding settings in Piwik Pro. Furthermore, the code dynamically updates the Piwik Pro settings in accordance with any changes made by the user in the CookieFirst consent banner.
If you need to know more about the code, you can check the code documentation section right after the Javascript code.
Use the code provided below to integrate Piwik Pro and CookieFirst.
<script>
 function setComplianceSettings(settings) {
  ppms.cm.api(
    'setComplianceSettings',
    settings,
    function () {
      dataLayer.push({ 'event': 'Piwik_complianceSettingsSet' });
    },
    function (error) {
      dataLayer.push({ 'event': 'Piwik_complianceSettingsError', 'errorMessage': error.message });
    }
  );
}

function getComplianceSettings() {
  ppms.cm.api(
    'getComplianceSettings',
    function (settings) {
      dataLayer.push({ 'event': 'Piwik_complianceSettingsUpdate', 'settings': settings });
    },
    function (error) {
      dataLayer.push({ 'event': 'Piwik_complianceSettingsError', 'errorMessage': error.message });
    }
  );
}

function constructSettingsObject(acceptedCategories) {
  var cfAnalytics = acceptedCategories ? acceptedCategories.performance : false;
  var cfFunctional = acceptedCategories ? acceptedCategories.functional : false;
  var cfAdvertising = acceptedCategories ? acceptedCategories.advertising : false;

  console.log("analytics_settings: " + cfAnalytics);
  console.log("functional_settings: " + cfFunctional);
  console.log("advertising_settings: " + cfAdvertising);


  return {
    consents : {
      analytics: { status: cfAnalytics ? 1 : 0 },
      ab_testing_and_personalization: { status: cfFunctional ? 1 : 0 },
      user_feedback: { status: cfFunctional ? 1 : 0 },
      marketing_automation: { status: cfFunctional ? 1 : 0 },
      remarketing: { status: cfAdvertising ? 1 : 0 },
      conversion_tracking: { status: cfAdvertising ? 1 : 0 }
    }
  };
}

function handleConsentUpdate(acceptedCategories) {
  if (typeof ppms !== 'undefined' && ppms.cm && ppms.cm.api) {
    var settings = constructSettingsObject(acceptedCategories);
    setComplianceSettings(settings);
    getComplianceSettings();
  }
}

function delayedExecution() {
  console.log("cookiefirst consent update");
  var cookieFirst_consent = window.CookieFirst.consent;
  var cfAnalytics = cookieFirst_consent ? cookieFirst_consent.performance : false;
  var cfFunctional = cookieFirst_consent ? cookieFirst_consent.functional : false;
  var cfAdvertising = cookieFirst_consent ? cookieFirst_consent.advertising : false;


  if (typeof ppms !== 'undefined' && ppms.cm && ppms.cm.api) {
    var settings = constructSettingsObject(cookieFirst_consent);
    setComplianceSettings(settings);
    getComplianceSettings();
  }
}

window.addEventListener("cf_consent", function (event) {
  var acceptedCookieFirstCategories = event.detail || {};
  handleConsentUpdate(acceptedCookieFirstCategories);
 console.log("cookiefirst consent updated now");
});

setTimeout(delayedExecution, 2000);

</script>
Code Documentation (If You Need a Technical Explanation)
This JavaScript code performs the following actions:
1. Defines a function named “setComplianceSettings” which takes “settings” as a parameter. This function makes a call to an API method “ppms.cm.api()” with the arguments “setComplianceSettings“, “settings”, a success callback function, and an error callback function. If the API call is successful, it pushes an event object to the “dataLayer” array with the event name “Piwik_complianceSettingsSet“. If there is an error, it pushes an event object to the “dataLayer” array with the event name “Piwik_complianceSettingsError” and includes the error message.
2. Defines a function named “getComplianceSettings” which does not take any parameters. This function makes a call to the API method “ppms.cm.api()” with the arguments “getComplianceSettings“, a success callback function, and an error callback function. If the API call is successful, it pushes an event object to the “dataLayer” array with the event name “Piwik_complianceSettingsUpdate” and includes the retrieved settings. If there is an error, it pushes an event object to the “dataLayer” array with the event name “Piwik_complianceSettingsError” and includes the error message.
3. Defines a function named “constructSettingsObject” which takes “acceptedCategories” as a parameter. This function constructs and returns a settings object based on the provided “acceptedCategories“. It assigns values to the “cfAnalytics“, “cfFunctional“, and “cfAdvertising” variables based on the corresponding properties of “acceptedCategories“. It then logs the values of these variables to the console. Finally, it returns an object with a “consents” property containing sub-properties representing different consent categories with their respective statuses based on the “cfAnalytics“, “cfFunctional“, and “cfAdvertising” variables.
4. Defines a function named “handleConsentUpdate” which takes “acceptedCategories” as a parameter. It checks if the “ppms” object and its “cm” property exist, and if the “api” property is defined. If the conditions are met, it constructs the settings object by calling “constructSettingsObject” with “acceptedCategories”, and then calls “setComplianceSettings” and “getComplianceSettings” with the constructed settings object.
5. Defines a function named “delayedExecution“. This function is called after a delay of 2000 milliseconds. It logs a message to the console and retrieves the consent object from “window.CookieFirst.consent“. It assigns values to the “cfAnalytics“, “cfFunctional“, and “cfAdvertising” variables based on the corresponding properties of the consent object. If the “ppms” object and its “cm” property exist, and if the “api” property is defined, it constructs the settings object using the consent object and then calls “setComplianceSettings” and “getComplianceSettings” with the constructed settings object.
6. Adds an event listener to the “window” object for the custom event “cf_consent“. When this event is triggered, it calls the “handleConsentUpdate” function with the event’s “detail” property (or an empty object if “detail” is not defined). It also logs a message to the console.
7. Sets a timeout of 2000 milliseconds to execute the “delayedExecution” function after the specified delay.


