


In the past, Microsoft Clarity lacked support for event tracking; however, it has now introduced event tracking capabilities, referred to as “Smart Events.” In this blog post, you’ll comprehensively understand my findings after my experimentation and analysis of these newly introduced event-tracking features, plus more.
Previously, event tracking in Microsoft Clarity was only possible using Custom Tags, a topic I have covered extensively in two previous articles, with the most popular being the “10 Innovative Ways of Using Custom Tags.”
In this article, I aim to help you understand the concept of Smart Events, detailing the methods for setting them up, exploring their different types, demonstrating their application in Clarity project analysis, outlining the limitations of this feature, and drawing comparisons between “Microsoft Clarity Smart Events” and “Custom Tags“, where I’ll talk about their similarities and differences.
Additionally, you will gain access to Microsoft Clarity worksheets designed to make the implementation and utilisation of Microsoft Clarity enjoyable for both you and your team.
Do you feel sold and find this interesting? If it’s YES, let’s get the ball rolling.
Table of Content
- What are Microsoft Clarity’s “Smart Events”?
- Here is How To Locate Smart Events In Microsoft Clarity
- Auto Events vs Custom Events vs API Events
- Auto Events In Microsoft Clarity
- Custom Events (User-Defined Events) in Microsoft Clarity
- API Events In Microsoft Clarity
- How to Utilise Smart Events in Your Analysis
- Custom Tags vs Smart Events: Similarities and Differences
- Limitations of the Event Tracking Feature in Microsoft Clarity:
- Some Valuable Clarity Takeaway Worksheet Resources
- Conclusion on Event Tracking in Microsoft Clarity
What are Microsoft Clarity’s “Smart Events”?
If you are new to Microsoft Clarity and find it challenging to grasp the tool, refer to this detailed, in-depth article on Microsoft Clarity designed for beginners and those with intermediate knowledge levels.
In Microsoft Clarity, terms like “Auto Events,” “API Events,” and “Custom Events” essentially refer to the same concept. They are just different types of “Smart Events.” This feature lets you communicate with Microsoft Clarity that you are capturing key user actions on your website. Notably, this feature does not yet support projects for mobile applications.
Aside from manually setting up event tracking, Clarity can autonomously define “smart events,” also known as “auto events,” tailored to your business. You have the flexibility to customise or create new events, even without the need for coding or engineering resources. However, to be able to do this, it is necessary to collect historical data, a process that might be challenging at first for new projects.
As of writing this article, the feature allows you to capture only the event name without possibly including the event parameters or properties.
For instance, if a user adds an item to the cart, you can track it as “AddToCart.” However, you cannot capture details like the specific item added or additional information about the action as event properties, even though Microsoft Clarity supports e-commerce tracking to some extent.
It’s important to note that there is no standardised format for naming events when working with event tracking in Microsoft Clarity. Nevertheless, I recommend adopting an internal naming convention. In this article, you will also find free resources to assist in achieving the organisational structure needed for event tracking implementation in your business Clarity project.
Here is How To Locate Smart Events In Microsoft Clarity
If you’re already collecting data in your Clarity project, navigate to the project “dashboard” interface. There, you’ll discover the “Smart Events” card. Within this card, you’ll find automatically generated smart events for your Clarity project, along with your custom and API events, provided you’ve previously configured them.
You also have the option to display either the number or percentage of sessions where your website users did that action. Additionally, you can click on the recordings or heatmaps icon to filter your session recording and heatmap data.
To do any editing, creation, hiding, or configuration changes related to an event, you must do it in the “Settings” interface.
Navigate to your Microsoft Clarity project’s “Settings” view and click the “Smart Events” tab on the left. Here, you’ll find all automatically generated smart events created by Microsoft Clarity for your business based on recent historical data collected in your project. Also listed are the event actions you’ve previously set up, assuming you’ve configured them beforehand.
It’s essential to note that only project admins can create “custom event” types of “smart events” in Microsoft Clarity.
Auto Events vs Custom Events vs API Events
In Microsoft Clarity, when it comes to event tracking, you have three types of “Smart Events.” Clarity can leverage recently collected data to generate new events automatically, known as “Auto Events.” Alternatively, you can define your events using “API Events” or create “user-defined events“, which I call “Custom Events.”
Auto Events In Microsoft Clarity
System-defined events, created by Microsoft Clarity, fall under the “Auto Events.” The events accessible or displayed in your project depend on the recent click interaction data collected by your project.
Clarity seamlessly identifies and categorises user actions, primarily click interactions, on your website, grouping them into recognised events listed under “Defined by Clarity” in Smart Events.
While these auto events are predefined, you have the flexibility to customise them. Currently, Clarity supports nine types of auto events:
- Add to Cart
- Begin Checkout
- Contact Us
- Download
- Login
- Purchase
- Request Quote
- Sign Up
- Submit Form
If you are working on a new Microsoft Clarity project or have yet to collect data, your project may either have no auto events or have a limited number of them. Building an event from scratch based on these auto events may be challenging for your scenario.
However, I advise against relying solely on the data reported under “Auto Events.” These events were created using button-click event types and by evaluating the button text information. This methodology can result in false positives, potential issues with translated website content, or underreporting when variations in button text convey the same meaning.
For instance, in the experiment I did, clicking on a button using the Spanish word “Realizar pedido” and the Italian word “Invia ordine,” both meaning “Place Order” in English, did not get included in what Microsoft Clarity counts as a “Purchase Auto Event.”
The image shows it also didn’t get counted when translated to Spanish.
Furthermore, my experimentation revealed that a click action associated with the button text “Order now, sales close so,” a variation containing the phrase “Order now,” did not register in Clarity’s defined “Purchase” system-defined type of smart events.
To address these limitations, I recommend utilising “API Events,” a type of smart event that I will discuss shortly.
Also note that Microsoft Clarity periodically updates its definition of what constitutes the event based on a specific “Auto Event,” provided that recent click data aligns with their own internal criteria.
For example, from just “Place Order,” make up the “Purchase Auto Event,” as shown in the image below.
You can see how more click action gets rolled into what should trigger the Microsoft Clarity “Purchase” Auto event.
The same thing is noticeable with the “Add to cart” auto event, which is updated upon using text that Microsoft internally defines as a signal for that website action.
Then, more signal gets picked up and added as an “Add to Cart” auto event.
One unique thing about the “Submit Form” and “Contact Us” auto events is they don’t solely rely on button click data for its occurrence to be signalled by Microsoft Clarity.
For example, the “Submit Form” smart event doesn’t only fire on button clicks with the text “Submit“. It also executes on Clicks that trigger the browser’s submit event, which you can see in the image below.
The “Contact Us” triggers on clicks that send an email and Clicks that start a call, for example, when your website visitors click on a mailto link, which directs them to their email inbox to write you an email.
Editing Auto Events:
“Auto Events” are editable, and you can make these modifications in the administrative settings interface of your Microsoft Clarity project.
An edit you can’t do is deleting these event types is impossible or adding an extra auto event in the event composition. Nevertheless, you can choose to hide them.
To initiate an “Auto Event” editing process, navigate to your Microsoft Clarity project interface. Click on the edit icon next to the auto event, typically categorised under the creation definition as “Clarity.”
Alternatively, you can click the “Auto Event” to open a view where you’ll be shown the “edit event” button and the event composition.
Upon getting to the event configuration view, you gain insights into how the event is defined. It’s crucial to understand that you can only modify what other actions constitute to get counted for that particular auto event. This is achievable using the various event tracking methods available in Microsoft Clarity. However, altering the event name of an “Auto Event” is not permitted.
When referring to modification, it means you can supplement additional events that should also be used to signal the occurrence of the “Auto Event.” Conversely, you cannot remove the default signals that Microsoft Clarity automatically generated for that smart auto event.
Also, you can’t add an extra auto event to the configuration of that particular auto-generated smart event; you can see that the auto event tab is greyed out as an option.
After completing your modifications, save your changes by clicking the “save” button.
Now, let’s look at “Custom Events” types.
Custom Events (User-Defined Events) in Microsoft Clarity
When you create a new Microsoft Clarity smart event, it gets classified as “user-defined” events, something I also refer to as “Custom Events“. Within your Clarity project, you also get the ability to create and define your unique events, which you can do through various methods, a combination of which I will elaborate on shortly in significant detail.
Custom Events offer flexibility within Clarity, allowing you to measure user activities on your website without dabbling into codes. Think of it as something similar to the event creation feature within Google Analytics (GA4).
The user-defined events you create are valuable data points that aid filtering data when analysing heatmaps and session recordings, enabling you to focus on what is pertinent to your objectives.
Once a new user-defined smart event gets created, it becomes visible on the dashboard after a website user has executed the defined action.
Creating a New Smart Event (User-Defined Event Types):
To create a new custom smart event, you can either begin from scratch or utilise an “Auto Event” if your Microsoft Clarity has collected any data and has identified any smart events from the recent historical data.
Click the “New” button to start creating a new smart event.
If auto events get detected in your project, you’ll be presented with the option to start with an “Auto Event” of your choice or start from scratch, as illustrated in the image below.
However, if it’s a new Microsoft Clarity project or there hasn’t been recent data collection on your website, you’ll encounter the “creating from scratch” screen.
If you have just created a new Microsoft Clarity project or if your project has not received any data for a long time, you may not have any data on button clicks, page visits, auto events, or API events. This can make it difficult to create your own custom events, also known as user-defined events. Therefore, using the “API Events” is recommended or waiting for data to be collected before creating yours.
Creating Custom Smart Events from Auto Events:
If you opt to “Start from auto-generate events,” you can initiate the process by selecting one or more “Auto Events” available in your project. Afterwards, click the “Next” button to proceed.
In the subsequent screen, you can optionally choose a category from “Button clicks“, “API events“, “Auto events“, or “Page visits” to add more events configuration. Don’t worry; you can add more categories or a mix of them on the next screen.
In the event configuration screen, you can select and search for button click actions recorded by Microsoft Clarity using historical data on button click interactions collected for that Clarity project on your website.
This includes API events you’ve set up (which will be covered shortly), existing auto events, or the page URL visitors visit on your website.
After configuring, select “Next” to enter a name for the event and save it.
Creating User-Defined Smart Events from Scratch:
If you choose the “Start from scratch” option, select “Next” to continue. The next screen is the same as I just covered, even if you use the “Auto Events” option to start your creation.
After adding your configuration, click the “Next” button to enter a name for the event and save it.
Another crucial point to highlight is that when utilising the “Page Visits” event configuration, you are not solely confined to the “URL Is Exactly” condition. This signifies that you get the flexibility of telling Microsoft Clarity how to register a smart event when your website visitors visit a page with a URL that counts as a useful event.
Editing a Custom Event Type of Smart Events:
Various possibilities exist when it comes to editing a custom event type of smart events in Microsoft Clarity, including:
- Deleting a “Custom Event” is only available for user-defined events.
- You cannot hide user-defined smart events, which is possible with “auto event” types.
- It is possible to rename a custom event by clicking the pencil icon and changing the name.
- The ability to further modify your custom event’s composition in Microsoft Clarity.
Please note that when you use a group of different event actions to build a user-defined custom event, they all trigger the event independently. It’s not a form of trigger group functionality you’re accustomed to in Google Tag Manager.
The image from my experiment shows that the user-defined event, “Group Event Action,” which I created, was triggered twice in this session.
This occurrence can be attributed to the following event compositions:
- A visit to the homepage of my portfolio website, https://judeonyejekwe.com/
- The occurrence of the “Purchase” Auto Event
- The API event, which I named “newsletterSignup.”
In this particular session, when I accessed the homepage of the portfolio website, it triggered one instance of the custom event “Group Event Action.” Subsequently, upon initiating the second API event, “newsletterSignup,” another triggering of the user-defined event took place, thus explaining why the session recording playback displays two instances of the custom event.
Another intriguing discovery from my experiment is that when you modify the name of a user-defined event, the change is applied retroactively. Allow me to illustrate this with a real-life example from my testing.
During the experiment, I initially had a Microsoft Clarity custom event named “Visit Contact Page,” as indicated in the image below, where the event is categorised as “user-defined.”
In the test, I configured the custom event to execute when a user visits the Contact Us page, as demonstrated in the image.
After visiting that web page on my website to collect data, you can see that the “Visit Contact Page” event is now included in the session recording timeline, as shown in the image below.
Following the renaming of the event from “Visit Contact Page” to “Saw Contact Page” without altering the event composition, as shown below.
Upon revisiting the same session recording, without visiting the Contact Us Page on the website again, the recording timeline also got updated to reflect the modified custom event name, as seen in the image.
API Events In Microsoft Clarity
API events in Microsoft Clarity represent another category of smart events that can only be implemented outside the Microsoft Clarity interface, using Tag Management Solutions such as Google Tag Manager and Piwik Pro Tag Manager or by involving your developer to have it hardcoded, thereby executing the code when a user performs a specific action.
Despite the term “API,” there’s no need to be intimidated, as these are the same methods (The Clarity Client API) used for setting up “Custom Tags” and “Custom Identifiers.”
In the “Smart Events” section under the Clarity Project’s “Settings” tab, API events are classified under API and are represented with a code icon.
Below is the JavaScript code that you would instruct your developer to execute, or alternatively, you can implement it through the Google Tag Manager custom HTML tag type when the specified event occurs:
<script>
//replace the “event name here” with your event name
window.clarity("event", "event name here");
</script>
Modifying the event name when sending or using the code in your tag manager is crucial.
Also, I normally recommend using “API Events” when setting up e-commerce tracking in your business or client’s project, which I covered in a step-by-step guide on e-commerce and purchasing tracking in Microsoft Clarity.
To implement this in GTM, create a new tag, select the custom HTML tag type, and insert the code in the code field.
As an illustration, if you want to track when a website user books a vacation, the event code might resemble the following:
<script>
window.clarity("event", "bookVacation");
</script>
After adding the code to the tag, attaching your trigger and naming the tag in Google Tag Manager, your setup will look similar to what I have shown below.
It’s worth noting that you can call this API multiple times per page, and each event is logged individually and can be filtered and viewed in all verticals.
Without a descriptive name, it becomes challenging to understand the purpose or triggering conditions of the event. Therefore, I recommend using the Microsoft Clarity implementation worksheet like the one we’ve developed at DumbData; it’s FREE and can help document your installation, configuration, and event instrumentation in Microsoft Clarity.
API events cannot be hidden, and unlike “Custom Events.” If you wish to delete an API event, you need to identify how it was implemented and manually remove it from your website code or the Tag Management Solution used to set up the event. Apart from this method, there is no other way to delete an API event.
Additionally, please note that admin access is not required to set up API event actions.
Initialising the Microsoft Clarity tracking code before executing API events is necessary. Failing to load the base tag will result in untracked and unreported actions in your project dashboard via the Clarity Client API; this is something you need to take into account, especially when working with dataLayer events that happen early on the page load.
It’s essential to remember that event names are case-sensitive, and there is no standardised way to name an event. I used different naming conventions in my experiments, and all were successfully reported in my Clarity test project, as shown below.
How to Utilise Smart Events in Your Analysis
Smart Events can help you focus on relevant data rather than sifting through all available information in Microsoft Clarity. They aid in filtering your data for session recordings and heat map analysis, providing a more targeted approach.
They are used in the following methods:
- data filtering
- session recording
- heatmap analysis
- dashboard segmentation
- Funnel performance analysis
Data Filtering
To apply Smart Events as a filter, navigate to your Microsoft Clarity project’s “Dashboard” interface. In the “Smart Events” card, click on the “heatmap” and “session recording” icons. This action automatically applies the chosen event as a filter, directing you to session recording or heatmap reports where the action you’ve filtered for was performed.
You also have the option to click on a specific event, which subsequently filters the dashboard you are currently viewing based on that particular event.
Furthermore, you can click on another event displayed in the same card after the initial filter, resulting in your dashboard being filtered by both Clarity smart events, utilising an “AND” logic condition.
Alternatively, you can access the filter configuration view by clicking the filters button.
Within this view, scroll to the “User Actions” section, where you’ll find the “Smart Events” category. Here, you can select the events you wish to include in your filter configuration.
Navigating to the session recordings or heatmap reports will have your data effectively filtered to help focus on what matters or will help lead to the answers you are looking for.
Session Recording
Another method of using these smart events for streamlining your analysis involves moving to the specific action while watching a session recording playback.
Smart events are highlighted on playback controls and can be accessed in Recordings on the left side by clicking “More details“, and in the recording timeline, you can click to select the desired “Smart Events.” that you’d like to jump to in the recording video.
It’s worth noting that, based on my tests, it displayed all types of “Smart Events” (“Auto Events“, “User-defined Events“, and “API Events“) that happened in that user session.
Heatmap Analysis
You can also use Microsoft Clarity Smart events to filter the interaction data points that get included in the heatmap report you are currently viewing. This proves crucial in identifying usage patterns among website users who engaged in that particular action while on that page.
Dashboard Segmentation
If you wish to narrow down the data displayed in your Microsoft Clarity dashboard reports, you can create a filter for a specific Clarity “smart event.” Alternatively, navigate to the “Smart Events” card and select the event you want to use as a filter for the dashboard.
For example, I clicked on the “newsletterSignup” event name, and the whole dashboard got filtered by this action.
Doing this lets you view segmented data from user sessions where your website visitors did that action. For instance, you can explore details such as page information, UX insights (including dead clicks, rage clicks, JavaScript errors, etc.), acquisition data (referrer, marketing channel, campaign, and source), or the technical specifications of devices that are associated with that event data, to draw more insights that you can make actionable.
To streamline future analyses, you can convert these filters into segments. Click the “save as a segment” option.
You should save the filter configuration as a segment on the next screen.
Give it a name and hit the “save” button. This segmented configuration can be effortlessly reapplied whenever necessary.
Your next question is whether “Custom Tags” are still necessary and how Smart Events compare to Custom Tags. I address these questions in the following section of this blog post.
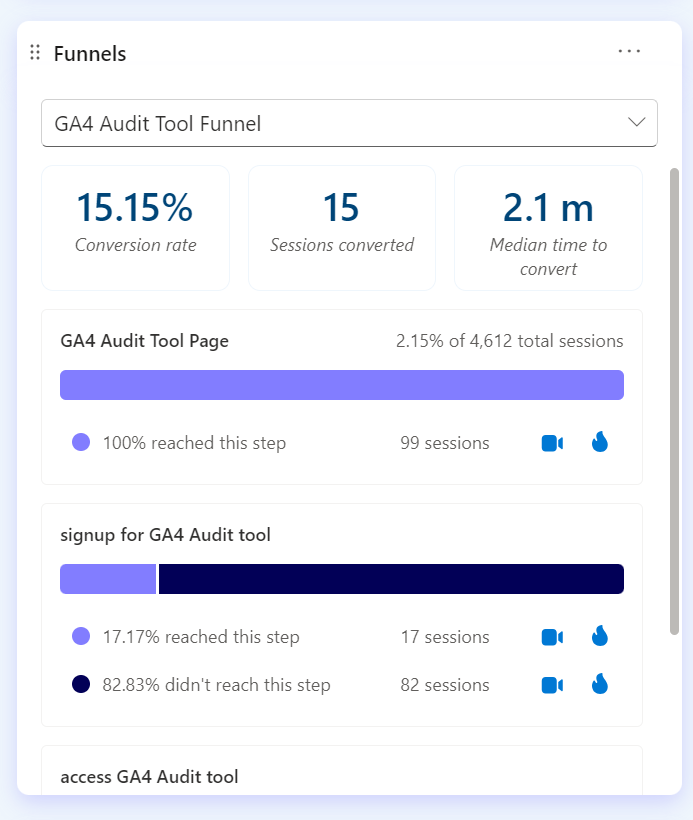
Funnel Performance Analysis
One of the outstanding features of Microsoft Clarity is its funnel tool, which enables you to measure the conversion flow on your website. To set up a funnel report, you must have “Smart Events” (API Events, Auto Events, Custom or User-Defined Events) or page visit data collection for your Clarity project.
I have written an in-depth article on Microsoft Clarity Funnels to help you understand how to use Clarity to analyse funnel performance.
Custom Tags vs Smart Events: Similarities and Differences
Microsoft Clarity’s “Custom Tags” and “Smart Events” share similarities but also exhibit distinct differences.
Firstly, they both provide additional information and enhance flexibility in utilising Microsoft Clarity to measure user interactions on your website, contributing to improved optimisation efforts.
Their similarities include:
1. Filtering Capabilities: After gathering data using both “Custom Tags” and “Smart Events” features, you can use them to create filters for your reports that help hasten analysis, and you can turn these filters you’ve made into segments, which allow you to focus on what matters, saving time and enabling efficient analysis of session recordings and heatmaps.
2. Flexibility in Usage: Both features, Custom Tags and Smart Events, bring flexibility to measuring website engagement, usage, and conversion within Microsoft Clarity.
3. No Creation Limits: There are no limitations on the number of custom tags or event tracking associated with a Microsoft Clarity project.
4. Implementation through Clarity Client API: Custom Tags and API event types of Smart Events can be implemented using the Clarity Client API.
However, their differences are notable:
1. Scope and Intention: Custom Tags are designed to be applied to a page and were not initially intended for event tracking. In contrast, the primary purpose of Smart Events is event measurement.
2. Page Tag Limitations: Custom Tags have application limitations, allowing a single page to have no more than 128 tags applied. Any additional tags get ignored. This constraint does not apply to Microsoft Clarity’s event tracking feature, known as “Smart Events.”
3. Character Length Limits: The custom tag and its value are restricted to a maximum of 255 characters. However, no part of Microsoft’s documentation states that such limits exist for the event tracking feature in Smart Events.
While the introduction of Smart Events may lead one to believe that Custom Tags are now unnecessary, it’s essential to understand the unique roles each plays.
For instance, if you need to capture page titles (which Microsoft Clarity doesn’t capture by default) or information with unpredictable values, Custom Tags remain a reliable choice.
Combining Custom Tags with event tracking allows for a comprehensive approach in scenarios where event properties/parameters are vital for analysis. You can use the custom tag key as the event name and collect its event property into “Custom Tags.”
For example, a vacation company that is tracking the “book a vacation” action on their website as an API event can have a custom tag that has the key “vacation type“, and then the value is the type of vacation package booked, which is not possible to capture with Microsoft Clarity’s smart events.
There are still multiple scenarios where Custom Tags prove helpful, but for critical actions, tracking them as Smart Events in your Microsoft Clarity project is recommended.
Limitations of the Event Tracking Feature in Microsoft Clarity:
While the introduction of “Smart Events” in Microsoft Clarity brings forth exciting possibilities and numerous advantages, it is essential to acknowledge its downsides and limitations, including:
1. Difficulty In New Projects: New Microsoft Clarity projects or those lacking recent historical data will not have any “Auto Events” available in their project or even build a custom event using “button clicks” and “page URLs” data.
2. Potential for False Positives: The “Auto Events” types of Clarity Smart Events may trigger false positives, especially in cases where an action wasn’t successful but was performed. This limitation arises because it relies on a button click trigger type and may not work well with button text variations or when website content is translated into different languages.
3. Lack of Event Properties/Parameters Support: The current state of the event tracking feature in Microsoft Clarity does not support the inclusion of event properties/parameters as you would in Google Analytics (GA4).
4. Limited to Website Projects: Event tracking in Microsoft Clarity is exclusively supported for website projects and does not apply to mobile apps.
5. Can’t Determine Event Count: You can’t determine the aggregate number of times your website visitors performed that action because Microsoft Clarity reports only the number of distinct sessions where website visitors performed a tracked action, not the aggregated number of times the event was executed.
6. Independent Group Events: During my test, the group events configuration will trigger independently, indicating that not all of them need to occur for the “Custom Event” to be executed. It’s important to understand that this is not similar to your “trigger group” functionality in Google Tag Manager.
7. Dynamic Updates for Auto Events: Microsoft Clarity will continuously update what constitutes the signal for an auto event, and it does this using recently collected data. And if you rely on “Auto Events,” regular setup reviews are advisable.
8. Don’t Fully Trust The “Download” Auto Event: The “Download” Auto event type looks for text containing the word “Download” and does not track actual clicks on links initiating a download.
9. Real-time Viewing Limitations: Event data cannot be viewed in real-time during session recording; it becomes visible only after processing. The visible types are limited to auto events and user-defined/custom events, with no indication of API events during testing.
10. Challenges in Debugging on The Fly: Debugging is not straightforward, and the primary option is to wait until the data is processed and displayed in the Microsoft Clarity report interface.
Some Valuable Clarity Takeaway Worksheet Resources
As promised earlier in this blog post, I am sharing valuable worksheets to enhance collaboration for you and your team. The free Clarity implementation documentation worksheet, developed by our team, not only assists in documenting event tracking but also facilitates the documentation of setup configurations, custom tags, and the sharing of insights with your team.
When you primarily need to audit your business or client’s Clarity project setup to identify potential gaps. In that case, the FREE PDF Microsoft Clarity setup checklist or the Google Sheet worksheet can be valuable tools.
Conclusion on Event Tracking in Microsoft Clarity
I did not anticipate its length and detail when writing this article. Nonetheless, I trust that you have gained insights into Smart Events in Microsoft Clarity, including its various types, such as Auto Events, API Events, and Custom Events.
We also looked into its limitations, explored its similarities with Custom Tags, and highlighted the distinctions between them.
In the future, more updates will be introduced to enhance the capabilities and utilisation of this feature in Microsoft Clarity.
I am eager to hear what you have learned and how you plan to leverage this feature. You can do this via LinkedIn or the DumbData email; until then, I am happy to optimise your website!


