You’ve set up your Google Analytics (GA4), and it’s already collecting data that gets processed for reporting. Your next goal is to share the Google Analytics reports (standard, custom, and exploration reports) you’ve created or reports you’ve personalised for your clients and teams. Don’t worry. I will guide you through the various available options for sharing Google Analytics reports with your team or client.
This article aims to be concise while shedding light on the available choices for sharing reports in Google Analytics, whether standard, custom, or exploration reports.
Step-by-Step Guide On How To Share GA4 Reports (The 6 Options That You Have)
For some of the sharing options discussed in this blog post, the user requires access to the Google Analytics property, while in other methods, such access is not necessary.
Let me begin by enumerating the options that I will be exploring in this article:
- The traditional method of copying the report page URL
- Utilising the standard report share link option
- Sharing or sending Google Analytics (GA4) reports via email
- The manual export report option
- Making use of the GA4 scheduled report feature
- Using the exploration share capability
The choice of sharing methods depends on the type of report you are sharing (standard, custom, or exploration reports), the access status, the purpose or need for the report and the preferred format. I will address each of these considerations in detail for each of the GA4 report-sharing options.
The Traditional Method of Copying the Report Page URL
This approach is direct and applicable when sharing both Google Analytics standard, custom, and exploration reports (assuming you’ve first shared the GA4 exploration report using a method discussed in this blog post).
To use this method, the person accessing the report must also possess some form of access to the specific Google Analytics property (at least at the viewer role access level) to be able to view the shared report.
The procedure entails navigating to the shared standard/custom report or exploration report, copying the entire URL from the browser, and subsequently sending the URL to your client or colleague who needs the report.
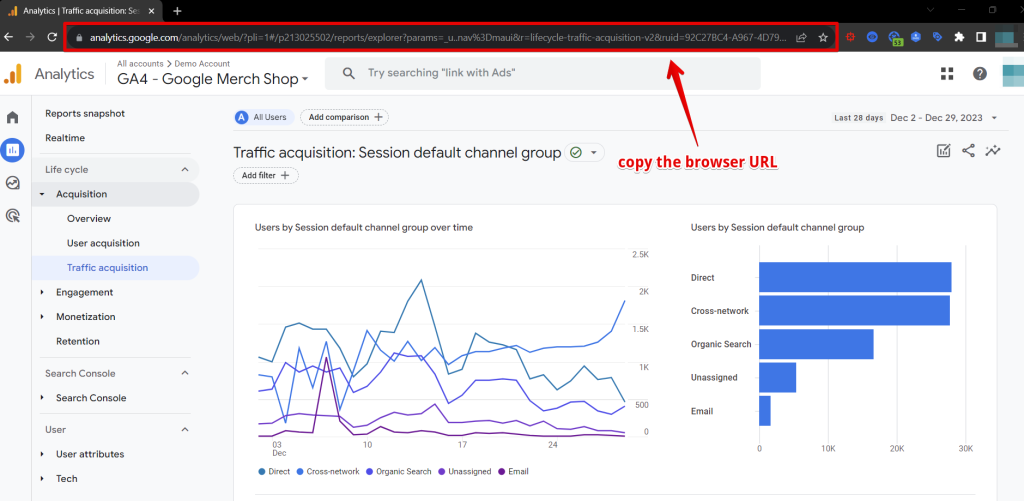
Upon clicking the URL, they will gain access to the shared report for that specific Google Analytics property.
While the process is uncomplicated, the report viewer must have access to your GA4 property’s account.
Utilising the Standard Report Share Link Option
This process is straightforward but has limitations, as it is not usable with Google Analytics explorations created within your analytics property.
Additionally, both you and the report viewer must have at least the Viewer role at the GA4 property level to utilise this method.
To use this approach, simply navigate to the standard/custom report you wish to share.
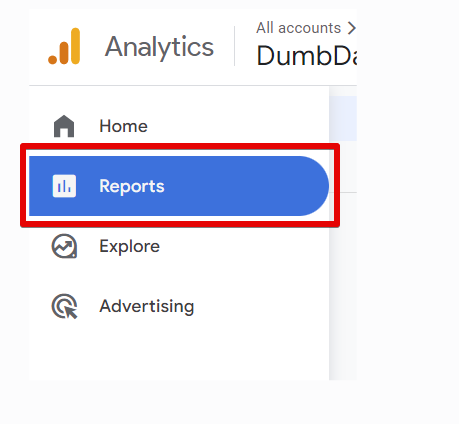
Click on the share icon in the report’s top right corner and select the “Share link” option.

Subsequently, copy the report link to share it with the individual who needs to view and use the analytics report.
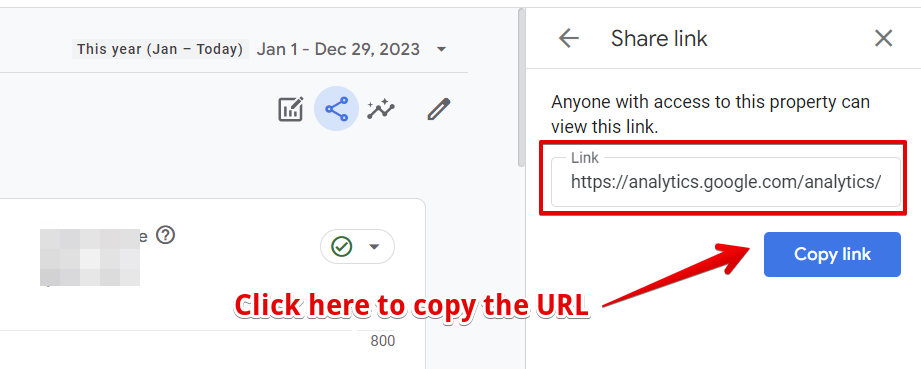
While this method has some similarities with the initial approach discussed, it is worth noting that, as of the publication of this blog post, it only applies to standard or custom reports and does not extend to exploration reports.
Sharing or Sending Google Analytics (GA4) Reports via Email
Google Analytics has a collaborative feature that allows you to share a report via email, but only with email addresses that have access to your GA4 property, user groups excluded.
To use this feature, you need to be an “administrator” of that analytics property and follow these steps:
Navigate to the report you want to share in your analytics property, click the share icon and select the “Send Email” option.
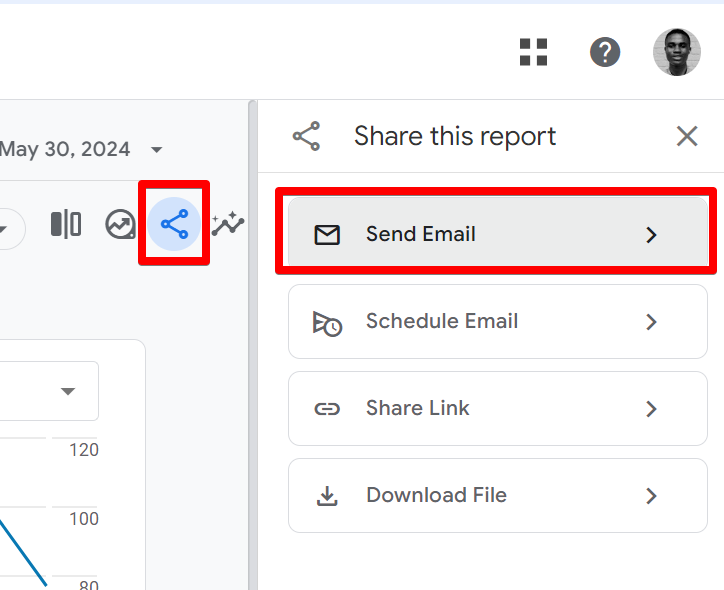
A new modal will appear on your screen with the necessary configurations for the report you want to send via email. These configurations include:
- Giving the report a name
- Selecting the report format (currently supports PDF and CSV)
- Choosing the language in which the email will be written
- Selecting the email addresses that can receive the report (note that you can only add up to 50 email addresses)
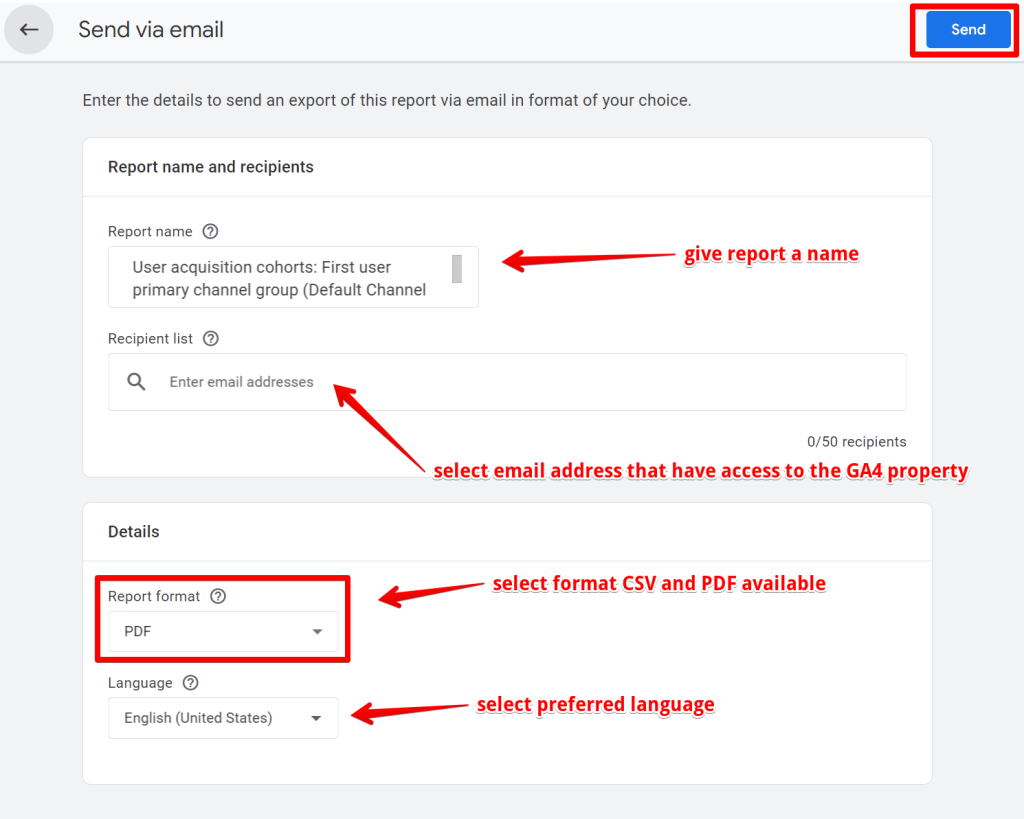
After configuring the email report, click the send button. The report will be delivered to the selected email addresses.
The email will include the report in the chosen file format (as an attachment) and a link for the recipient to view the actual report in Google Analytics.
Additionally, the email will include the name of the report you entered and reference the name of the Google Analytics (GA4) property.
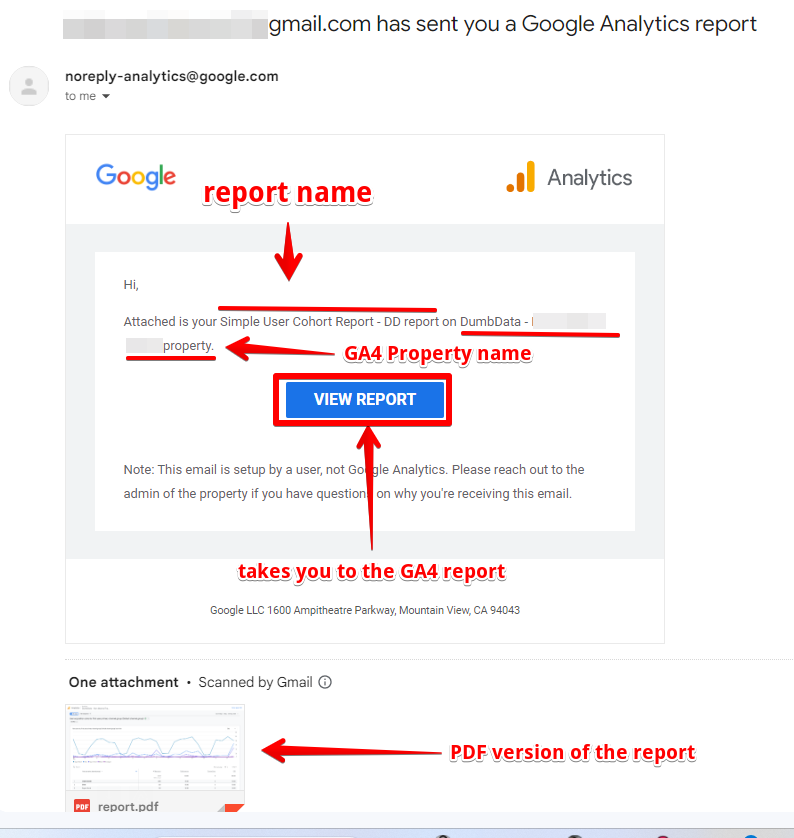
One interesting thing I found about this feature is that according to Google’s documentation on sending GA4 reports via email, if a user associated with your Analytics property has multiple email addresses, and one of those addresses is a “@gmail.com” address, the report will be sent to the Gmail address regardless of which email address you specify in the recipient list.
The Manual Export Report Option
This method eliminates the need for the individual you share the report data with to have access to the Google Analytics property since you will manually download the report data instead of sharing the GA4 report page.
Depending on your preferred format, this approach offers the flexibility of selecting your desired file format when downloading the data.
This method applies to both standard, custom, and exploration reports. It is also easy to complete, and I will outline the steps for custom and standard reports and GA4 explorations.
Manual Export of Custom and Standard Reports Data:
For standard/custom reports, navigate to the report of your choice, click the social share icon in the top right, and select “Download File.”

You will then be prompted to choose your preferred format, which is limited to “Download PDF,” “Download CSV, “or “Google Sheets,” as shown in the screenshot below.
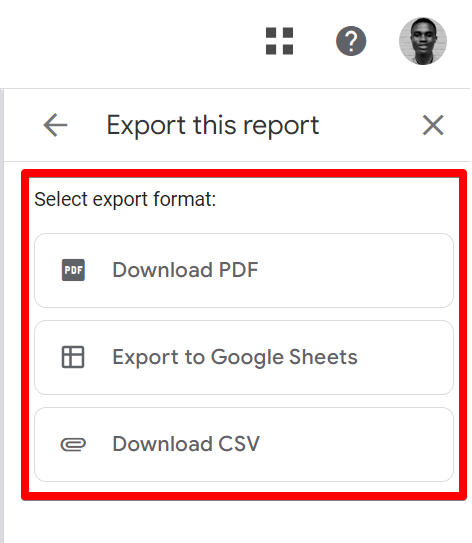
As for Exploration reports, you’ll get more format choices.
When downloading the file as a PDF or CSV, it will be accessible in your downloads folder. Google Analytics allows exporting up to 5k rows when downloading a report as a CSV.
Manual Export of Exploration Reports Data:
Visit the explore section in the GA4 UI, select your preferred exploration, and choose the report tab you wish to share.

In the upper right, click on the “Export data” option.

The export screen presents you with various export format options:
- Google Sheets
- TSV (tab-separated values)
- CSV (comma-separated values)
- PDF (all tabs)
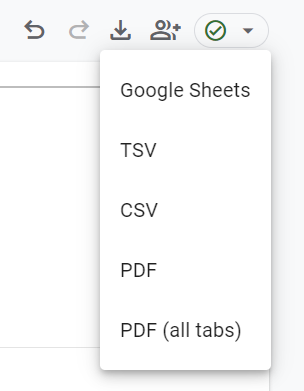
When exporting to Sheets, TSV, or CSV formats, all the data available in the selected visualisation you’ve exported. Keep in mind that this may exceed the currently displayed data.
As for PDF formats, only the currently displayed data in the visualisation gets saved when exporting to PDF.
Note that there are more format options when exporting exploration data. However, another step that involves cleaning the data for easy readability may be needed on the exported CSV or Google Sheets file format.
Making Use Of The GA4 Scheduled Report Feature
This option is exclusively applicable when sharing standard and custom reports and necessitates that you have an administrator access level in the GA4 property.
The GA4 Scheduled reports are delivered via email, proving particularly useful when reports are requested to be periodically delivered to your clients’ or stakeholders’ inboxes. The emailed report contains data for the specified date range, including any report filters or comparisons applied when the email was initially scheduled.
Upon scheduling a report, you gain the ability to view and manage the scheduled reports associated with the property. This includes identifying scheduled reports with errors for prompt resolution.
It’s crucial to note that you can schedule up to 50 standard and custom reports to be regularly sent via email, facilitating team members’ receiving periodic updates about your website or app performance. However, scheduling emails for Advertising or real-time reports is not supported.
How to Implement This Approach:
To utilise this approach, navigate to the report you intend to schedule via email. Click on the share icon at the top right of the report, and in the subsequent screen, select the “Schedule Email” option.

If the “Schedule Email” option is not visible in the menu, it indicates a lack of permission to schedule a report, a privilege reserved for administrators.
Assuming you have the requisite permissions, click “Schedule Email” and complete the fields in the configuration settings to schedule email reports. While not delving into each field in this view, it is intuitively understandable.
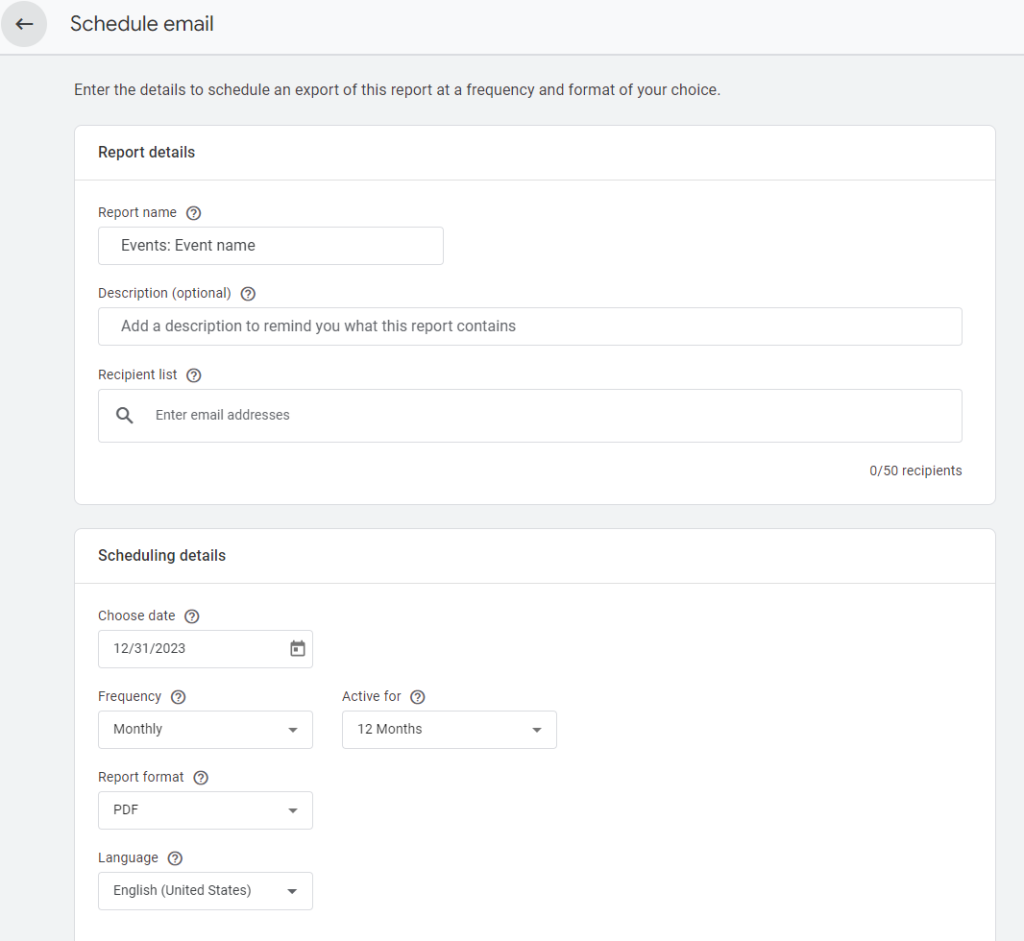
Upon inputting the necessary information in each field, click “Save” to schedule an email. Notably, the recipient of the GA4 scheduled report does not require access to the GA4 property.
Once saved and scheduled, recipients will receive emails on the selected dates. Recipients have the option to unsubscribe by clicking “Unsubscribe” in the email. If unsubscribed, they receive a notification within the same email, which includes a link for resubscribing.
Note: Opting out of an email does not remove the user from the recipient list in the Google Analytics Admin, as this is a known issue. For you to resume receiving emails, the user must be added to the new scheduled report after opting out.
For additional details, click “View Details” at the bottom of the screen to access the Admin details, where you can effectively manage scheduled reports.
Utilising the Exploration Share Capability
As the name suggests, this method is exclusive to sharing exploration reports created within the Google Analytics property. When you initially make an exploration, it remains visible only to you.
However, you can share your insights with colleagues. While we covered the manual export option for sharing exploration reports earlier, I will now explain the remaining two methods for sharing exploration reports.
These methods are:
- Using the exploration share option
- Utilising custom funnels
Using the Exploration Share Option:
This self-explanatory approach provides a simple means to share all report tabs created within a single GA4 exploration, whether they pertain to free form, funnel, cohort, segment overlap, user, user lifetime, or path exploration.
To use this method, ensure you are within the desired exploration, click on any report tab, and in the upper right, click “Share exploration,” represented by a human icon, to share the developed exploration analysis.
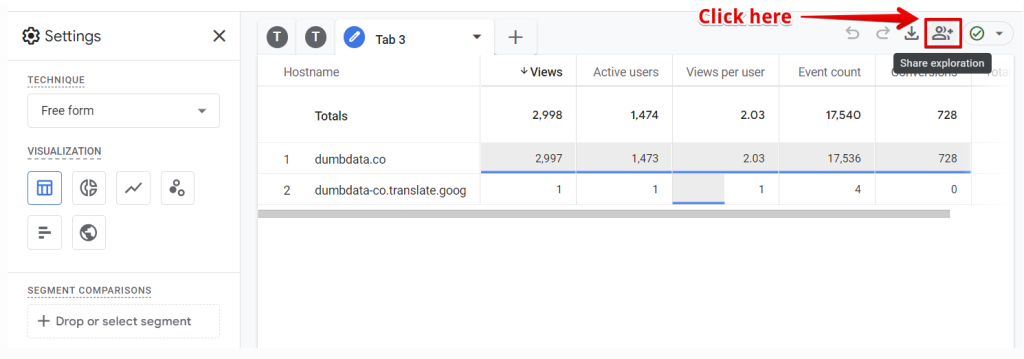
It’s important to note that, to share an exploration, one must hold at least an Analyst role in the analytics property. Additionally, keep in mind that only the creator of the exploration, and not just anyone with access to the GA4 property, can share the report.
If you’ve done this, the exploration report is now accessible to individuals with access to the Google Analytics property; additionally, sharing an exploration also allows you to share your explorations with the first step we discussed (copying the report page URL).
Using Custom Funnels:
This method is exclusive to “Funnel Exploration,” allowing you to make the funnel exploration report accessible from the custom and standard Google Analytics reports section.
Start by Navigating to the funnel exploration and clicking “Save as a report in the Library” by clicking the folder icon in the top right to save the exploration as a report.
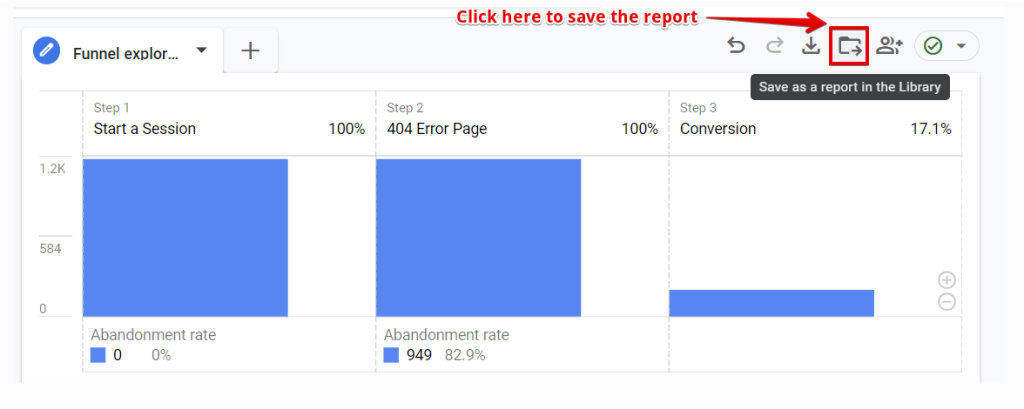
Please note that this button is only visible to Editors and Administrators. In the ensuing screen, you’ll need to enter a name and description for the new report, then click the “Save” button.
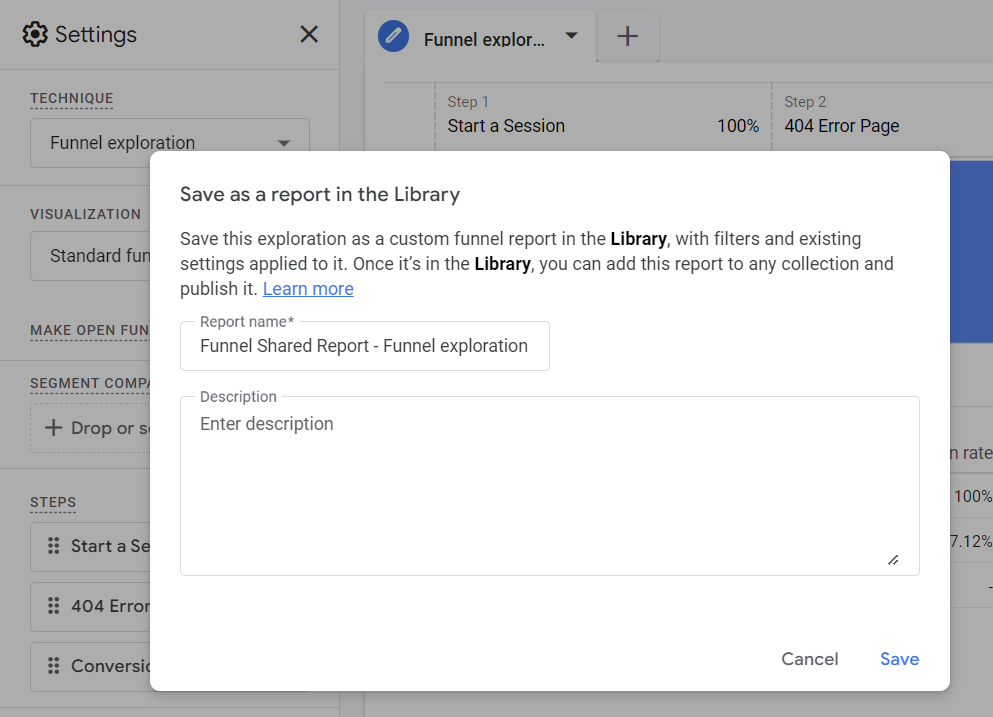
Your saved report includes the following settings from the funnel exploration:
- Applied filters
- Funnel step definitions
- Type of funnel (open or closed)
- Dimension breakdown
It’s essential to be aware that advanced edits, including elapsed time and next action, are not saved to the newly created funnel custom report.
After you’ve created the custom funnel report, an extra step involves adding the report to a collection report and a topic in the standard report library; after that, it’s now accessible in the standard reports and to anyone with access to the Google Analytics property.
Limitations for Utilising the Custom Funnels Saved Reports Option:
When you save a funnel exploration as a funnel report, your management options get restricted to deleting or renaming the funnel report and adding or removing the funnel report from report collections. If you wish to make edits to the funnel report, the only avenue is to modify the original funnel exploration and subsequently save the exploration as a new report.
Unlike other standard and custom reports, the data reporting is using the Google Analytics raw event data table, which means if you’ve configured your GA4 property data retention settings to be two (2) months, then A warning, “Partial data shown for date range,” is displayed when viewing data that exceeds the specified data retention period.
It’s crucial to understand that the saved report essentially mirrors the state of the funnel exploration at the time of saving. Once the report is saved, it becomes independent of the exploration. Any subsequent alterations made to the exploration do not impact the saved report, and vice versa.
Closing Remarks on Google Analytics Report Sharing
In conclusion, we have reached the reflective segment of this article, wherein we explored the various sharing options available in Google Analytics for sharing standard, custom, and exploration GA4 reports.
Despite the concise nature of this blog post, it burrows deeply into the capabilities of each sharing method and provides clear guidance on their utilisation.
As Google Analytics undergoes continuous evolution, it wouldn’t be surprising to see additional sharing settings and methods in the future, all aimed at facilitating seamless collaboration and sharing insightful reports for analysts and business stakeholders alike.
Additional sharing methods not covered in this blog post include:
- Exploring options such as Looker Studio.
- Leveraging the Analytics API.
- The linking of your Google Analytics and BigQuery, thereby exporting the data to BigQuery.
I am eager to hear your thoughts on the methods explained in this article. Which ones have you given a shot at in the past, and do you have any feedback to share? Feel free to express your insights by contacting the DumbData team via email or reaching out on LinkedIn. Until then, happy reporting.


