


The release of Google Consent Mode version 2 is no longer breaking news but represents a significant shift in the marketing landscape. This development propelled me to explore the potential effects of Google Consent Mode version 2 on users of Piwik Pro analytics who also utilise Google Ads for paid media marketing. Additionally, I will discuss what implementation changes you should make to prevent any negative impact on your marketing effort.
I want to save you some time from reading something you don’t need. It’s important to note that not all Piwik Pro customers need to be concerned about Google Consent Mode version 2. However, there are specific cases where some Piwik Pro users are required to make certain changes.
This article isn’t a tutorial on what Consent Mode is; doing a simple Google search should provide you with comprehensive articles that have already explored this topic.
With Google’s move to make consent mandatory (not for everyone) and the introduction of two new consent storage types (analytics_storage and ad_storage) in Consent Mode version 2, it is critical to understand their implications and how they’ll impact doing paid media with Google Ads:
- ad_user_data: This consent type determines if the user data is shareable with Google for advertising purposes.
- ad_personalization: This parameter determines whether personalised advertising, such as remarketing, is permitted.
My focus in this article is on Piwik Pro customers who are leveraging Google Ads, its conversion tracking, and remarketing solutions. I will show you the necessary adjustments to ensure compliance and avoid any potential penalties.
Are you intrigued? If so, continue reading for insightful information.
Why Piwik Pro Customers Should Care About Consent Mode v2
Businesses utilising Piwik Pro for measurement with Google’s advertising solutions, particularly those targeting users within the European Economic Area (EEA), should pay attention to Consent Mode v2.
Starting March 2024, without implementing Consent Mode v2, If you’re using Google Ads, user data about new EEA users will not be captured for usage within the advertising platform.
The absence of Consent Mode v2 could significantly affect the performance of your advertisements. More importantly, it could render your remarketing efforts and the ability to leverage these remarketing strategies when targeting EEA users ineffective.
Therefore, if your operations are outside the EU, or if you don’t market to visitors from the EEA, or do not use Google Ads, the content of this article may not be relevant to you.
What Implementation Changes Are Required When Using Piwik Pro?
You will need to implement some configuration changes in Piwik Pro. The specific alterations depend on your current setup with Piwik Pro or the technology stack used on your website.
Consider the following potential setups:
Setup 1: Utilising Google Ads and Piwik Pro suites (analytics, tag manager, and consent manager) without Google Tag Manager.
Setup 2: Using Google Ads, Piwik Pro suites (analytics, tag manager, and consent manager), and Google Tag Manager.
Setup 3: Using an alternative Consent Management Platform, Google Ads, Piwik Pro suites (analytics, tag manager), and Google Tag Manager.
Setup 4: You’ve implemented a different Consent Management Platform, advertising on Google Ads, using Piwik Pro suites (analytics, tag manager), and without Google Tag Manager.
Setup 5: Operating with a different Consent Management Platform, Google Ads, and only the Piwik Pro analytics suite, with or without Google Tag Manager.
If your configuration matches Setup 1, then the information in this article will be particularly relevant to you. For those using Setup 2, I recommend reviewing a separate article where I have provided a detailed solution tailored to your needs.
Unfortunately, for those using Setups 3, 4, and 5, this article will not offer specific solutions applicable to your configurations.
With this in mind, let’s take a detailed look at the changes you should make in your Piwik Pro implementation.
Here is a breakdown of the implementation process to ensure that as a marketer utilising a combination of Piwik Pro and Google Ads, your marketing strategy remains effective post-March 2024.
- Establishing the default consent, which will initially be set to ‘denied.’
- Next is to activate the options for conversion tracking and remarketing consent within the Piwik Pro Consent Management Platform (CMP) through the tag management suite.
- This is followed by creating a tag integration that monitors the user’s consent choices and communicates to Google how the user data should be handled for ads.
- Show you how to use the “Tag Priority” feature to modify tag execution within the Piwik Pro Tag Manager.
- I’ll show you the necessary adjustments to be made to your Google Ads tag in the Piwik Pro tag manager.
The first thing you should do is enable the Piwik Pro consent banner on your website. I believe you’ve done this first step, as without this step, the code solution discussed is needless. You can do this by navigating to the administration view, where you can check to see if you are using the consent banner created by the Piwik Pro consent manager.
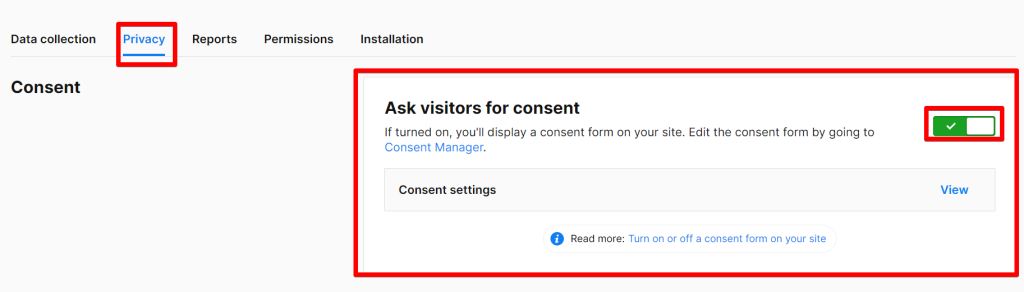
Also, check if you’re not using a “custom consent form“, as this article focuses on setup 1 for individuals utilising Google Ads and Piwik Pro suites (analytics, tag manager, and consent manager) without Google Tag Manager.

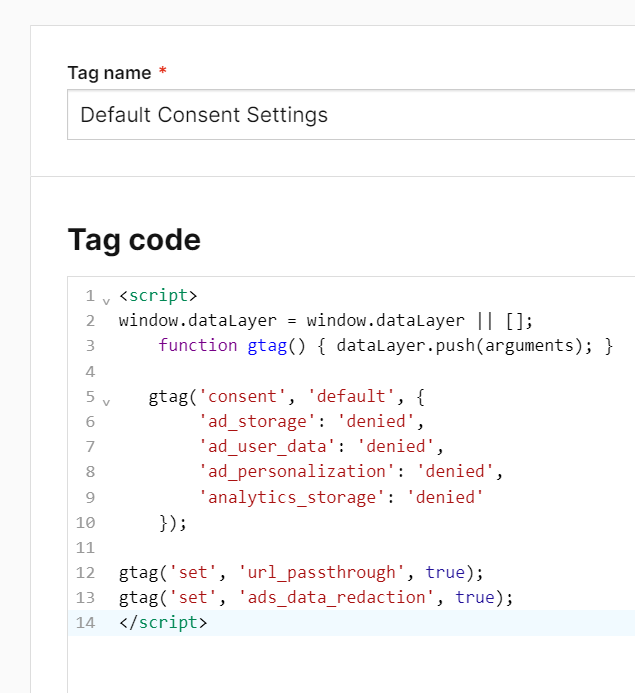
Step 1: Setting the Default Consent Storage Setting
In alignment with the standard implementation of Google Consent Mode, the default state for consent types should be configured as ‘denied.’ This setting only gets updated once the website visitor makes their consent choices or their preferences are determined.
You can achieve this by copying and adding the following code to your website, positioned above your Piwik Pro tracking code.
<script>
window.dataLayer = window.dataLayer || [];
    function gtag() { dataLayer.push(arguments); }

   gtag('consent', 'default', {
        'ad_storage': 'denied',
        'ad_user_data': 'denied',
        'ad_personalization': 'denied',
        'analytics_storage': 'denied'
    });

gtag('set', 'url_passthrough', false);
gtag('set', 'ads_data_redaction', true);
</script>
💡You can set the “URL_PASSTHROUGH” parameter to “TRUE” if you are cool with how it decorates your URL. Also, remember that it is known to potentially cause conflict to your tracking and modify your website URL in the following way.
“example.com/?_gl=1q1r7e4_upMQ.._gaMTg5MDM3ODUzNC4xNzA4NzA1MTM5_ga_6W18NBS9M1*MTcwODcwNTEzOS4xLjAuMTcwODcwNTEzOS4wLjAuMA”
Here is a visual representation of the code hierarchy for your website:
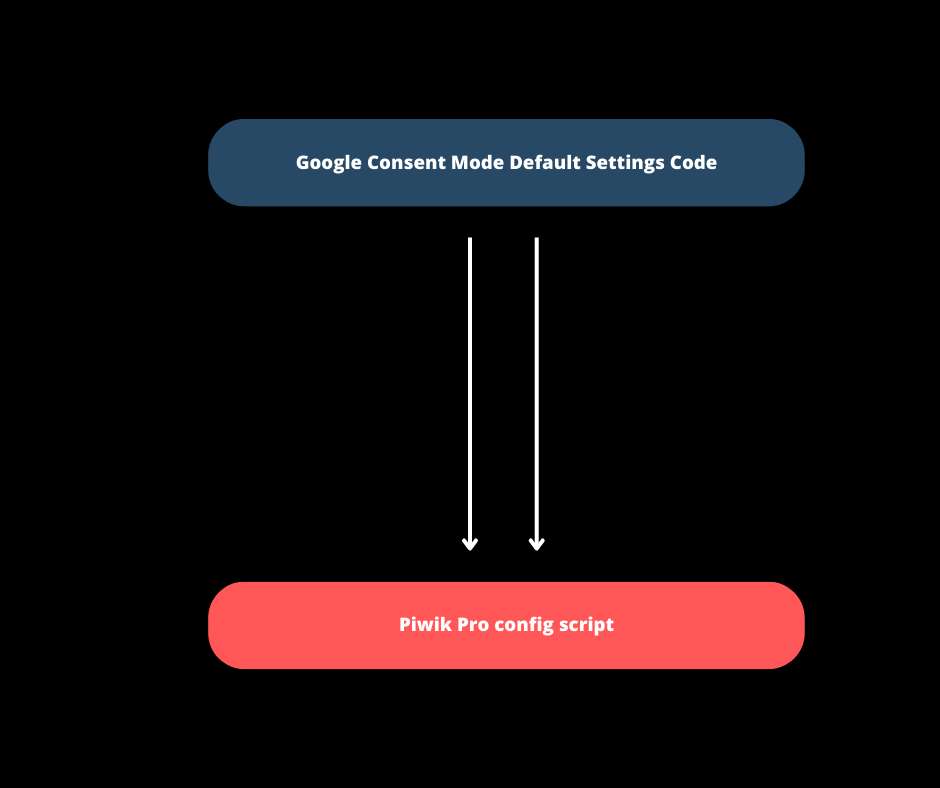
First, insert the default Google Consent Mode code, which your Piwik Pro configuration script should follow.
This code ensures that when a visitor accesses your website, the Google Consent Mode storage types (ad_storage and analytics_storage) are initially set to ‘denied.’ These storage types include ‘ads-user-data‘ and ‘ad_personalization,’ newly introduced in Consent Mode version 2.
Note: The ‘analytics_storage‘ setting is not mandatory for Google Ads users, but it’s advisable to include it in case of future changes.
Once you or your developer have implemented the above code, activating the ‘remarketing‘ and ‘Conversion tracking‘ consent options in your Piwik Pro CMP is next.
Alternatively, if you prefer not to hardcode the default consent settings, you can implement the code via your Piwik Pro Tag Manager. This method is not highly recommended; however, it can be done better using the ‘Tag Priority‘ feature within the Piwik Pro Tag Manager, which I will discuss later in this tutorial.
Add the default consent settings code as a custom HTML tag type.
Ensure that under the ‘Consent Type‘ tag configuration settings, you select ‘No Consent Is Required‘ and use the ‘all page views‘ trigger.

Step 2: Enabling Conversion Tracking and Remarketing Consent Options in Your Piwik Pro Consent Banner
You may skip this step if you have previously configured tags for “conversion tracking” and “remarketing” consent types.
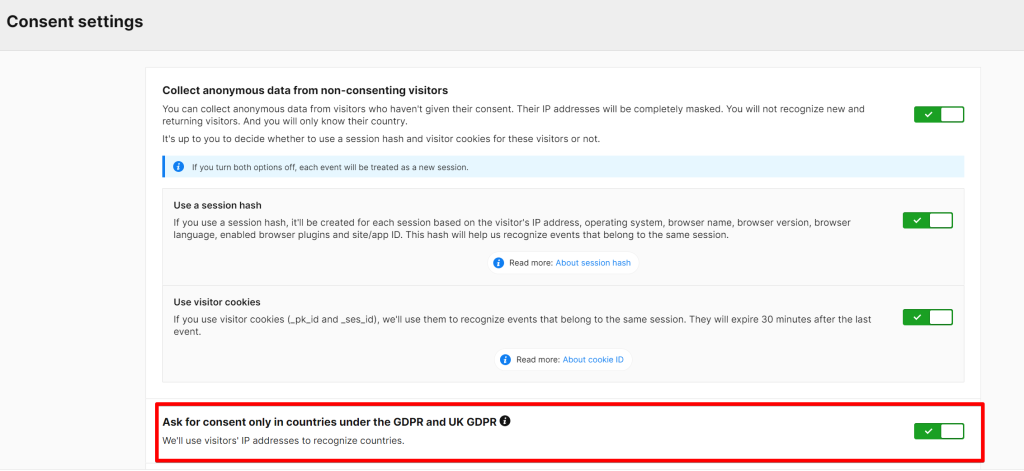
To verify if you have these options enabled in your consent banner, visit your website. And, if the conversion tracking and remarketing choices are not visible in your Piwik Pro consent banner (as illustrated in the provided image), it indicates that these consent types are not yet activated.
To enable these consent choices, you’ll have to configure this within your Piwik Pro Tag Manager.
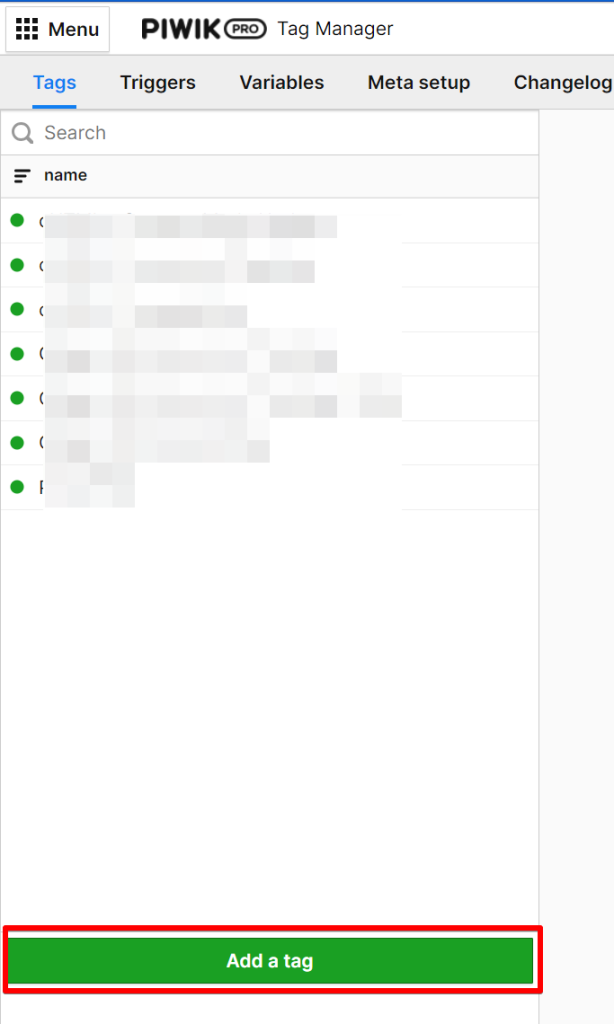
1. Access the Tag Manager suite and create a new tag.
2. Navigate to the tag section and click the “Add a tag” button.
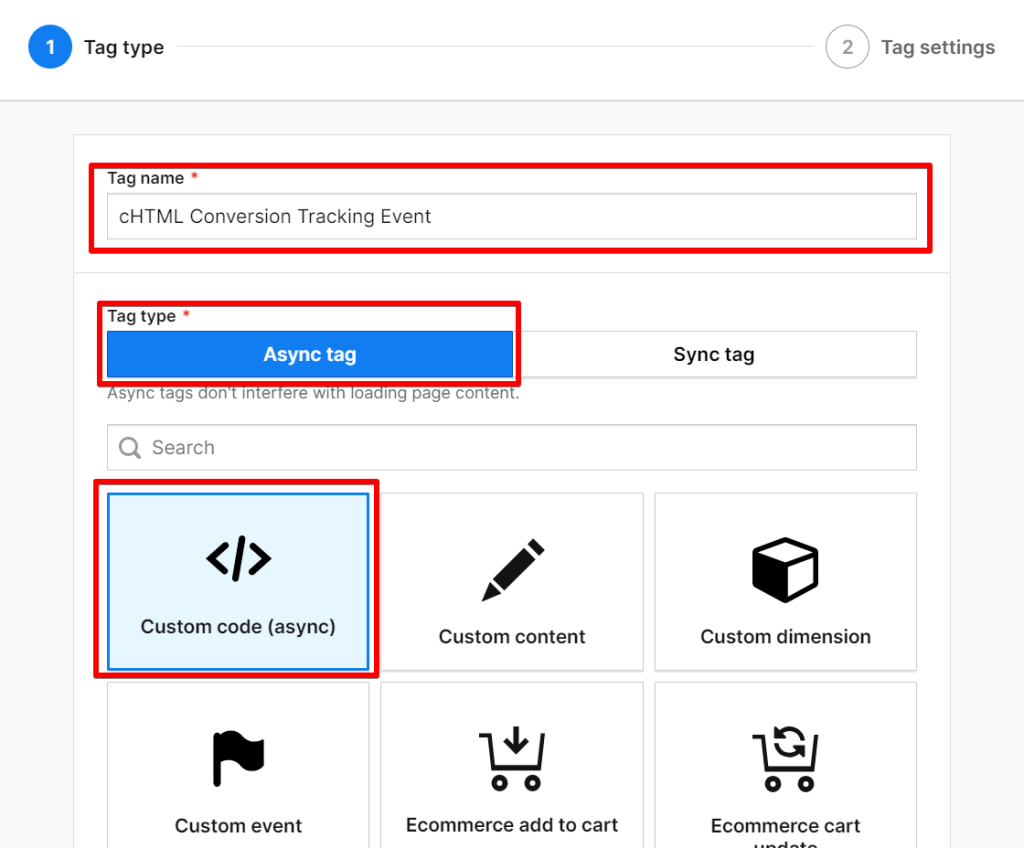
3. Name the tag appropriately, such as “cHTML Conversion Tracking Event,” and select ‘Custom code (async)‘ as the tag type and category, respectively.
In the following screen, you’ll encounter a code editor where you can input the JavaScript code provided below.
<script>
  window.dataLayer = window.dataLayer || [];
  dataLayer.push({
  'event' : 'piwik_cookie_update',
  'Consent_conversion_tracking': 'granted'
});
</script>
Scroll to the Advanced Tag Settings.
Under “Consent Types,” choose the “conversion tracking” consent type.
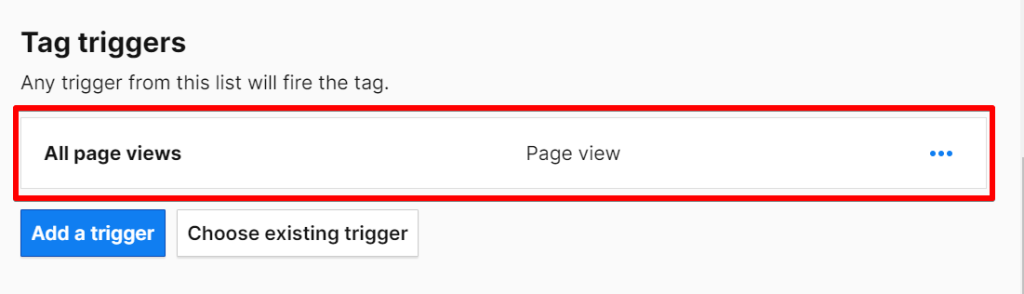
After selecting this, move to the triggers section and add the “all page views” trigger.
Save your tag and trigger configuration.
The subsequent step involves enabling the remarketing consent choices. Follow the same steps above, but select ‘remarketing‘ as your consent type, as shown in the image.
Please copy the code provided and paste it into the code editor field of the remarketing consent tag. Use the same trigger type and ensure you save the tag.
<script>
  window.dataLayer = window.dataLayer || [];
  dataLayer.push({
  'event' : 'piwik_cookie_update',
  'Consent_remarketing': 'granted'
});
</script>
To verify that these new consent choices are now displayed in the consent banner for your website visitors, publish the current version of your tag manager. Then, visit your website, clear your browser cookies, and reload your website. You should now see the “Conversion Tracking” and “Remarketing” consent options in your Piwik Pro banner.
If these options are still not visible, revisit your tag consent settings to confirm that the correct consent types have been selected.
Step 3: Synchronizing Consent Changes with Google via Piwik Pro Tag Manager
This crucial step involves implementing a JavaScript code that helps monitor the website visitor’s consent choices after interacting with the consent banner. Subsequently, these consent decisions are communicated to Google through the Consent Mode API, which helps ensure that the behaviour of Google Ads remarketing and conversion tracking scripts is compliant regarding data collection and usage.
To implement this, you’ll need to create another “Custom code (async)” tag type and then copy and insert the javascript code below. Please don’t modify the provided JavaScript solution.
<script>
// Variable containing consent information
var piwikConsents = {{ Consents }};

// Google Consent Mode Logic
window.dataLayer = window.dataLayer || [];
function gtag() { dataLayer.push(arguments); }

if (piwikConsents === undefined || Object.keys(piwikConsents.current_state).length === 0) {
    // If piwikConsents is undefined or current_state is empty, execute default code
    gtag('consent', 'update', {
        'ad_storage': 'granted',
        'ad_user_data': 'granted',
        'ad_personalization': 'granted',
        'analytics_storage': 'granted'
    });
   console.log("it fired the first GCM check");
} else {
    // If current_state is not empty, extract values and update consent accordingly
    gtag('consent', 'update', {
        'ad_storage': (piwikConsents.current_state.conversion_tracking === 1) ? 'granted' : 'denied',
        'ad_user_data': (piwikConsents.current_state.remarketing === 1) ? 'granted' : 'denied',
        'ad_personalization': (piwikConsents.current_state.remarketing === 1) ? 'granted' : 'denied',
        'analytics_storage': (piwikConsents.current_state.analytics === 1) ? 'granted' : 'denied'
    });
  console.log("it fired the second GCM check");
}
</script>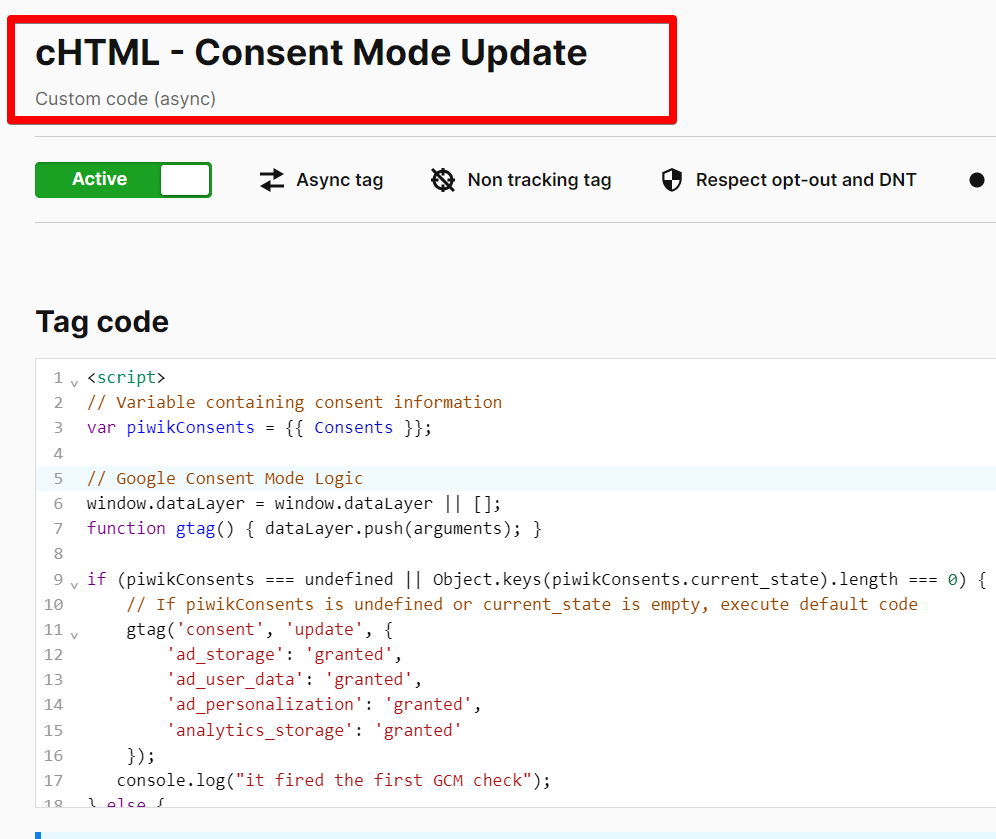
Next, in the tag configuration, set the consent type to “No Consent Is Required“, as depicted in the image.

Following this, you need to add two triggers:
- The first is an “All Window Loaded” trigger.
- The second is a “Data Layer Event” trigger that listens to the event emitted by the Piwik Pro consent manager whenever a user makes a consent decision, whether it’s an update to their preferences or their initial consent.
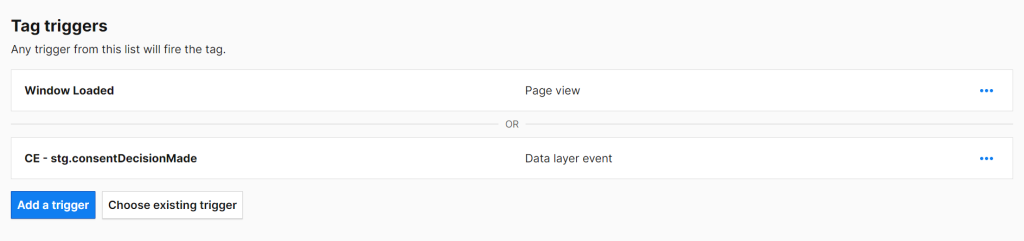
Window Loaded Trigger
Create a new “Page View” trigger type.
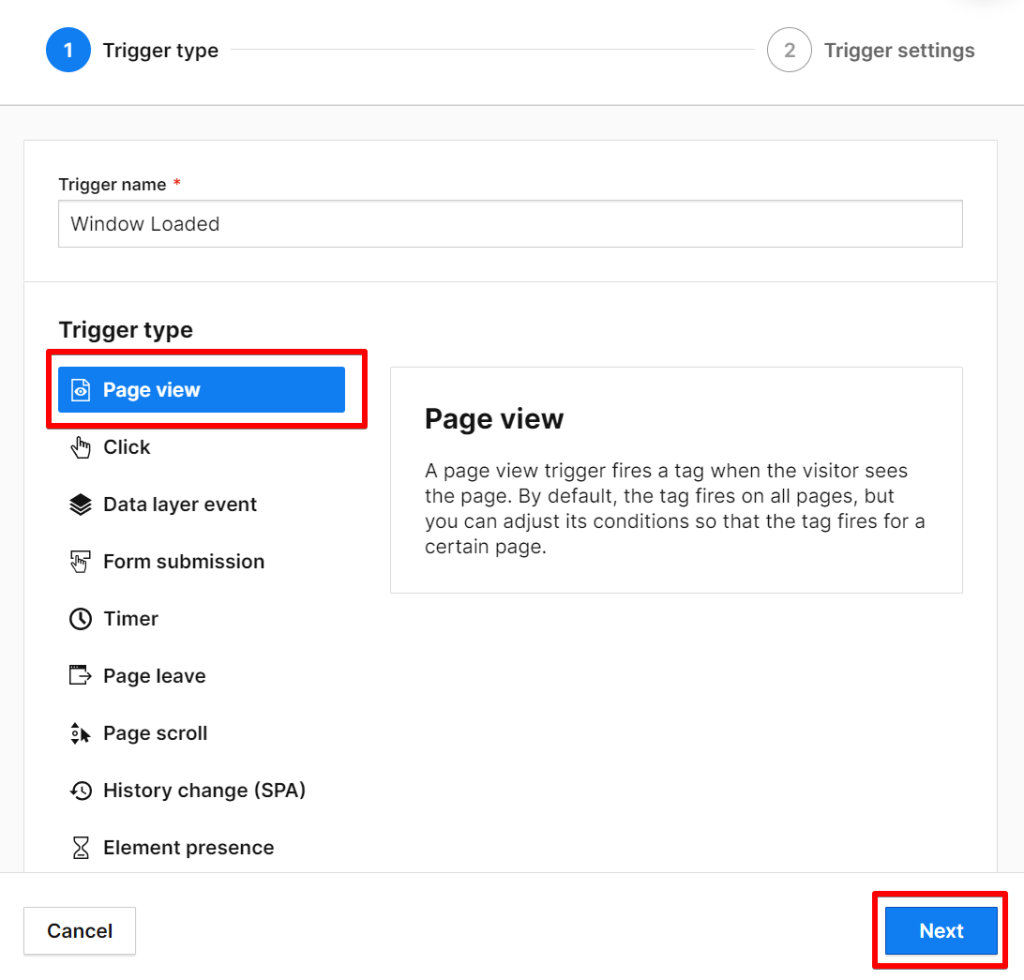
In the trigger configuration that determines when the tag should execute, select the “Loaded All Page Elements (Page Load).”

The reason behind this approach is to address scenarios where a user encounters the consent banner for the first time or sees the banner after their consent choices have expired or browser cookies cleared. Upon their initial page view, the user’s consent preference isn’t determined yet, potentially resulting in inaccurate consent data. While there are advanced methods to ascertain consent status at the point of page view for such scenarios, I won’t treat this technique here to avoid complexity.
Data Layer Event
The second trigger, the “Data Layer Event” trigger, should be configured with the event name “stg.consentDecisionMade“.
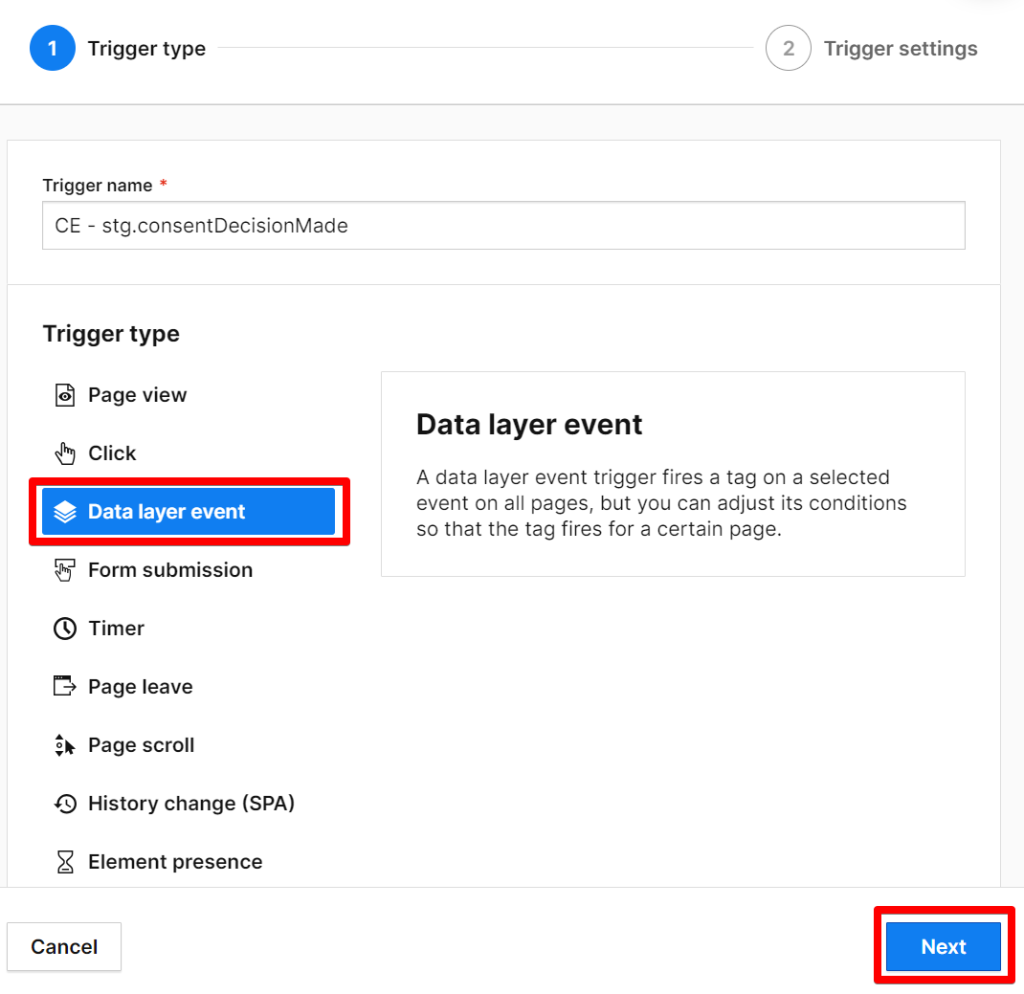
This event is emitted by the Piwik Pro consent manager when a user makes a consent decision, both in the initial consent choices and subsequent updates. Name this trigger and add both triggers to the tag you created. Your final setup should resemble the example shown in the image.

Ensure you give the tag a name; for illustration purposes, I named mine “cHTML – Consent Mode Update“.
Here’s a breakdown of what the code accomplishes:
- It examines the values and availability of the Piwik Pro built-in variable named “{{ consent }}” to determine the user’s current consent preferences (privacy choices).
- The script then updates the Google Consent Mode storage types (either ‘denied‘ or ‘granted‘) based on this “current_state” object value in the “{{ consent }}” built-in variable gathered about the user consent preferences and, in a case where the “{{ consent }}” variable is “UNDEFINED“, a behaviour that is expected if you’ve configured the Piwik Pro consent banner to be shown to users in the UK and GDPR region.
In scenarios where the Piwik Pro consent banner is configured solely for UK and European users, Piwik Pro CMP is known not to have stored information of the user privacy choices, and this is because it believes that by default, it’s granted for users in this location, so that means that the “{{ consent }}” builtin variable in Piwik Pro tag manager will have the value of “UNDEFINED“, the code accounts for this type of behaviour. It then sets the consent settings as “granted” for all consent types.
Upon completing this step, proceeding with the next phase is crucial, which plays a significant role in ensuring system integrity and preventing potential data loss or non-compliance with Google’s regulations.
Step 4: Optimising Tag Execution Sequence in Piwik Pro Tag Manager, Using Tag Priority
This crucial step ensures the efficient management of tag execution orders within the Piwik Pro Tag Manager, thereby averting potential data loss due to race conditions or compliance violations resulting from delays in updating Google Consent Mode choices. To mitigate such risks, you will utilise the Tag Priority feature of the Piwik Pro tag manager suite.
The “Tag Priority” role in Piwik Pro Tag Manager allows you to determine the sequence in which tags get executed on your website. This feature is handy when dealing with interconnected tags that require a specific execution order. By default, tags get fired randomly, which could lead to undesirable outcomes. Tag Priority allows assigning a defined order to ensure that one tag triggers a script before another, as necessary.
To adjust the tag execution priorities, proceed to the “Settings” tab within your Piwik Pro Tag Manager. Here, select the “Tag Priority” option. This will enable you to configure the execution methodology for your tags.

Typically, you will be working within the “Async Tags” group. Within this group, it’s essential to position the custom HTML tag responsible for communicating the website visitors’ consent choices to Google through the consent mode API above your Google Ads conversion tracking and remarketing tags in the priority hierarchy. This arrangement ensures that consent information gets processed before any data collection or remarketing list evaluation actions occur.
What I mean with the above is that you should place the custom HTML tag, created in “step 3“, which I labelled “cHTML – Consent Mode Update,” above the Google Ads-related tags and possibly below the Piwik Pro analytics tag.
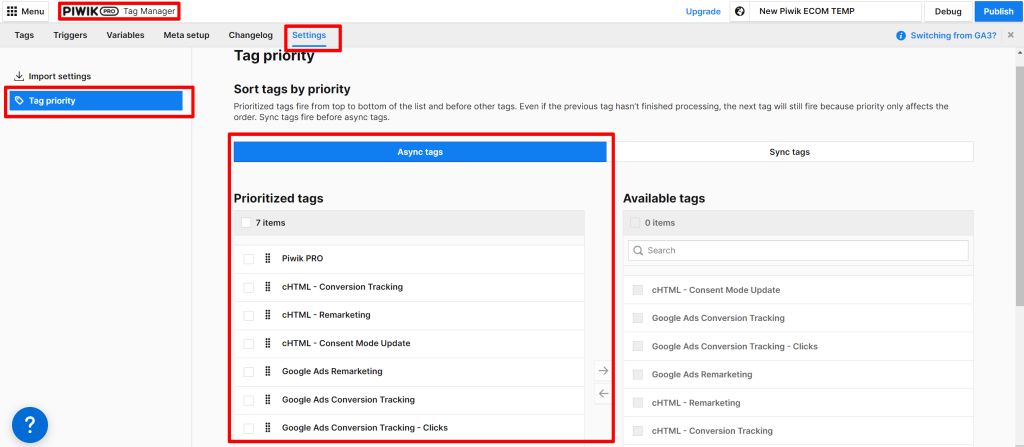
Above the tag labelled “cHTML – Consent Mode Update,” ensure you place the custom code tag types we created and the Piwik Pro analytics tag above it.
Suppose you’ve added the Google consent mode default code through the Piwik Pro tag manager. In that case, I’ll recommend you place this code higher than any other tag related to this implementation, which configuration you should save from race conditions causing issues.
Once you have reorganised the tags in your preferred order, save your changes and publish them to push them live for all website visitors.
Step 5: Updating Your Google Ads Tags in the Piwik Pro
The final step in this process involves thoroughly reviewing and updating your Google Ads conversion and remarketing tags. This is applicable if you have previously integrated these tags into your system, and if you’re creating a new one, ensure that the changes discussed in this section are in place.
Ensure that each tag, whether implemented in the Piwik Pro tag management suite using the native template or custom HTML, is accurately tagged with the “conversion tracking” and “remarketing” consent types. This step is vital to maintain compliance and effectiveness of your ads strategy.
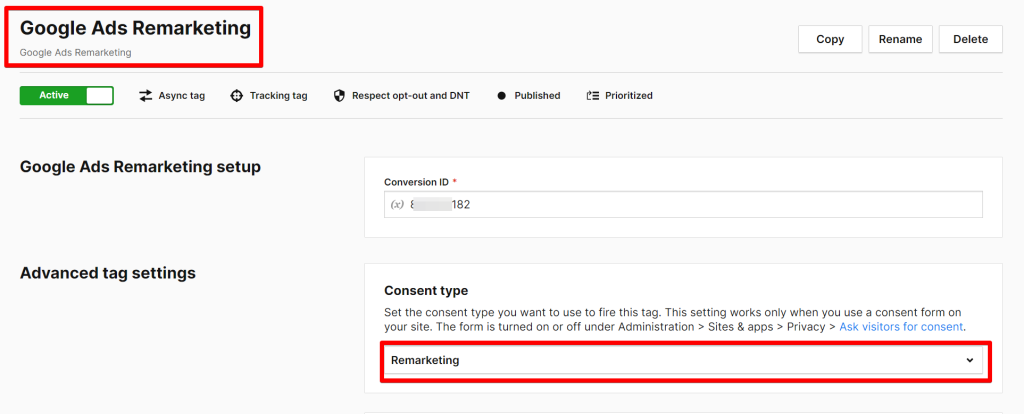
And if you have any related to Google Ads tags configured to execute when your website visitors load the website, ensure it’s on “Page Load” and not “Page View” type.
Closing Remarks
I believe that the Piwik Pro team are working on a native solution which will get released pretty soon due to the Google announced deadline, but in the meantime, this solution should work perfectly fine without any issues.
In a scenario where you’re using Google Tag Manager on your website to manage your different marketing pixels, then look at another article I created that covered how to integrate Piwik Pro and Google consent mode v2 using Google Tag Manager. I also made an easy-to-use template from that article if you’re a fan of templates.
In conclusion, it’s imperative to reiterate the specific applicability of the steps covered in this blog post. For those utilising Piwik Pro and not running ads on Google Ads, the Consent Mode v2 updates are irrelevant.
However, if your marketing strategy involves using Google Ads and targeting audiences within the European Economic Area (EEA), it becomes crucial to adapt to these changes. Ensuring that your data collection practices align with the Consent Mode v2 guidelines is essential for Google’s method of providing legal compliance and the efficiency of your advertising efforts.
I’d like to know the measure you’re taking with the shift to consent mode v2. You can reach me via the DumbData email or LinkedIn to share your feedback; until then, happy staying complaint.


