


Like Custom Tags, Only a small percentage of Microsoft Clarity users have implemented Clarity User ID tracking or “custom identifiers” in their Clarity projects. The majority simply add the Microsoft Clarity script to their website, Google Tag Manager, or Piwik Pro TMS and consider it done. This is primarily because the feature isn’t built for all websites, or people aren’t aware that user ID tracking is possible in Microsoft Clarity and the benefits it offers.
In my guest post on Roots and Branch, I extensively did an in-depth look at Microsoft Clarity, leaving no stone unturned. The article takes a look into Microsoft Clarity identifiers customisations like userID tracking and pageID, among others. It occurred to me that I should write a detailed piece on this topic, providing an overview, setup options, use cases, real-life examples, and common mistakes to avoid when implementing it.
Furthermore, this article you’re about to read provides in great detail what custom Identifiers are in Microsoft Clarity and step-by-step instructions on setting up this feature using various methods discussed in the blog, such as Google Tag Manager, direct integration into the website source code, and Piwik Pro Tag Manager. These methods should also apply to other TMS solutions and CMS platforms.
About User ID and “Custom Identifiers” Tracking in Microsoft Clarity
This functionality is valuable for websites with a login system or mechanisms for identifying visitors, sessions, or pages.
Microsoft Clarity offers the flexibility of utilising custom identifiers accessible within the Microsoft Clarity UI to create filters that can later be saved as segments.
This feature allows you to collect the store or website ID assigned to a user, which is required for utilising custom identifiers in Microsoft Clarity.
Apart from user IDs, you can transmit individual web page IDs and a personalised session ID through the Microsoft Clarity Identify API.
Don’t worry if the term “API” seems daunting to you. I will explain what the “Clarity Identify API” means and the possible ways to set this up either directly in the source code or utilising TMS (Tag Management Solutions) like Google Tag Manager and Piwik Pro TMS.
What exactly are “Custom Identifiers” and the “Identify API”?
The “Identify API” is also part of the “Microsoft Clarity Client API“, and it happens to be the same mechanism used for “custom tag” implementation and recently introduced API event tracking, a type of “smart event” in Microsoft Clarity.
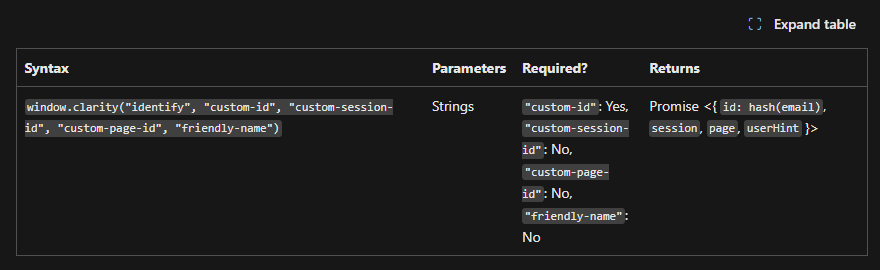
Custom Identifiers refer to data values regarding website visitors that are transmitted to Clarity through your client-side code via the Identify API. These identifiers consist of the required “custom-user-id” parameter, as well as optional parameters specific to your website, such as “custom-session-id,” “custom-page-id,” and “friendly-name.”
For you to send this data to Clarity servers, key-value pairs are utilised. The “custom-user-id” serves as the unique user identifier sent to Clarity, allowing for retrieving user information and correlating relevant collected data associated with the ID.
For instance, when a user accesses your website using both a mobile device and a desktop computer on different browsers, Microsoft Clarity typically treats these sessions as belonging to two separate users. However, by implementing a custom-user-id, such as an email address, you can gain visibility into the user’s journey across various browsers and devices.
Keep in mind that user ID tracking doesn’t prevent Microsoft Clarity from double-counting users. However, you can still stitch the user visits when doing a user-level-based analysis.
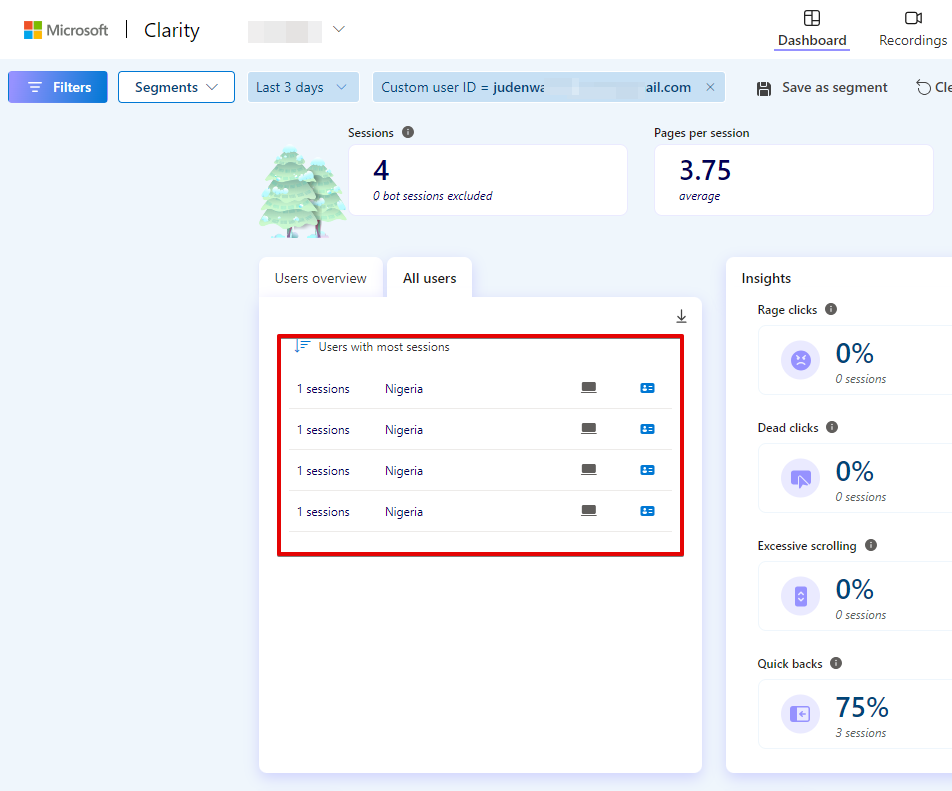
You can see because I visited from different browsers, I was seen as four distinct website visitors, but due to the implementation of user ID and custom identifier tracking in Microsoft Clarity, I was able to see all my different visits using my user ID.
Likewise, you have the ability to customise the custom-session-id and custom-page-id as well.
This feature proves immensely useful when debugging, unifying the user journey in Microsoft Clarity, investigating patterns, or examining data based on specific user, session and page-related elements.
When Can You Utilise Custom Identifiers in Microsoft Clarity?
You can instrument Microsoft Clarity’s custom identifiers if you possess any of the following and require the usage of the associated data points within Microsoft Clarity:
- UserID: This feature proves useful for websites equipped with a login system, such as e-commerce stores, SAAS products, digital communities, and their likes. The UserID enables user identification throughout all their visits to your website.
- SessionID: If you possess a means to identify a user’s session or have an analytics tool whose session ID you wish to pass, a typical example being the GA4 session ID or Piwik Pro session ID. The SessionID helps establish a connection between a user and a specific visit.
- PageID: If you operate a CMS-based website, each page possesses its unique ID that can be employed to identify the page visited by the user within your website’s backend. The PageID assists in linking multiple website visits to a particular page visit.
- Friendly-Name: Also known as userHint, this entails providing a unique or non-unique name, label, or actual name for the user.
Key Considerations for ID Tracking in Clarity
There are a few important points to keep in mind when using Microsoft Clarity Identify API to track users by identifiers such as user ID, page ID, session ID, etc.
1. Use of Session ID and Page ID: It is only possible to utilise session ID and page ID if the user ID is an included parameter in the “identify” API. Microsoft Clarity requires the user ID as a mandatory parameter when tracking users by custom Identifiers.
What does this entail?
Essentially, it means that you cannot send unique page IDs or session IDs without including the user ID in the parameter when using custom identifiers in the Clarity “identify” API.
2. Including User ID Parameters: However, you can include the user ID parameters without including other identifiers such as page ID and session ID. This signifies that you can set up user ID tracking without the availability or passing of the page and session identifiers.
It is crucial to consider the following aspects regarding custom identifiers:
- Clarity employs “secure” hashing on the client side to protect the custom user ID before transmitting it to Clarity servers.
- For optimal user tracking using the userID, it is recommended but not compulsory to call the Identify API for each website page, even if you are not passing a custom session ID or custom page ID.
- In the Microsoft Clarity identifier parameter dimension, sending an email as the userID is permissible and using “friendly_name” or “user_hint” as the user name is allowable. However, please exercise due diligence to assess whether this may violate user privacy or violate regulations applicable to your business entity, despite Microsoft Clarity hashing the custom user ID.
- For the best user tracking results, the Identify API should be exclusively used for authenticated users or identified users and not for guest users, and this is because the “custom user ID” is a required parameter every time you use the Clarity Identify API.
Distinguishing Custom Identifiers From Custom Tags
It is crucial to understand that in Microsoft Clarity, user ID tracking or custom identifiers feature differs from “custom tags,” despite both being utilised to enhance data segmentation and obtain actionable insights.
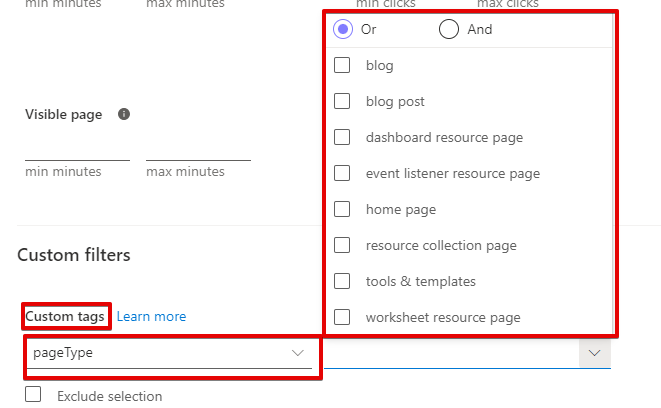
One advantage of custom tags over custom identifier trackings, such as userID, sessionID, and pageID, lies in the Microsoft Clarity filters. With custom tags, you can apply multiple “custom tags” types that can encompass multiple values. However, only one value of each custom identifier can be applied in whatever custom identifier field you intend to use for your filter configuration.
In the case of “custom tags,” you get to see the values you’re sending to Microsoft Clarity, enabling easier identification of issues in your custom tag implementation.
Apart from the tag name, you can see the value as well.
But that’s not the case with custom identifier tracking, such as userID, sessionID, and pageID.

Another distinction between custom tags and identifier customisation is that “custom tags” can be applied to both logged-in and guest users, whereas custom identifiers can only be used for logged-in users.
Setting Up User ID Tracking in Microsoft Clarity (Including Session ID and Page ID)
Now, let’s go straight into the heart of this blog post, where you will be guided through the actual setup process. Whether you are using Piwik TMS, Google Tag Manager, or any other CMS, the methods discussed here should be applicable across different platforms.
Implementing UserID Tracking in Microsoft Clarity Using Google Tag Manager
In case you’re not aware, The DumbData team developed a Microsoft Clarity instrumentation recipe in the form of a Google Tag Manager template. This template saves you valuable time during instrumentation and includes “userID tracking” as an element in the instrumentation template. However, don’t worry if you prefer to set it up manually, as we will guide you through the process in this section of the article.
To configure Clarity’s user-ID tracking using Google Tag Manager, you have two options: utilising the custom HTML tag type or using the Luratic Microsoft Clarity template.
If you previously utilised the Luratic Microsoft Clarity custom template tag type for the Clarity tracking script installation, it is recommended to continue using it. Otherwise, you can use the custom HTML tag type.
Here’s an example of JavaScript code that utilises the Microsoft Clarity “identify” API and includes the userID parameter in the call:
window.clarity("identify", "custom-id", "custom-session-id", "custom-page-id", "friendly-name")
By incorporating this code snippet and specifying the appropriate user ID value, you can effectively activate user-ID tracking in Microsoft Clarity using Google Tag Manager, but in detail, let’s take a closer look at how to implement this in Google Tag Manager.
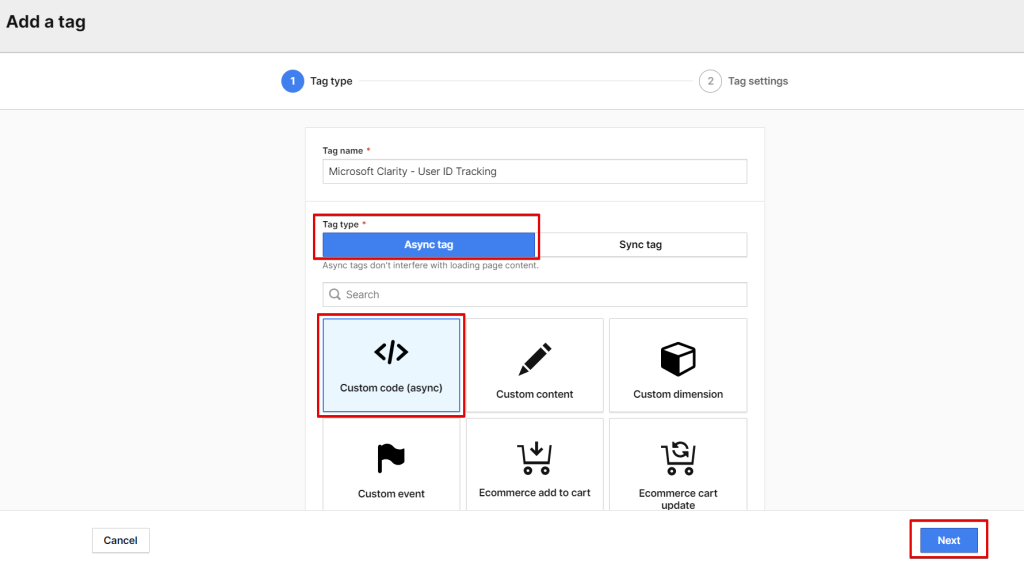
Utilising Custom HTML:
To begin, create a new custom HTML tag type and paste the code provided below. Make sure to replace “{{userID variable}}” with the actual user ID variable that you have defined to capture the user’s ID.
<script>
  window.clarity("identify", "{{userID variable}}")
</script>
Next, add a DOM or Window Ready trigger to the tag to ensure it fires after executing the Microsoft Clarity tracking script. It is crucial to ensure your trigger conditions comply with privacy regulations and fire the custom HTML tag only when the user-id is available.
Using Luratic’s Custom Template:
For users of the Luratic Microsoft Clarity template, create a tag and populate the userID field with the corresponding userID variable.
Also, trigger when the “user-ID variable” is available.
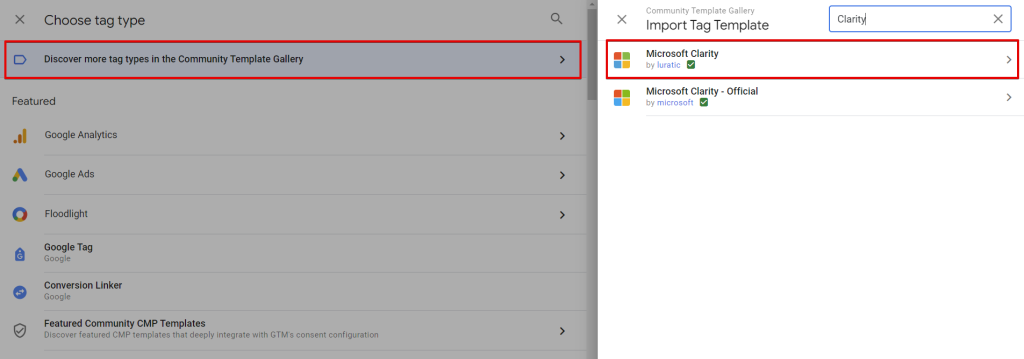
If you’re wondering how to add this tag in Google Tag Manager, access the custom template tag gallery and search for “Microsoft Clarity.” Select the template provided by Luratic.
Utilising Google Tag Manager for Tracking Additional Custom Identifiers like PageID and SessionID (Including Friendly_Name or UserHint)
In addition to userID tracking, Microsoft Clarity offers the option to track optional identifiers such as pageID and sessionID. But how can you configure this using Google Tag Manager?
Similar to the setup for user-ID tracking, you can achieve this using Google Tag Manager.
Using Custom HTML Tag:
As the userID is a required parameter in the “identify” API call, you need to include it along with the optional identifiers sessionID, pageID, and friendly_name.
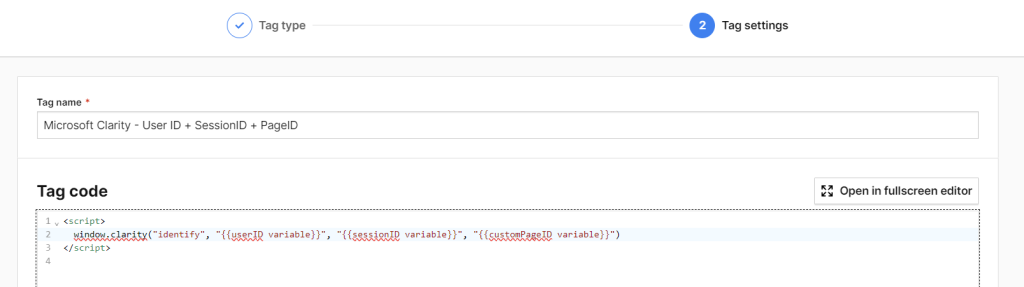
Below is the code snippet incorporating all three identifiers (userID, sessionID, pageID) in your custom HTML setup. Remember to update each variable with the corresponding variables in Google Tag Manager (GTM).
<script>
  window.clarity("identify", "{{userID variable}}", "{{sessionID variable}}", "{{customPageID variable}}")
</script>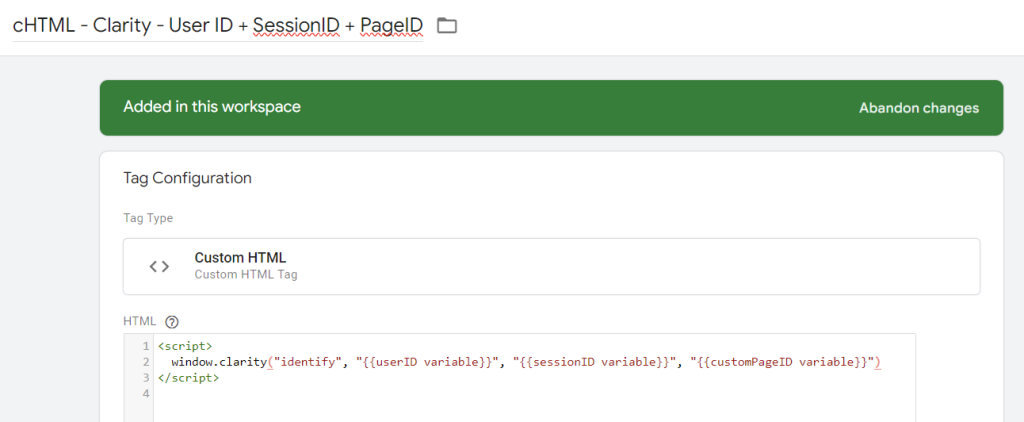
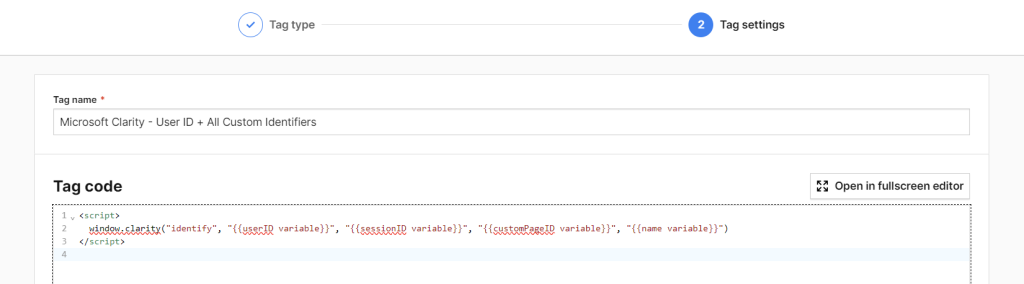
While the setup below includes all custom identifiers (userID, sessionID, pageID, friendly_name).
<script>
  window.clarity("identify", "{{userID variable}}", "{{sessionID variable}}", "{{customPageID variable}}", "{{name variable}}")
</script>

In scenarios where you only want to send the userID and sessionID, here is your setup, along with the JavaScript code to use. Remember to update the variables with the ones you created in GTM.
<script>
  window.clarity("identify", "{{userID variable}}", "{{sessionID variable}}")
</script>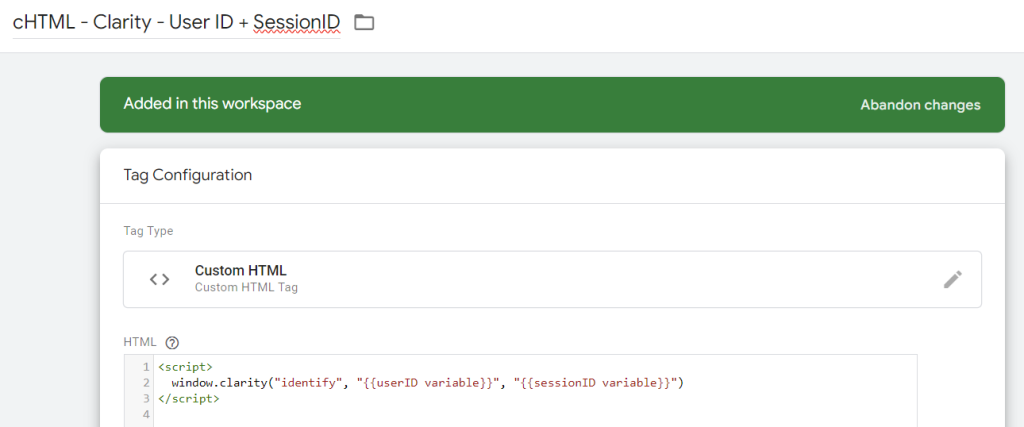
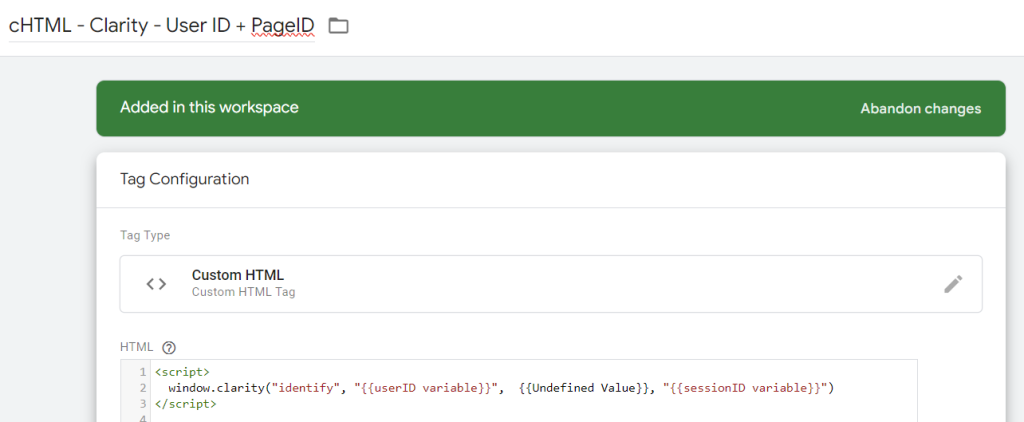
If you intend to send only the userID and pageID, follow the setup below and utilise the provided JavaScript code. Please ensure you use the appropriate GTM variables.
<script>
  window.clarity("identify", "{{userID variable}}", {{Undefined Value}}, "{{custom pageID variable}}")
</script>

// or use this code

<script>
  window.clarity("identify", "{{userID variable}}", undefined, "{{customPageID variable}}")
</script>
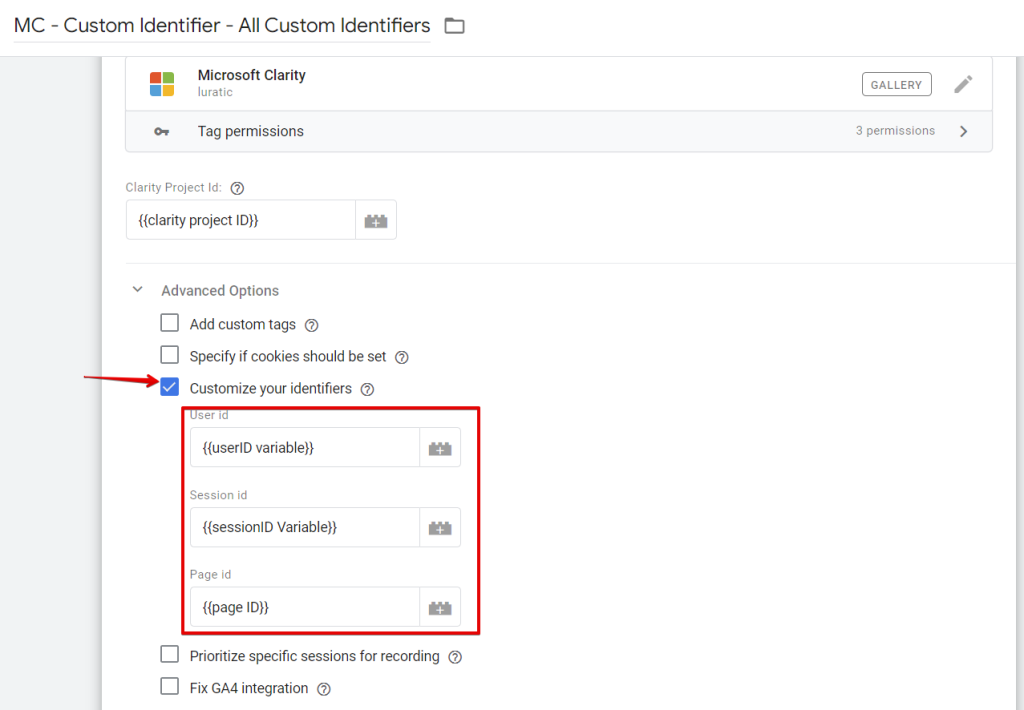
Using Luratic’s Custom Template:
With Luratic’s Microsoft Clarity template, you are relieved from writing any code. Simply fill in the fields for the custom identifiers you wish to include, as illustrated in the image below.
Utilising Piwik Pro Tag Manager for Custom Identifier Tracking in Microsoft Clarity
We have also created a Microsoft Clarity instrumentation template that you can import to a Piwik Pro Tag Manager. You can download the template using this link. Please note that imports in Piwik Pro TMS only support overwrite settings (which clears all your setup in Piwik Pro Tag Manager). There is no option to merge what you have in your Tag Manager with what is in the template.
To set up custom identifier tracking in Piwik Pro Tag Manager, follow these steps:
- Create a custom HTML tag type in Piwik Pro Tag Manager.
- Use any of the following provided JavaScript codes in your custom HTML tag, depending on what you intend to achieve with custom identifiers.
You’ll have to use the sample code below for setups involving only user-ID tracking in Microsoft Clarity. You must also update the “userID” variable with the variable you created in Piwik Pro.
<script>
  window.clarity("identify", "{{userID variable}}")
</script>
For setups where you want to include all identifier parameters, use the following code and ensure you update the variables with the corresponding variables in Piwik Pro Tag Manager.
<script>
  window.clarity("identify", "{{userID variable}}", "{{sessionID variable}}", "{{customPageID variable}}", "{{name variable}}")
</script>
Or instances where you want to include all custom identifiers except the “friendly_name”
<script>
  window.clarity("identify", "{{userID variable}}", "{{sessionID variable}}", "{{customPageID variable}}")
</script>
While scenarios where you only want to track the userID and sessionID, use the code below and update the variables accordingly in Piwik Pro Tag Manager.
<script>
  window.clarity("identify", "{{userID variable}}", "{{sessionID variable}}")
</script>
If you only intend to track the userID and pageID, use the following JavaScript code.
Your custom HTML tag type setup should be similar, as shown in the image below, with the variables updated to the appropriate variables you have created in Piwik Pro Tag Manager.
<script>
  window.clarity("identify", "{{userID variable}}", undefined, "{{customPageID variable}}")
</script>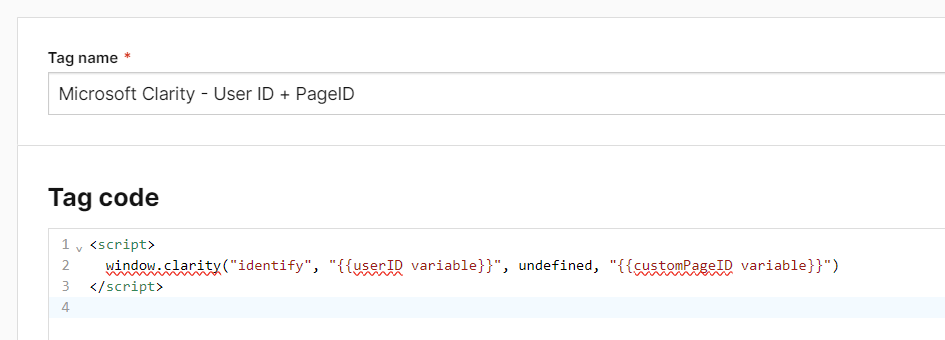
Remember to adjust the setup and variables in Piwik Pro Tag Manager based on your requirements and configurations. Also, you should only fire these tags when the user ID is available.
Where and How to Use Custom Identifiers in the Clarity UI
Once you have set up custom identifiers like userID, pageID, and sessionID in Microsoft Clarity, it’s crucial to know how to utilise this data for analysis and insight gathering within the platform.
First, let’s understand where we can use these identifiers and how to apply them to our filters, which can later be saved as segments for easy future reference.
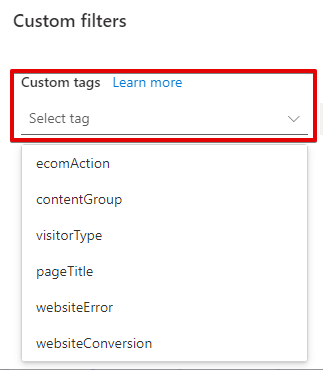
To access the filter panel, click the “Filters” button at the top.

You can either scroll down to the “Custom Filters” section or click the “Custom Filters” option on the left. Here, you’ll get the option to add the user ID, session ID, or page ID.
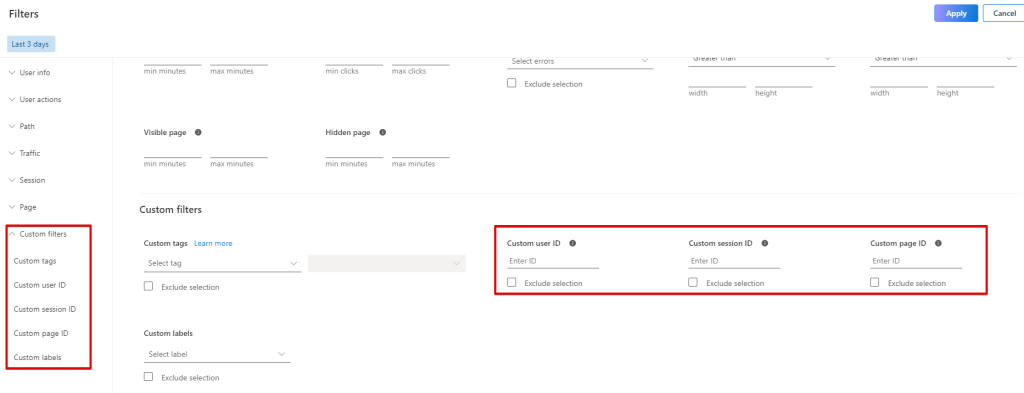
These filters can be applied and used in various sections of Microsoft Clarity, including the Dashboard, Recordings, and Heatmap reporting interfaces.
By utilising custom ID filters, you can access multiple distinct sessions by a user in the visitor tables and visitor profiles view in the Microsoft Clarity project.
Visitor Profiles provide a detailed and organized display of information that your Microsoft Clarity project has collected about a website visitor, all conveniently presented in one place.
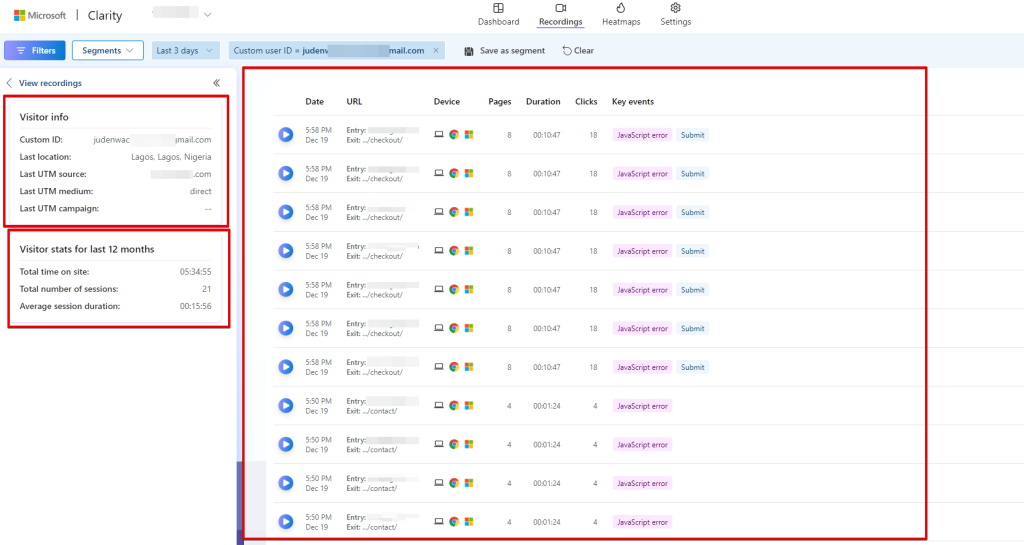
They enable you to access a comprehensive summary of each visitor’s site journey, activities, and various data points related to technology, marketing, and geography. This includes details such as their browser, device type, location, and UTM source.
In a case where I got through this “visitor profiles” view without applying a “Customer User ID” filter, the email or user ID value that will be visible in the “Visitor Info” summary card is a redacted version of the user ID is what is displayed.
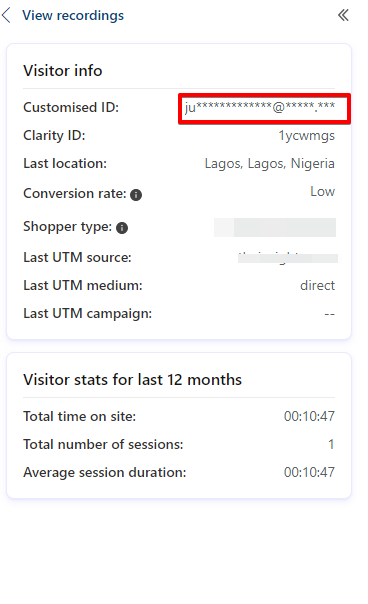
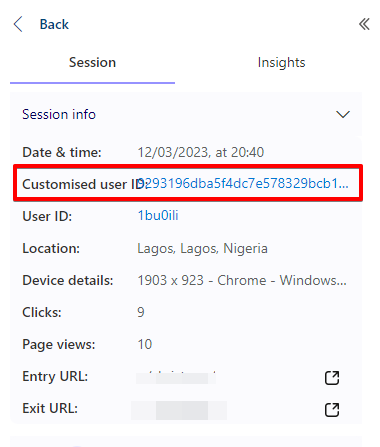
When viewing the user detail in the session recording “session details” tab, the hashed version of the custom user ID is displayed instead of the actual visitor user ID.
Limitations and Common Mistakes to Avoid
Before delving into the common mistakes to avoid, let’s first discuss the limitations of the identification tracking feature in Microsoft Clarity.
Limitations of the Identification Tracking Feature:
- You can only include one value for each userID, pageID, or sessionID identifier in your filter. The same identifier type can not be applied multiple times in a filter.
- Unlike custom tags, you cannot directly view the specific value of the userID, sessionID, or pageID data collected within Microsoft Clarity.
- The custom-user-id parameter is required when using custom identifiers, which means the Microsoft Clarity Identify API can only be used for logged-in users with an assigned ID. This restricts the ability to send pageID and sessionID data alone without a custom user ID.
- The platform still lacks the capability to deduplicate user counts when they share the same custom user ID but possess different Microsoft Clarity user IDs, often resulting from visits through distinct browsers or devices. Nevertheless, you can still obtain a comprehensive understanding of the user’s journey when you apply the user ID filter and also use the visitor profiles feature of Microsoft Clarity.
Mistakes to Avoid:
Here are some common mistakes to avoid when setting up custom identifier tracking:
- Suppose your business is subject to a privacy regulation or guideline that prevents you from sending PII to Martech vendors. In that case, you cannot use emails or other forms of personally identifiable information (PII) as a custom user ID. Doing so could violate privacy regulations.
- Not including the custom user-ID parameter in the Microsoft Clarity Identify API call, which has the potential of leading to incomplete or inaccurate user tracking.
- Executing the identification customisation script before the Microsoft Clarity base tracking script, resulting in improper data collection.
- Triggering the ID customisation tag when the user ID is unavailable or not properly assigned.
- Confusing the pageID with the sessionID, which can occur when attempting to send the pageID without indicating that the sessionID is “undefined” or null.
You can effectively utilise the custom identifier tracking feature in Microsoft Clarity by being aware of these limitations and avoiding common mistakes.
Time to Say Goodbye
As is customary in my blog posts, I would like to reflect on the topics we covered in this article. We explored the concept of custom identifiers in Microsoft Clarity, delving into the types of IDs that can be tracked in Microsoft Clarity and the circumstances in which this feature can be used.
We discussed various methods of setting it up, including using Google Tag Manager or Piwik Pro Tag Manager or implementing it through direct code instrumentation.
Additionally, we examined how custom identifiers differ from “Custom Tags” despite sharing certain similarities. In this guide, we also explored how the data can be utilised within the Microsoft Clarity reporting interface. Furthermore, we highlighted the limitations of this feature and provided insights into common mistakes to avoid during implementation.
By now, you should understand user ID tracking in Microsoft Clarity and what custom identifier tracking entails. If you found this article engaging and would like to receive further insights on similar topics, please subscribe to our newsletter.
And suppose you’re curious about DumbData and its purpose, in simple terms. In that case, it is a free resource hub for measurement, offering templates, worksheets, event listeners, Looker Studio templates, articles, and videos on marketing analytics.


