


Guide: Integrating Google Consent Mode v2 with Piwik Pro Consent Manager (Or Utilizing Manual Blocking Triggers in Google Tag Manager) Step-by-Step
Privacy in the measurement space isn’t just another buzzword. Instead, it’s an important consideration that can attract fines or cause a loss of customer trust if left unattended.
This privacy-related article will discuss ensuring tag compliance in Google Tag Manager using Piwik Pro’s integrated Consent Management Platform (CMP).
We’ll also explore using Piwik Pro’s CMP to activate Google Consent Mode or manually block tags in Google Tag Manager.
Please note that this blog post has been updated to cover the latest version of Google Consent Mode version 2 (v2).
Let’s get started if this interests you and you’re eager to learn about these techniques!
First, if you are not using Google Tag Manager on your website, the article linked here will help you understand how to integrate Google Consent Mode v2 with Piwik Pro without needing GTM.
->> You can save time and concentrate on other essential tasks by downloading the pre-made GTM and Piwik Pro tag manager templates here.
Why Piwik Pro Consent Management Platform
You may wonder why to use Piwik Pro’s Consent Management Platform instead of other vendors available. Listed below are reasons why choosing their built-in CMP can be a wise decision, although it may only be optimal sometimes.
- It’s free at no extra cost to your business, as the Piwik Pro Consent Management Platform is part of their product offering in both the core and enterprise plan packages.
- A detailed consent report is available, which provides insights into consent form interactions, including data on impressions, no decisions, no consents, full and any consents, and more.
- The platform integrates easily with Piwik Pro analytics.
- You can choose to collect consent from website visitors in all countries or just those under GDPR, such as the UK.
- Not too powerful, but impressive personalization capability as you can personalise the language based on the user language.
- Numerous privacy settings are available for further customisation.
The sole obstacle of their CMP is its need for seamless integration with Google Tag Manager, whether through the utilisation of Google Consent Mode or manual tag blocking, to ensure compliance with privacy standards concerning tag deployment.
How To Activate Piwik Pro CMP?
Activating the consent form in Piwik Pro CMP is simple and direct. Follow these steps:
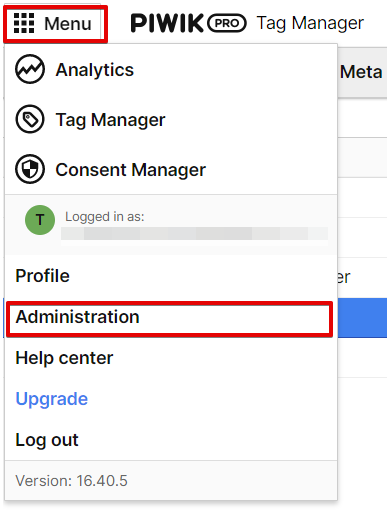
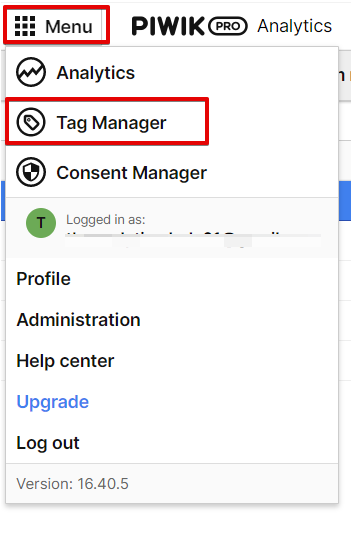
- Click on the “menu” option and navigate to “Administration“.
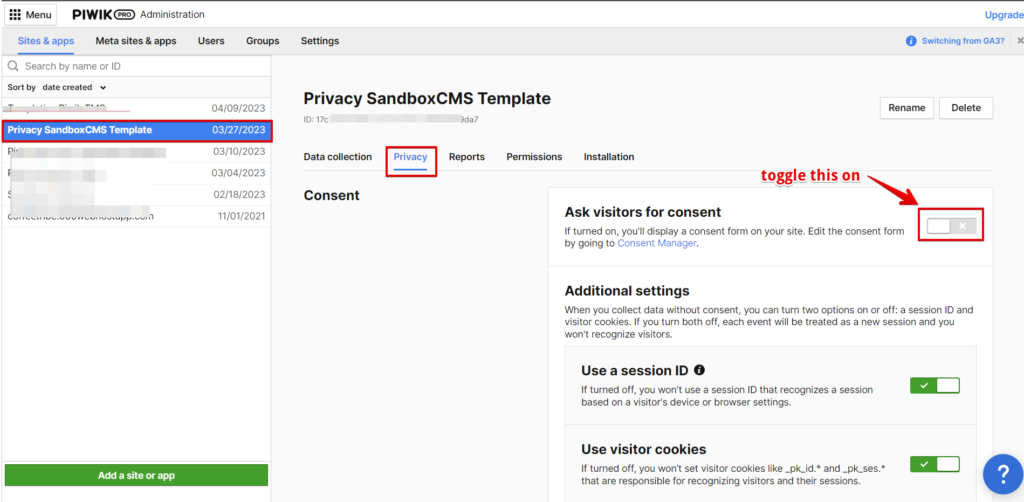
- In the “Administration” screen, select the website you want to activate the consent form and navigate to the privacy section.
- If the “Ask visitors for consent” setting is not turned on, it means that Piwik Pro CMP is not yet enabled for that property.
- To enable it, click the toggle button, and you’ll get access to five additional consent settings.
Navigating to the Piwik Pro Admin settings
Select your Piwik Pro project and the “Privacy” tab to activate your consent form, and hit the save button to publish it live for your website visitors.
You’ll get five extra privacy settings.
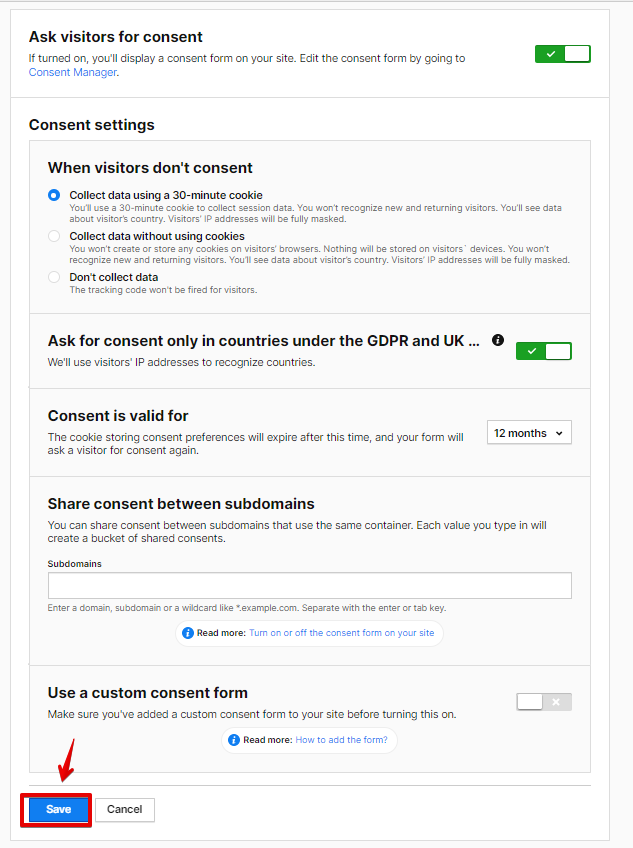
When visitors don’t consent
This configuration allows you to specify Piwik Pro Analytics’ behaviour if a user refuses to consent. You have three options to choose from:
- Collect data for 30 minutes using cookies
- Collect data without using cookies
- Do not collect data at all.
Ask for consent only in countries under the GDPR and UK.
Once you activate these configurations, Piwik Pro will utilise the IP addresses of website visitors to ascertain their country of origin before determining whether to display the privacy consent form.
Consent is valid for
Another configuration that gives you the flexibility to choose the validity period of the user consent. The form displays again when the set time elapses, asking for new permission.
Share consent between subdomains
It’s a privacy setting for a business website with a sub-domain, and we would like to share visitor consent across subdomains using the same Piwik Pro tracking container.
Use a custom consent form.
For those who prefer to use a custom consent form, this is a separate topic that requires further discussion.
Once you have activated Piwik Pro CMP and finalised your consent settings, click “save” to publish your consent form and settings.
You can access Piwik’s consent manager module to personalise the consent form. However, this blog post is beyond the scope of this article.
Activating Google Consent Mode or Manual Google Tag Manager Blocking Using Piwik Pro Consent Manager
In the next phase of this article, we’ll treat the practical step-by-step guide to leveraging Google Consent Mode or manual tag blocking in GTM using the Piwik Pro consent manager module.
As usual, our implementation starts inside the Piwik Pro interface.
Privacy Configuration In Piwik Pro Tag Manager
To implement privacy configurations in the Piwik Pro tag manager, you must create four new custom code tag types corresponding to different consent categories requested from website visitors.
These tags will require the following Piwik Pro tag manager consent types to fire:
- Analytics
- Conversion Tracking
- A/B Testing and Personalization
- Remarketing
Here is what your Analytics consent tag should look like after you’ve copied and pasted the code below to your custom code tag type.
<script>
  var cookieName = "piwik_analyticsSettings";
  var cookieExpiry = new Date();
  // Set expiry time of 1 day (in milliseconds)
  cookieExpiry.setTime(cookieExpiry.getTime() + 1 * 24 * 60 * 60 * 1000);
  var expires = "expires=" + cookieExpiry.toUTCString();
  // Set cookie
  document.cookie = cookieName + "=" + "granted" + ";" + expires + ";path=/;domain=." + location.hostname.replace(/^www\./i, "");


  window.dataLayer = window.dataLayer || [];
  dataLayer.push({
  'event' : 'piwik_cookie_update',
  'Consent_Analytics': 'granted'
});
</script>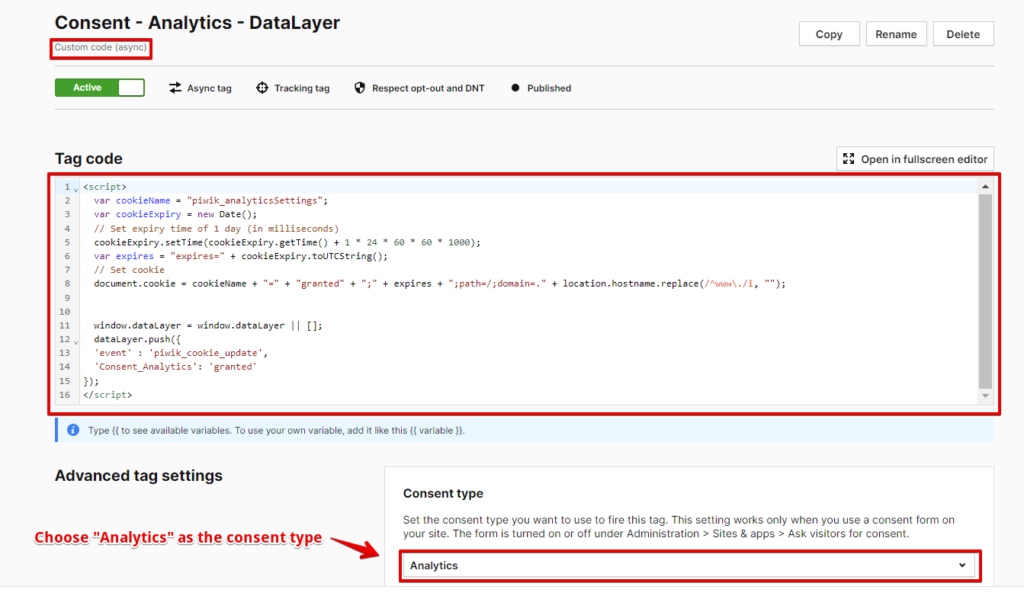
Here is what your Conversion Tracking (Marketing) consent tag should look like after you’ve copied and pasted the code below to your custom code tag type.
<script>
  var cookieName = "piwik_marketingSettings";
  var cookieExpiry = new Date();
  // Set expiry time of 1 day (in milliseconds)
  cookieExpiry.setTime(cookieExpiry.getTime() + 1 * 24 * 60 * 60 * 1000);
  var expires = "expires=" + cookieExpiry.toUTCString();
  // Set cookie
  document.cookie = cookieName + "=" + "granted" + ";" + expires + ";path=/;domain=." + location.hostname.replace(/^www\./i, "");

  window.dataLayer = window.dataLayer || [];
  dataLayer.push({
  'event' : 'piwik_cookie_update',
  'Consent_Marketing': 'granted'
});
</script>
Here is what your AB Test/ Personalization consent tag should look like after you’ve copied and pasted the code below to your custom code tag type.
<script>
  var cookieName = "piwik_personalizationSettings";
  var cookieExpiry = new Date();
  // Set expiry time of 1 day (in milliseconds)
  cookieExpiry.setTime(cookieExpiry.getTime() + 1 * 24 * 60 * 60 * 1000);
  var expires = "expires=" + cookieExpiry.toUTCString();
  // Set cookie
  document.cookie = cookieName + "=" + "granted" + ";" + expires + ";path=/;domain=." + location.hostname.replace(/^www\./i, "");

  window.dataLayer = window.dataLayer || [];
  dataLayer.push({
  'event' : 'piwik_cookie_update',
  'Consent_ABtest_Personalization': 'granted'
});
</script>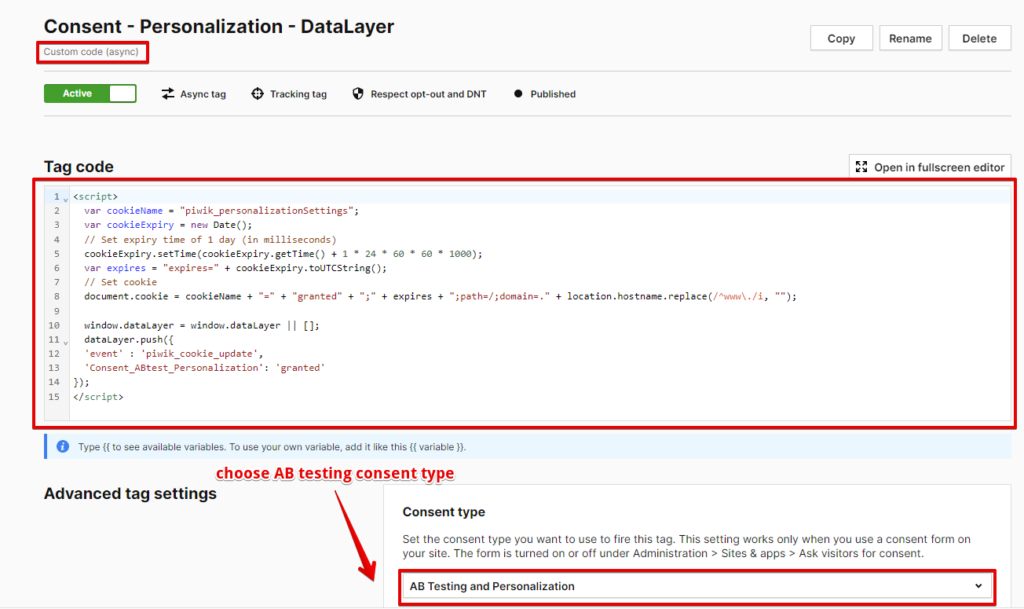
Below is your Remarketing consent tag configuration and the code to copy and paste to your setup.
<script>
  var cookieName = "piwik_remarketingSettings";
  var cookieExpiry = new Date();
  // Set expiry time of 1 day (in milliseconds)
  cookieExpiry.setTime(cookieExpiry.getTime() + 1 * 24 * 60 * 60 * 1000);
  var expires = "expires=" + cookieExpiry.toUTCString();
  // Set cookie
  document.cookie = cookieName + "=" + "granted" + ";" + expires + ";path=/;domain=." + location.hostname.replace(/^www\./i, "");

  window.dataLayer = window.dataLayer || [];
  dataLayer.push({
  'event' : 'piwik_cookie_update',
  'Consent_Remarketing': 'granted'
});
</script>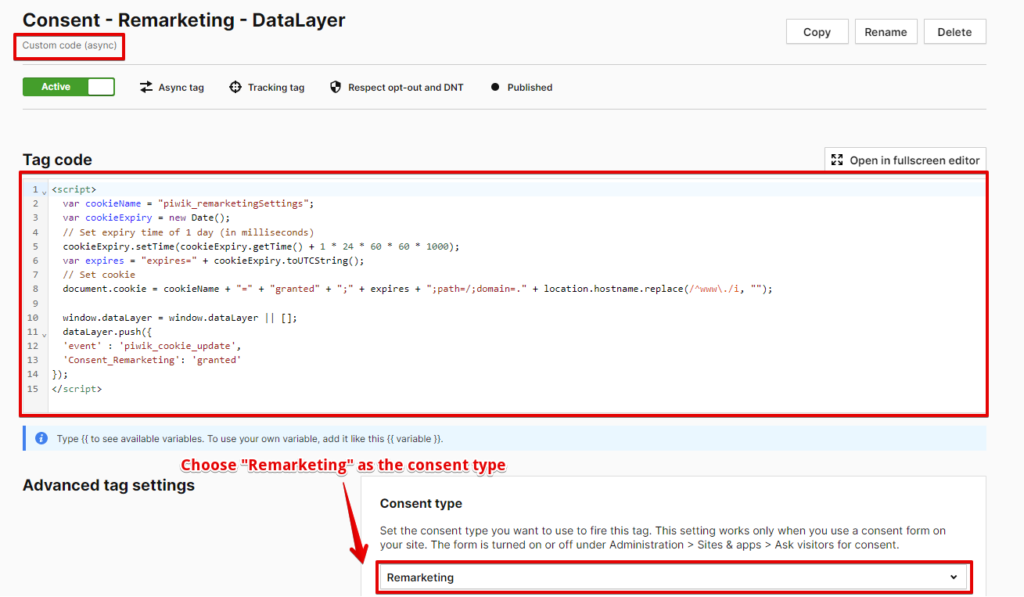
Whenever these tags get fired, two actions get executed, which are as follows:
- A dataLayer event named “piwik_cookie_update” is triggered.
- Cookies get set on the user’s browser for every consent preference granted with the value “granted“. The cookie names vary depending on the consent preference given, and they are as follows:
- “piwik_analyticsSettings” for analytics
- “piwik_marketingSettings” for conversion tracking
- “piwik_personalizationSettings” for AB testing and personalisation
- “piwik_remarketingSettings” for remarketing consent preference.
The cookies mentioned above have a 24-hour lifespan, and their expiration time gets updated with every page load.
Why cookies and not just dataLayer events only?
Using cookies is crucial for our implementation, particularly for accounts where the consent form is configured to display for visitors from the UK and GDPR countries. We rely on cookies because of the behaviour of the Piwik Pro consent manager.
During my tests, I realised that I couldn’t access the user privacy settings if the user’s location weren’t among those designated for the consent form to display (UK and GDPR countries).
Implementing Privacy in Google Tag Manager with Piwik CMP
In the next phase of this blog post, we’ll focus on the implementation side of things, on how to use Piwik’s consent form to enable the use of Google consent mode or manually block tags in Google Tag Manager.
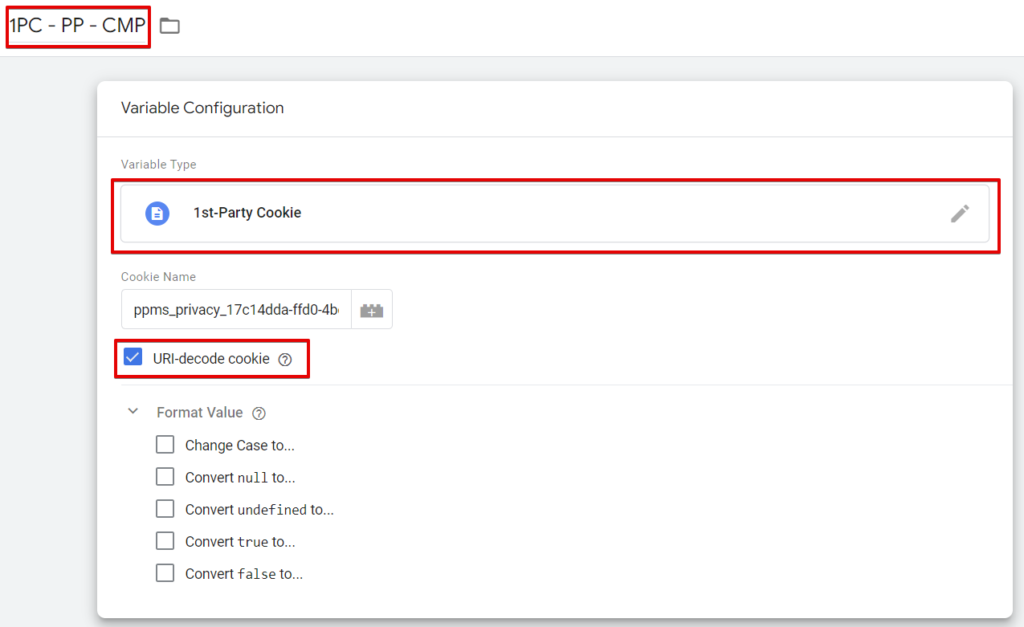
The first action is to create a “1st-Party Cookie” variable that will allow us to access the user’s current Piwik Pro privacy consent settings.
To do this, navigate to the “variables” tab and select “User-Defined Variables”.

Then, click “New” and choose the “1st_Party Cookie” variable. Next, add “ppms_privacy_piwik-pro-site-id” as the value for the “Cookie Name” field, but ensure to replace “piwik-pro-site-id” with the actual Piwik Pro site ID for the respective property.
You must check the “URL-decode cookie” formatting settings before saving the variable in Google Tag Manager.
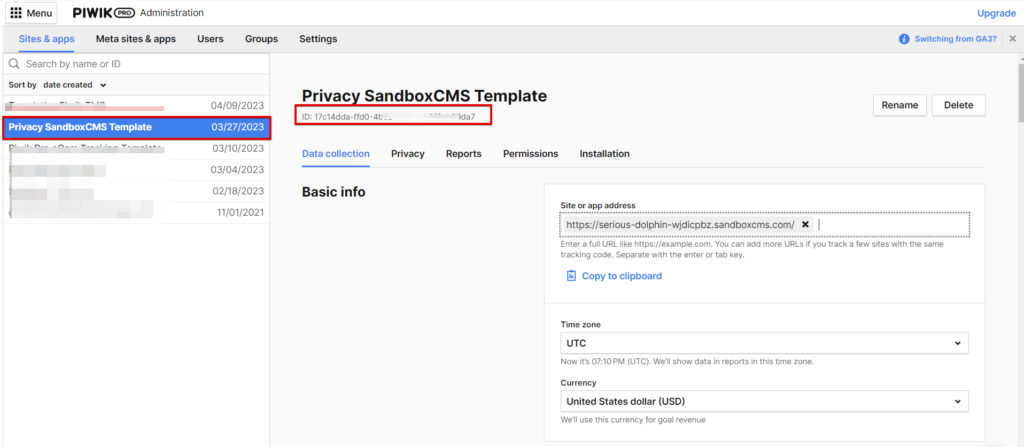
How Do You Get The ID?
To obtain the ID, navigate to that property’s “Administration” section.
Here is where you can copy your Piwik Pro Site ID
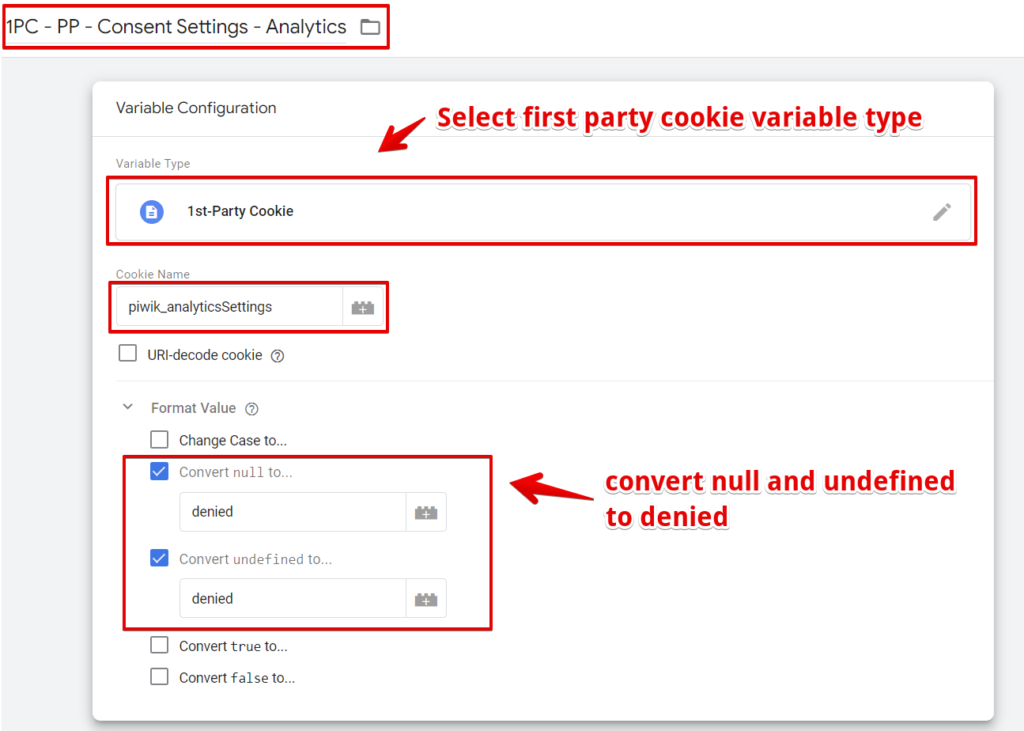
The next step in this implementation is to create four cookies for the cookie set by the tags fired in the Piwik Pro tag manager.
The variables for the cookies are as follows:
piwik_analyticsSettings;
Name the variable “1PC – PP – Consent Settings – Analytics“. The cookie name should be set as “piwik_analyticsSettings“, and the format values for “null” and “undefined” should be set to “denied“.
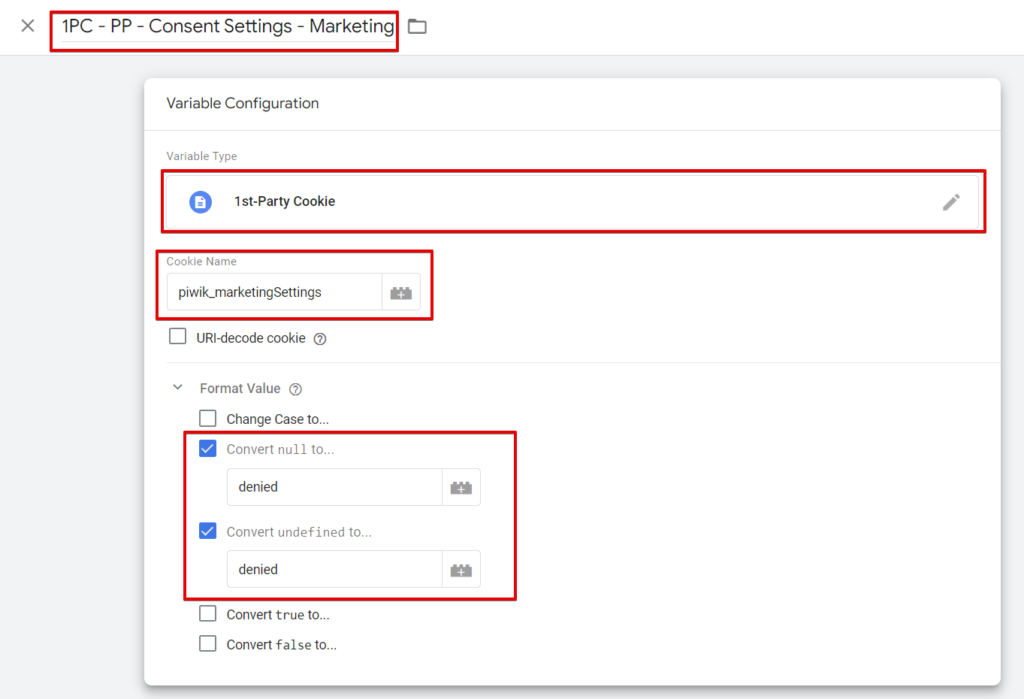
piwik_marketingSettings;
The variable name will be “1PC – PP – Marketing Consent Settings” Use “piwik_marketingSettings” as the cookie name and set “denied” as the format value for “null” and “undefined“.
piwik_personalizationSettings;
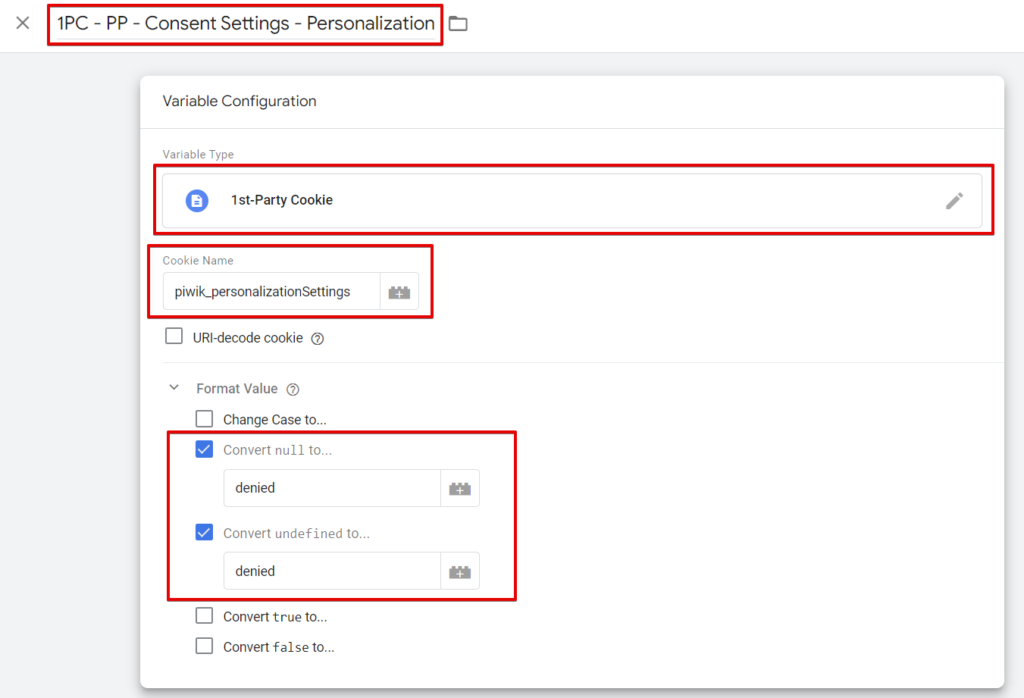
Name the variable “1PC – PP – Consent Settings – Personalization“, set the cookie name as “piwik_personalizationSettings“, and set the format values for “null” and “undefined” to “denied“.
piwik_remarketingSettings;
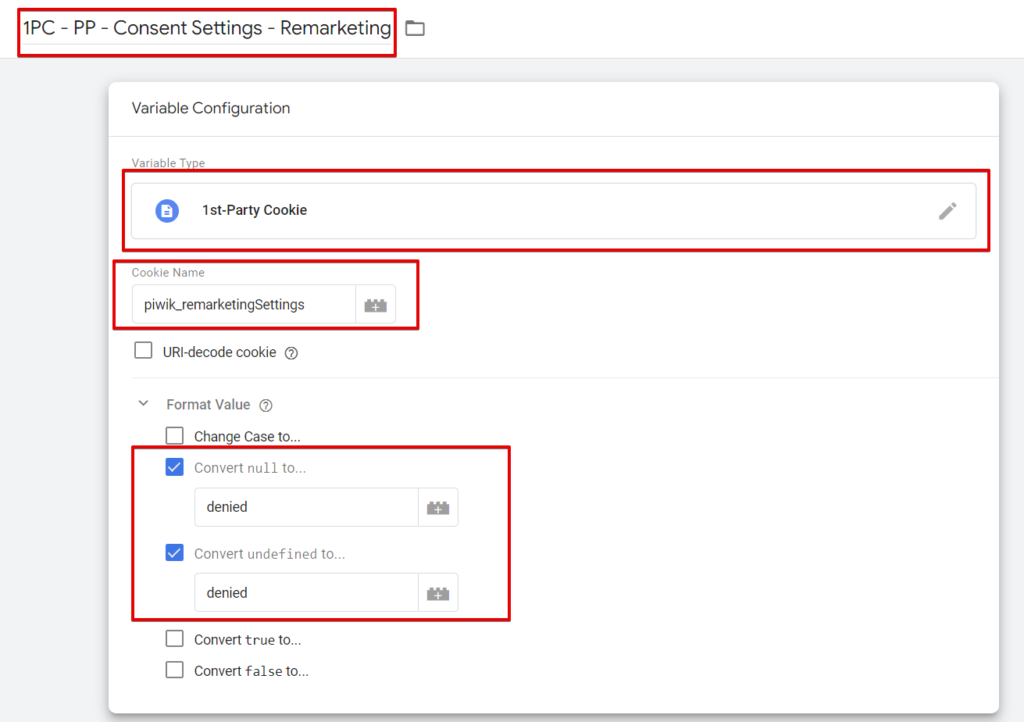
Name this variable “1PC – PP – Consent Settings – Remarketing“, set the cookie name as “piwik_remarketingSettings“, and convert “null” and “undefined” format values to “denied“.
Additionally, in the “Format Value” section for each of these “1st-Party Cookie” variables, ensure that “nulls” and “undefined” are converted to “denied“.
Creating The Single Consent Verification Variable For Each Preference.
The next step in our implementation will be to create custom JavaScript variables to determine whether the user has consented to deploy analytics, marketing, remarketing, personalization, or conversion tracking tags.
We’ll create four variables for each consent category to check whether the Piwik Pro consent manager cookies exist in the user’s browser and the status of that specific consent category.
Suppose the cookie does not exist, typically for users outside the scope of GDPR and accounts where the consent form is configured to display only for UK and GDPR countries. In that case, the variable will read the value of the custom cookie we created in the Piwik Pro tag manager.
Creating the Custom JavaScript Variables For Each Consent Category.
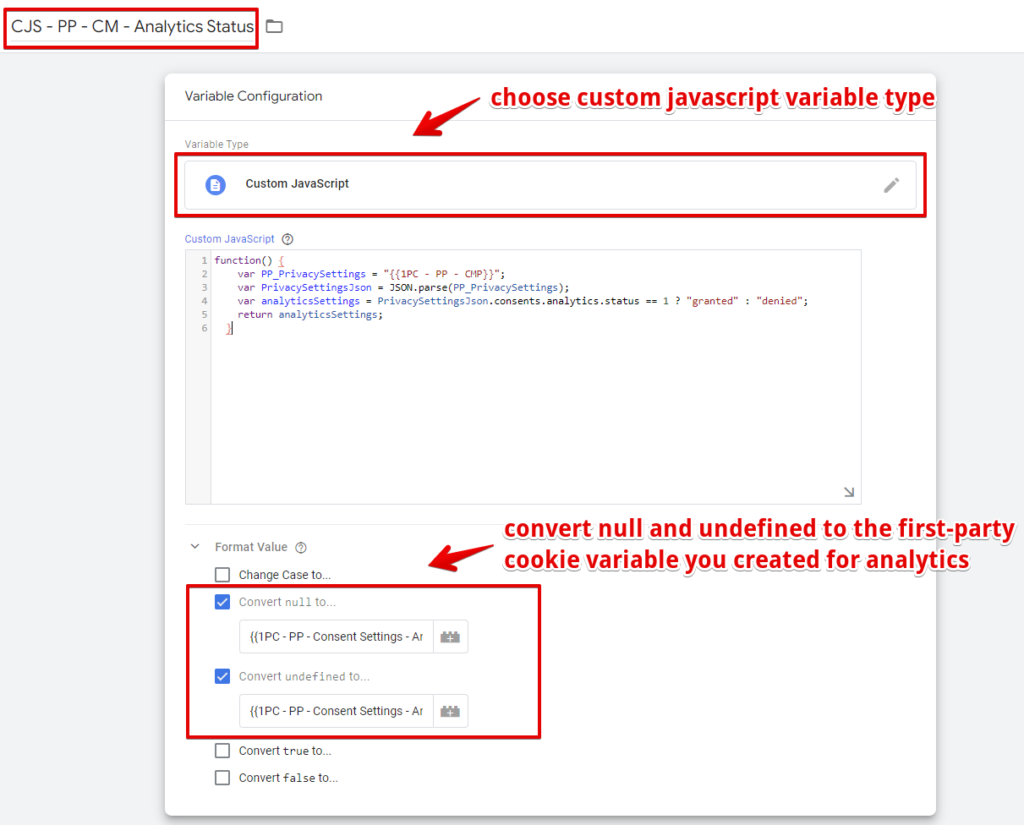
For Analytics consent Category;
We will create a new custom JavaScript variable type and copy and paste the code below. If any variables created earlier have been renamed or modified, you must update them accordingly in the variable setup.
function() {
    var PP_PrivacySettings = "{{1PC - PP - CMP}}";
    var PrivacySettingsJson = JSON.parse(PP_PrivacySettings);
    var analyticsSettings = PrivacySettingsJson.consents.analytics.status == 1 ? "granted" : "denied";
    return analyticsSettings;
  }
Furthermore, in the “Format Value” section, you should convert “null” and “undefined” to “{{1PC – PP – Consent Settings – Analytics}}“, which was the analytics cookie consent that we created earlier.
The CJS variable name should be “CJS – PP – CM – Analytics Status“.
Here is what your variable configuration should look like
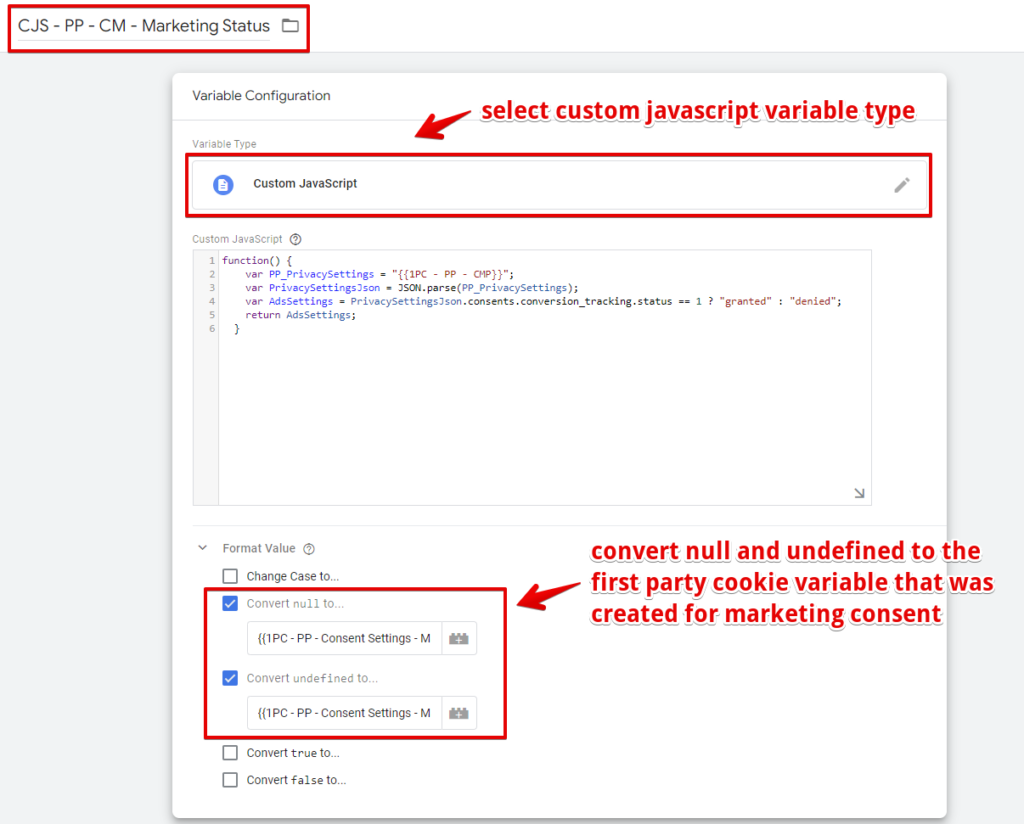
For Marketing/Conversion Tracking Consent Category;
We’ll create a new custom javascript variable type, where you copy and paste the code below. If you’ve changed/modified the name of any of the variables created earlier, you have to update them in your setup.
function() {
    var PP_PrivacySettings = "{{1PC - PP - CMP}}";
    var PrivacySettingsJson = JSON.parse(PP_PrivacySettings);
    var AdsSettings = PrivacySettingsJson.consents.conversion_tracking.status == 1 ? "granted" : "denied";
    return AdsSettings;
  }
Additionally, in the “Format Value“, convert “null” and “undefined” to “{{1PC – PP – Consent Settings – Marketing}}“, which was the analytics cookie consent that we created earlier.
The custom javascript variable name will be “CJS – PP – CM – Marketing Status“.
Your conversion tracking (Marketing) consent category variable configuration should look like what is shown below
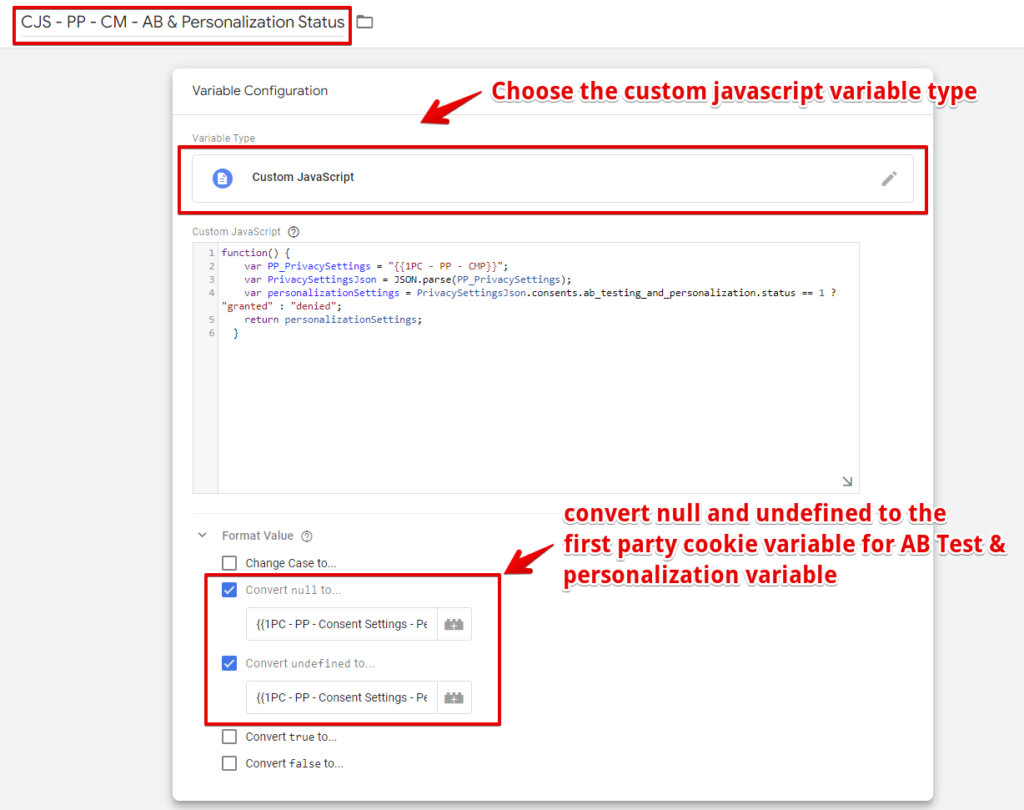
For AB Testing / Personalization Consent Category;
As we did for other consent categories, we’ll create a new custom javascript, where you copy and paste the code below.
function() {
    var PP_PrivacySettings = "{{1PC - PP - CMP}}";
    var PrivacySettingsJson = JSON.parse(PP_PrivacySettings);
    var personalizationSettings = PrivacySettingsJson.consents.ab_testing_and_personalization.status == 1 ? "granted" : "denied";
    return personalizationSettings;
  }
Additionally, in the “Format Value“, convert “null” and “undefined” to “{{1PC – PP – Consent Settings – Personalization}}“, which was the analytics cookie consent that we created earlier.
The variable name will be “CJS – PP – CM – AB & Personalization Status“.
Your AB Testing / Personalization consent variable should end up as shown in the image below.
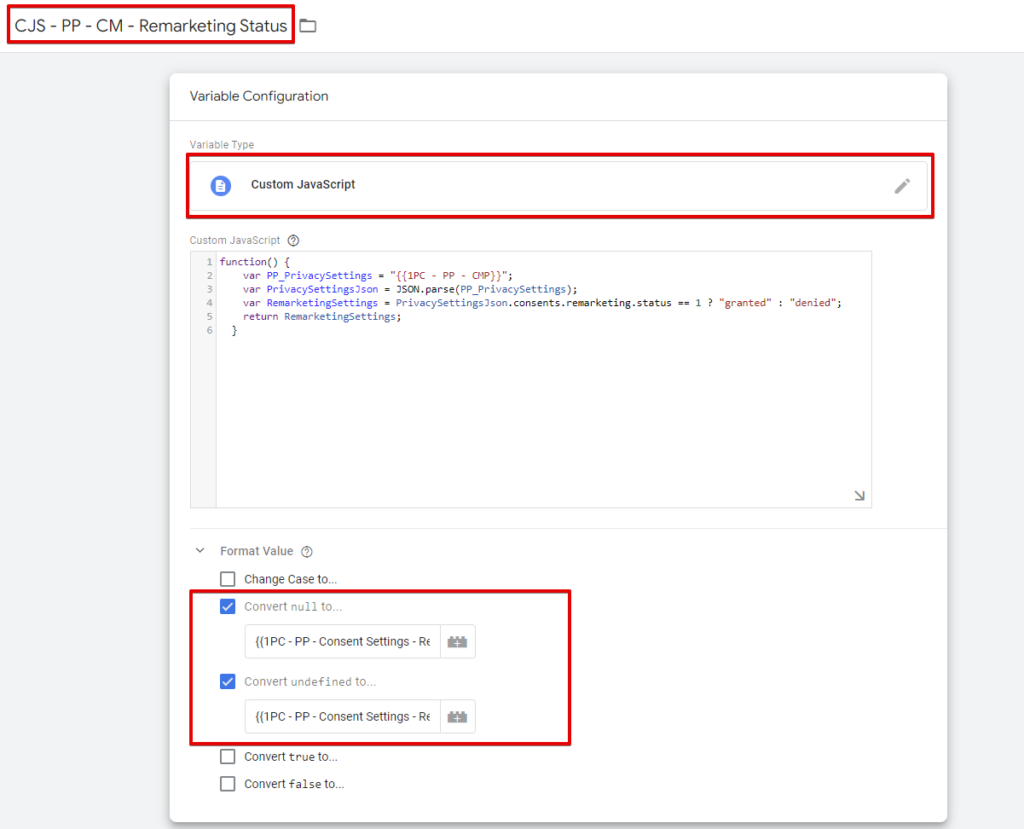
For Remarketing Consent Category;
As we did for other consent categories, we’ll create a new custom javascript, where you copy and paste the code below. If you’ve changed/modified the name of any of the variables created earlier, you have to update them in this code.
function() {
    var PP_PrivacySettings = "{{1PC - PP - CMP}}";
    var PrivacySettingsJson = JSON.parse(PP_PrivacySettings);
    var RemarketingSettings = PrivacySettingsJson.consents.remarketing.status == 1 ? "granted" : "denied";
    return RemarketingSettings;
  }
Additionally, in the “Format Value“, convert “null” and “undefined” to “{{1PC – PP – Consent Settings – Remarketing}}“, which was the analytics cookie consent that we created earlier.
The variable name will be “CJS – PP – CM – Remarketing Status“.
You should arrive at a setup similar to the one below
Manual Blocking Vs Google Consent Mode
There are two approaches to tag compliance: manually blocking tags when the user doesn’t consent or using Google Consent Mode, which offers enhanced privacy functionalities for Google tags.
Of course, if you’re greedy like me, you can also use both methodologies; now, let’s dive into these two approaches.
Manually Blocking Tags In Google Tag Manager When Consent Isn’t Giving or Denied.
To create your blocking trigger, as the name implies, you must set up a new trigger in GTM, but the trigger will be used as an exception, which prevents tags from firing.
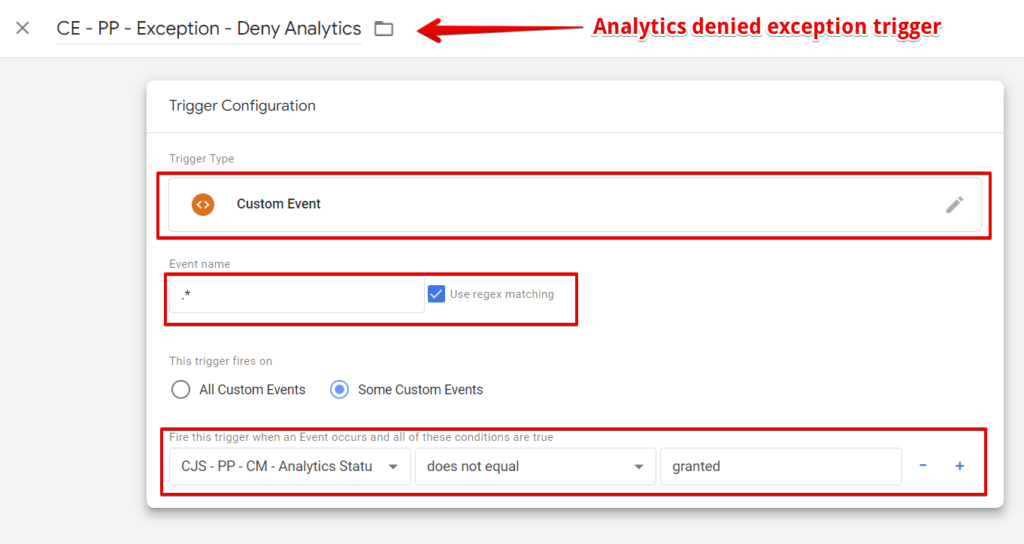
Let’s create one that blocks Analytics tags from firing when the user doesn’t grant analytics consent.
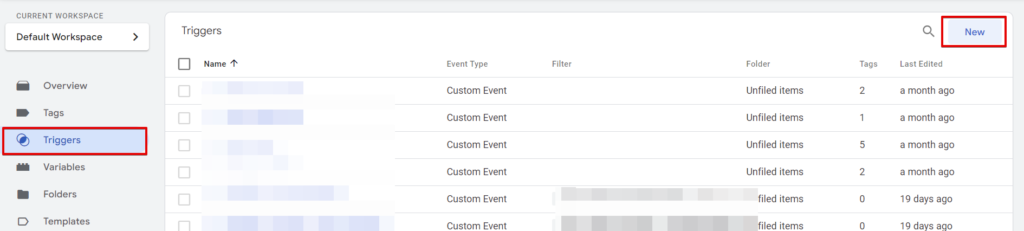
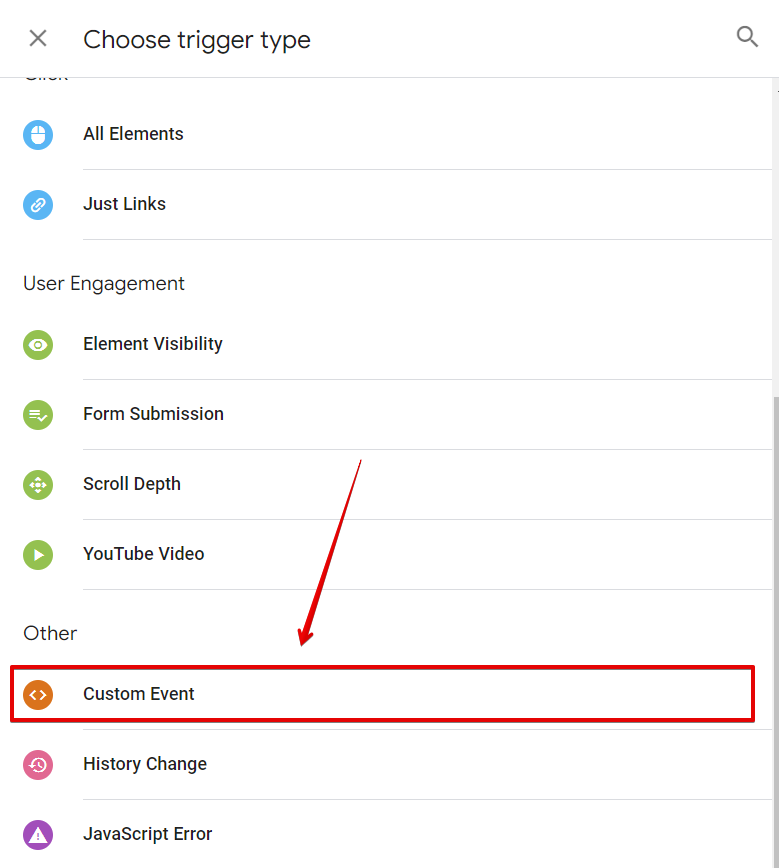
Navigate to triggers, click the new button and select the “Custom event” trigger type.
In the trigger, check the regex matching and enter “.*” in the event name field, as shown in the image below.
In the trigger condition, select “some custom events” and choose the analytics consent variable we created earlier, ” CJS – PP – CM – Analytics Status“, as the condition variable, and let “does not equal” be your condition type with the condition value set to “granted“.
Your setup should be the same as what is shown below.
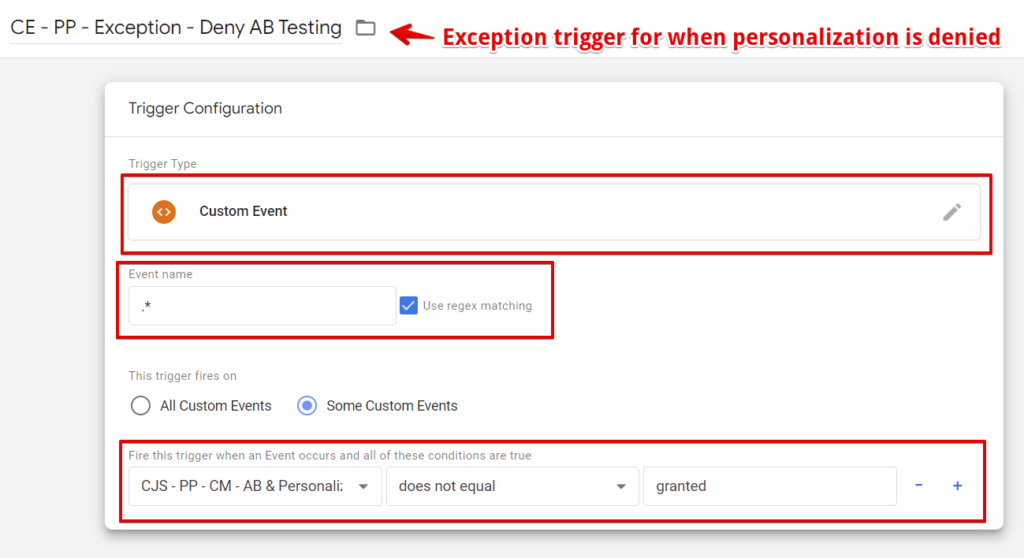
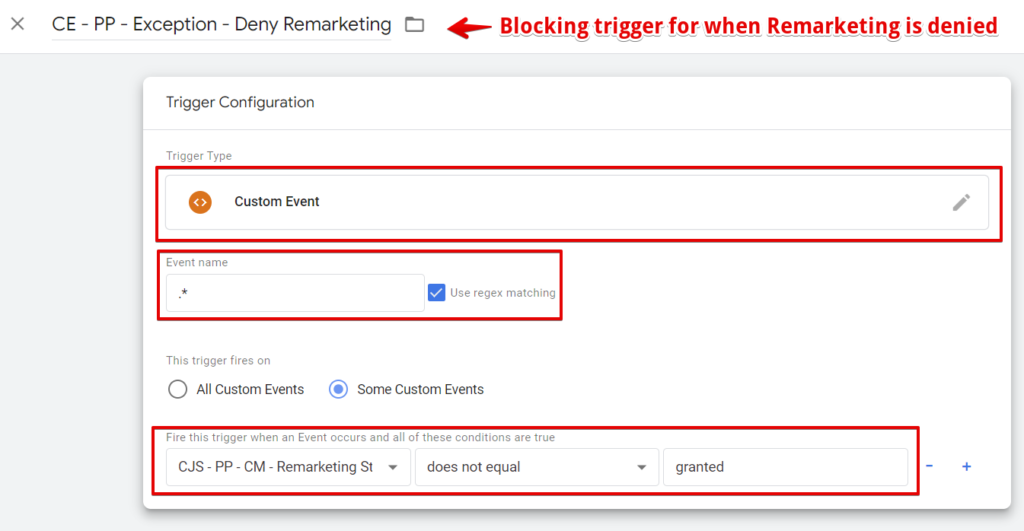
Now let’s recreate the same thing for other consent categories.
For The Marketing Blocking Trigger;
the condition variable will be “CJS – PP – CM – Marketing Status“.

For The AB Testing/ Personalization Blocking Trigger;
the condition variable will be “CJS – PP – CM – AB & Personalization Status“.
For Remarketing Blocking Trigger;
the condition variable will be “CJS – PP – CM – Remarketing Status“.
When the user hasn’t consented on page load, you’ll have to create a trigger that will fire tags that rely on the page view trigger but got blocked because the user hasn’t consented yet. A typical example is our Google Analytics (GA4) config tag.
We’ll leverage the dataLayer event “stg.consentDecisionMade” that the Piwik Pro consent manager emits when the user makes consent decisions.
Navigate to triggers to create a new one, select the “Custom Event” trigger type and add “stg.consentDecisionMade” as the event name hit save.
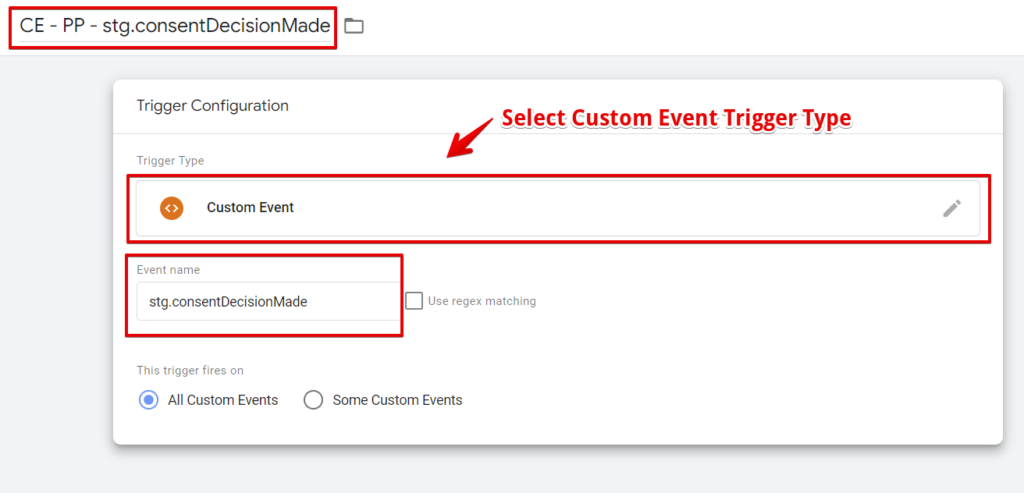
The variable can be called “CE – PP – stg.consentDecisionMade“
Here is an example of adding an exception trigger to your tag; from the GTM tag, you should select exception and your preferred consent category blocking trigger.
Activating Google Consent Mode Using Piwik Pro Consent Form
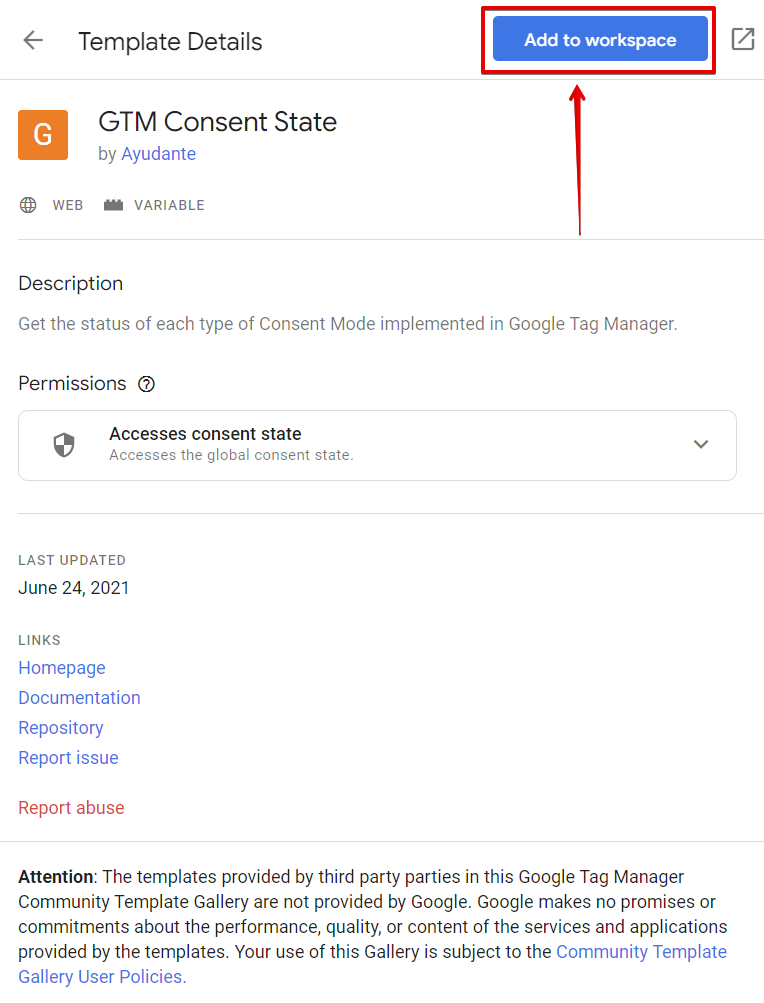
To set up and debug Google Consent Mode in Google Tag Manager using your Piwik Pro CMP, you’ll need to add the “GTM Consent State” custom template variable by “Ayudante“, and it’s possible from the community template gallery.
This particular variable will be helpful when debugging our setup.
To add the variable, go to the “variables” section, and click the “New” button under User-Defined Variables.
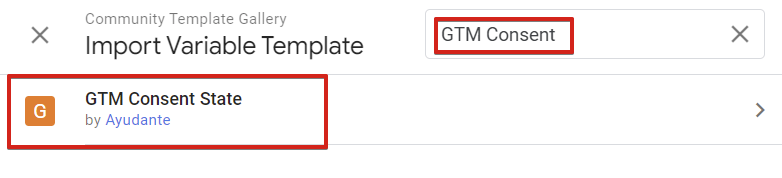
In the variable type selection screen, click the link to Community Template Gallery. Then, in the search bar, search for “GTM Consent State” and choose the one created by Ayundate.

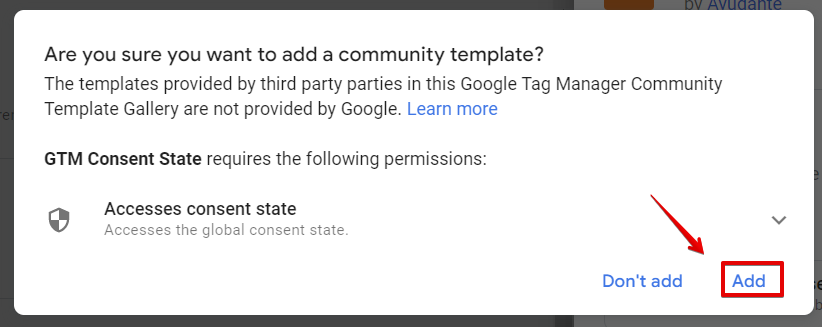
Click the “Add to workspace” button and “Add” to add the custom template variable.
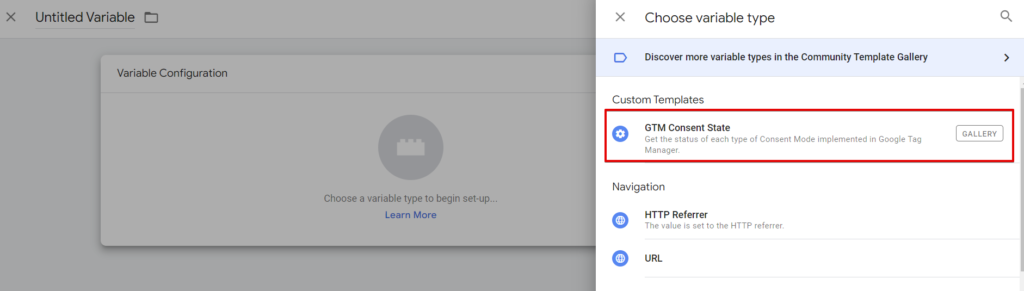
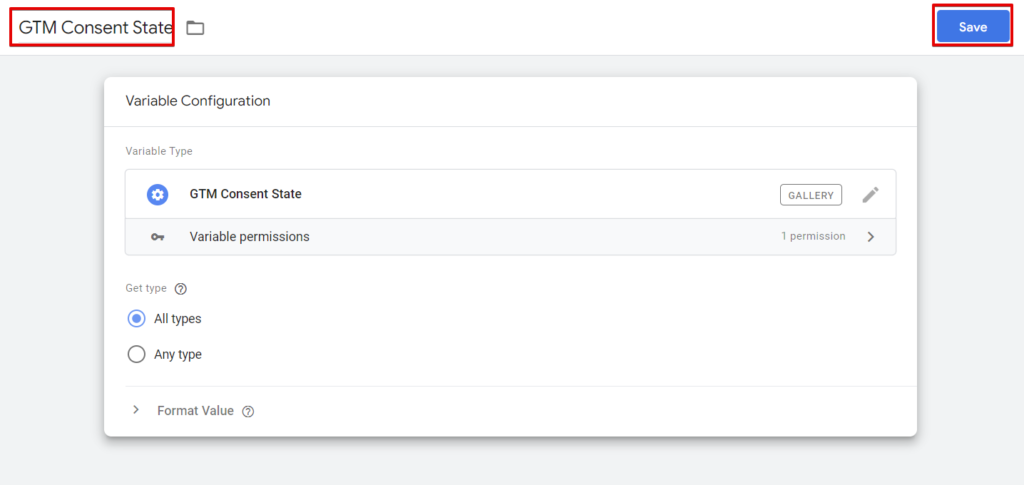
After successfully adding the template, refresh your GTM, click the new button, and select the GTM consent state variable you’ve added.
Nothing is required of you other than give the variable a name and hit save.
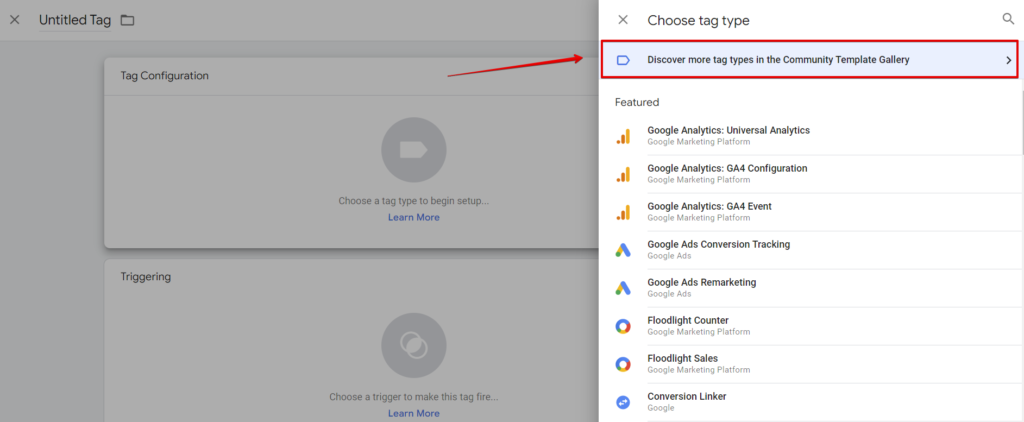
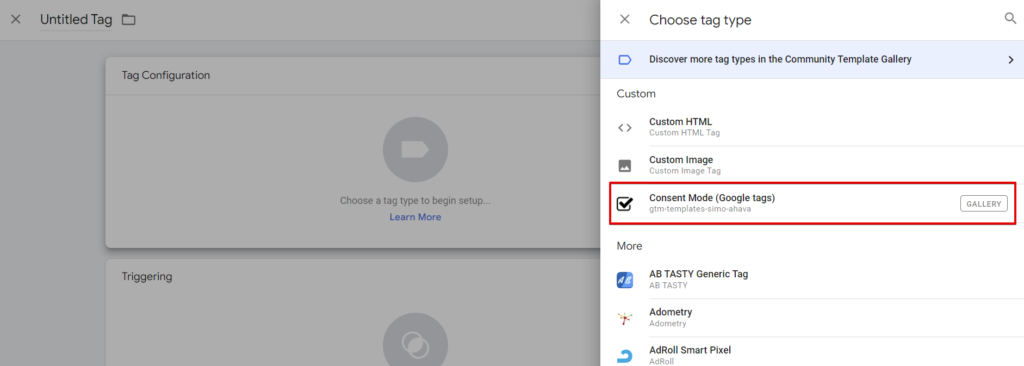
The next step will be to add Simo Ahava‘s custom template for activating the Google Consent Mode privacy settings, and we can do this right from the tag section.
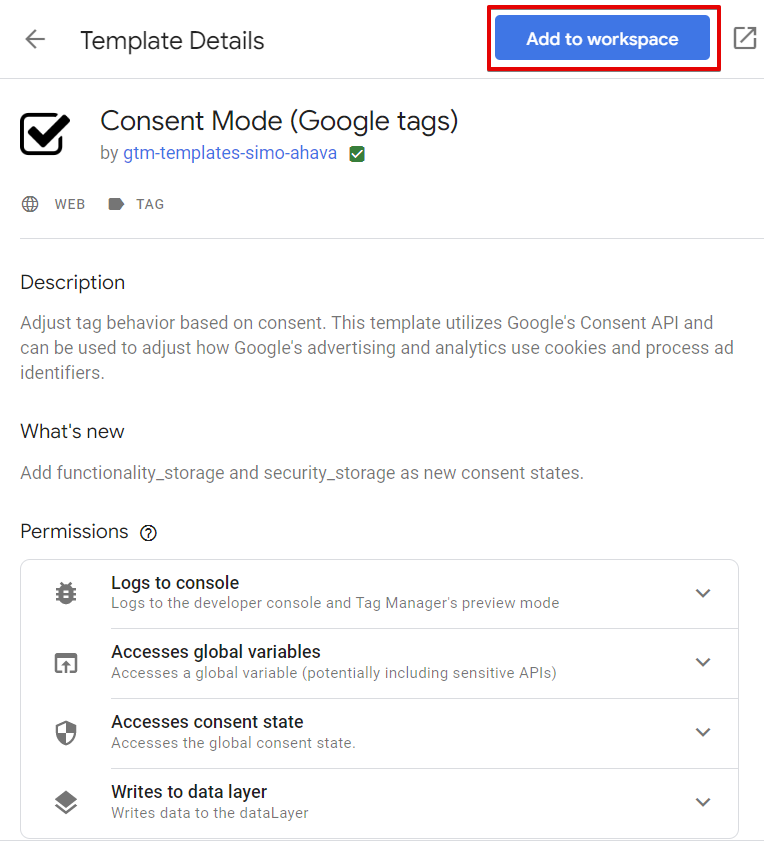
Add a new tag, select the community template gallery, and use the search bar to find “Consent Mode” Choose the template from Simo Ahava, “gtm-templates-simo-ahava“.
Select Simo’s Consent Mode custom template.

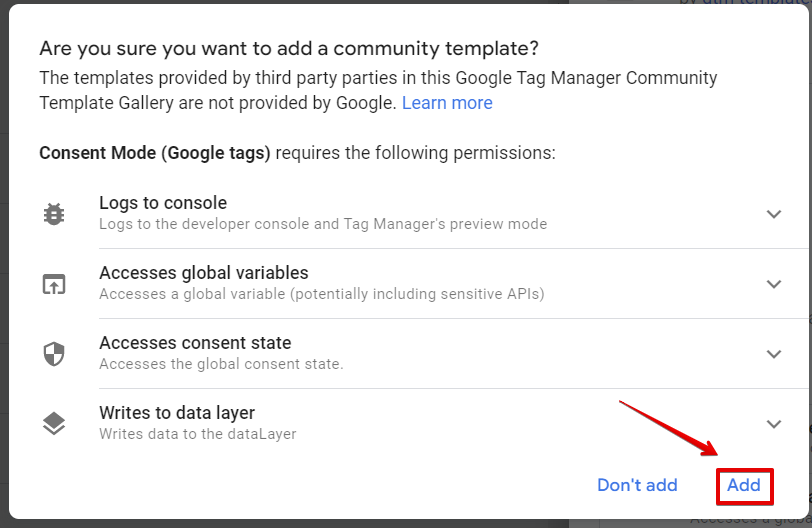
Click “Add to workspace” and then the “Add” option to add the template.
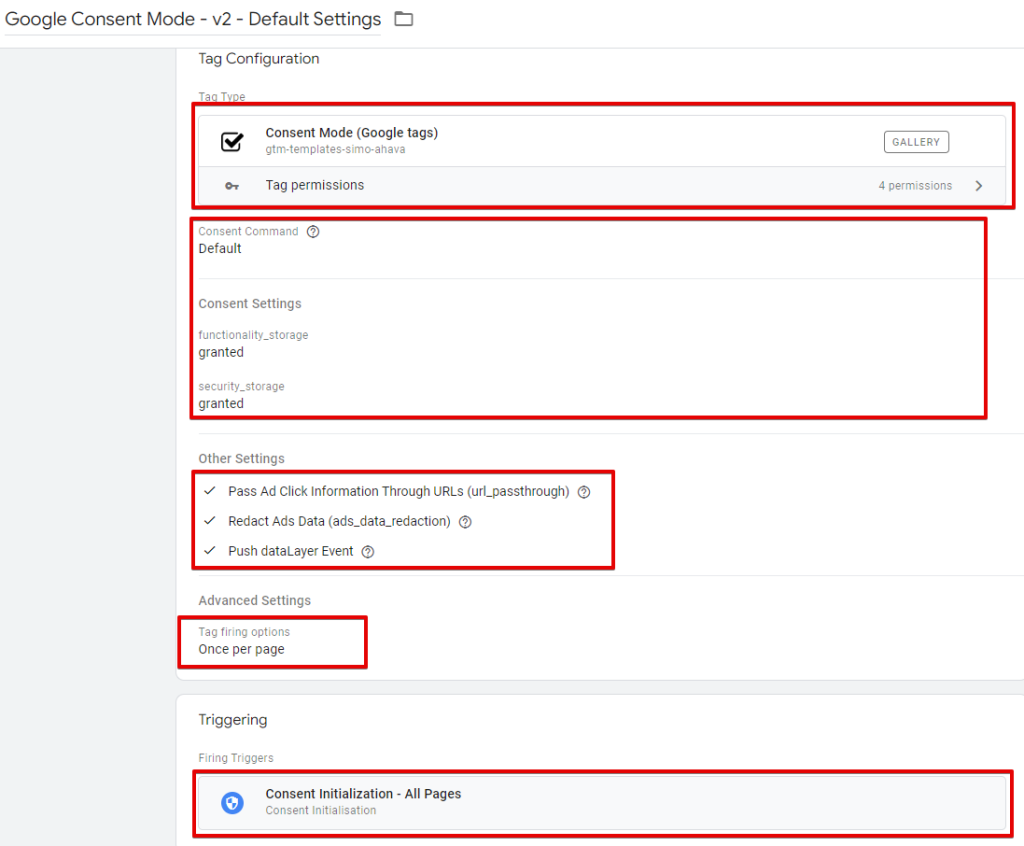
We’ll then create two tags using this custom template, one for the “default” and one for the “update” consent command.
For the default consent command;
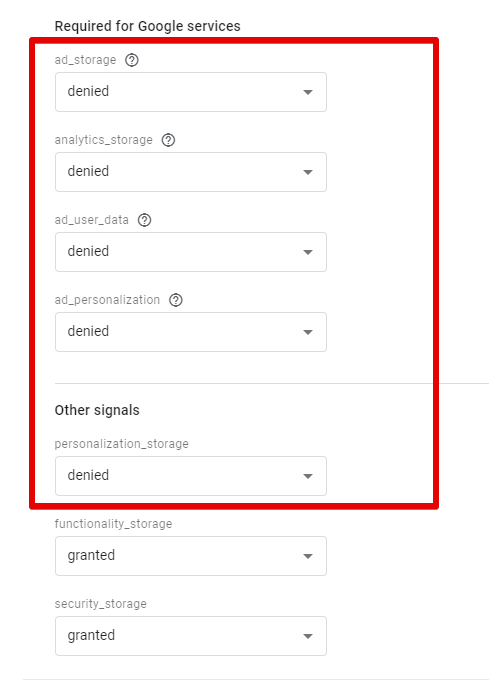
Add a new tag and select Simo’s consent mode tag; your consent command should be “Default” Click on the “add setting” to configure the state for each default consent category.
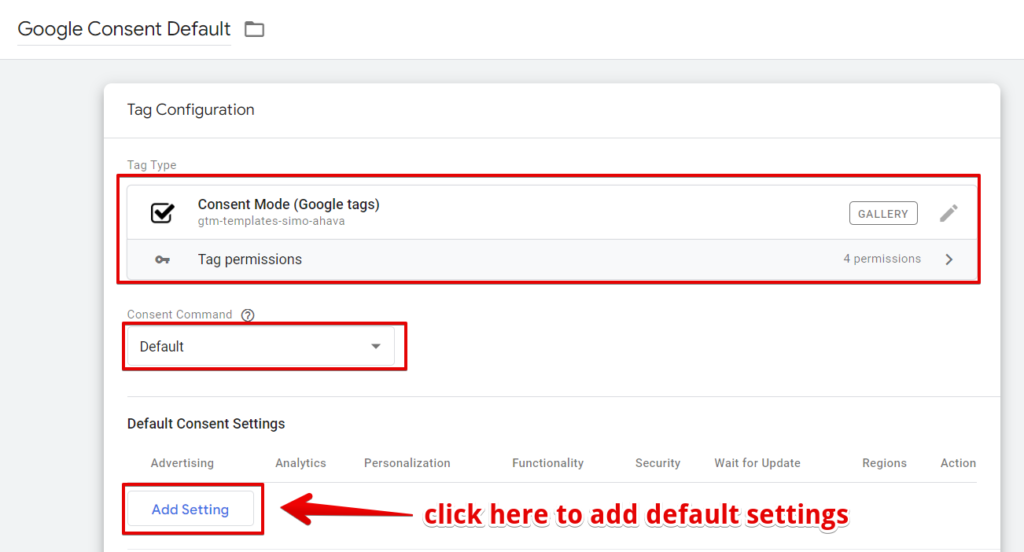
You should set everything to denied, or you can leave “functionality” and “security” as granted, just like I did in my setup.
Once you’ve completed your configuration, click the “add” button.
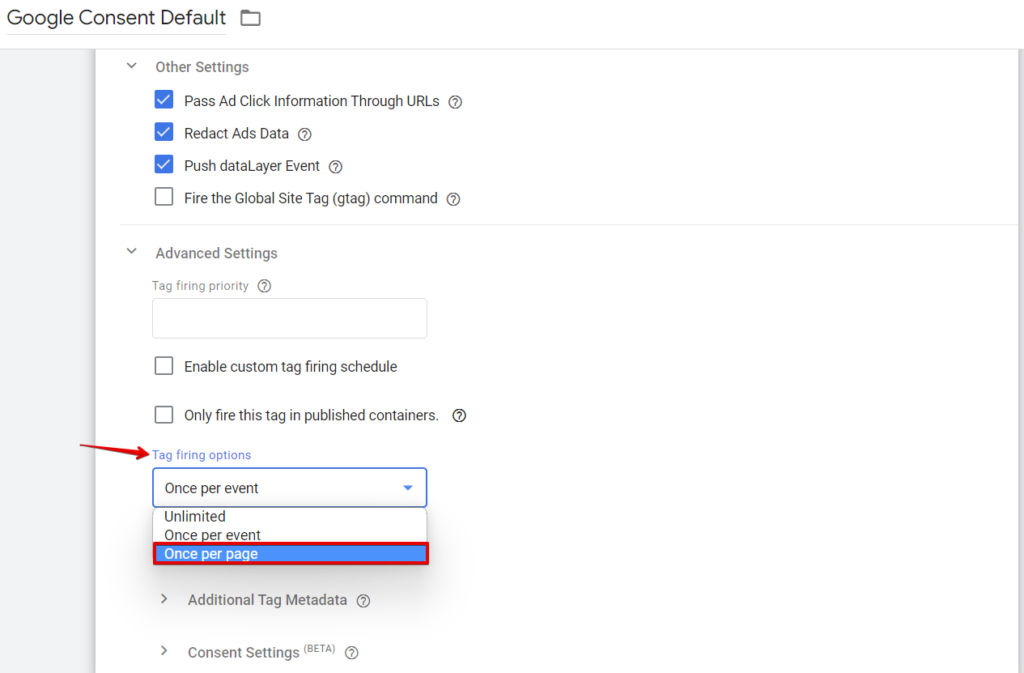
Under other settings, check the following configurations as shown in the screenshot below;
- Pass Ad Click Information Through URLs
- Redact Ads Data
- Push dataLayer Event
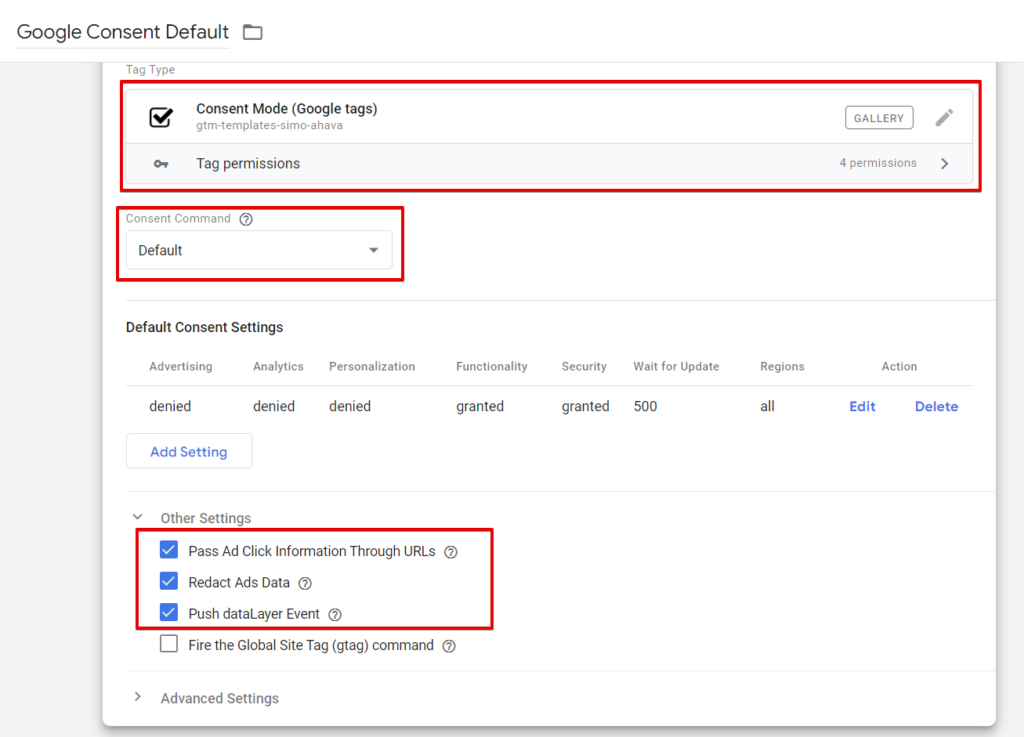
Additionally, you should configure the tag firing options to fire “Once per page”.
Let the tag fire on all Consent Initialization.
It’s a page view trigger type.
As shown in the screen below, please name and configure it to fire on the All page’s initialization.

Here is what the final tag configuration will look like
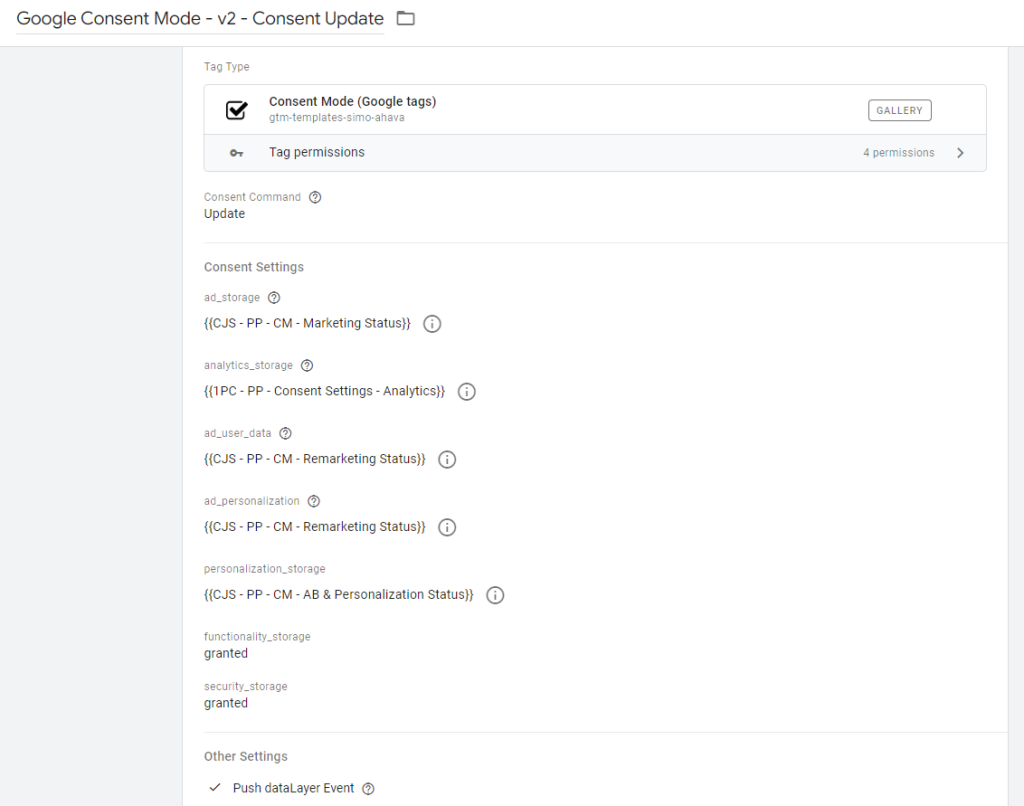
Next, we’ll have to create an update consent command, click the new button to add a new tag, and select update as the consent command.
In the updated consent settings, ensure you have the following configurations;
Analytics: choose the analytics consent variable we created, “CJS – PP – CM – Analytics Status“.
Advertising: You must choose the custom javascript variable for the marketing consent category, ‘CJS – PP – CM – Marketing Status‘.
Personalization: use the variable for AB testing & personalization consent category “CJS – PP – CM – AB & Personalization Status“.
Ads_User_Data: You must choose the custom javascript variable for the marketing consent category, ‘CJS – PP – CM – Remarketing Status‘.
Ads_Personalization: You must choose the custom javascript variable for the marketing consent category, ‘CJS – PP – CM – Remarketing Status‘.
Set functionality and security to “granted“.
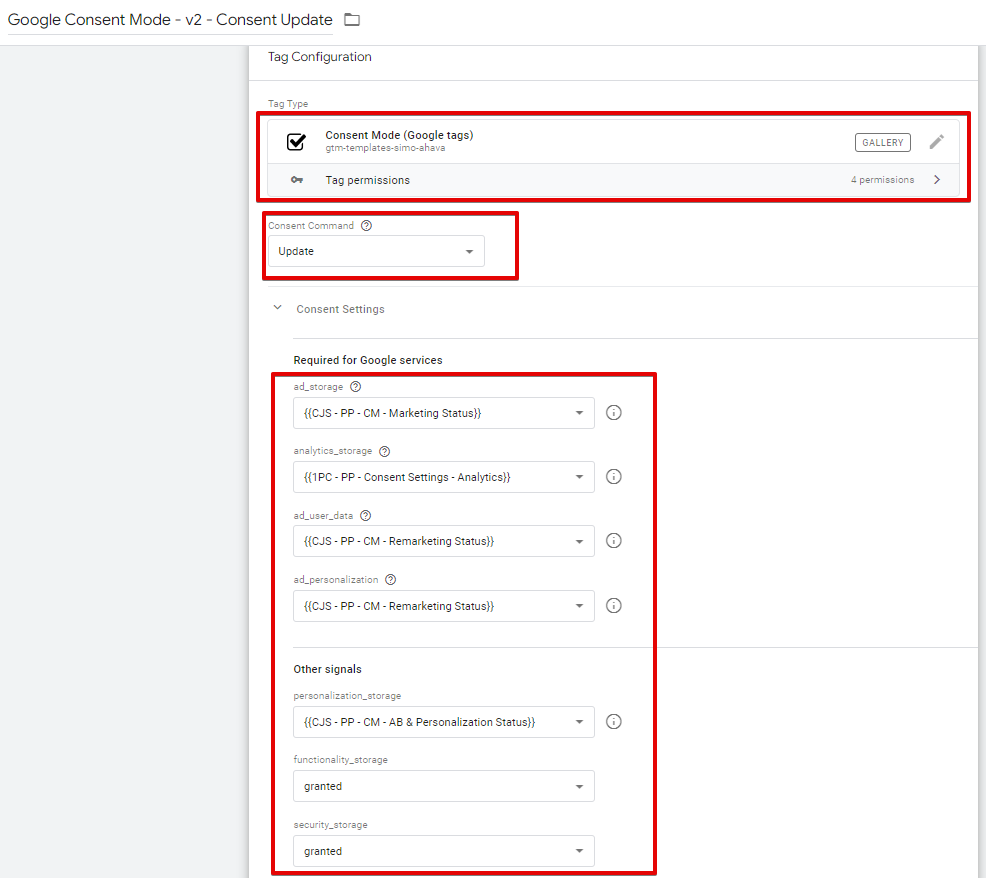
Additionally, push the consent mode update to the dataLayer by enabling this checkbox in the tag configuration.
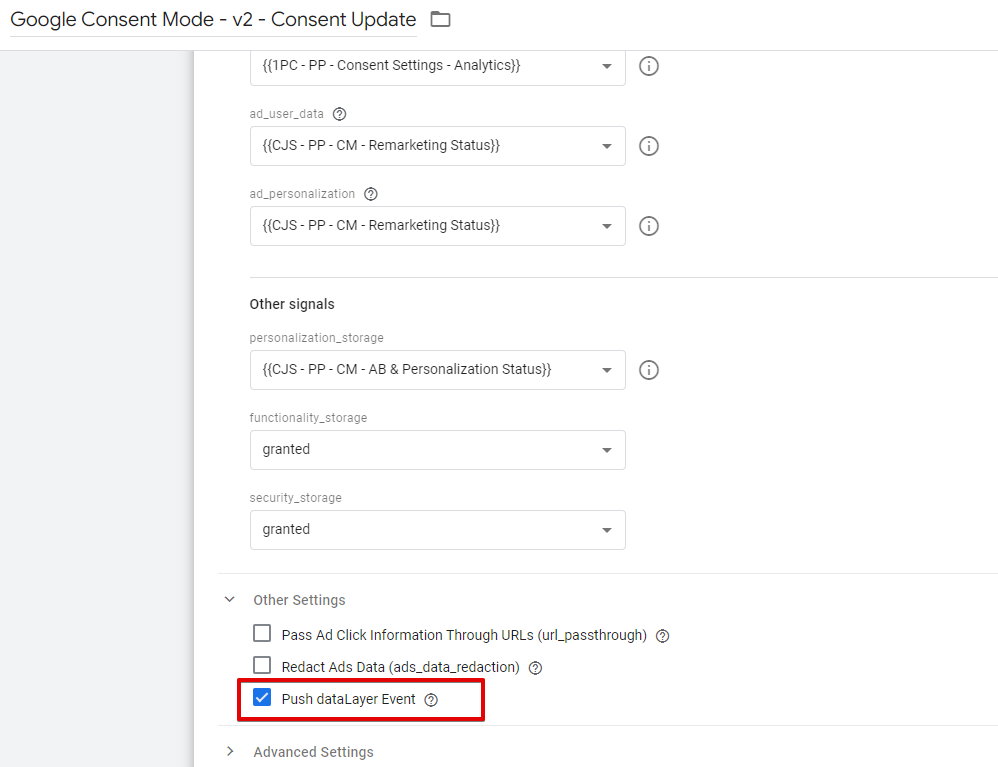
Under other settings, only enable the “Push dataLayer Event” setting, which allows it to emit a dataLayer event “gtm_consent_update” when the consent gets updated.
Here is what the consent mode v2 update tag configuration will look like.
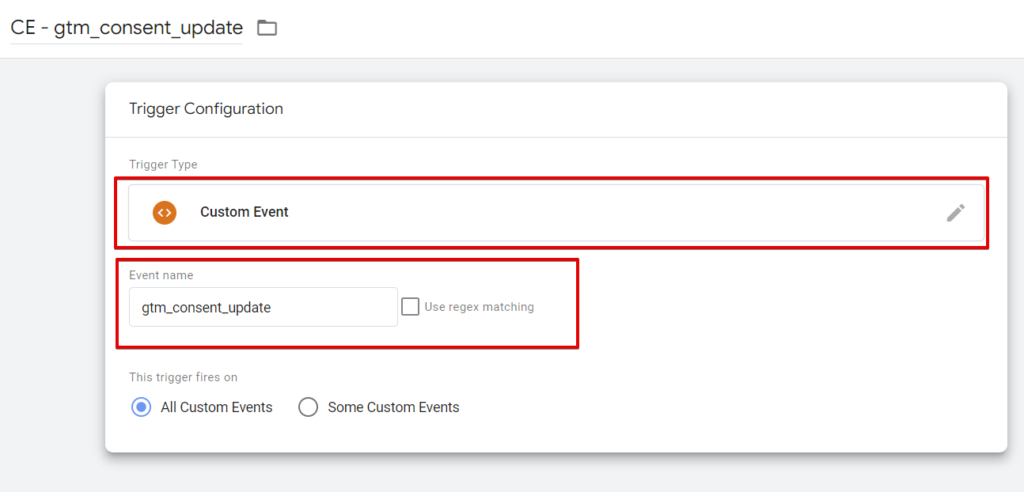
Ensure the firing option fires on “Once per event” and not “Once per page” You’ll add two triggers to this tag, and these are;
- The initialization – All Pages
- Piwik Pro consent custom event trigger
The initialization trigger is a page view trigger type, and you should configure it to fire on all pages.

As for the Piwik Pro consent custom event trigger will be a custom event trigger type using the event name Piwik’s consent module automatically emits it.
The last two steps in our implementation will be to create the consent update event trigger.
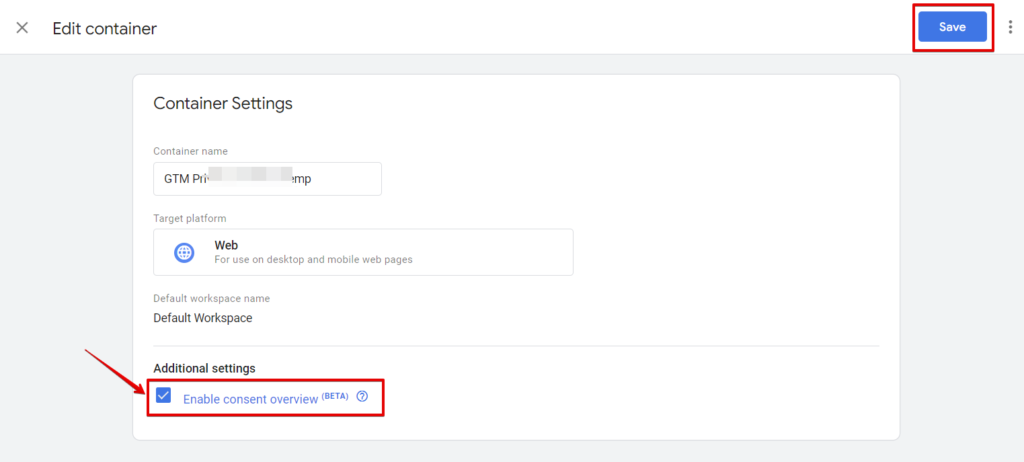
And lastly, we’ll have to enable the GTM consent view, which you can do from the admin section. Click “container settings” to activate this.
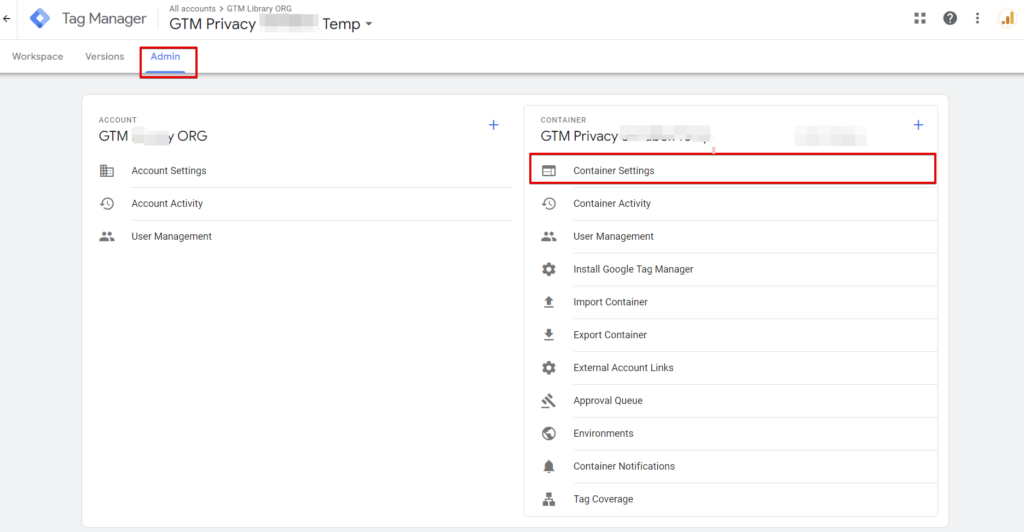
Under “Additional Settings“, check the “enable consent overview” settings, just as shown below, and click save.
Applying The Consent Settings To Google and Non-Goog Tags In Google Tag Manager
You can do this in three ways;
- Manually in the tag’s consent settings
- In bulk, using the consent overview screen
- Leveraging the bulk “edit consent settings” feature in the tag section of GTM.
The Manual Consent Application Process
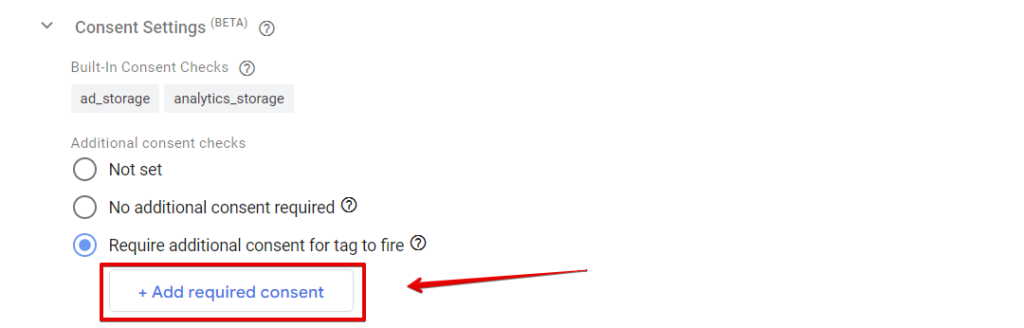
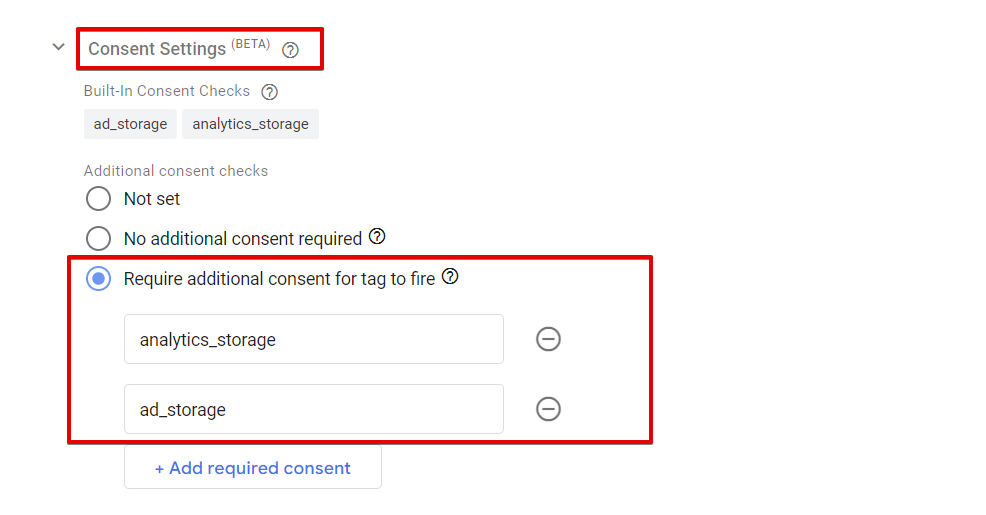
Select the tag you want to update its consent settings, expand the ‘Advanced Settings“, and select “Consent Settings“.
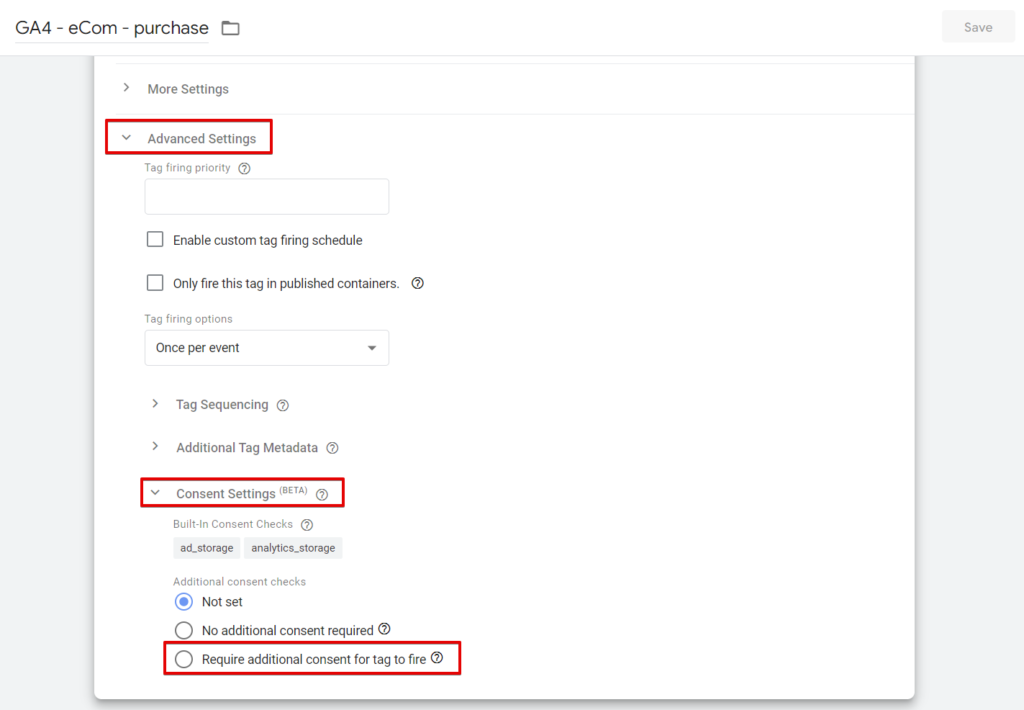
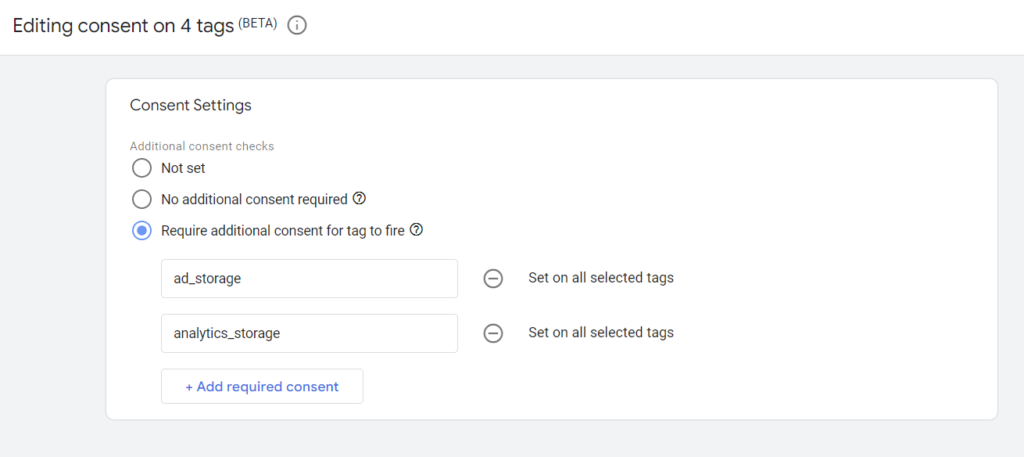
Click the required additional tag consent to fire the consent check option. Next, add the consent, which can be any or a mix of the options below;
- ad_storage
- analytics_storage
- personalization_storage
- security_storage
- functioonality_storage
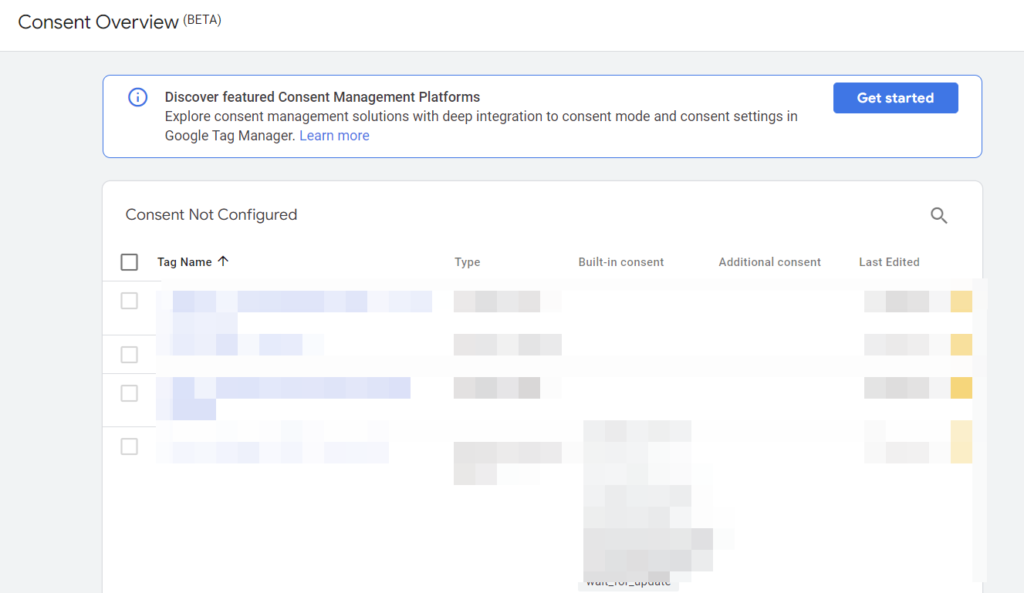
Consent Overview Screen
You can get to this place from the “Tags” view by clicking the shield icon beside the button used for creating new tags.
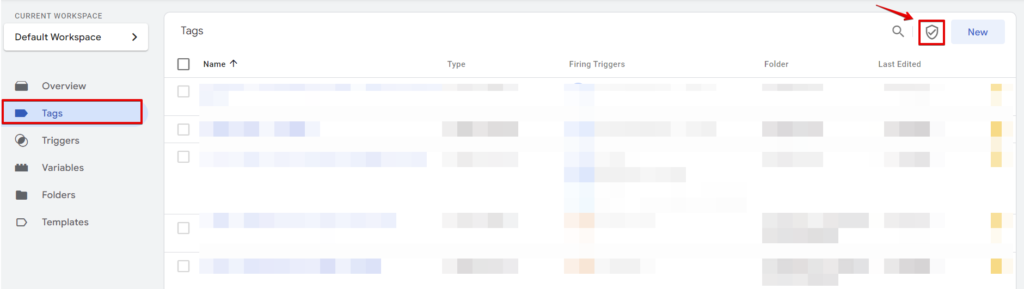
In this view, you see tags that have no consent settings configured as well as those configured.
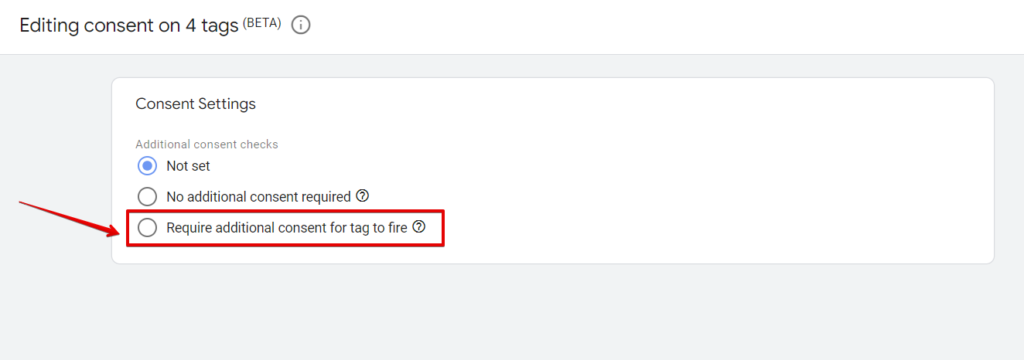
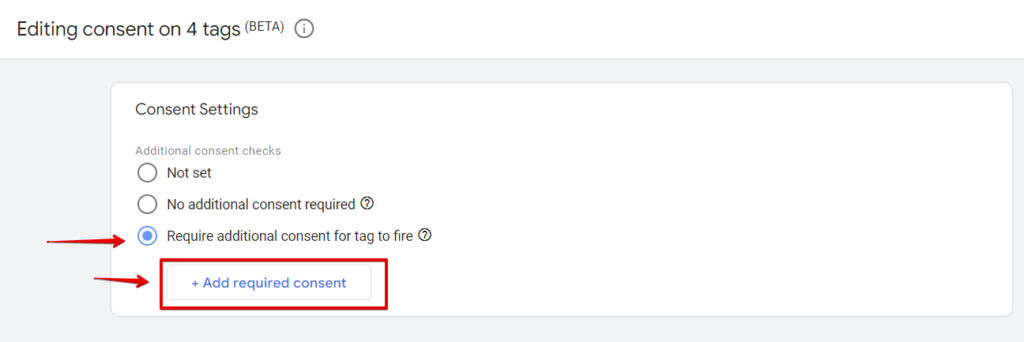
In this view, you can do bulk editing. First, you’ve to select the tags you want to edit or apply consent settings to and then click the icon that has both a shield and a gear together, and you should see a modal screen where you can add the consent settings by the “require additional consent for a tag to fire” option.
Select this option to add your consent settings
Then you’ll be able to add your preferred consent to these tags.
Using The Bulk Edit Consent Settings Feature In GTM
Also accessible from the “Tags” section, but to get to this feature, you’ll have to select the tags you’d want to modify or apply consent settings by bulk selecting the tags and clicking the last three-dotted icon to view more options, where you can choose “Edit Consent Settings“.
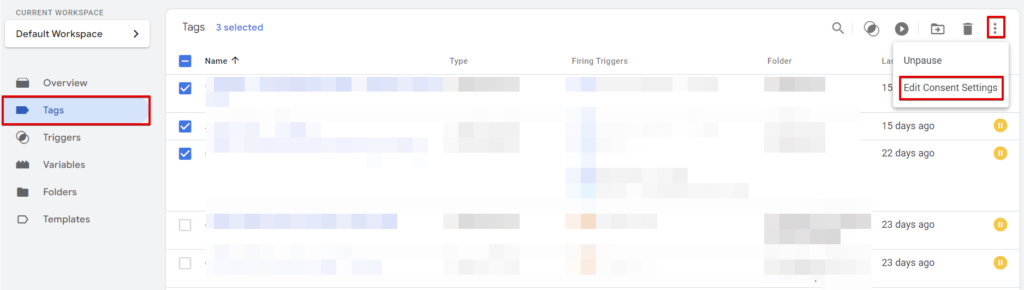
In the next screen, you’ll see the same consent settings view, and now you can add your consent settings configuration.
Note: You should still add the appropriate consent category settings to Google tags like GA4, Google Ads conversion tag, etc., even when they have built-in consent checks.
Preview your setup and publish it if everything looks good.
It’s Time To Say Goodbye
As usual, we’ve reached where we’ll have to reflect on what the article has covered regarding being privacy compliant with how tags are fired in Google Tag Manager when using Piwik Pro Consent Form.
It’s incredible to see the robust solution and privacy configurations that the Piwik Pro consent module and Google Tag Manager provide and how we can leverage Google consent mode or manually blocking tags can be leveraged when both tools communicate with each other.
If you love our article, you can manually revisit our website to see if we’ve added a new blog post, or you can subscribe to our newsletter and get updated not only when recent articles get added but also when we include new resources in our event listeners, analytics worksheet, Looker Studio Template, and tools and template measurement resources.
Thanks, and until then, happy measuring.
Content Author:
Jude Nwachukwu Onyejekwe, an analytics specialist with Hedy and Hopp (an Health Care marketing agency) and DumbData’s co-founder, wrote this lovely piece.


