


E-commerce transactions are key customer actions you should have tracked using whatever analytics tools you use in your e-commerce business’s online store. If you use Microsoft Clarity, you may wonder how you can measure transactions effectively.
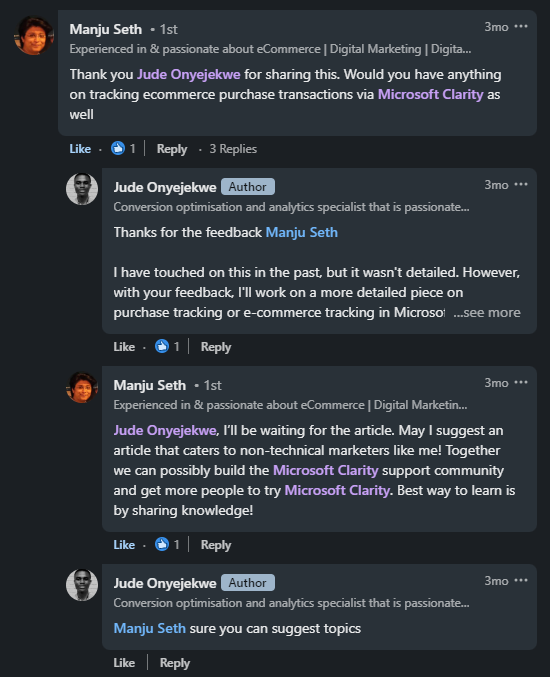
When asked how to track purchases in Microsoft Clarity in a LinkedIn post comment, I decided to write a detailed blog post about it, even though I had previously touched on it in other Microsoft Clarity articles.
I will explain how to set up e-commerce and purchase tracking for your Microsoft Clarity project in this article.
As is customary in many of my articles on Microsoft Clarity, if you are new to the tool and wish to gain a deeper understanding, I recommend reading my in-depth guide on Root and Branch, which covers all aspects of Microsoft Clarity.
Moving on, why is measuring transactions in your Microsoft Clarity project crucial? Tracking purchases allows you to segment sessions with and without purchases, enabling further investigation into how to enhance user experience and identify friction within the purchase journey.
Moreover, measuring other e-commerce-related actions can help segment website visits based on these actions, which could help provide more context to the “Copilot in Microsoft Clarity” AI, which it uses to provide insights into user behaviour on your website.
Using Microsoft Clarity’s purchase and e-commerce tracking features, you can discern patterns in the user purchase journey, identify barriers to conversion, and capitalise on any insights that prove effective.
This underscores why I strongly recommend setting up purchase and e-commerce tracking in your Microsoft Clarity project for any e-commerce business.
Let’s address whether it is possible to track website purchases in Microsoft Clarity.
The answer is partially yes. The “E-commerce Insights” feature is only available for Clarity projects integrated with Shopify sites. This feature includes exclusive tools like “Checkout Abandonment” and the “Product Information” card. While the latter is not limited to Shopify, it does require either the Google Analytics e-commerce data layer or Product JSON-LD to be available.
However, if you are not using Shopify, feel free. You can still track website purchases and other e-commerce actions for your analyses.
Here is What is Possible with Manual E-commerce & Transaction Tracking in Microsoft Clarity
To measure purchases in Microsoft Clarity, you can utilise “Smart Events.” I have previously detailed Microsoft Clarity’s event tracking capabilities in this guide linked here, where I extensively explored “Smart Events” and documented my observations.
The first thing that comes to your mind might be to use the “Auto Events” type of “Smart Events” for your Microsoft Clarity project.
Microsoft Clarity “Auto Events” can help you track e-commerce actions, including purchases that happen automatically on your website.
However, I advise against this because “Auto Events” may not accurately represent successful transactions; they can be triggered by mere clicks on the purchase button, including unsuccessful order placement or missing clicks when the button’s text gets translated into a non-English language.
So what should you do?
You can manually track website orders and users’ e-commerce actions in Microsoft Clarity. I’ll cover how to do this and the strategy you could adopt and innovate.
So, what type of “Smart Events” should you use? Since “Auto Events” isn’t recommended.
Instead, I recommend using “API Events,” a specific category of “Smart Events” that can be implemented to track successful purchases accurately.
Here is the “API Event” code you should have executed upon successful purchase on your website. Also, notice I used a small letter to help you identify between “API Events” and “Auto Events” when using them in your filters.
<script>
window.clarity("event", "purchase");
</script>
You can implement this using Google Tag Manager or Piwik Pro Tag Manager.
A pro tip: use Microsoft Clarity’s “custom tag” to enhance the data collected during the purchase event. More details on this will follow later in the blog post.
Using API Events to Track E-commerce Actions
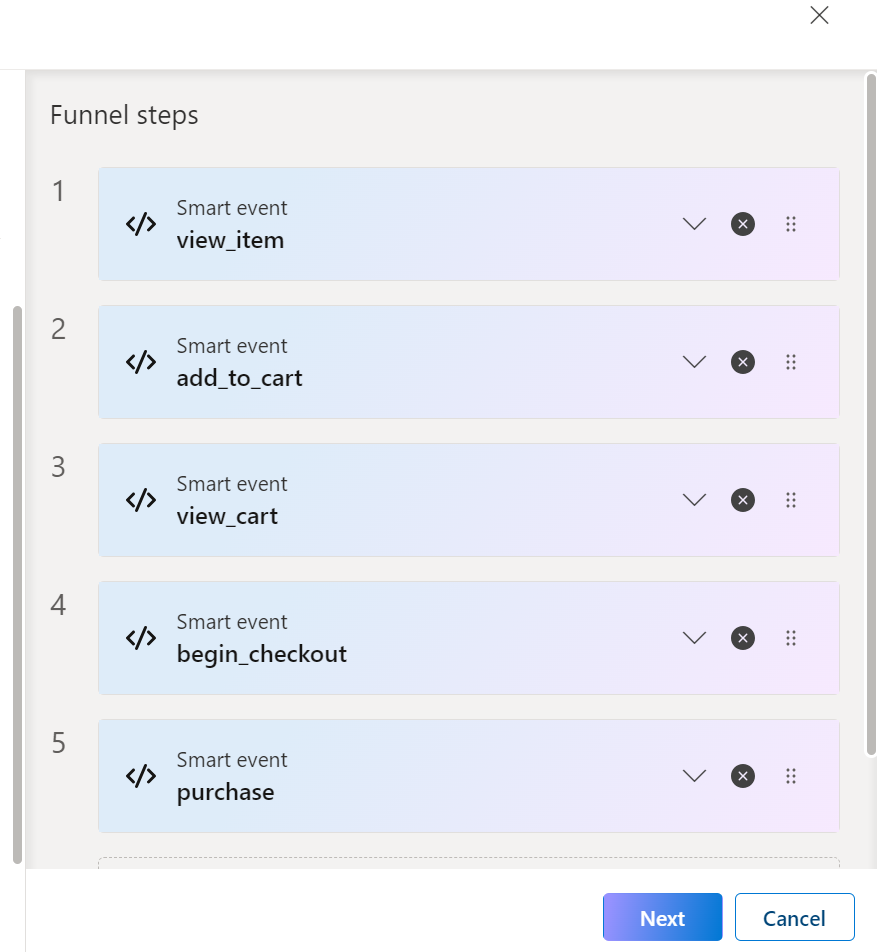
1. Identify Trackable Actions:
Begin by identifying the parts of the shopping journey that you want to have tracked that are trackable on the client side. Currently, these events cannot be sent from the server side. For most businesses, the trackable actions might include:
- Viewing an item
- Adding to cart
- Viewing the cart
- Beginning checkout
- Adding payment information
- Adding shipping details
- Completing a purchase
2. Customise Event Tracking Code:
Use the appropriate code for each action, adjusting the event name to correspond to the user’s specific e-commerce action.
<script>
window.clarity("event", "{{e-commerce action}}");
</script>
I have developed a downloadable GTM template at Dumbdata to help facilitate your e-commerce and purchase tracking setup in Microsoft Clarity.
The GTM recipe will help you save time and enhance the accuracy of your e-commerce tracking efforts.
Using Custom Tags In Microsoft Clarity To Add More Context
“Custom Tags” in Microsoft Clarity are valuable and can enrich the contextual depth of page data collected in your project.
I recommend you read this guide, which shows some innovative ways to use Microsoft Clarity “Custom Tags” to enhance the data you gather.
Custom Tags should add valuable context to the “Smart Event” e-commerce data you are collecting.
clarity("set", "key", "value");– Key: Specifies the tag’s name.
– Value: Defines the value that the tag should hold upon application.
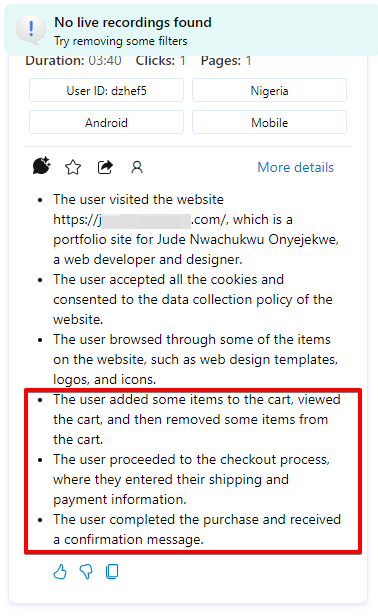
For instance, if you wish to review the session recording of a specific transaction rather than every transaction on your site, relying solely on “Smart Events” is insufficient. Unlike Google Analytics, “Smart Events” in their current form do not support the inclusion of event properties or parameters.
However, with “Custom Tags,” you can also capture details such as the “transaction ID,” enabling you to segment and locate the precise order in question quickly.
<script>
clarity("set", "transactionID", "{{your order ID}}");
</script>
Don’t limit yourself to just using a “Transaction ID.” Consider setting up “Custom Tags” for additional categories such as:
- PageType: Enhance content grouping strategies in Microsoft Clarity (refer to our guide on setting up content grouping).
- PurchaseQTY: Track the quantity of products purchased, which helps segment transactions based on product volume.
- CustomerType: Add context regarding whether a first-time buyer or a returning customer made the purchase.
- AppliesCouponCode: You can use this to determine whether the website visitors used a coupon when purchasing.
- SpendCategory: An internally defined spending range, such as labelling $100 to $500 as low spending. This segmentation helps analyse customer behaviour across different spending categories without having to start collecting the revenue data.
- ConversionType: This can be used to apply a value of “website purchase.” You might think of this as a duplicate of the “purchase” Microsoft Clarity Smart Event. However, it will be helpful when you want to exclude users who didn’t perform a purchase action but did other valuable e-commerce-related actions on the website, as shown in the image below.
In the DumbData Microsoft Clarity e-commerce and purchase tracking template, I utilised “Custom Tags” in different ways to inspire you in what you can achieve with this feature.
You gain significant control and flexibility by manually setting up e-commerce and purchase tracking in your Microsoft Clarity project.
It also enables a more precise measurement of the user journey and a deeper understanding of how different customer segments interact with your website.
Utilising The Collected E-commerce Data In Microsoft Clarity
You can leverage e-commerce data in your filter configuration by creating filters that use “Smart Events,” a combination of “Smart Events” and “Custom Tags,” or other relevant filter options based on the user journey you wish to analyse.
Additionally, you can save these filters as segments for easy future reference.
Applying these filters helps you locate session recordings that contain the specific information you’re looking for. The same principle applies to heatmap data as well.
You can also use the e-commerce data with Microsoft error tracking capability to identify JavaScript errors that occur when the user makes a purchase or enters the checkout funnel. You could even go to the advanced level of manually measuring errors yourself.
These e-commerce events become beneficial when Microsoft Clarity’s Copilot summarises a user session. Having “Smart Events” in your project gives Clarity AI more to use when generating summaries, providing actionable insights that can enhance user experiences.
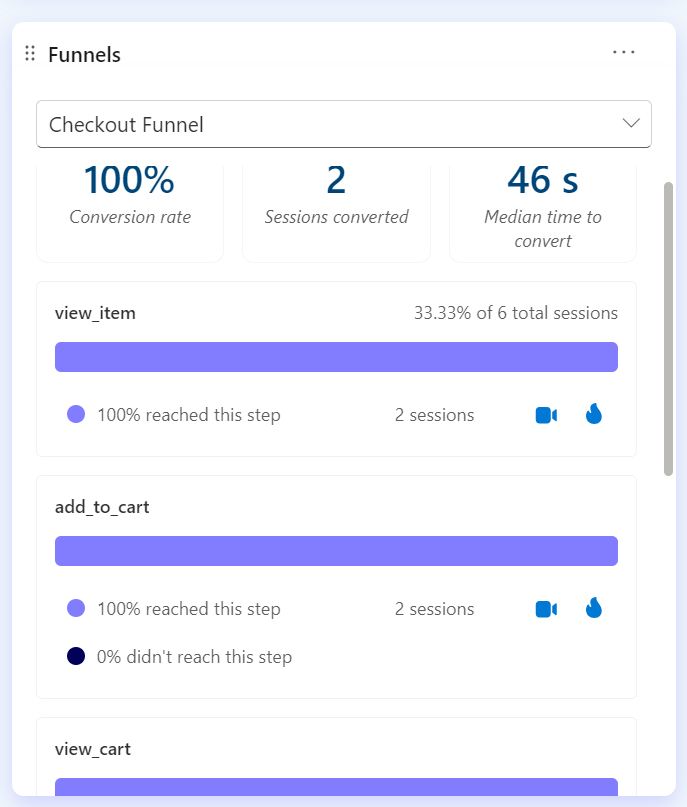
One innovative and actionable way to use these e-commerce API events is to build a funnel in your Microsoft Clarity project to help you understand how users move through the funnel in different sessions.
Read this comprehensive guide about funnels in Microsoft Clarity.
Using Shopify Integration for Purchase Tracking:
If you are using Shopify and have integrated it with Microsoft Clarity, the native integration ensures that purchases get tracked by default.
This integration tracks purchases and provides other valuable e-commerce insights, such as detailed Checkout Abandonment reports.
However, it does not include “Smart Events” for other e-commerce actions; remember that relying on “Auto Events” may not accurately reflect successful actions.
The Shopify e-commerce insights report is a powerful tool for identifying conversion frictions. While I won’t go into all the details of the e-commerce insights Microsoft Clarity provides for Shopify stores here, I recommend checking this documentation to explore this topic further.
Closing Remarks
Professional advice that I’ll give to you is to not limit your event tracking to e-commerce actions. You should also track critical check-out errors so that you have control over what errors you want to monitor and determine how they impact your business revenue and website conversions.
You might see Microsoft Clarity try to set up e-commerce tracking for you by using the “Auto Events” type of “Smart Events“, which I’d recommend you shouldn’t rely on but instead manually have your set up.
So, basically, in this guide, I covered how to set up e-commerce tracking, including purchase tracking, for your Microsoft Clarity project.
If you’ve learned something new or have any challenges or questions, please get in touch with me on LinkedIn or via the email address on the DumbData Contact Us page. Happy measuring!


