


Piwik Pro Analytics can be used to track internal site searches, and it is a no-brainer not to implement internal site search tracking on a website with a site search capability.
Tracking this activity in your web analytics tool can provide invaluable insights into user search behaviour and its impact on key business metrics.
In this detailed article, I will guide you through setting up internal site search tracking in Piwik Pro Analytics.
Configuring search tracking in Piwik Pro Analytics can be easy or complex, depending largely on your website’s search form technology and experience.
Piwik Pro offers the capability to automatically track site searches, which simplifies the initial setup for many users. However, the need to manually set up site search tracking in Piwik Pro Analytics might also arise.
I will start my explanation with the more straightforward method of setting up search tracking in Piwik Pro, covering both the automatic and manual way of tracking these user behaviours in your analytics project.
How to Automatically Track Internal Site Search in Piwik Pro Analytics
This process is easy, and the implementation of internal site search tracking in Piwik Pro Analytics is done automatically, with no need for extra setup hours, provided that each user search triggers a page reload or not (as Piwik Pro site search configuration works seamlessly in Single-Page Applications and Progressive Web Apps when I did my test) and updates the URL with specific query parameters.
If your search result pages include a unique query key, you can leverage Piwik Pro’s automatic search tracking capabilities.
Here Is a Step-By-Step for Automatically Setting Up Site Search Tracking In Piwik Pro Analytics:
1. Start by navigating to the “Administration” section of Piwik Pro. You can do this by clicking on the menu and selecting the “Administration” option.
2. In the “Sites & Apps” view, find the Piwik Pro site project for which you wish to configure site search tracking. Then, proceed to the “Data Collection” view and scroll down to the “Internal Search Engine” section.
You’ll have to determine your website’s search query and verify whether its search query parameter is listed among the system-added parameters.
3. If your search parameter is not listed, add it manually.
Take, for instance, if your website (e.g., companyabc.com) uses the query parameter “find” in its search URLs (like companyabc.com/search/?find=pricing)
- URL: “companyabc.com/search/?find=pricing”
- Parameter to Add: “find”
You must add “find” to the Piwik Pro search keyword parameter field.
4. There’s no need to save changes, as Piwik Pro updates configurations automatically.
Next Optional but Recommended Action:
Tracking Search Category:
First on the list is the tracking search category setting. If your site allows users to filter searches by category, you can add the category query parameter in the “Category Parameters” field within the site search tracking settings.
Adding this to your setup lets Piwik Pro capture and provide you with the search term and the category in your analytics report.
Removing Search Keyword Parameters From Page URLs:
Depending on your preference, you may choose to have Piwik Pro strip the search keyword parameters and their value from page URLs.
This prevents Piwik Pro from storing the search result page URL as a distinct URL, which can skew page view metrics in reports. Removing these parameters ensures that search result pages aren’t reported as having zero page views.
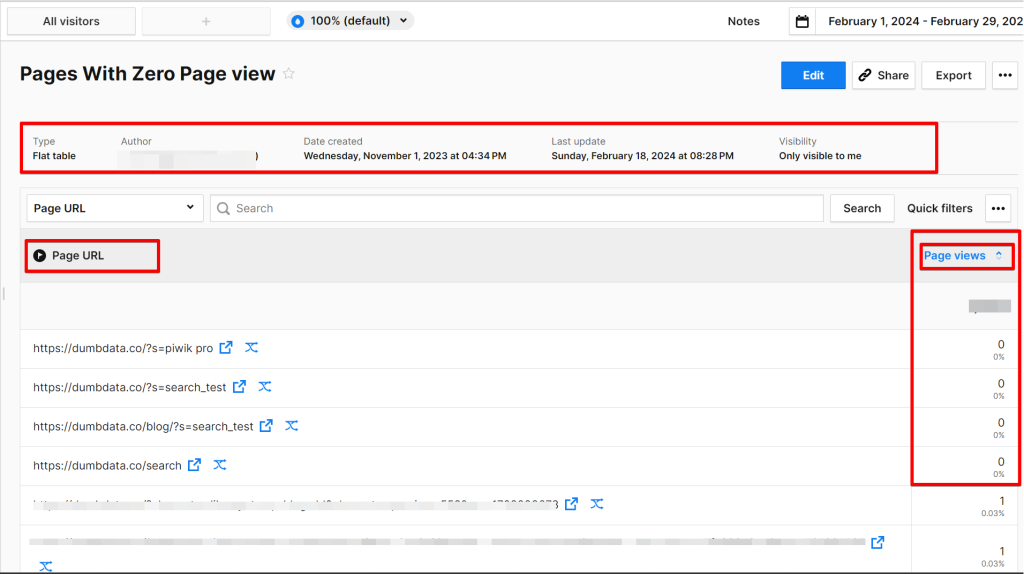
Practical explanation of the impact if you don’t strip the search parameters.
By default, Piwik Pro collects and stores the search keyword and page URL data, including the search URL parameter keys and their values., and then reports them as a distinct page.
For example, if Company ABC has searches like:
- “companyabc.com/?s=shoes”
- “companyabc.com/?s=books”
- “companyabc.com/?s=bags”
Piwik Pro retains the search query parameter and reports on these pages but shows zero page views when pulling the “Page URL” dimension and “Page View” metric in custom reports or exporting data to Google Sheets.
However, if you enable the settings that allow Piwik Pro to strip search keyword parameters, these pages will automatically not be reported unless they contain other significant URL (non-search and marketing campaign) parameters.
You can read more about this in this article, where I also proposed some solutions and actions to take whenever you notice this in your report.
Now that you understand how to automatically track website search activity in Piwik Pro.
Next, we will explore the manual approach to tracking search results, which offers more flexibility and allows you to include additional data, such as result counts. This approach can help you identify terms with zero results and potentially highlight content gaps on your website.
Manually Tracking Site Search in Piwik Pro Analytics
Manual tracking of site search activity in Piwik Pro Analytics is essential in specific scenarios where URL addresses do not store query parameters or cases where you also want to capture the number of returned results for the search term, which isn’t possible with the automatic approach.
Below is a list of the following situations where manually setting up an internal site search might be needed:
- Non-Standard URL Structures: These are cases where the search result page doesn’t utilise URL query parameters. A typical example can be a URL format like “example.com/search/{{search-term}}”, where the search term is part of the path rather than a query parameter.
- Autocomplete Searches: Another scenario where the search may trigger an autocomplete function without navigating to a dedicated search result page.
- Popup Search Results: In this example, the search results are displayed in a popup rather than a full page.
- Complex Tracking Needs: Even if search URL parameters exist, you may need to track additional metrics, such as the number of results returned by a search term, to identify gaps where user interest is high but content is lacking.
In these cases, manually tracking internal site search activity is a good option. This can be accomplished using JavaScript code that utilises the Piwik Pro JavaScript Tracking API to capture and transmit internal search data to your Piwik Pro Analytics project.
Here is an example of the tracking function syntax:
_paq.push(['trackSiteSearch', 'keyword', 'category', 'search_count']);When implementing this, you should:
- Replace “keyword” with the actual search term used by the visitor.
- Update “category” with the actual category of the search term, or use an undefined value if no category exists.
- Set “search_count” to the number of results returned by the search. If you cannot capture this, you should set it to zero (0). Note that Piwik Pro will handle string conversions automatically, so adding quotes is optional.
The Three Methods for Manual Site Search Tracking Implementation In Piwik Pro Analytics
This section will cover three effective methods to implement manual site search tracking for your Piwik Pro Analytics project, which is helpful in the scenarios described above.
Each method can be implemented using either Google Tag Manager or Piwik Pro Tag Manager:
- Using DataLayer Push
- Capturing and Using Page URL Variables
- Scraping and Using DOM Content
Let’s take a deeper look at each method.
Implementing DataLayer Push:
Using the DataLayer push method is a future-proof strategy applicable to various scenarios requiring a manual approach to internal site search tracking in Piwik Pro Analytics. This method necessitates collaboration with your developer to implement the DataLayer and update its values according to the search data.
Below is an example of the DataLayer push code you can provide your developer.
<script>
window.dataLayer = window.dataLayer || [];
window.dataLayer.push({
  'event': 'site_search',
  'searchKeyword': 'the user inputted search term', // Replace dynamically with the actual search query
  'searchCategory': 'search category', // Replace dynamically with the category of the search term
  'searchResultCount': 0 // Replace with the number of results returned for the search term
});
</script>
It would be best if you had it communicated with your engineering team that the values for the search term, category, and search count need to be dynamically updated based on user search activity.
Once the DataLayer get correctly implemented on the website and is working as expected, you will need to set up variables in your Tag Manager (GTM or Piwik Pro) to retrieve values using the DataLayer keys:
- Search Term: DataLayer key is ‘searchKeyword’
- Search Category: DataLayer key is ‘searchCategory’
- Search Count: The DataLayer key is ‘searchResultCount’
Setup Example In Google Tag Manager:
Navigate to the “Variables” section, click the “New” button in the “User-Defined Variables” section, and create a variable for each DataLayer key.
Setup Example In Piwik Pro Tag Manager:
Go to the “Variables” view and click the “Add Variable” button to set up each necessary variable using the “Data layer” type.
Setting Up Triggers:
The next step is to create a trigger to activate the Piwik Pro JavaScript function to track site searches manually.
You’ll have to use a “Custom Event” trigger type in Google Tag Manager.
While in Piwik Pro Tag Manager, you’ll have to use a “DataLayer Event” trigger.
Implementing the Tag That Tracks Site Search In Piwik Pro:
Finally, implement the Piwik Pro Analytics internal search JavaScript tracking API using a tag:
<script>
  _paq.push(["trackSiteSearch", "{{DLV - searchkeyword}}", "{{DLV - searchCategory}}", {{DLV - searchResultCount}}]);
</script>
In Google Tag Manager, your tag setup should look like this, and you’ll have to use a “Custom HTML” tag.
In Piwik Pro Tag Manager, you should have something similar to the one below, and you’ll have to use a “Custom Code” tag.
Ensure the following in your setups;
- Ensure all variables correctly represent your actual search parameters.
- Thoroughly test the setup to confirm everything is functioning as expected. Utilise tools such as the “Piwik Pro Tracker Debugger” to validate your configuration.
- Once verified, go ahead and publish your site search tracking implementation.
For further reading on debugging and troubleshooting, you can read my guide on Piwik Pro debugging to familiarise yourself with this implementation aspect.
Capturing and Using Page URL Variables:
This method is an alternative for businesses that don’t have the engineering resources to implement a DataLayer, and your website’s search result pages do not utilise URL query parameters.
So, if your search result pages are formatted as follows, you can set up search tracking using this approach:
- “https://example.com/search/search-term”
- “https://example.com/search#search-term”
Suppose your website’s search result URLs are structured similarly to the examples above and lack the resources for a DataLayer push. In that case, consider using JavaScript to capture the search term directly from the URL.
This is viable as long as the search term remains the last segment of the URL path, which consistently indicates a search results page.
Here’s how you can extract the search term using the JavaScript code below, which I copied from Analytics Mania.
function() {
  var pagePath = window.location.pathname;
  var searchParam = '/search/'; //replace this with your page path before the search term
  if (pagePath.indexOf(searchParam) > -1) {
    return decodeURI(pagePath.split(searchParam)[1].split('/')[0])
  }
}
In line 3 of the JavaScript code, you need to enter the page path of your URL before the search term. Let me illustrate.
- If your search URL is “example.com/search/user-search-term”, you need to input “/search/” including the slashes.
- For “example.com/search/results/user-search-term/”, enter “/search/results/”.
The JavaScript will return undefined if the page path does not match your defined search parameter.
Setting Up The Variable In Tag Manager:
In Google Tag Manager (GTM), use the “Custom JavaScript” variable type.
Use the “Custom JS” variable type in Piwik Pro Tag Manager.
Create a Trigger For Executing The Site Search Tag:
The next step that comes in the implementation is setting up the trigger, and this trigger should fire when the page’s Document Object Model (DOM) is ready, but only if the search term variable does not match the regex pattern “^(undefined|null|0|false|NaN|)$“:
In GTM, configure the trigger as “DOM Ready” with a condition that does not match the regex pattern.
In Piwik Pro Tag Manager, set it to fire on “DOM Ready” when “regexp doesn’t equal” the pattern.
Configuring The Tag For Capturing Site Search Actions In Piwik Pro:
Add a tag type of “Custom HTML” in GTM and add the Piwik Pro site search JavaScript API code in the tag.
<script>
  _paq.push(["trackSiteSearch", "{{CJS - Search Term", "{{CJS - Search Category", {{DOM - Search Count}}]);
</script>
You should use the “Custom HTML” tag type when using Google Tag Manager to deploy the Piwik Pro internal site search tracking tag.
And, for instrumentations done in Piwik Pro Tag Manager, you’ll have to use the “Custom Code” tag type with the same site search tracking code.
If the search category is part of the URL, capture it using JavaScript; otherwise, set it as “undefined” or leave it blank. For the search count, default to zero unless it can be dynamically captured from the user interface by scraping the page’s Document Object Model (DOM).
Add the trigger you’ve created to the tag, test your instrumentation to ensure it’s working as expected, and apply whatever privacy configuration you’d like to the tag.
When your “search term” is not the last segment found in the page path but with a consistent number placement, you can still capture it using JavaScript but with a different approach.
Scraping and Using The DOM Content:
While effective under certain circumstances, manually tracking site searches by scraping the DOM is generally not recommended due to its fragility.
Design changes or updates to the search result pages could break your tracking. Also, this tracking approach is contingent upon visitors not translating the website; any language changes could cause your tracking not to work.
However, if other options are unavailable and it’s essential to implement tracking for searches on your website, this method may be utilised under certain conditions.
Firstly, confirm whether the search term appears on the search result page. If it does, identify whether it is presented in one of the following formats:
- Format 1: The Search Term Get Displayed Without Any Prefix
- Format 2: The Search Term Appears Preceded By a Specific Prefix
Format 1: The Search Term Get Displayed Without Any Prefix
Setting up tracking for this format is relatively straightforward. You can achieve this through JavaScript (which I wouldn’t cover) or by using a “DOM Element” variable in tools like GTM (Google Tag Manager) or Piwik Pro Tag Manager.
Begin by identifying the CSS selector for the search term, which can be done using the browser’s element inspector tool. Alternatively, right-click the element, select “copy,” and then “copy selector” to automatically capture the required CSS selector.
In my example, using the image below, my CSS selector will be “#search-keyword > section > h1 > span“
In GTM, your setup should be similar to this.
While in Piwik Pro Tag Manager, you should have something similar to this.
Format 2: The Search Term Appears Preceded By a Specific Prefix
Suppose the search term includes a prefix (e.g., “Search Results for: “); additional steps are required to isolate the search term.
First is to identify the CSS selector, and in my case, it’s “#search-keyword > section > h1“
The next step will be creating a variable in your TMS to capture the search term in the current format.
In GTM, you’ll use the DOM variable type and should have a setup like the one below.
In Piwik Pro, you’ll use the “DOM Element” variable type with a setup that mirrors the one below.
After this stage, the next step is to transform the value of the variable just to capture only the search term.
Use JavaScript to strip the prefix and capture only the search term. Below is a JavaScript function example that adjusts for this scenario (code is from Analytics Mania):
function () {
  var searchTitle = "{{DOM Element - Search Term}}";
  if (searchTitle && searchTitle.indexOf('Search Results for:') > -1) {
    return searchTitle.replace('Search Results for: ','');
  }
}
Remember to update “{{DOM Element – Search Term}}” with the actual variable that retrieves the value of the HTML element containing the search term and prefix text. Also, ensure the function’s “replace()” method reflects the specific prefix used with the search term on your site.
Here is what your setup should look like in Google Tag Manager.
In Piwik Pro Tag Manager, you should have a setup like this.
After capturing the search term, set up your trigger and activate the Piwik Pro site search tracking script. This script can be implemented as a “Custom HTML” tag in GTM or a “Custom Code” tag in Piwik Pro TMS.
Following the same approach, you’ll be able to capture the search count and search category value, if they exist in the web page document, to scrape using JavaScript DOM manipulations.
While there are other methods for tracking site searches, this article focuses on manual tracking methodologies that cater to a significant portion of website needs.
What’s Next? Accessing the Search Data
After setting up search activity tracking in Piwik Pro Analytics, the next step is to analyse the data to glean insights.
The easiest way to begin is by accessing the Piwik Pro Analytics suite.
Navigate to the “Report” view, proceed to the “Behavior” report section, and select the “Internal Search” report tab.
This section automatically generates a report detailing the search terms and categories, including data on how many times each keyword has been searched and the average number of search results returned for each keyword or category.
Much more can be done with this search data, and I will cover these in the next Piwik Pro topic and show you advanced stuff.
If you’re interested, consider subscribing to the DumbData newsletter to get notified when new content is published.
Concluding on Site Search Tracking in Piwik Pro
Navigating through the easy part and complexities of search activity tracking in Piwik Pro Analytics has been challenging, but we have covered most of what you need to track the search activities of your website visitors effectively.
If you have any feedback, find discrepancies, or feel updates are necessary for this article, please contact me via LinkedIn or the DumbData contact page. Also, remember to check out other resources on the DumbData website and subscribe to our newsletter. Until then, happy data analysing!


