


Here’s a detailed guide on integrating Piwik Pro Analytics data into Looker Studio and exporting it to Google Sheets.
As a marketing analytics specialist working with Piwik Pro Analytics, you will frequently build reports and dashboards using the data collected from Piwik Pro Analytics. Sometimes, you may utilize Google Spreadsheets for reporting and Looker Studio for dashboarding. The question then arises: How can you connect your Piwik Pro data to Looker Studio and Google Spreadsheets?
At DumbData, we have already covered how Piwik Pro integrates with third-party consent management solutions such as Osano, CookieYes, and CookieFirst. However, this article will focus on connecting your Piwik Pro analytics data to Looker Studio and Google Spreadsheets.
We will explore the diverse options available for reporting or extracting the data you need, such as your Piwik Pro Goal/Conversion data, traffic acquisition, event data, and custom business needs.
You may be curious about the benefits of importing your data into Looker Studio or Spreadsheet platforms like Google Sheets. These platforms offer several advantages, including:
- Flexibility: You can easily merge or combine Piwik Pro analytics data with external sources.
- Enhanced Visualization: You can access a wider range of visualization options and structure your Piwik Pro report layouts to strategically and intuitively communicate your business’s key performance indicators (KPIs).
- Unlimited Branding Options: Unlike standard reporting interfaces found in most analytics tools, Looker Studio and Google Spreadsheets allow you to customize the look and feel of how your Piwik Pro data gets presented to business stakeholders.
These are just a few examples of the benefits of using Google Sheets or Looker Studio to communicate business insights using your Piwik Pro Analytics data.
Connecting Piwik Pro Data to Looker Studio
Let’s begin by exploring how to connect your Piwik Pro data to Looker Studio. The process is simple and straightforward, starting within Looker Studio.
There are multiple pathways to achieve this, but they all lead to the same objective: building a dashboard or report using the data you’ve collected in Piwik Pro Analytics.
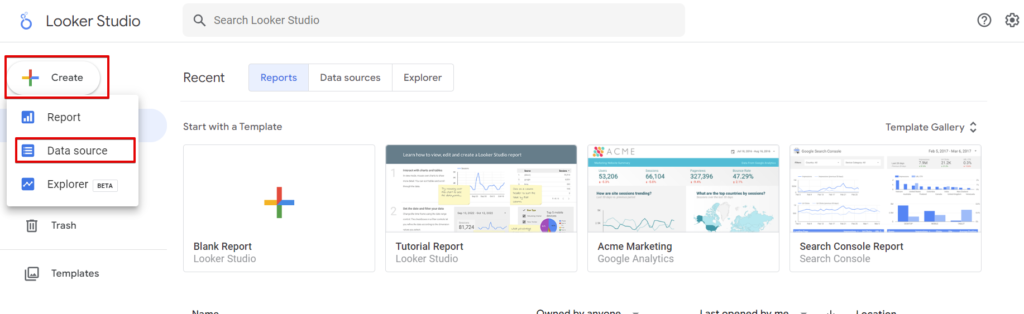
One approach is to open a Looker Studio report and select the “add data” option from the menu. This action will bring up a screen where you can find the Piwik Pro data connectors under the “Connect Data” tab by using the search field.

Alternatively, you can navigate to this screen through the Looker Studio overview page. Click the “Create” button and choose the “Data source” option. This will present you with a screen similar to the previous route.
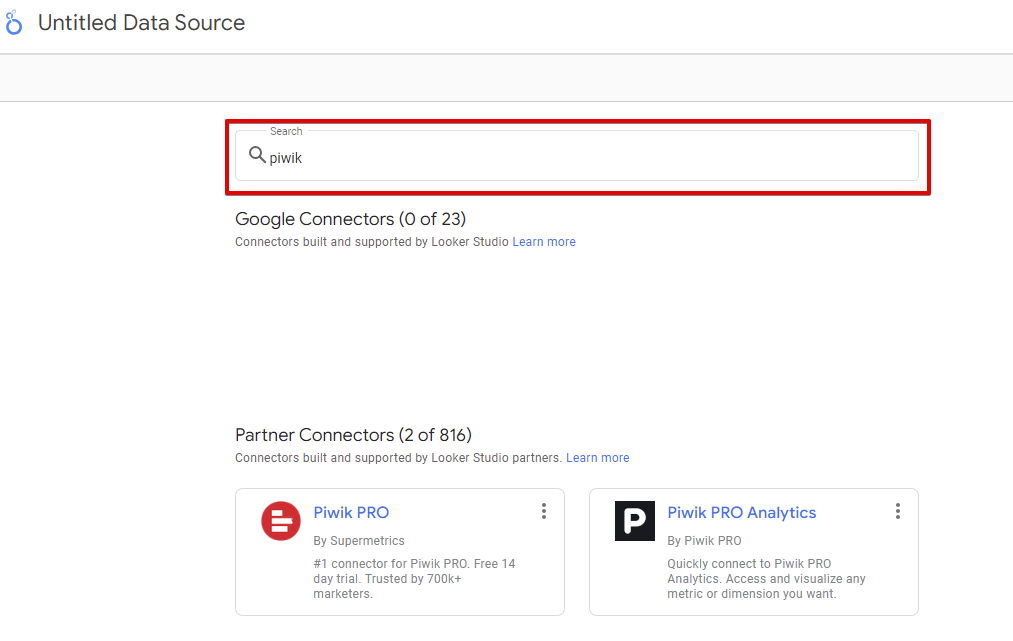
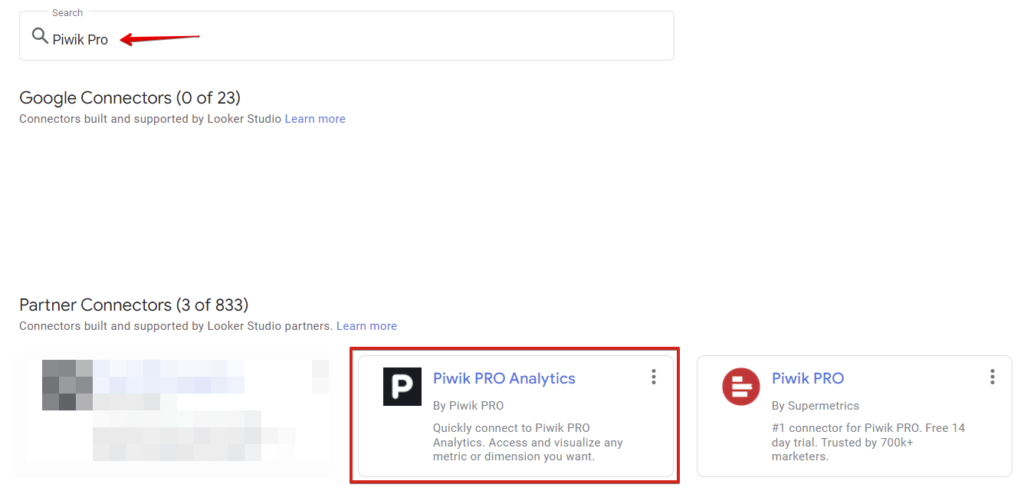
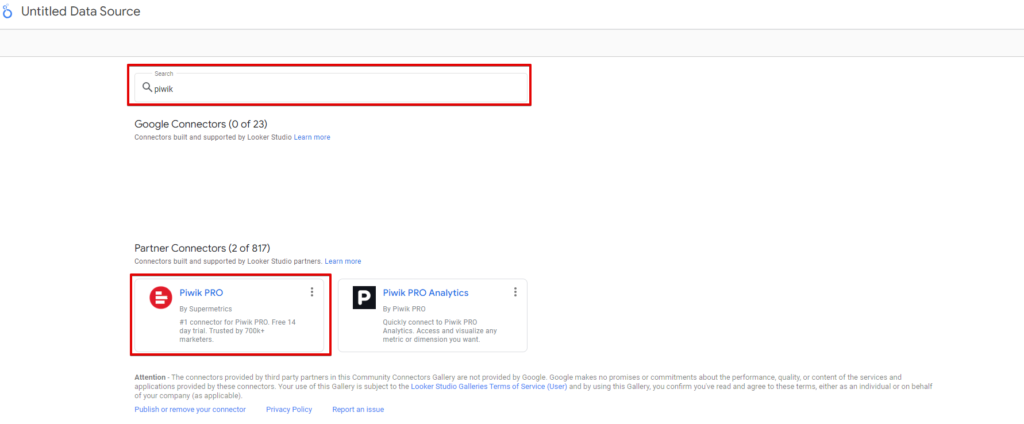
In the search field, you can enter “Piwik Pro” to find two available options: the “Supermetrics” connectors or the “Piwik Pro Analytics” connectors.
I will explain how to utilize both connectors, but please note that to use the “Supermetrics” connector, you must have an active Supermetrics subscription.
If you cannot find the Piwik Pro native connector, as shown on the screen above, don’t worry. I will provide a solution later in the article as we progress.
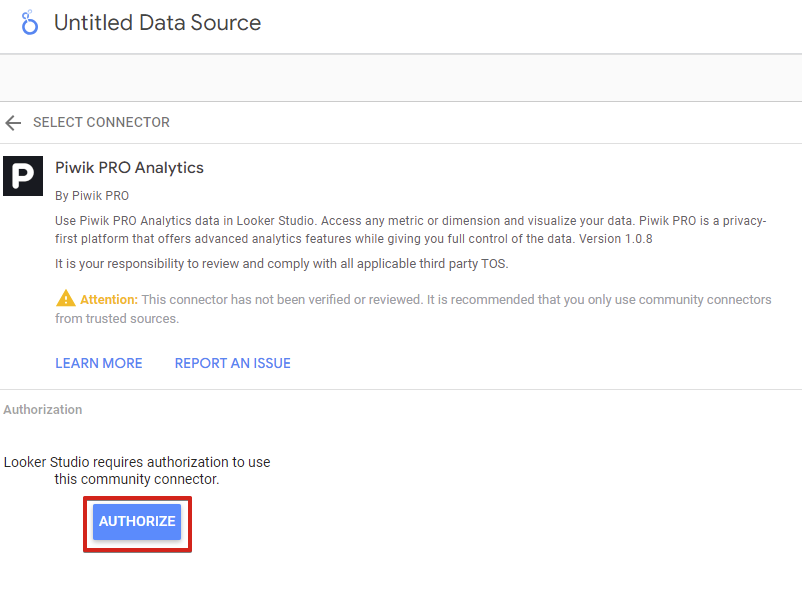
Connecting Piwik Pro to Looker Studio Using the Native Connector:
Use the steps below to establish a connection between Looker Studio and Piwik Pro Analytics suite using the native connector.
Start by selecting the Piwik Pro connector.
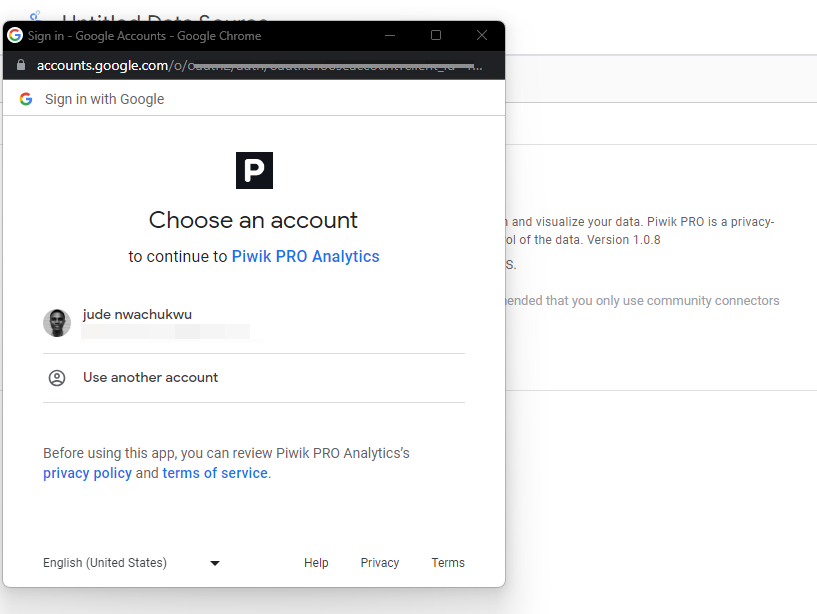
Since it’s your first time, you’ll be requested to authorize and authenticate your Google account.
Select your Google Account, which you’ll have to authenticate.
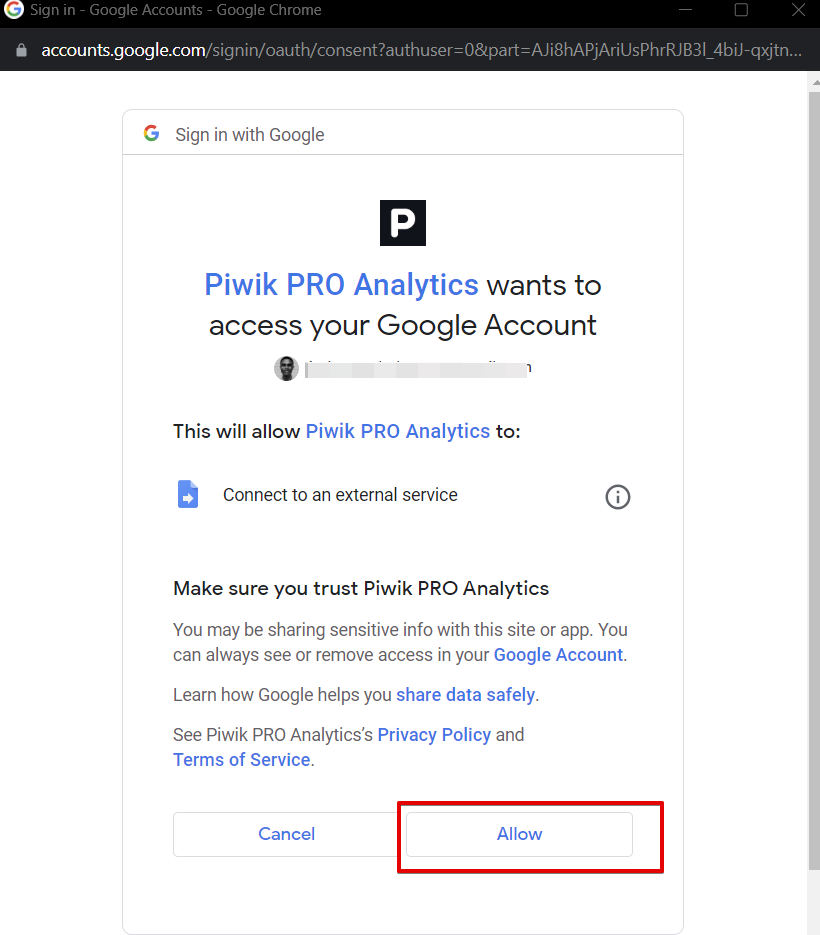
Complete the authentication by clicking the “Allow” button.
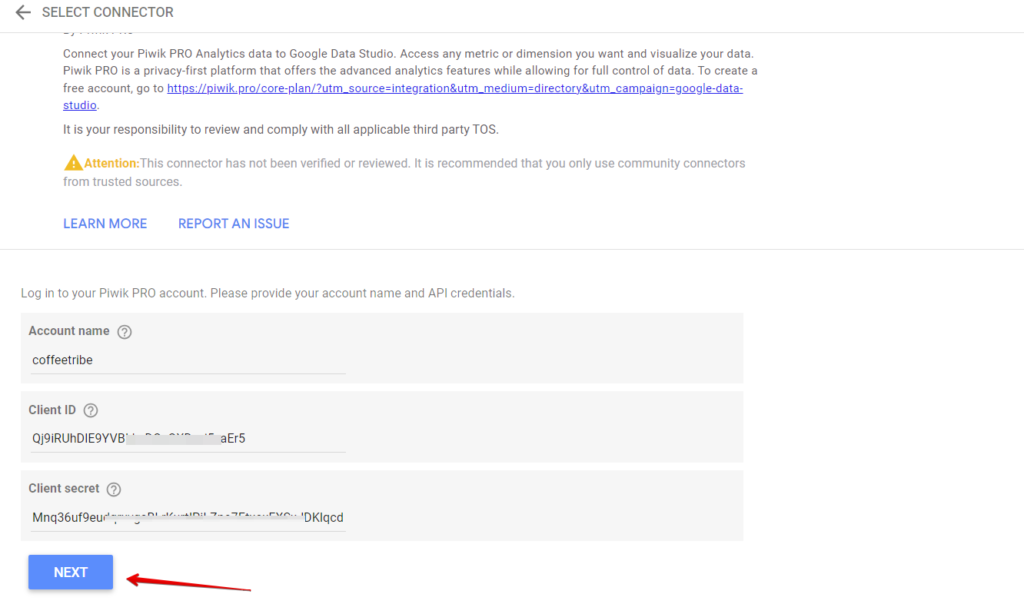
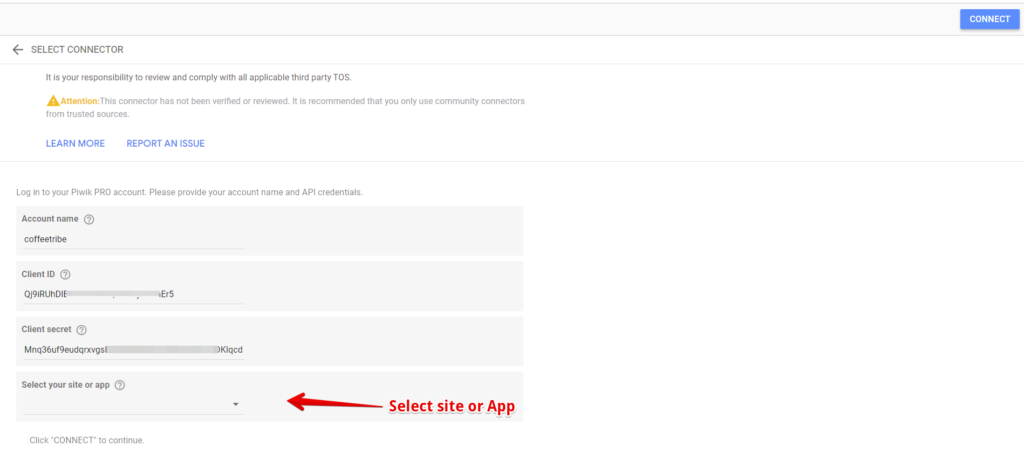
You’ve to select the native connector and proceed to the next screen, where you will be required to enter the following Piwik Pro credentials:
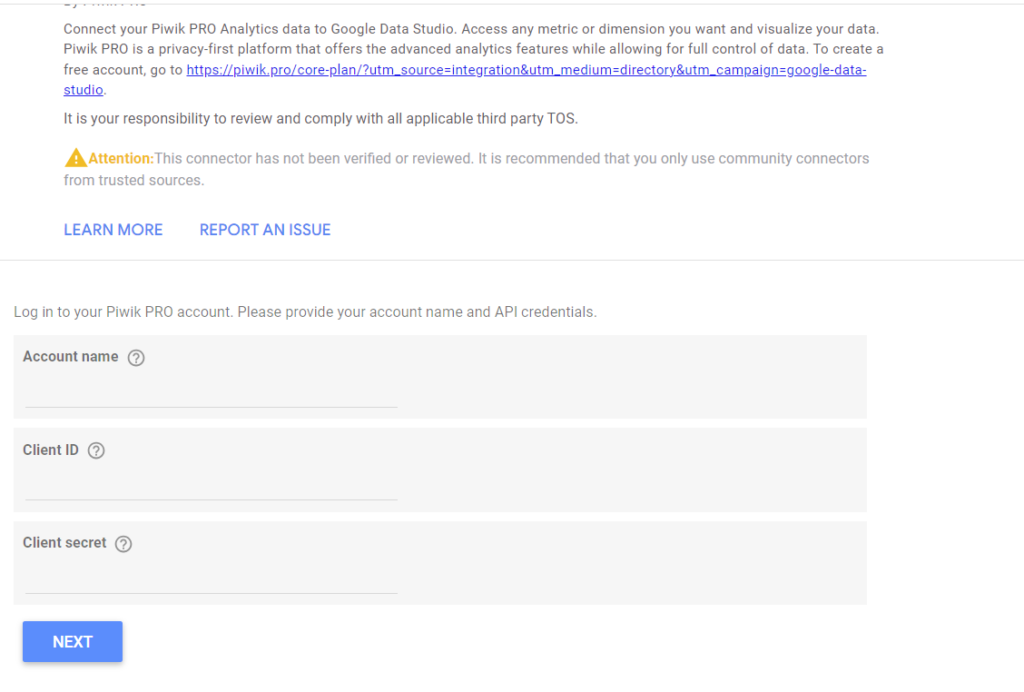
- Account Name
- Client ID
- Client Secret
Account Name:
You can obtain the “Account Name” in two ways. Firstly, you can find it in the URL of your logged-in Piwik Pro account or within the Piwik Pro interface itself.
Your account name is the initial part of your account address. For example, in “example.piwik.pro,” the account name is “example”.
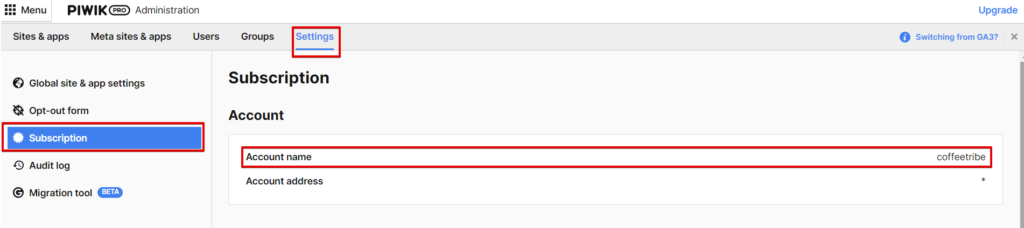
In the example below, the account name will be “coffetribe“.

The second method is for users who prefer an alternative approach or to host Piwik Pro on their domain. If you fall into this category, access the Piwik Pro “Menu” and navigate to the “Administration” section.
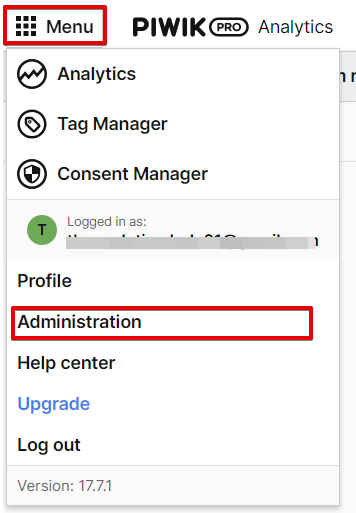
Within the “Administration” section, proceed to the “Settings” tab and select “Subscriptions.” Your Piwik Pro account name is on the right side, as illustrated in the image below.
Client ID & Client Secret:
We’ll be generating the values for both fields at the same time and through the same approach, and we’ll generate these API credentials (API keys) by following these steps:
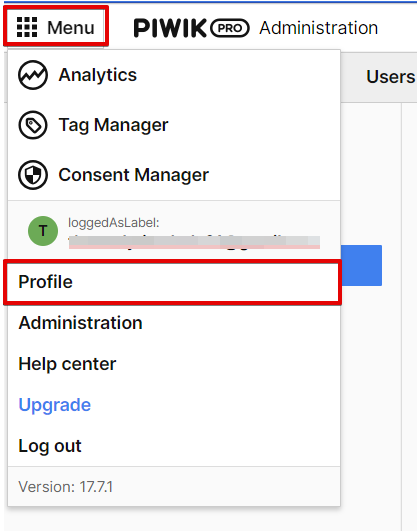
1. Access the “Profiles” section through the Piwik Pro “Menu” interface.
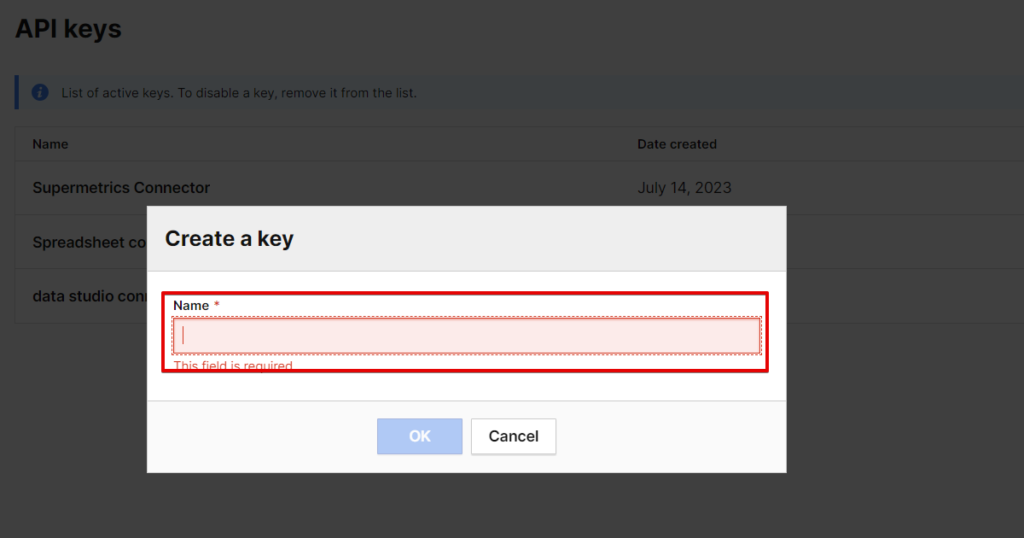
2. Proceed to the “API Key” section, where you will get the option to create a new API key by clicking the blue “Create a key” button.
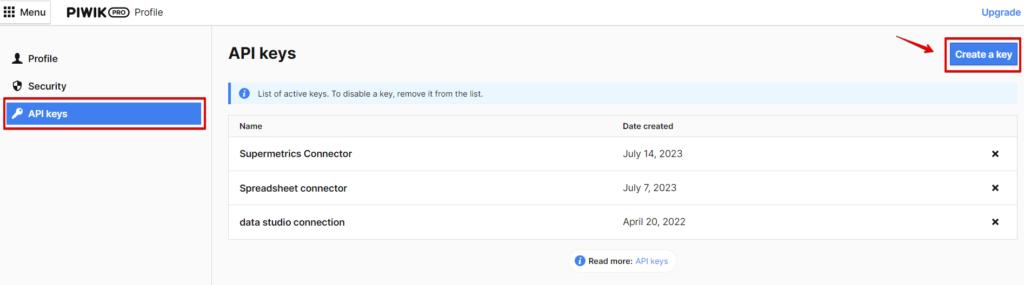
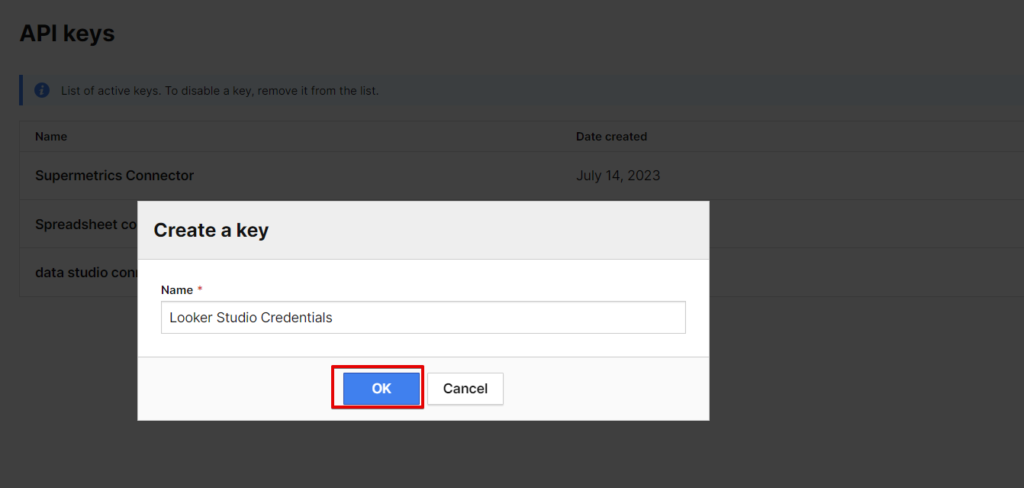
3. Provide a descriptive name for the API credentials and click “OK.“
Add the credential name and click “OK”.
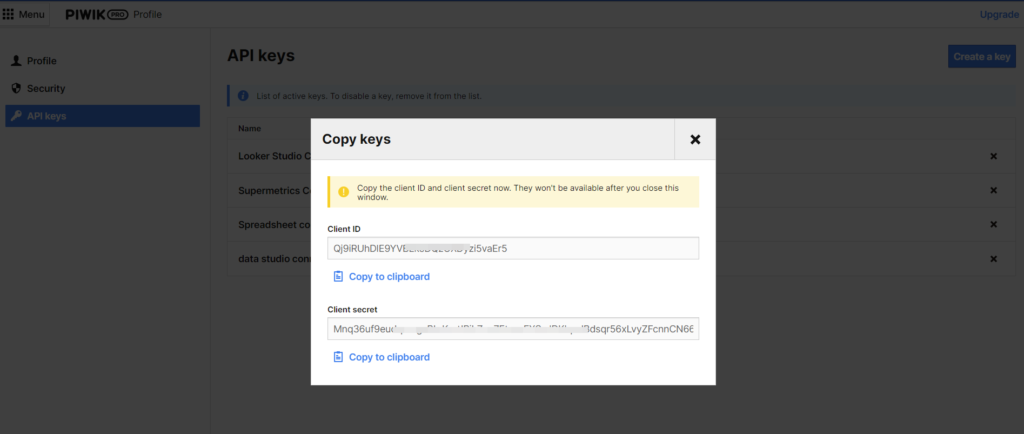
4. A window displays the “Client ID” and “Client Secret.” Please note that once you close this window, the information will no longer be accessible. You can only see the name without knowing the “Client ID” and “Client Secret” unless you create new API credentials.
Copy and enter all the required information into the appropriate fields in the Piwik Pro native connector’s authenticator screen, and click “Next.”
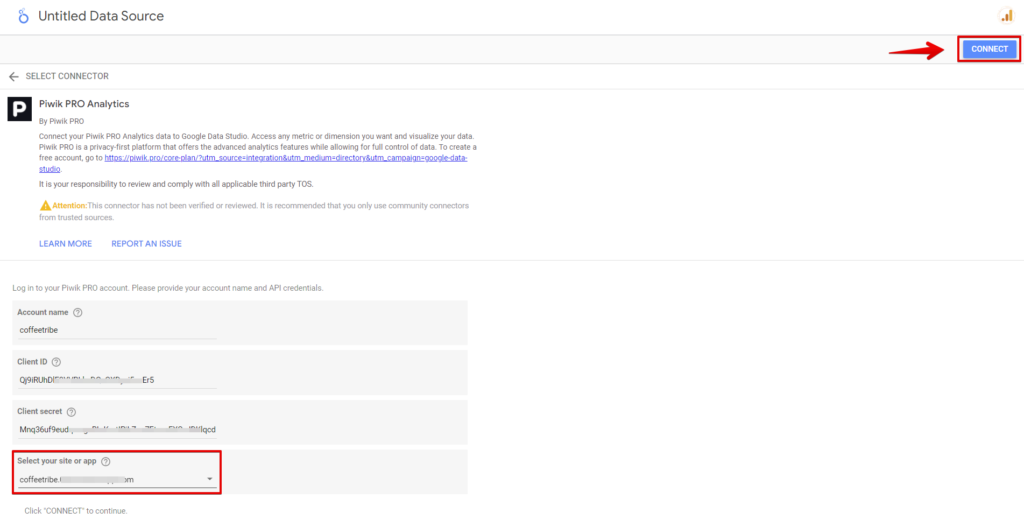
Immediately after the credentials you’ve added get authenticated, on the next screen, you will be required to select the Piwik Pro property site or app for which you want to use its data.
After making your selection, click the “Connect” button.
Congratulations! You have successfully connected your Piwik Pro analytics data to Looker Studio and gained access to different dimensions and metrics. If you encounter any issues with the connector, feel free to seek assistance from experts in the Piwik Pro community channel.

Connecting Piwik Pro to Looker Studio When the Piwik Pro Owned Connector Isn’t Available:
In a scenario where the native Piwik Pro Analytics connector isn’t showing up for you on the data source collection page, you can still use it following the solution presented below:
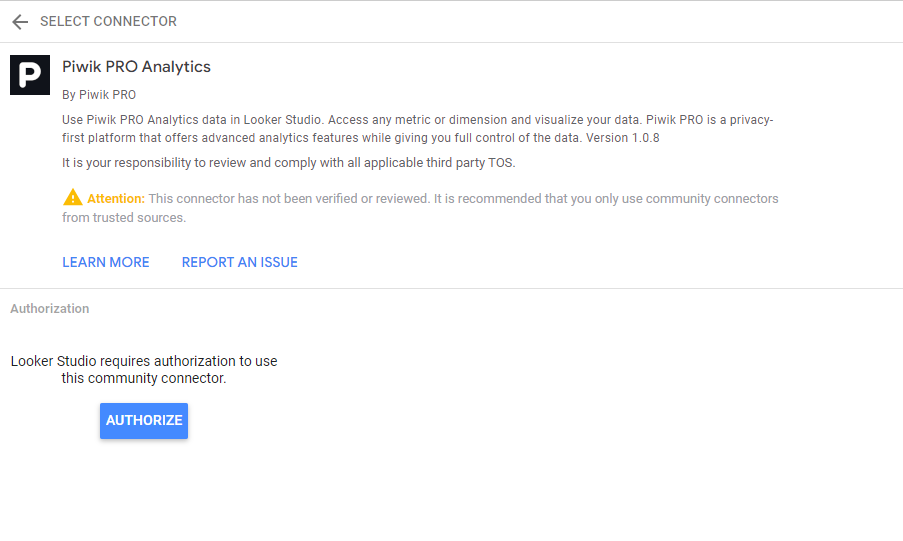
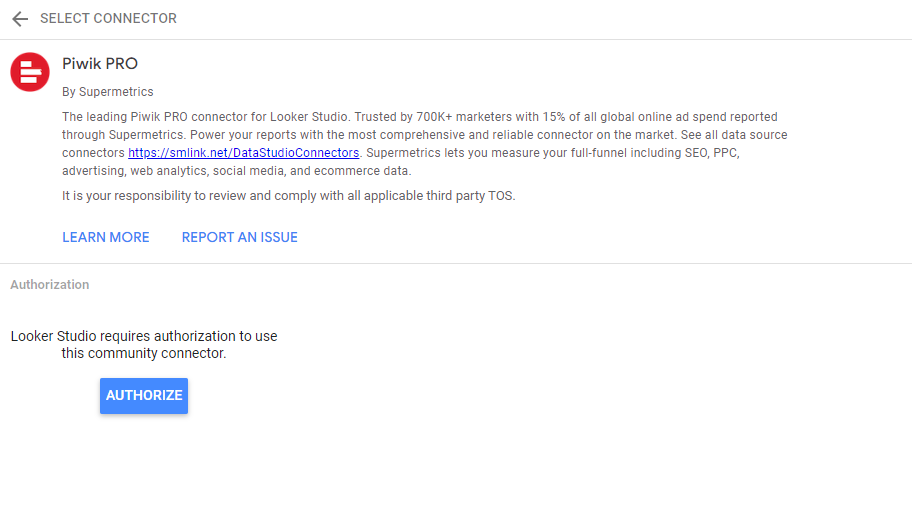
1. Click on this link to open the data connector called “Piwik Pro Analytics.” The Piwik Pro team develops this connector, which functions similarly to the connector discussed in the previous section.
2. Upon clicking the link, a screen will appear, and you will need to authorize the connector by clicking the “Authorize” button.
The subsequent steps are mostly the same as those explained earlier.
Please note that Google has not yet verified the Piwik Pro connector at the time of writing this article. And this means that any updates Piwik Pro releases for its Looker Studio connector will require you to manually re-add the Piwik Pro analytics connector using the process outlined in this blog post. However, before deleting the previous “Data Source,” you must first add the data connector with the latest updates.
To delete the previous source, go to the “Data Sources” section, expand the three dots, and select the “Remove” option.
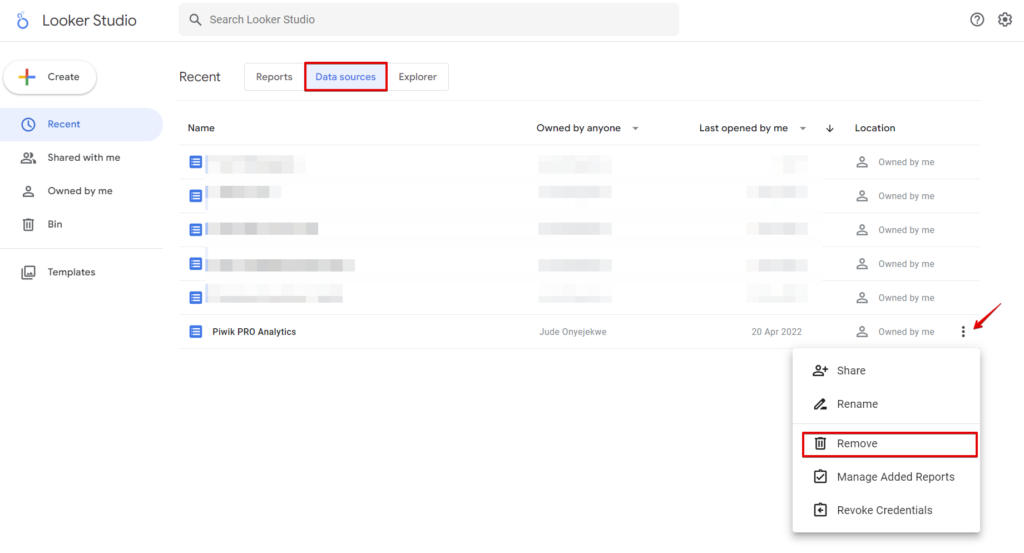
It is crucial to follow this sequence to ensure a smooth transition and avoid complications.
Connecting Piwik Pro To Looker Studio Using Supermetrics:
Using the Piwik Pro connector developed by Supermetrics is another viable option worth considering. However, to utilize this connector, you must have an active Supermetrics subscription that includes access to the Piwik Pro Looker Studio data connector.
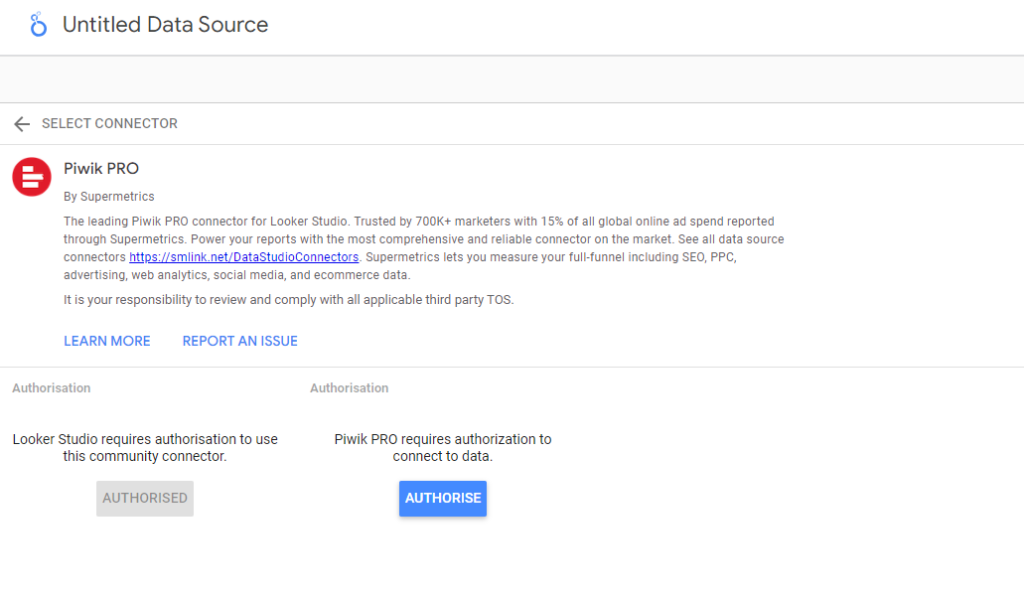
If the subscription covers you, proceed by searching for “Piwik Pro” in the data source connector list. Select the connector created by “Supermetrics”. If you have not done so previously, you will need to authenticate your Supermetrics account by clicking the authorize button.
Since it’s your first time, you’ll have to authroize Looker Studio to use the third-party connector.
After which, you’ll also have to authenticate your Piwik Pro to connect to the data.
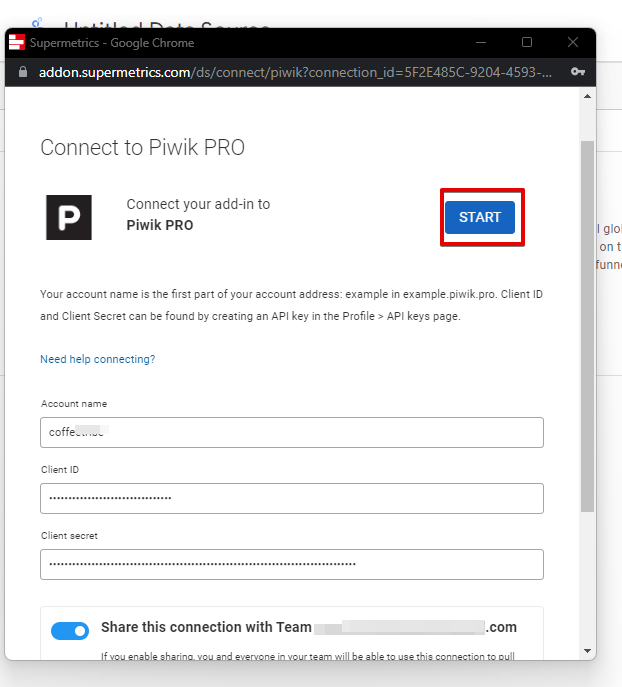
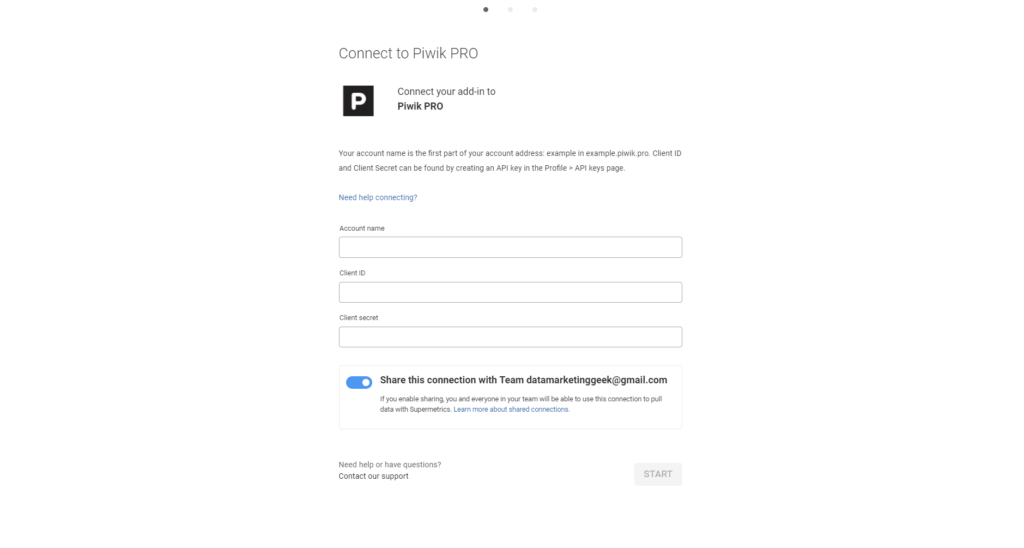
Next, you will encounter an authentication screen where you need to authenticate your Piwik Pro Analytics account. Enter the required credentials:
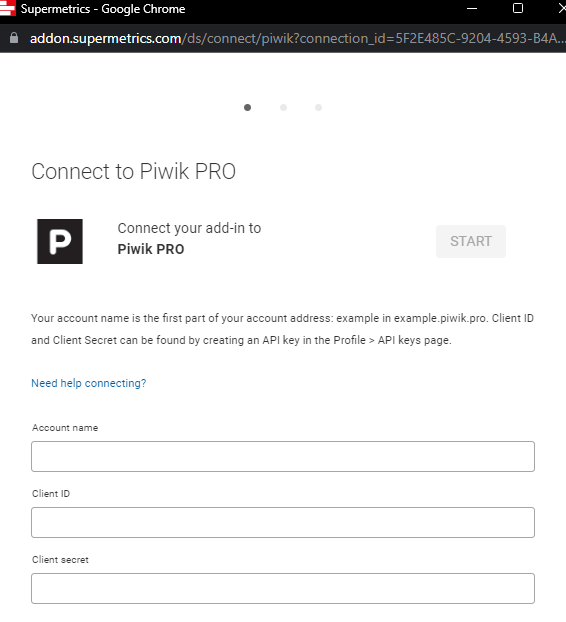
- Account Name
- Client ID
- Client Secret
Instructions on obtaining these credentials were provided in the section discussing the use of the Piwik Pro native connector; (explained here).
Once you have entered the details, click the “Start” button to authenticate your provided information.
If everything is correct, you should see the Piwik Pro account appear in a popup window after successful authentication. If you intend to add your client’s Piwik Pro account, you can do so by clicking the plus sign. However, for this tutorial, we will focus on a single account. Click the “Done” button to proceed.
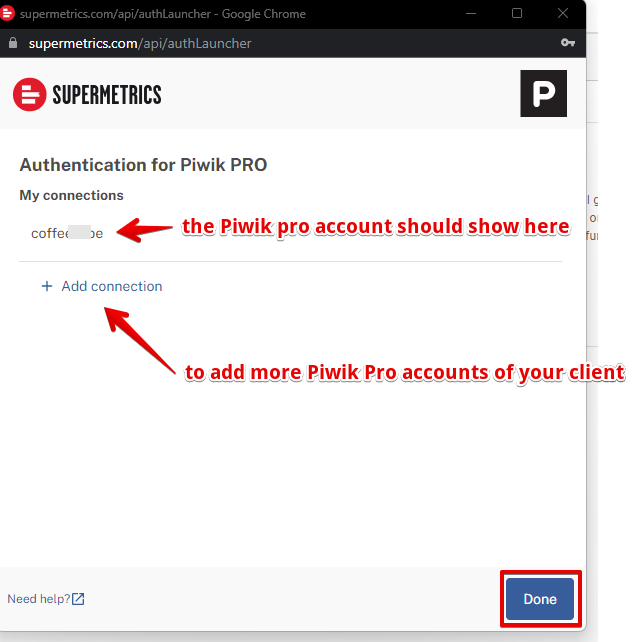
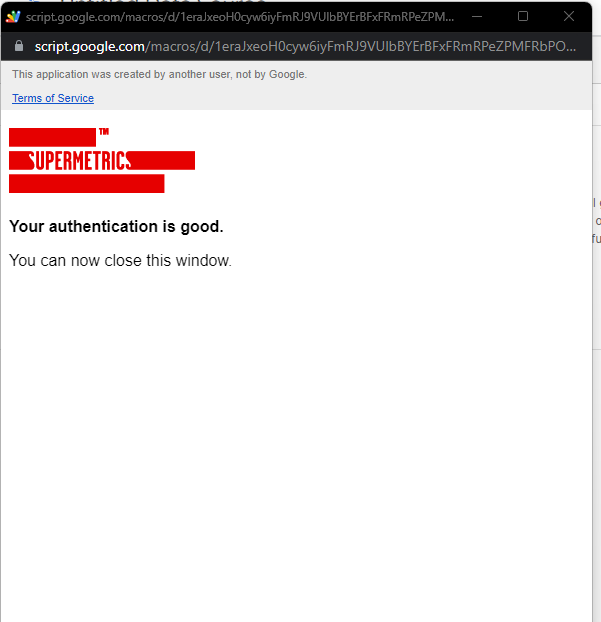
The next screen will display a success message, and you can close the window.
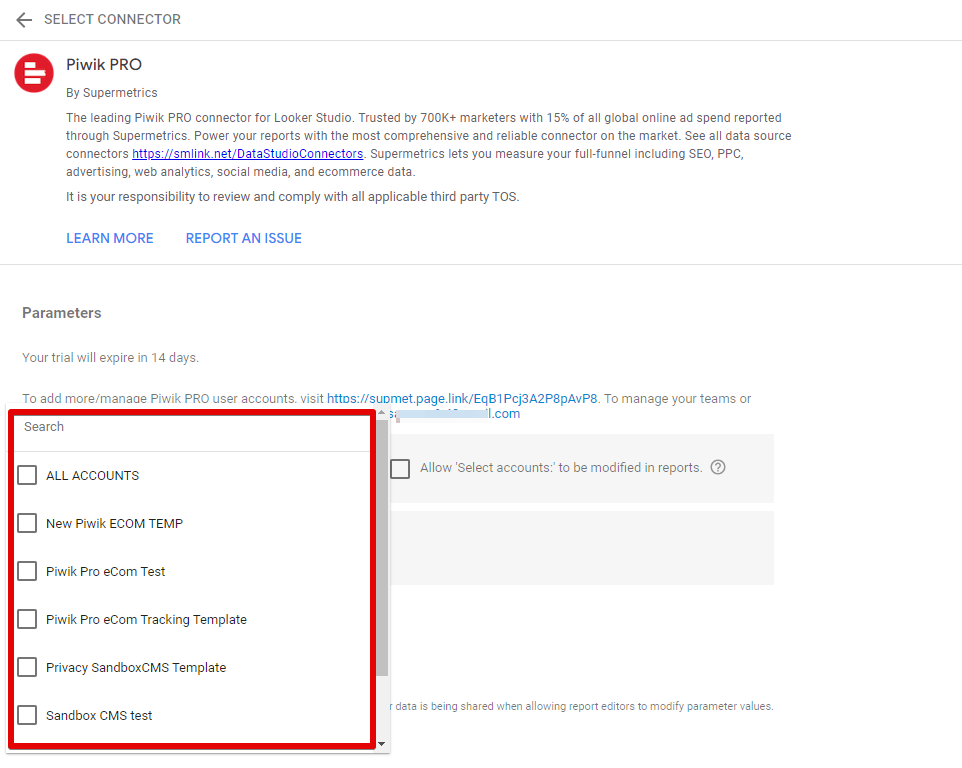
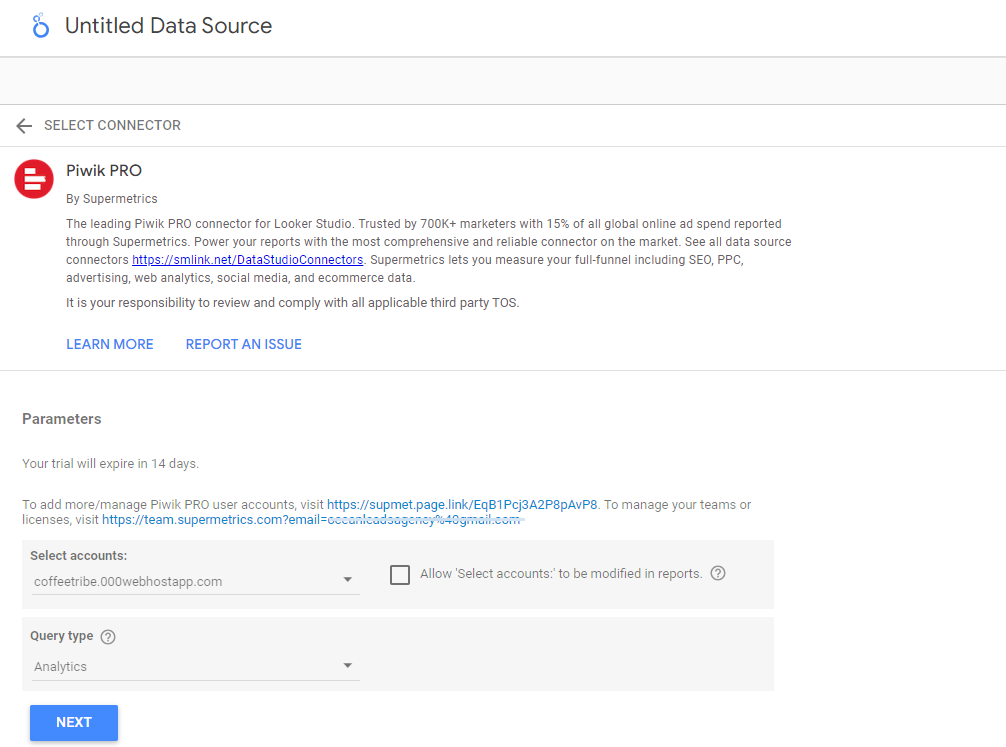
With this successful connection, you will need to enter the following parameters on the screen:
1. Select the Piwik Pro site or app property in your account. You also have the option to select “All Properties” and later filter them in your report. However, choosing the specific property you are working with is recommended in most cases.
2. Check the box labelled “Select Account to be modified by reports” if you want the flexibility to modify your data in Looker Studio reports using different analytics properties within the same Piwik Pro account. This checkbox is optional and typically unnecessary unless you pull data from multiple analytics properties within the same Piwik Pro account.

3. In the “Query Type” section, select “analytics” as your query type. Optionally, enable the checkbox for Supermetrics report template usage if needed.
Once you have provided all the necessary information, click the “Next” button to proceed.
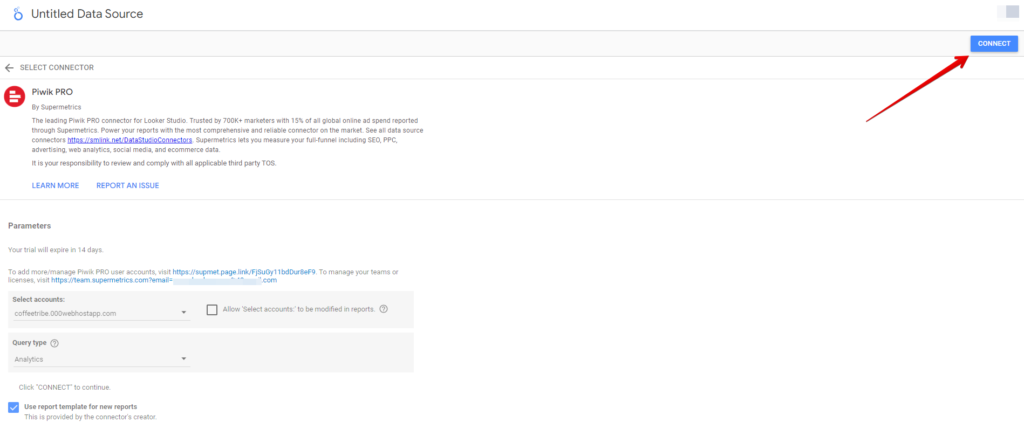
Complete the connection process by clicking the “Connect” button located in the top right corner. This will establish a connection between your Piwik Pro Analytics and Looker Studio using the Supermetrics connector.
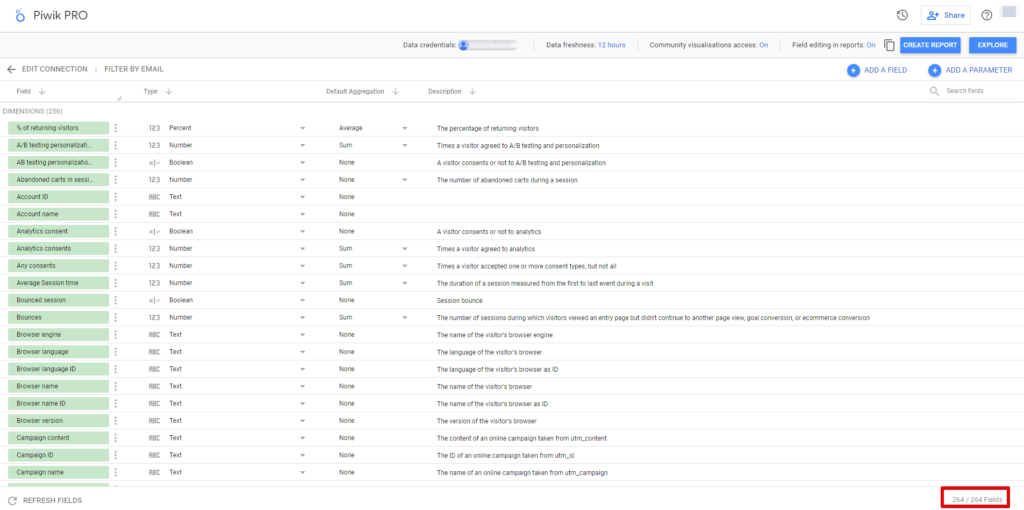
After successfully establishing the connection between Piwik Pro Analytics and Looker Studio, you will have access to numerous dimensions, metrics, and a parameter field.
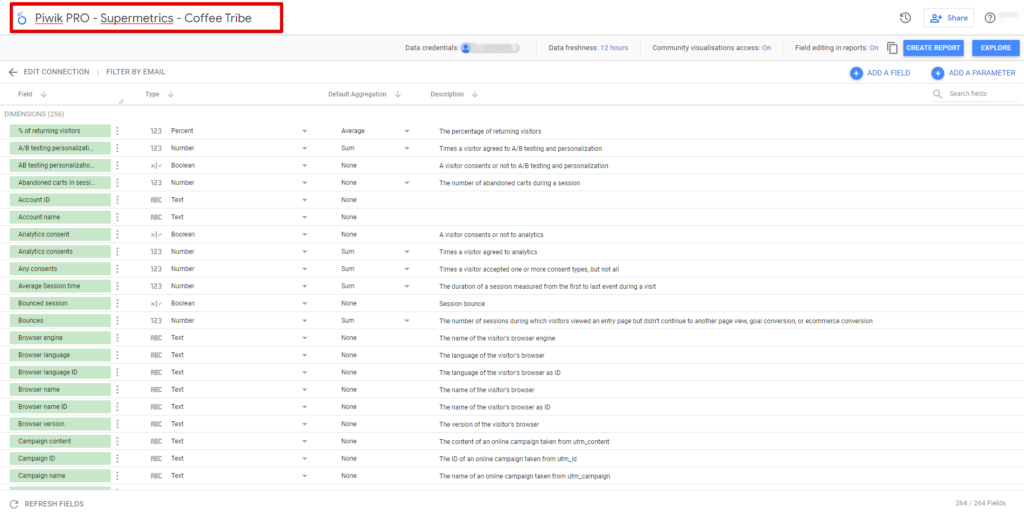
Give the connector a descriptive name using a convention that is internally adopted in your company.
Connecting Piwik Pro Data to Google Sheets
When you need to work with your analytics data from Piwik Pro in Google Sheets, you can use multiple methods to bring your Piwik Pro data into Google Sheets. In this article section, I will discuss how you can accomplish this.
The methods are as follows:
- Piwik Pro Native Google Sheets Connector
- Supermetrics Connector
Using the Native Connector:
Piwik Pro offers a Google Sheets connector; however, to access it, you must have one of the following Piwik Pro permission types: owner, manage, edit & publish, edit, or view.
It is important to note that the native Piwik Pro Analytics connector for Google Sheets may not provide the optimal experience. For instance, you are unable to modify a query after it has been executed and the data extracted. Moreover, scheduling data updates and having flexible date range configurations are not supported.
If you are looking for more robust functionalities in your spreadsheet, the Supermetrics connector could be a viable option to consider. However, the choice ultimately depends on your specific needs and budgetary considerations.
Installing The Piwik Pro Analytics Google Sheet Connector
To install the “Piwik Pro Analytics” connector for Google Sheets, you can visit this link that will take you to the app/extension in the Google Workspace Marketplace.
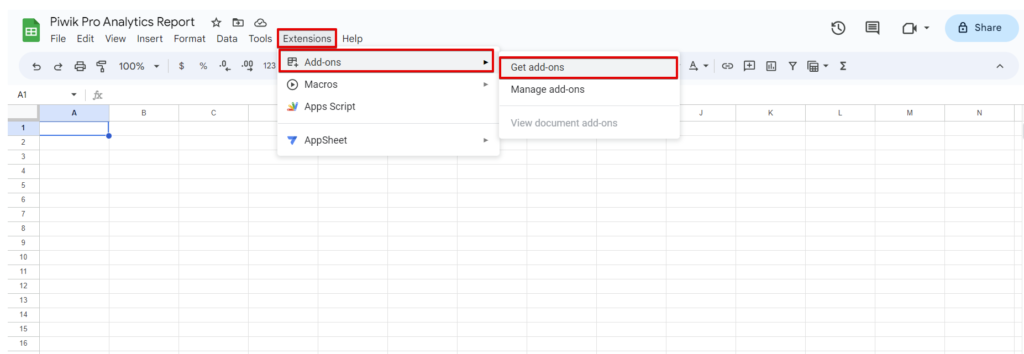
Alternatively, you can open a spreadsheet and navigate to the “Extension” menu. Hover over the “Add-ons” sub-menu and select the “Get Add-ons” option. This action will open a similar screen to the one mentioned above.
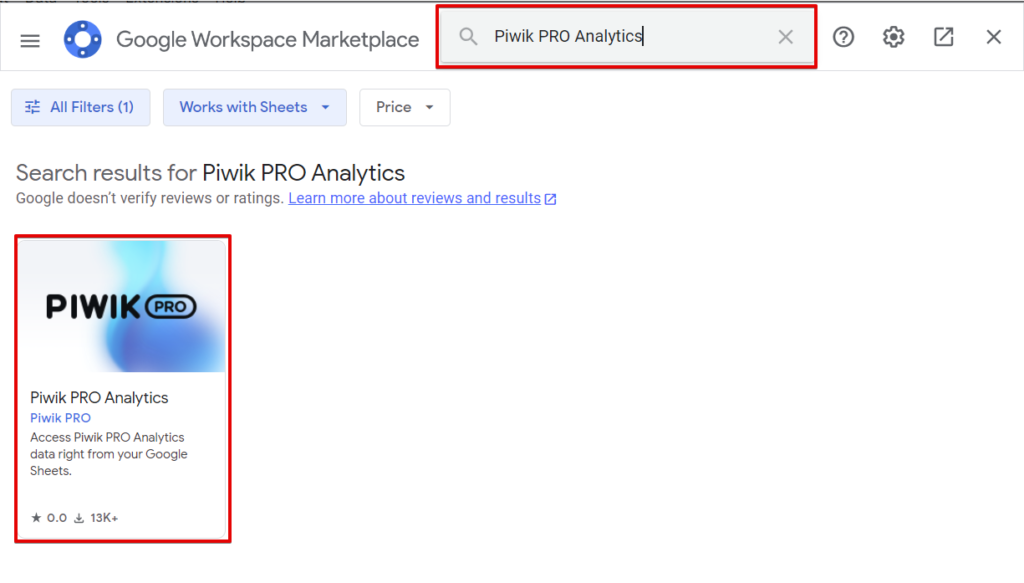
Next, search for the connector using “Piwik Pro” as the search term and choose the “Piwik Pro Analytics” extension.
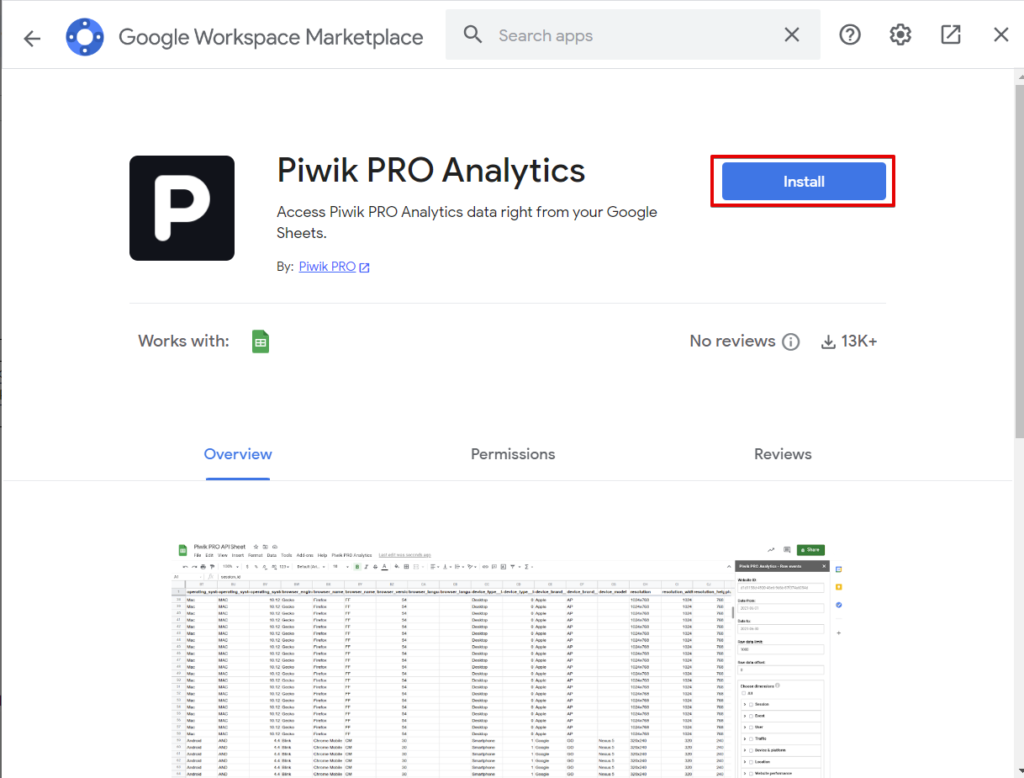
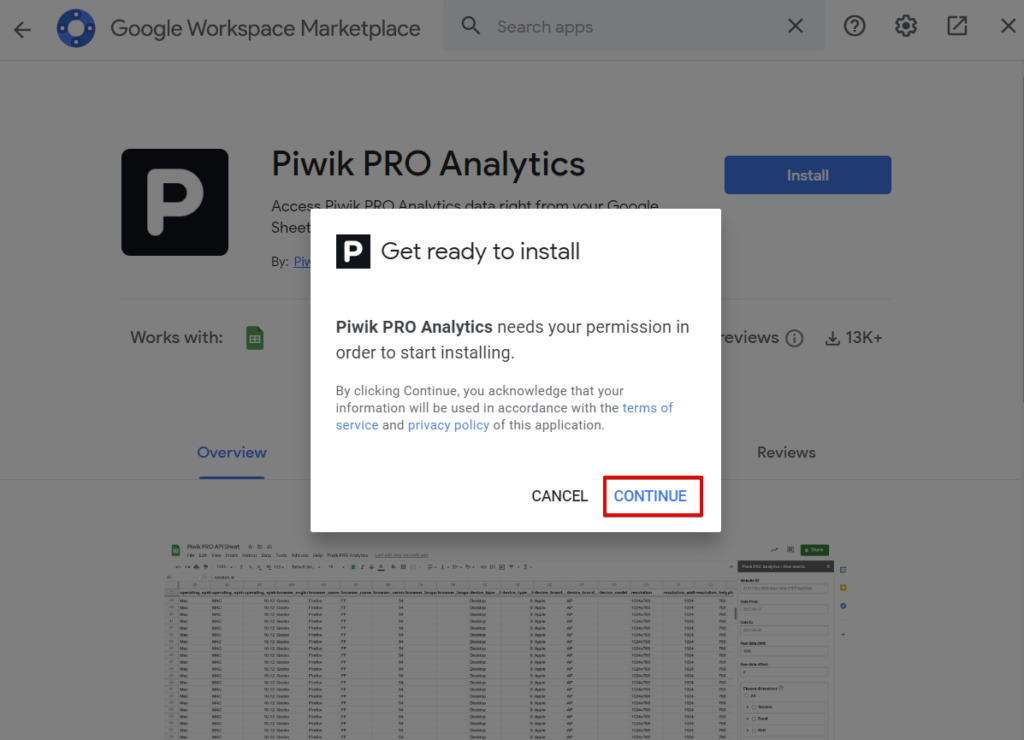
Click the “Install” button to add the connector to your Google Sheets reporting interface.
In the following screen, click the “Continue” option.
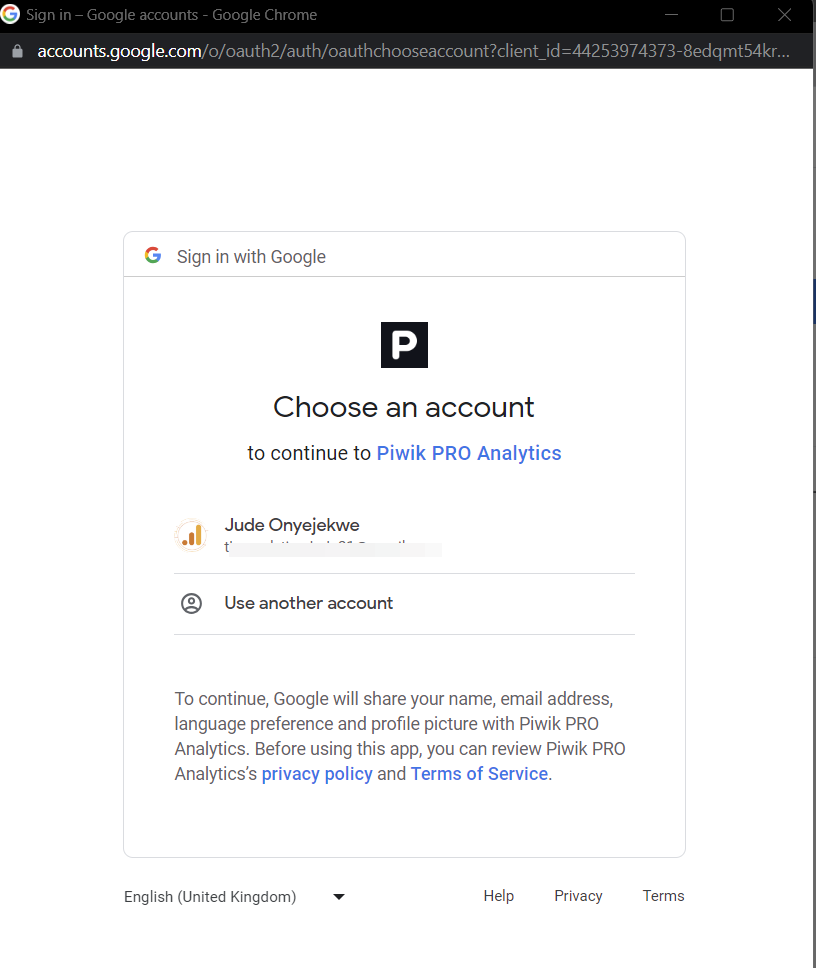
Select the Google Account you will use for your spreadsheet reporting.
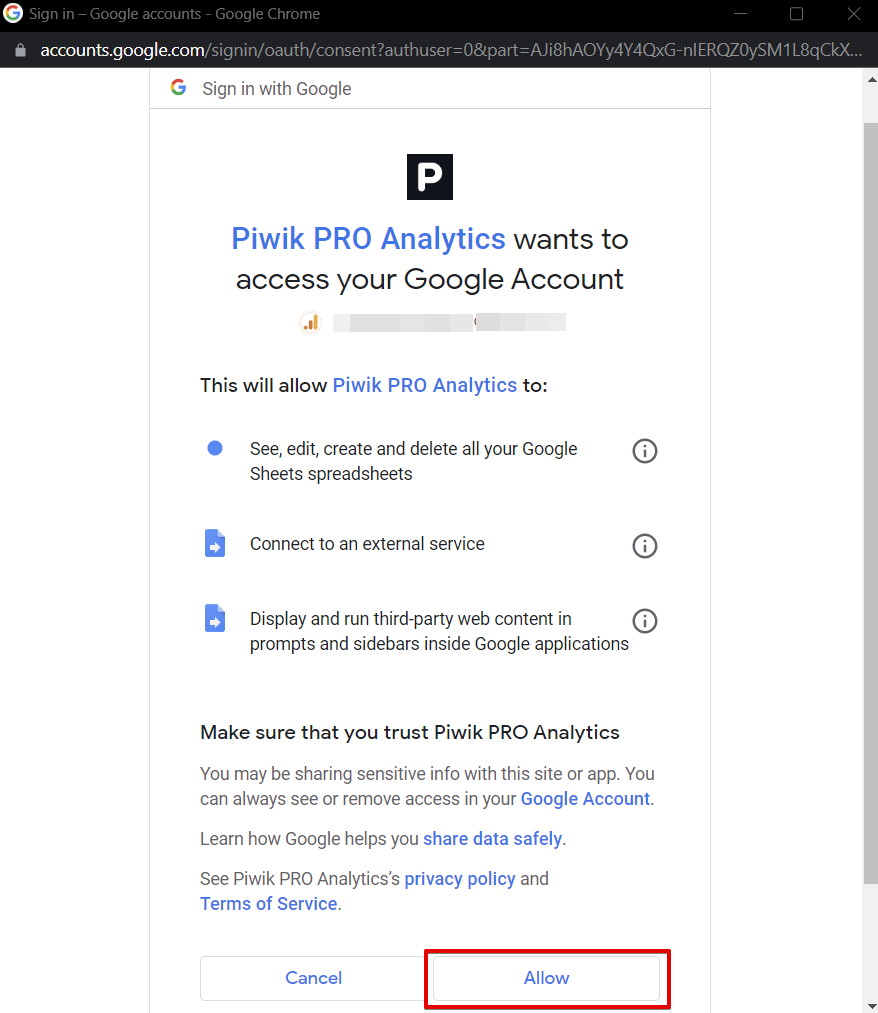
Subsequently, you will be presented with another screen where you must grant the necessary access permissions to the “Piwik Pro Analytics” connector for it to function properly.
A modal screen will appear after successfully authenticating and granting the required access permissions, indicating that the installation was successful. Click “Done.”
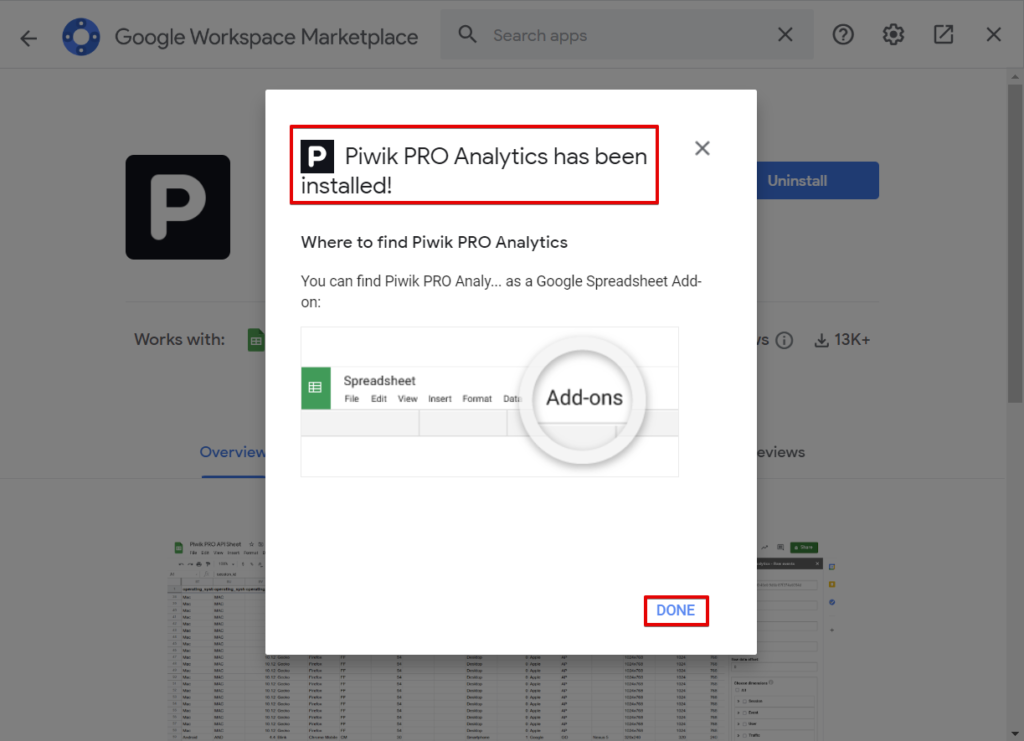
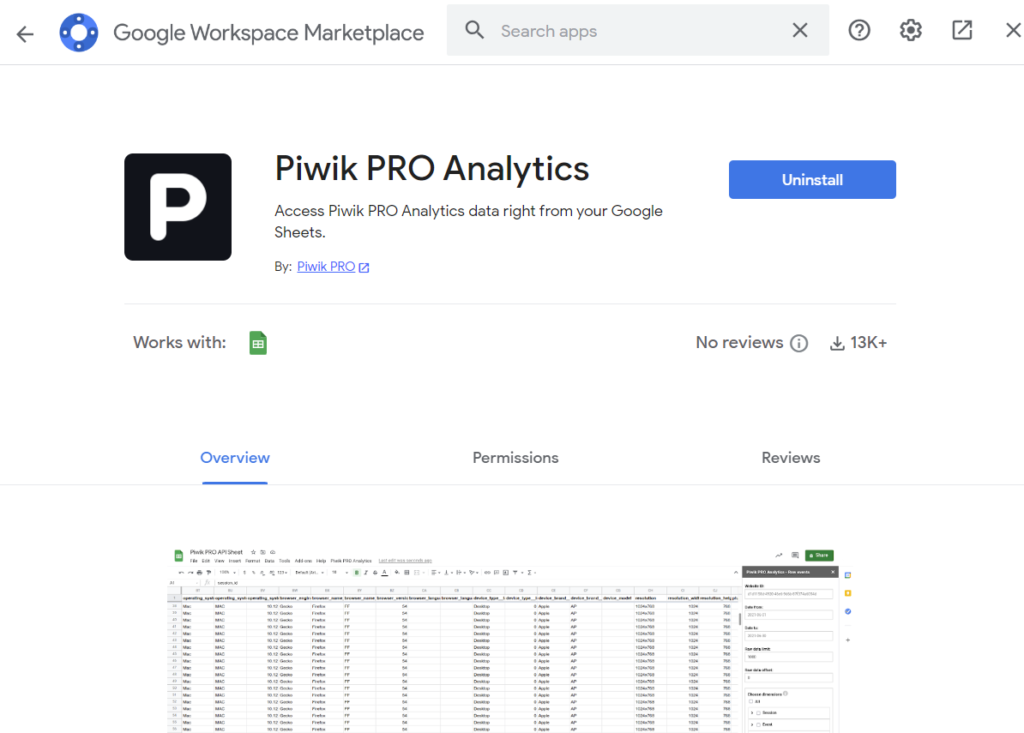
The “Install” button will now change to “Uninstall.”

However, some configurations still need to be made, which I will cover shortly.
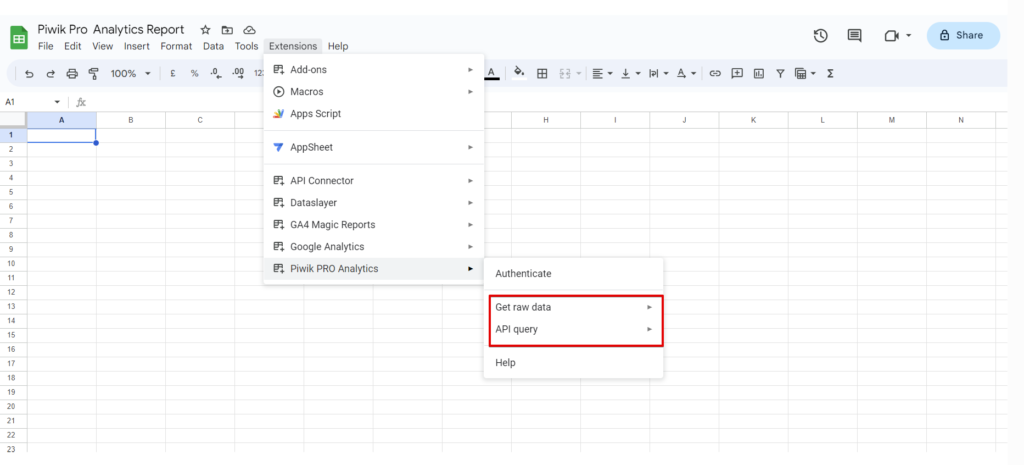
If you click on the “Extensions” menu, you should see the “Piwik Pro Analytics” extension. You will need to refresh your browser if you only see “Help” when hovering over it, as shown in the image below.
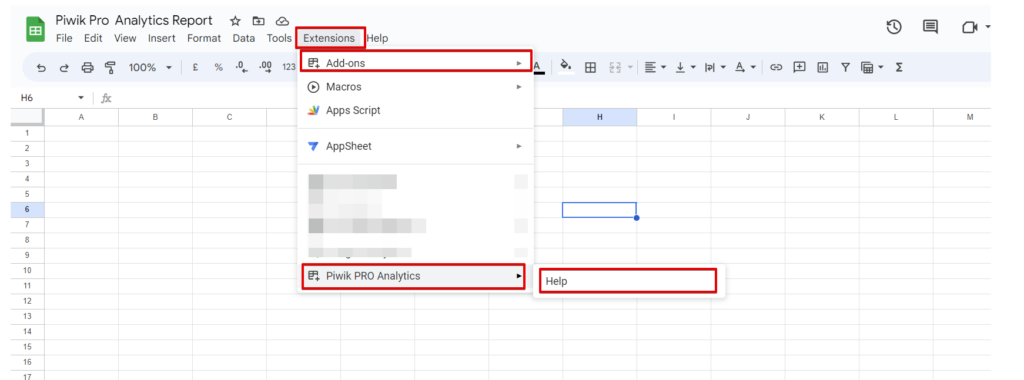
After refreshing the browser, the extension should display the following options.
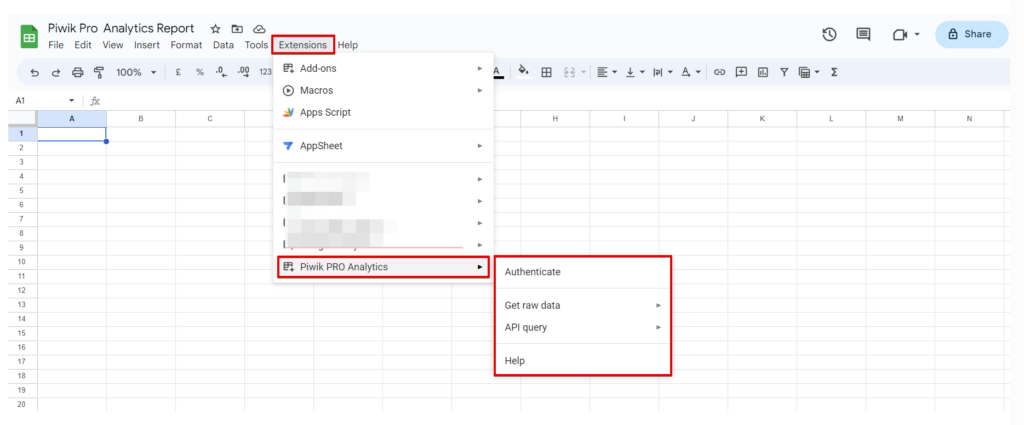
Authenticating The Piwik Pro Analytics Connector
The next three steps involve authenticating the extension by granting it access to your chosen Piwik Pro account. You will need the Piwik Pro instance domain, client ID, and Secret for this process.
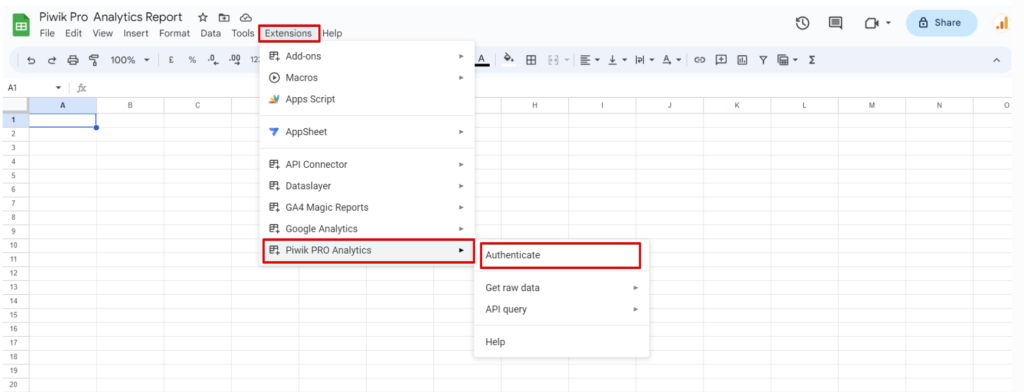
To begin, click “Extensions,” then select the “Piwik Pro Analytics” extension. Choose the “Authenticate” option.
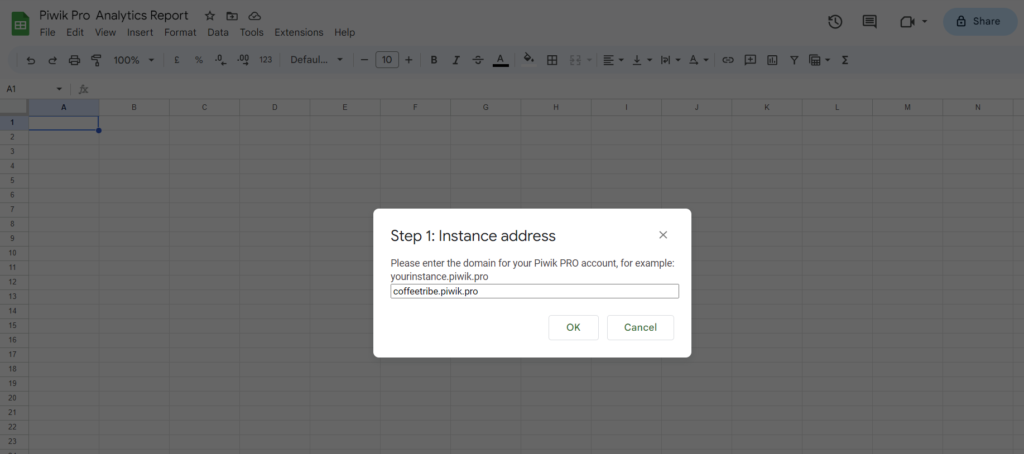
In the instance URL field, enter the domain where your Piwik Pro account is hosted. If you are logged into Piwik Pro, copy and paste the hostname without the trailing slash “/”. If you are hosting Piwik Pro on your business domain, include the Piwik Pro account name and business domain. Remember not to have the trailing slash “/” included. Click “Ok” to proceed to the next action item.

In the example, My instance is “coffeetribe.piwik.pro“.
In the next screen, add the Client Key, which we explained here on how to generate in the Looker Studio section of this article. Click “OK.”
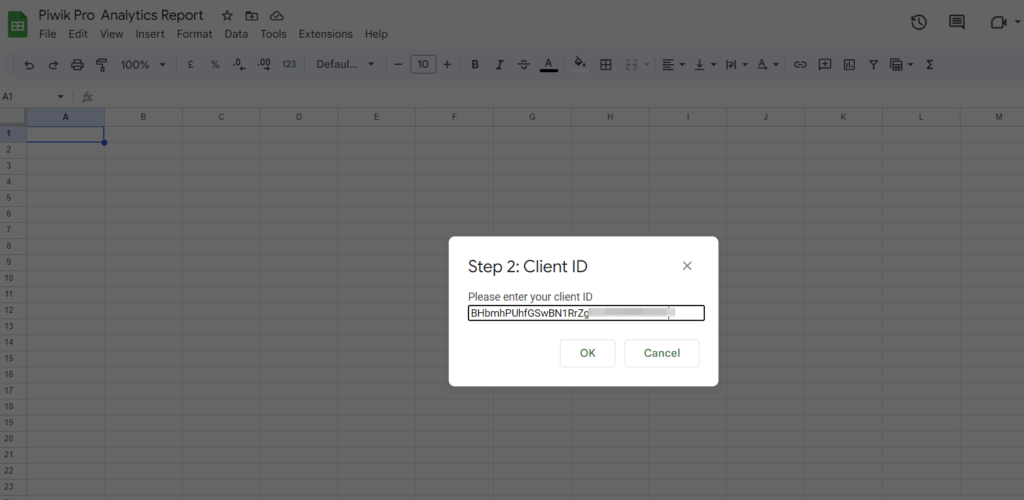
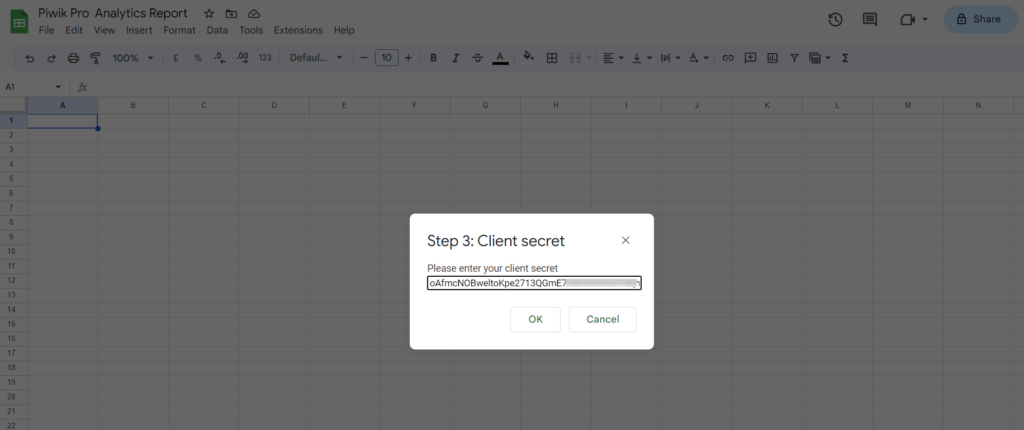
In the following step, add the Client Secret, also explained in the Looker Studio section.
Once successfully authenticated, you will see a success screen similar to the one in the image below.

Extracting The Data In Google Sheets
To extract Piwik Pro data and import it into Google Sheets, you have two options:
1. Get Raw Data from Piwik Pro:
This method involves directly accessing the raw data from Piwik Pro and importing it into Google Sheets.
2. Get Data from a Report in Piwik Pro:
I prefer using the “API Query” method, which extracts data from a report in Piwik Pro and imports it into Google Sheets. There are several reasons why this method is appealing, including its ease of use and intuitive nature.
In this blog post, I will cover both methods listed above, providing instructions on extracting data using each approach.
1. Get Raw Data from Piwik Pro:
To obtain raw data from Piwik PRO and import it into your spreadsheet, follow these steps:
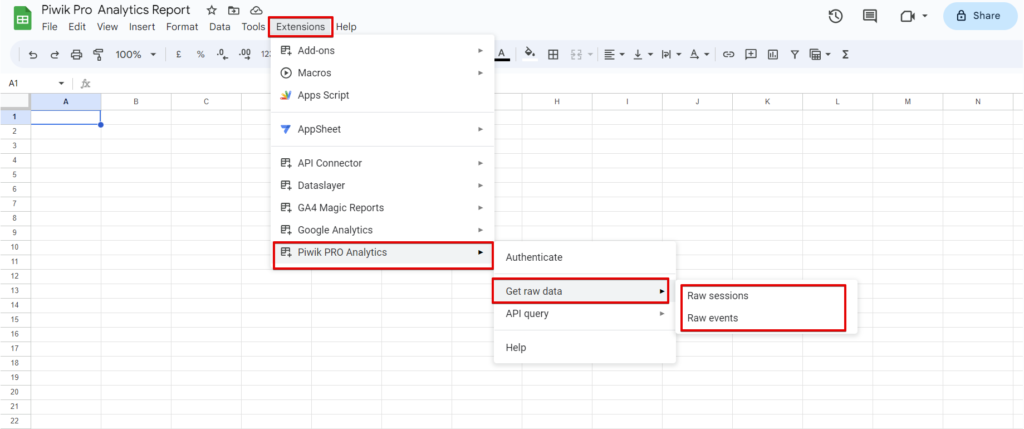
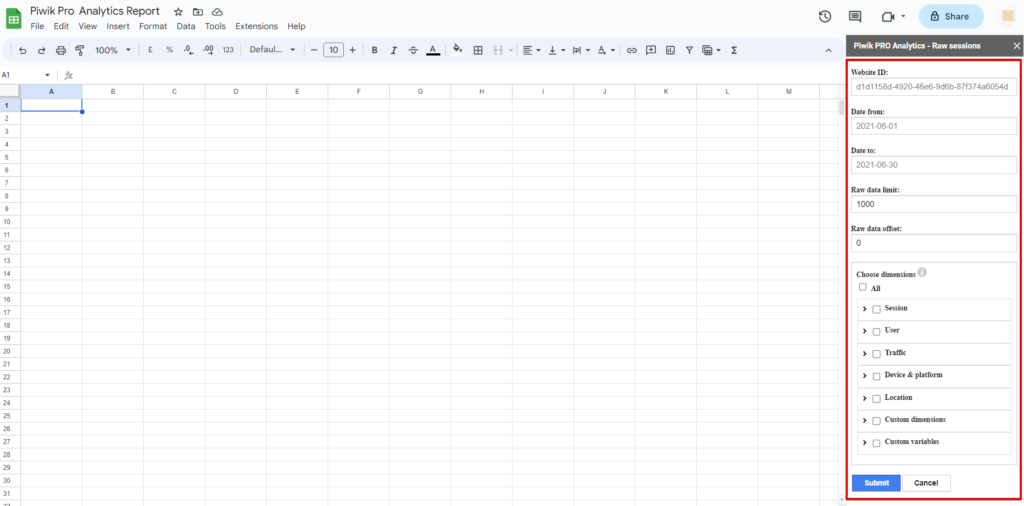
In your spreadsheet, click on the “Extensions” menu. From there, select the Piwik PRO Analytics extension and choose the “Get raw data” option.
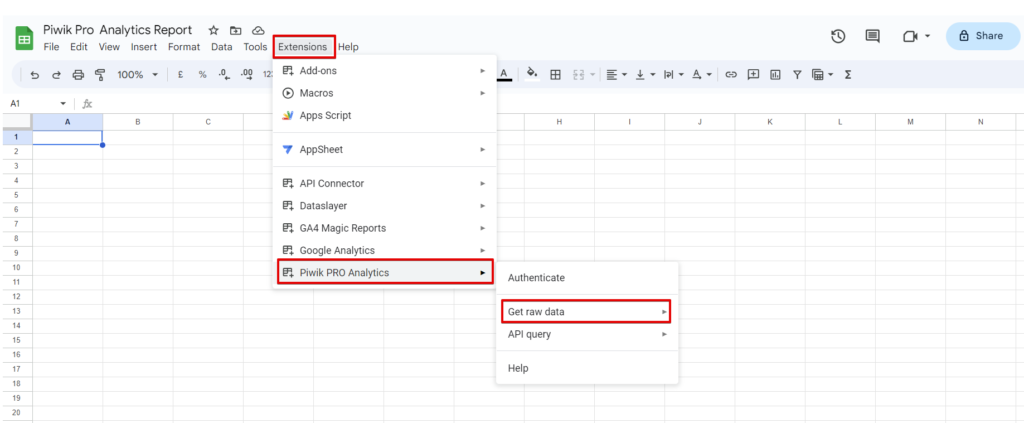
Doing these gives you two choices: “Raw Sessions” or “Raw Events” data.
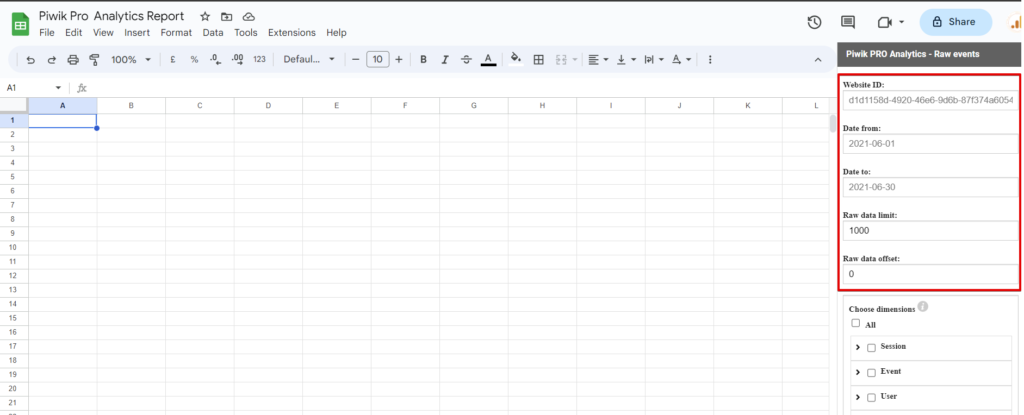
Whenever you need to generate a Piwik PRO report or extract data, you will need to configure the following parameters:
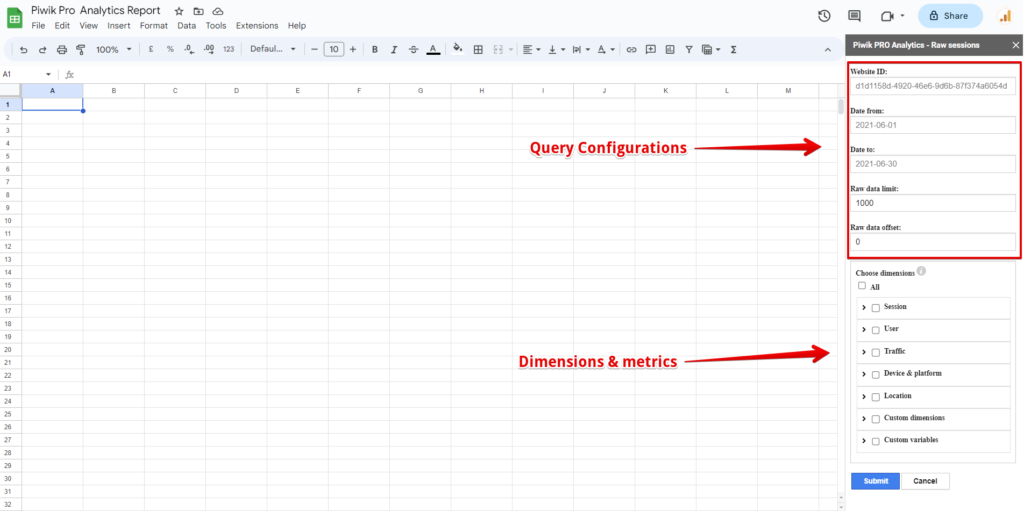
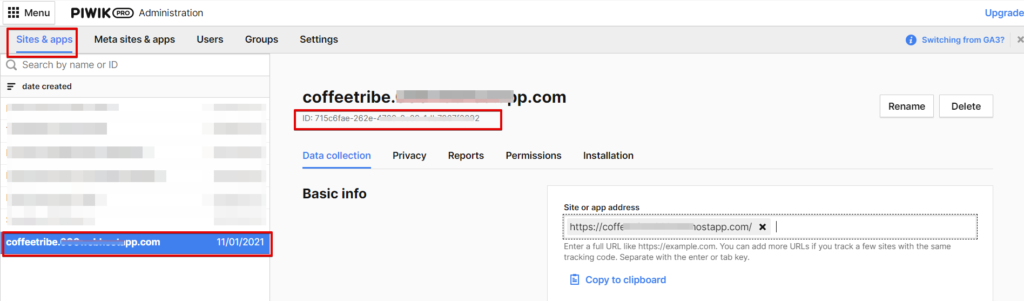
a. Piwik PRO Site or App ID: Go to the “Administration” section to find this information.
Under the list of sites you have access to in Piwik Pro, select the specific site or app from which you want to extract data. The ID located under the site name is your site or APP ID.
b. Date Range: Specify the desired date range. Please note that no calendar selector option is available, so you must manually enter the date in the format YYYY-MM-DD format.
c. Raw Data Limit and Offset: Set the limit for the raw data and define any offset if necessary.
After selecting the desired dimensions (as metrics are not currently supported), click the “Submit” button to initiate the data extraction process.
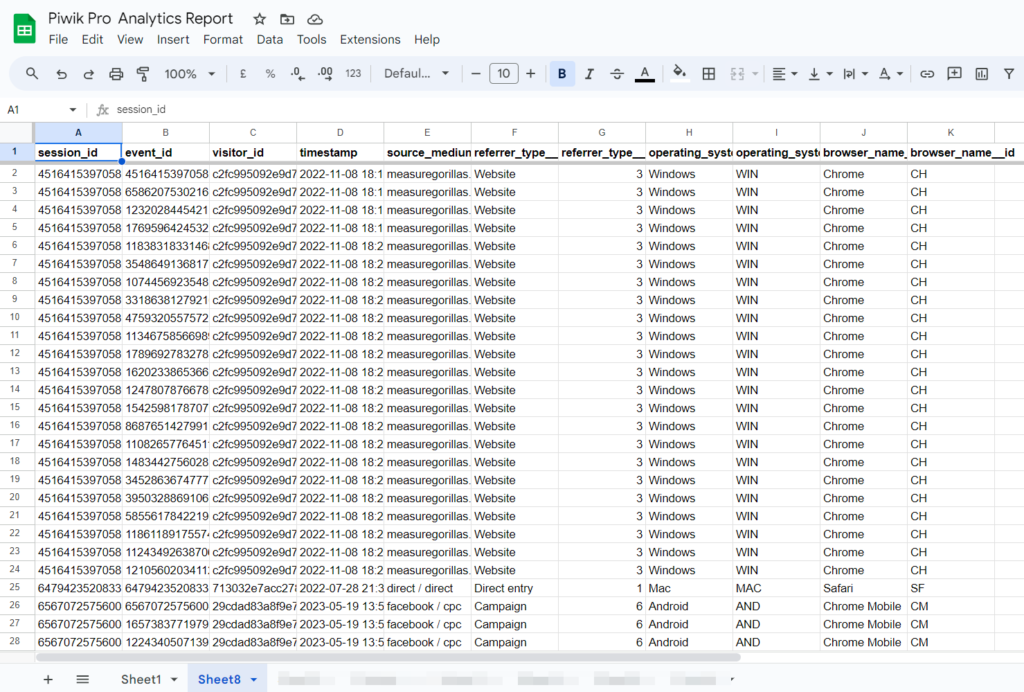
And your data should be available in a newly created sheet tab.
2. Extracting Data from a Report in Piwik PRO:
This is my preferred method when using the Piwik Pro Analytics connector for Google Sheets and is the approach you will frequently use for data extraction.
So, how does this process work?
Start inside Piwik Pro by either selecting a standard report or creating a custom report that includes the dimensions and metrics you need. Choose your desired date range and row limit, or you can adjust these settings later within Google Sheets.
Click the three-dot icon next to the report and select the “View API call definitions” option.
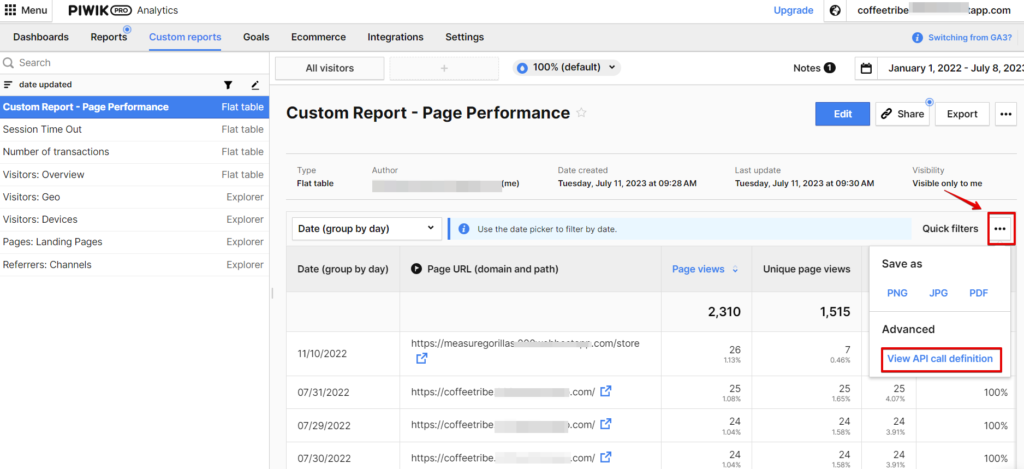
A modal popup will appear, allowing you to copy the query by clicking “Copy to Clipboard” under the query section. I will show you how to customize the query in the spreadsheet shortly.
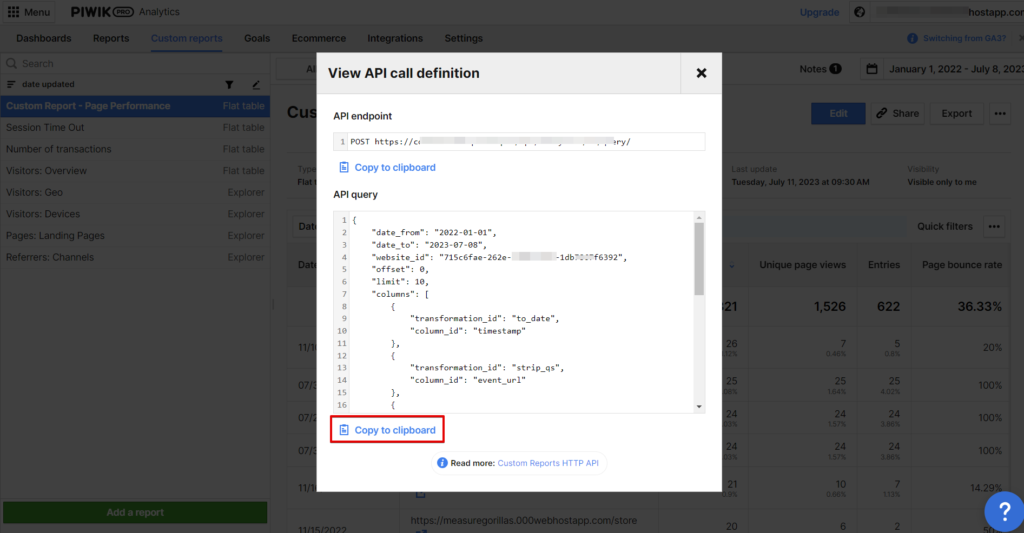
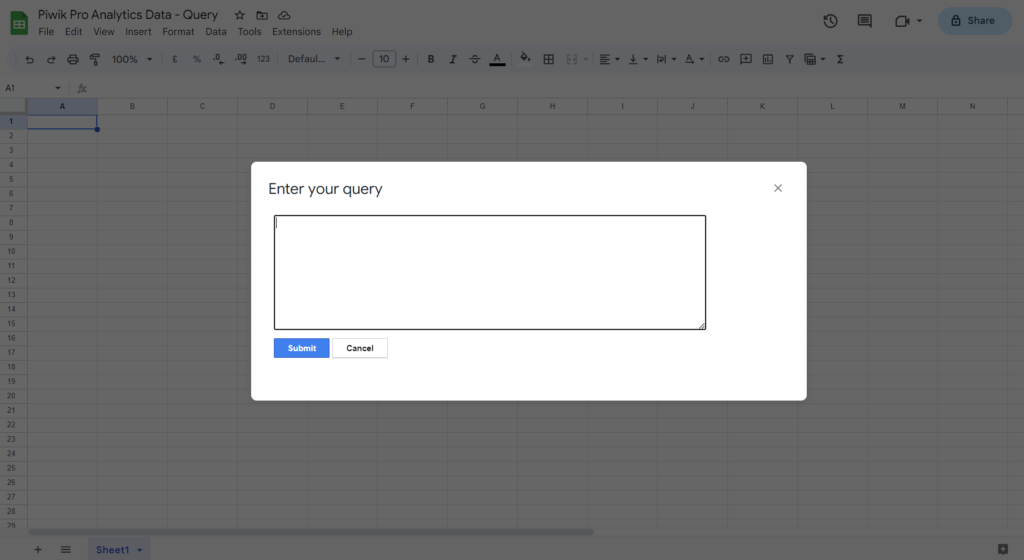
Access the “Extensions” menu in your Google Spreadsheet and select the “Piwik Pro Analytics” extension. Choose the “Run your Query” option.

A modal view will open, providing a field to paste the query you copied from Piwik Pro.
You can also modify the query using the following options:
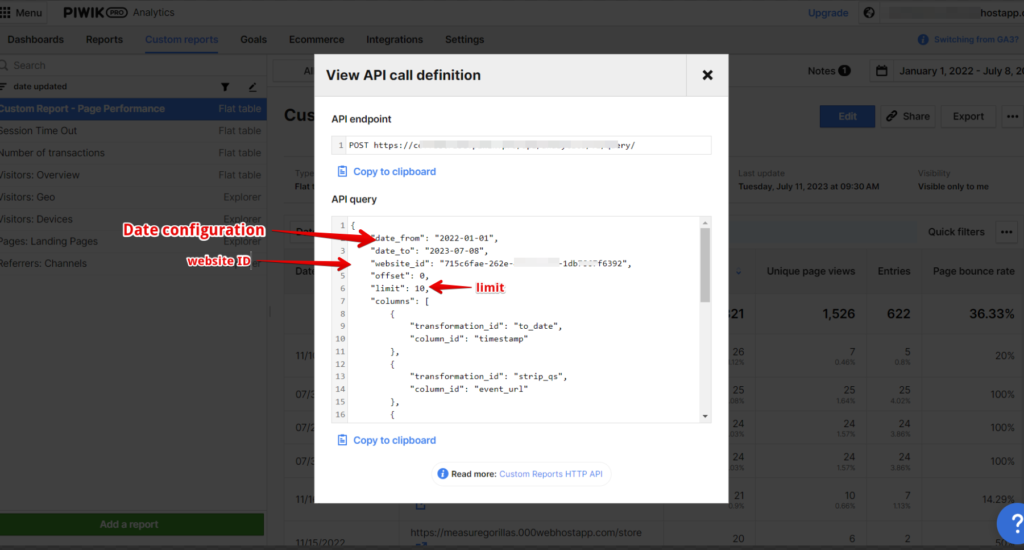
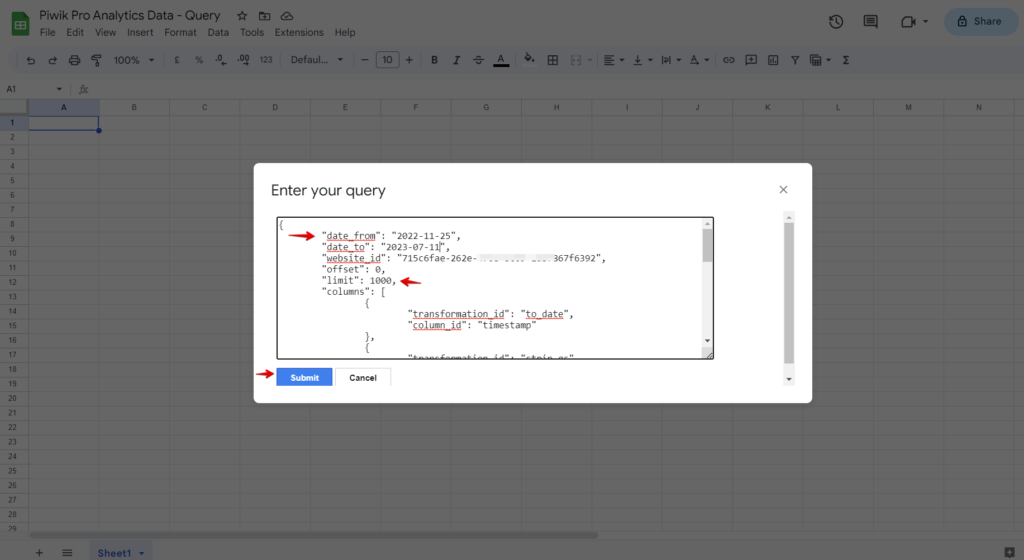
a. Date: Change the date range to your preferred range. The format is YYYY-MM-DD. By default, the copied query will have the date range from Piwik Pro, but you may need to modify it to match your reporting needs.
b. Website ID: Only modify this if you need to pull the same data sets from a different Piwik Pro site or app property within the same account.
c. Limit: This refers to the row limit of the data exported to Google Sheets. The default is often ten “10” for Piwik Pro report tables, but it can be higher depending on the table configuration. Adjust the limit before pasting the code into the “API Query” field in Google Sheets.
d. Columns Metrics & Dimensions: If you need to add or remove metrics and dimensions and prefer to avoid doing it in the Piwik Pro report, you can customize the columns array of the query here. However, I recommend doing this inside Piwik Pro.
e. Order: Customize the order you’ll like to sort the extracted data set in Google Sheets. Use the numbers assigned to the dimensions and metrics in the query, starting from one “1”. Choose between ascending (“asc”) or descending (“desc”) order.
f. Offset: This section of the query is usually set to zero, but you can offset the desired results, depending on your needs.
In your Google Spreadsheet, once you have made the necessary modifications in the query field provided by the Piwik Pro Analytics connector, click the “Submit” button to extract your data into the Google Sheet report.
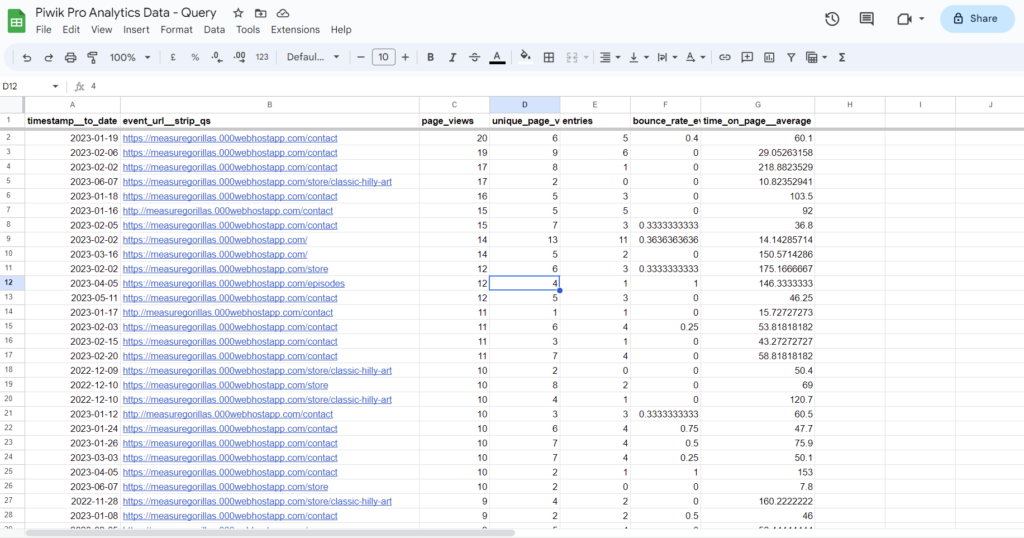
Your data will then appear in the spreadsheet, as shown below.
Using the Supermetrics Connector for Google Sheets:
To use the Supermetrics Connector for Google Sheets, you will need an active Supermetrics subscription that includes access to the Piwik Pro data source in the Google Sheets data connector.
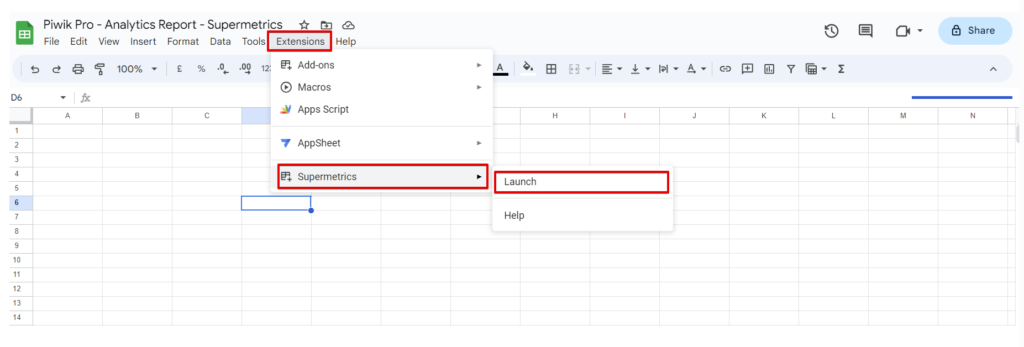
Assuming you have the necessary subscription, let’s proceed with the steps involved in this process. Start by opening the “Extensions” tab and scrolling to find the Supermetrics connector you have added.
Following a similar approach as we did with the “Piwik Pro Analytics” Google Sheets connector, you will be able to add the Supermetrics connector.
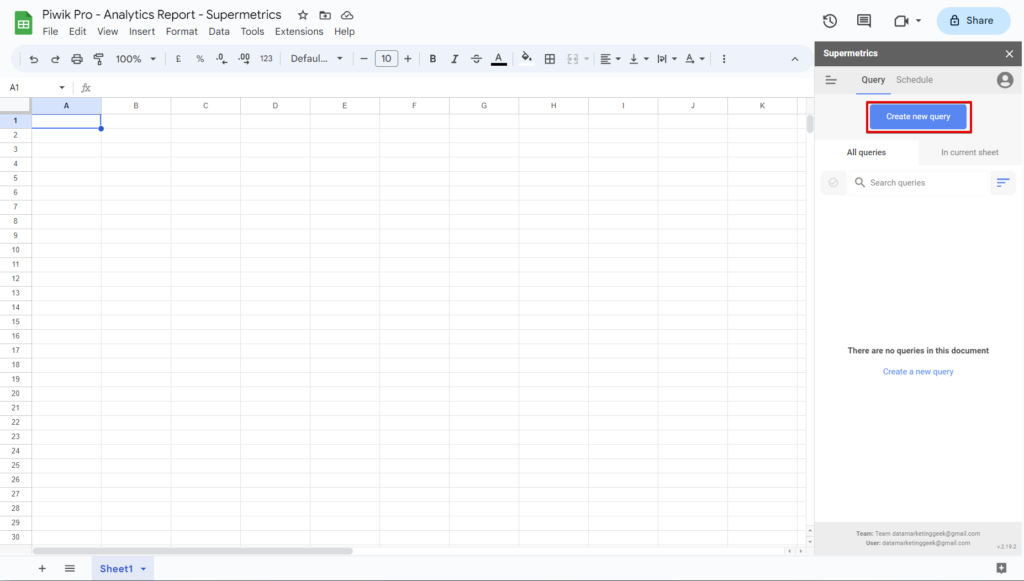
Click on the “Launch” option to access the Supermetrics connector interface. No queries will initially appear if it is your first time using it.
Click on the “Create new query” button to start the process of connecting Piwik Pro as a data source and configure your query to extract data from Piwik Pro into the spreadsheet.
The subsequent screen should resemble the one depicted in the image below.
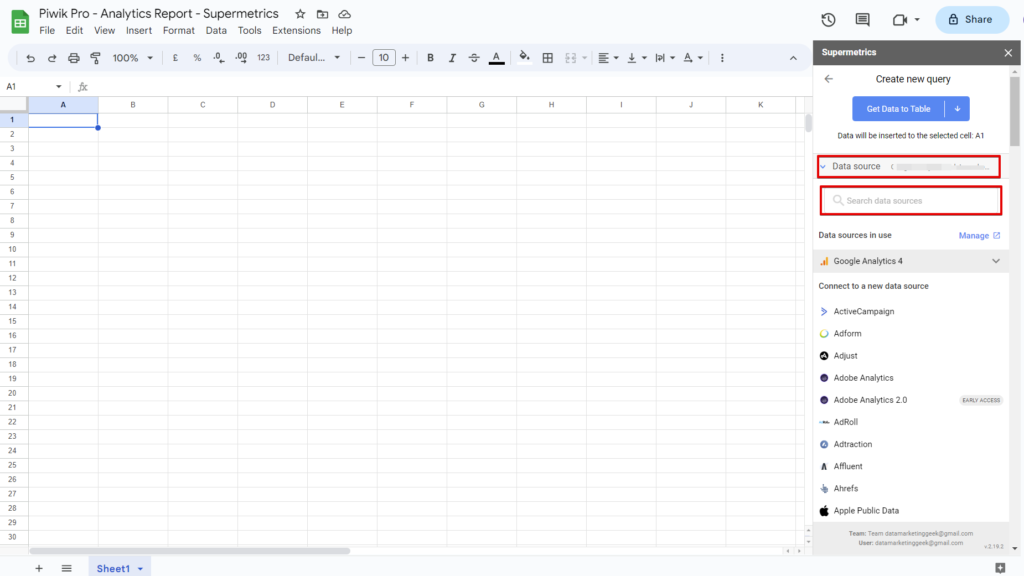
Expand the “Data Source” section and use the search data sources field to search for “Piwik Pro“.
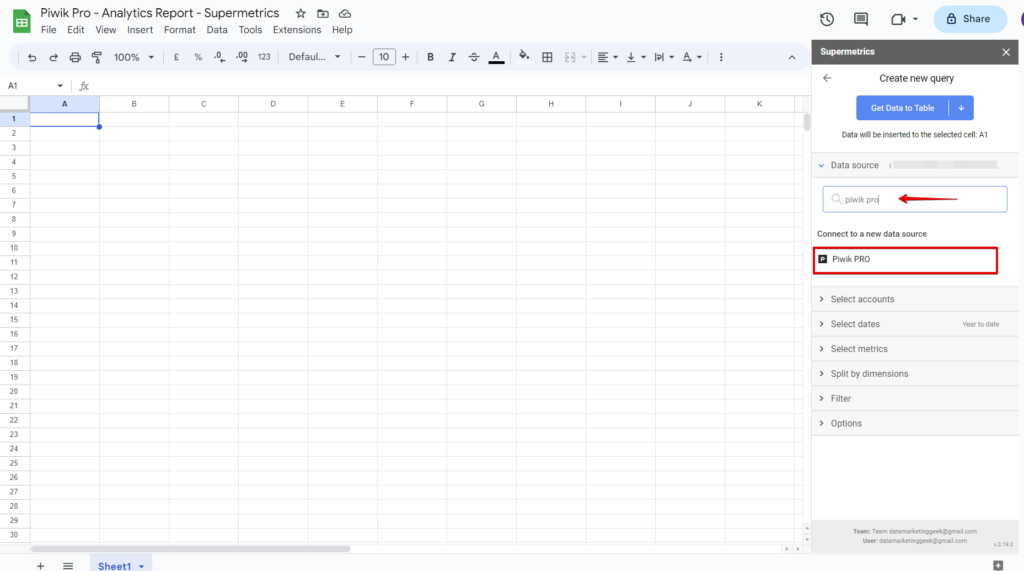
Select the Piwik Pro data source, which will take you outside the Google Spreadsheet interface. Here, you will need to input the following Piwik Pro credentials:
- Account Name
- Client ID
- Client Secret
You can follow the steps discussed in the section on connecting Piwik Pro to Looker Studio. There, you will find instructions on obtaining this information in Piwik Pro.
Closing The Curtains
First, I’d like you to know that reporting in Piwik Pro Analytics isn’t just limited to spreadsheets and Looker Studio. There is a lot you can do, and I’ve detailed that in my article, where I talked about the different reporting options that are available with Piwik Pro, covering BI, spreadsheets, reporting surfaces, etc.
And now, we have concluded this concise yet informative article. Reflecting on what we have discussed thus far, we have highlighted the significance of connecting your Piwik Pro analytics data to Looker Studio as a data source. We explored different means of achieving this using the native Piwik Pro connector for Looker Studio and the Supermetrics connector.
Additionally, we delved into the methods of bringing your Piwik Pro Analytics data into Google Sheets, as outlined in this blog post.
Piwik Pro integrates well with Looker Studio and Google Sheets. However, there is room for improvement regarding the seamless customer experience when connecting Piwik Pro with Looker Studio and Google Sheets.


