


Mixpanel Tip #1: How to Identify the Domains from Which You Collect Data
This is the first episode of Mixpanel’s bite-sized tips published on DumbData. In today’s episode, specifically focusing on Mixpanel implementation on the web, I will demonstrate how to identify the domains from which you’re collecting data and explain the importance of checking this in your Mixpanel property. Additionally, I aim to provide more tips like this to assist marketers in navigating Mixpanel effectively.
To provide some context behind my decision to create bite-sized Mixpanel content, I have been eager to write about Mixpanel. However, instead of solely focusing on implementation, I have other content ideas in mind. After coming across the recently released Mixpanel cheatsheet by the esteemed Alon, which I highly recommend you download, I decided to initiate my Mixpanel writing journey by sharing concise and straight-to-the-point tips. Meanwhile, I will continue working on more comprehensive content I already have planned.
Mixpanel, when used right, can be a powerful tool for analyzing your digital product or business performance, and its recent expansion to include marketing analytics is projected to drive increased adoption and implementation on websites.
Given my marketing background and their introduction of the GTM Mixpanel custom template, web instrumentation is anticipated to be primarily executed through Google Tag Manager. This implies that you need to be extra careful not to collect data from various hostnames, including production or test domains, or even domains you wish not to have included in your Mixpanel data collection. How can you identify the website domains where data collection is occurring in order to rectify any undesired data flows that may compromise your measurement strategy?
How to Identify the Domains from Which You’re Collecting Data
There are two approaches to accomplish this: one is retroactive, and the other is applicable if you have already implemented the necessary procedures from the outset.
The methods are as follows:
- Utilizing Custom Property (applicable to all Mixpanel web setups)
- Using Event Properties (For my GA4 folks, these correspond to event parameters)
Utilizing Custom Property
I highly recommend utilizing this approach to identify the domains from which you’re collecting data in Mixpanel. But first, let’s briefly discuss custom properties. If you’re unfamiliar with this feature, I’ll provide a basic description of this powerful functionality in Mixpanel.
Custom properties enable you to combine existing properties, both events and user properties, using a simple Spreadsheet-like formula language, allowing you to create new properties when you need them; you should also note that these properties are retroactive and applicable almost anywhere regular properties are usable, and they can be saved and shared for reuse within your team.
While I won’t delve into the details of this feature here, you can certainly find more information about it in the Mixpanel documentation on custom properties.
To proceed, I’ll share two formulas, and either one will work effectively without any issues. Feel free to choose the one that suits you best, but first, let’s start the creation process.
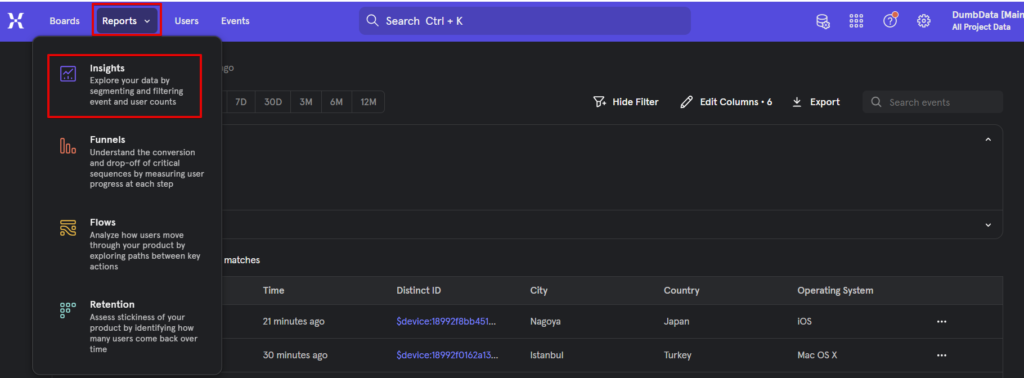
1. Creating a New Mixpanel Report:
– Click the “Report” menu and select “Insights” as the report type.
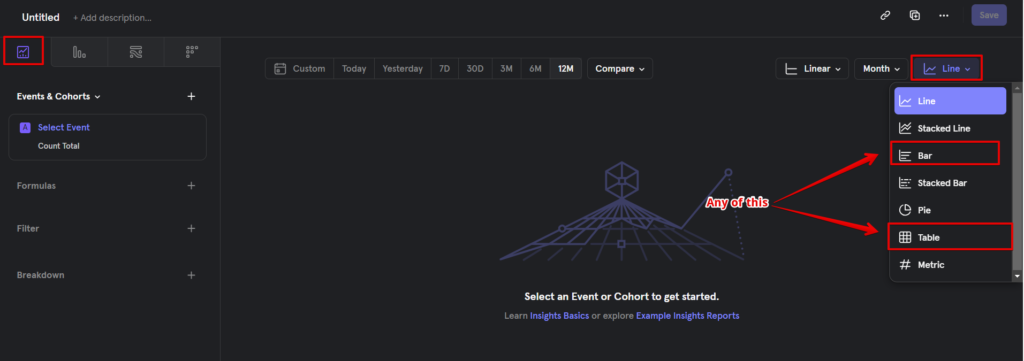
– In the reporting environment, on the right side, choose either the “Bar” or “Table” format as the report display type.
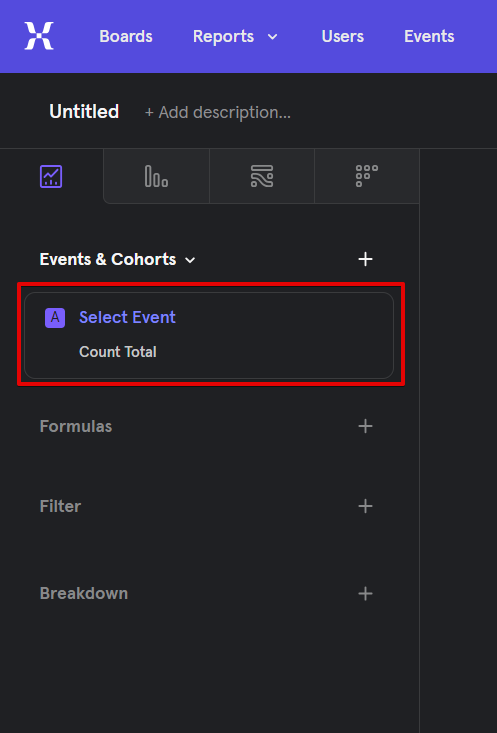
2. Configuring the Report Section:
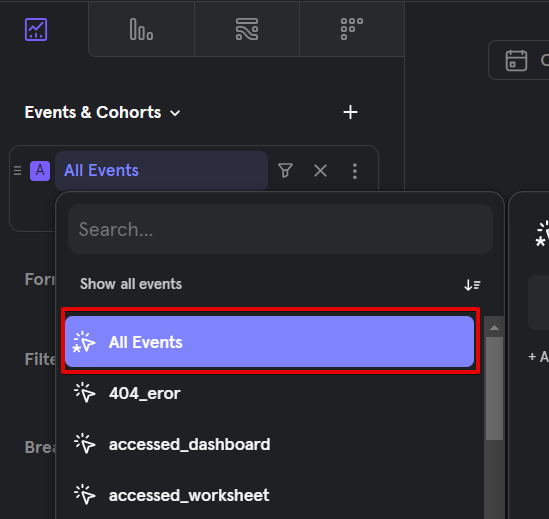
– Start by selecting the “All Events” value.
Select “All Events“
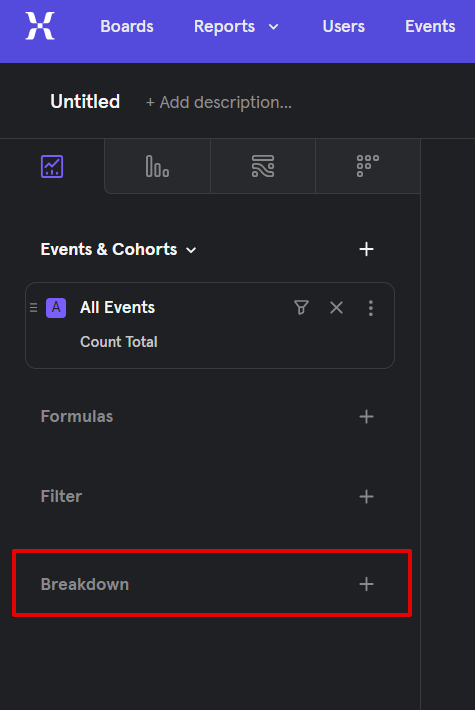
– Click the plus sign in the “Breakdown” section of the report configuration.
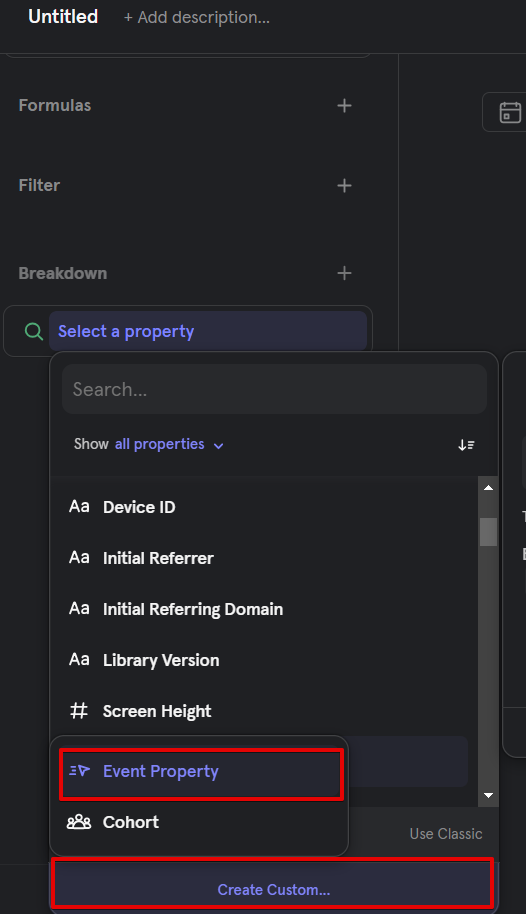
– Choose “Create Custom” and select “Event Property” as the type.
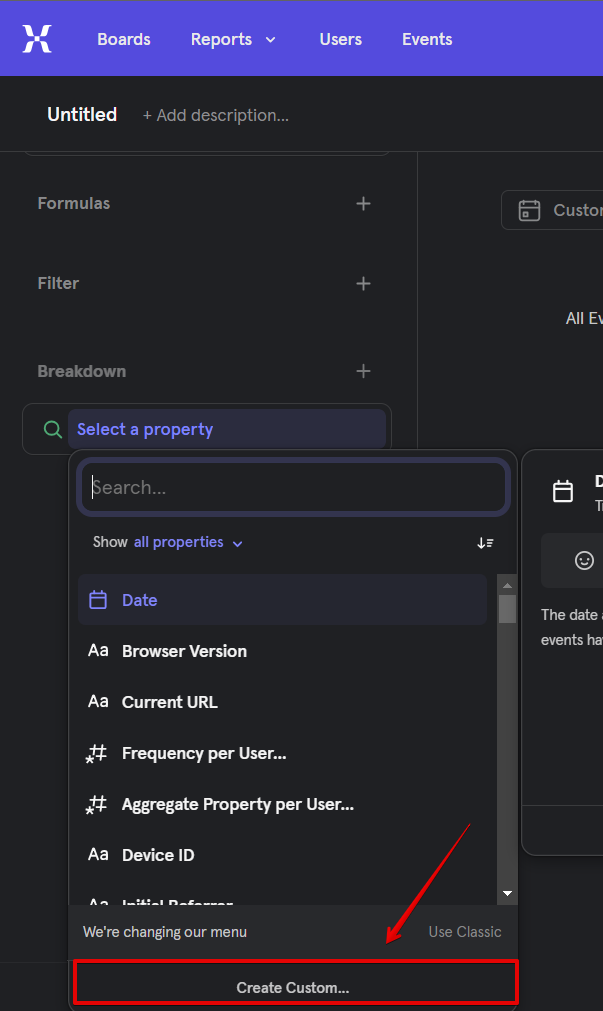
Select “Event Property“.
3. Custom Property Creation:
– Provide a name for the custom property on the new screen modal.
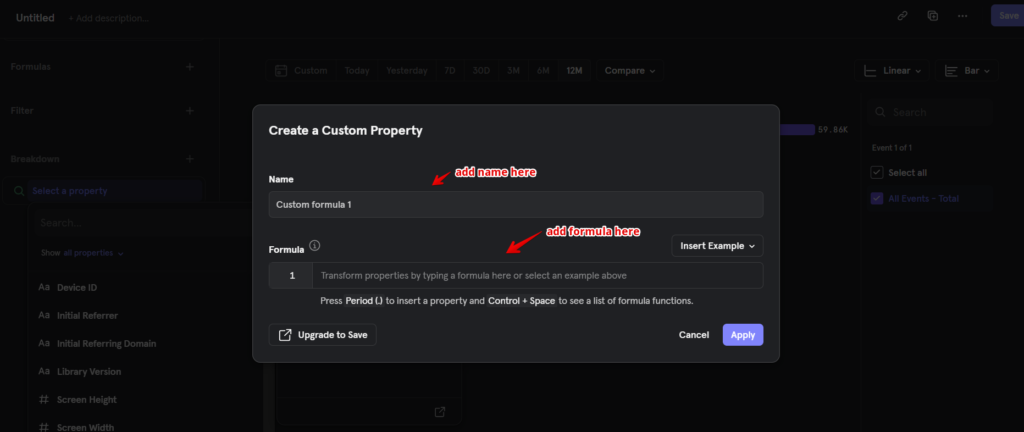
– Use one of the formulas below in the formula field, and I’ll briefly explain what each of them does.
Please Press Period (.) to insert a “Current URL” event property
SPLIT(CURRENT_URL, “/”, 3)
Or this
REGEX_EXTRACT(CURRENT_URL, “https?:\/\/([^\/]+)”, 1)
– In both formulas, replace “<CURRENT_URL>” with the automatically collected “current URL” property.
Formula 1:
SPLIT(CURRENT_URL, “/”, 3)
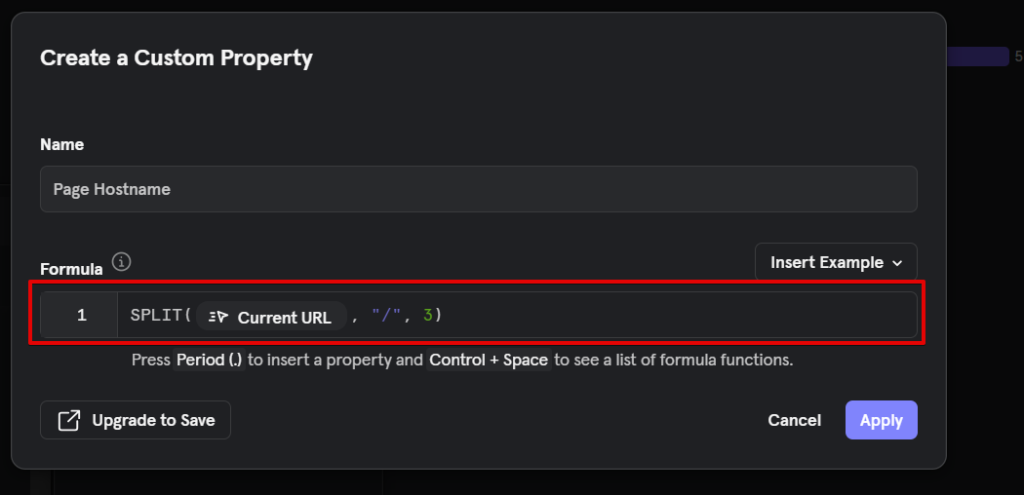
Formula Description:
This formula splits the “current URL” property by the delimiter “/” based on the pattern of URL structure. It then retrieves the third value of the split segment, which represents the domain.
Formula 2:
REGEX_EXTRACT(CURRENT_URL, “https?:\/\/([^\/]+)”, 1)
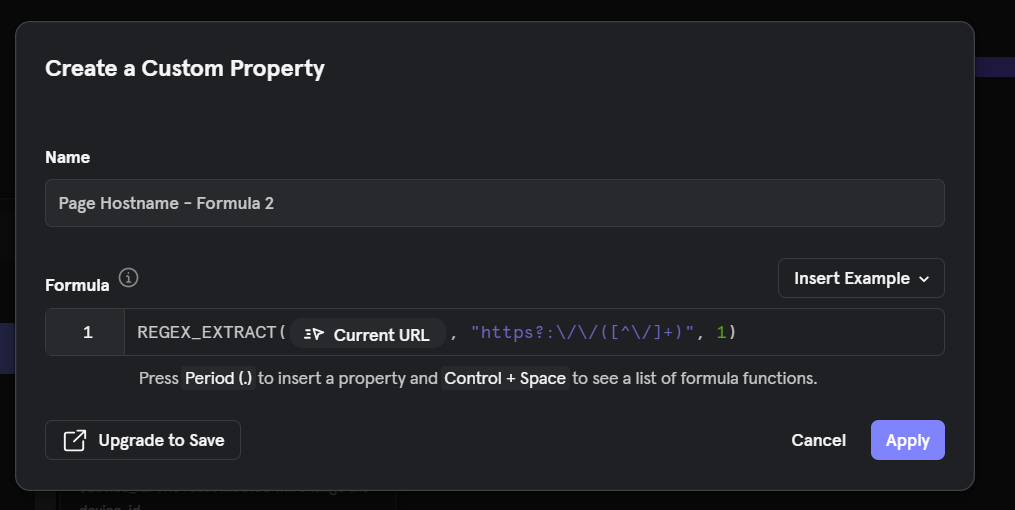
Formula Description:
This formula employs the REGEX_EXTRACT function to extract the desired portion of the URL, specifically the domain name (excluding the protocol and any path).
- https?: Matches the string “http” or “https,” with the “s” being optional.
- :\/\/: Matches the literal characters “://”.
- ([^\/]+): A capturing group that matches one or more characters that are not forward slashes (/). This captures the domain portion for extraction.
The number 1 at the end of the regular expression (1) indicates that the capturing group should be returned as the extracted value.
4. Apply the Formula:
– After adding your preferred formula, click the “Apply” button.
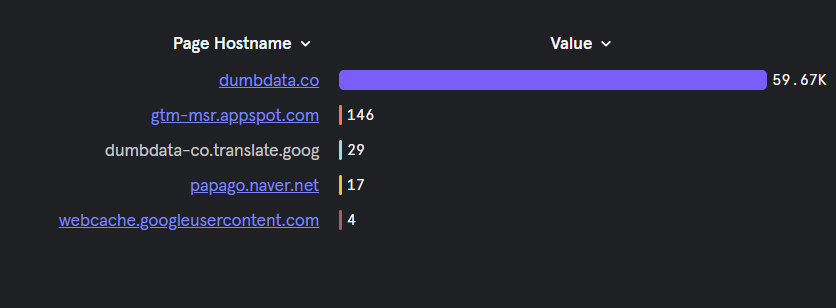
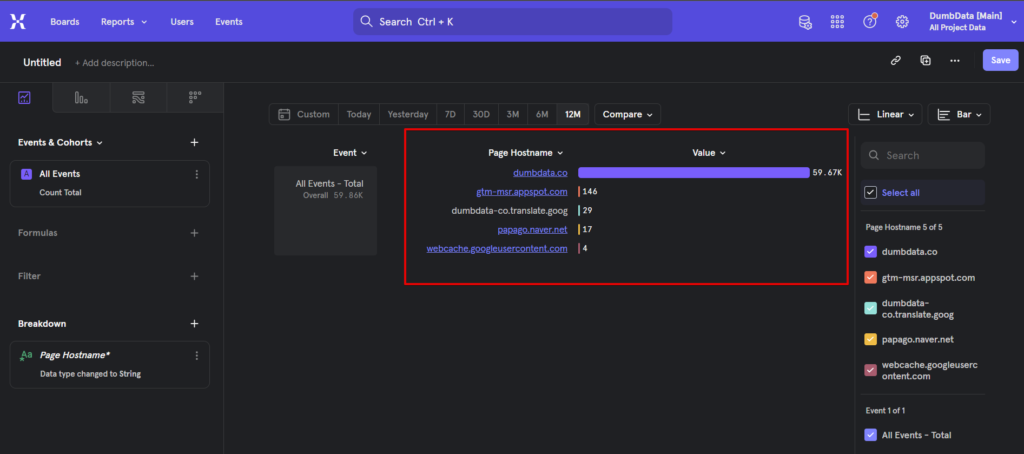
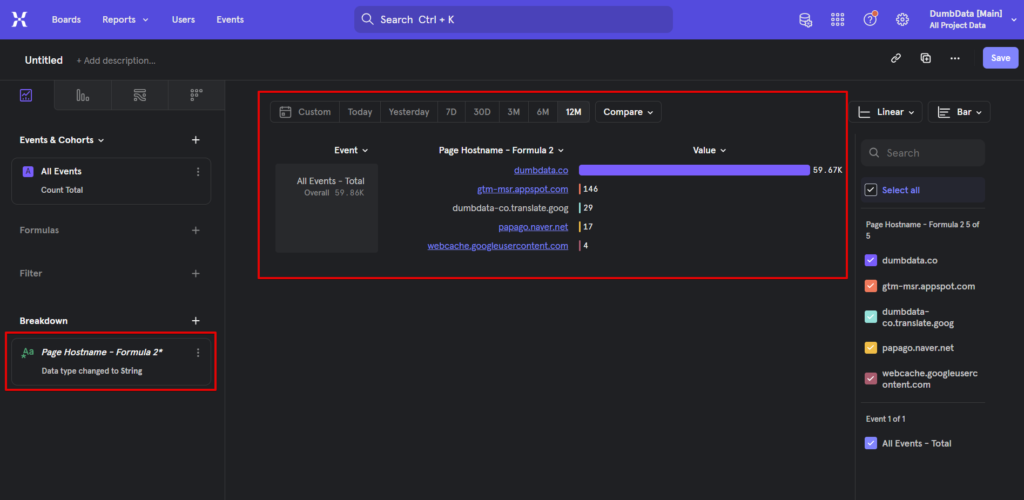
– You will then see the domains from which you are collecting data in your Mixpanel property.
The outcome of formula 1:
The outcome of Formula 2:
5. Adjust the Date Range:
– Remember to modify the date range to cover the desired time period for your report.
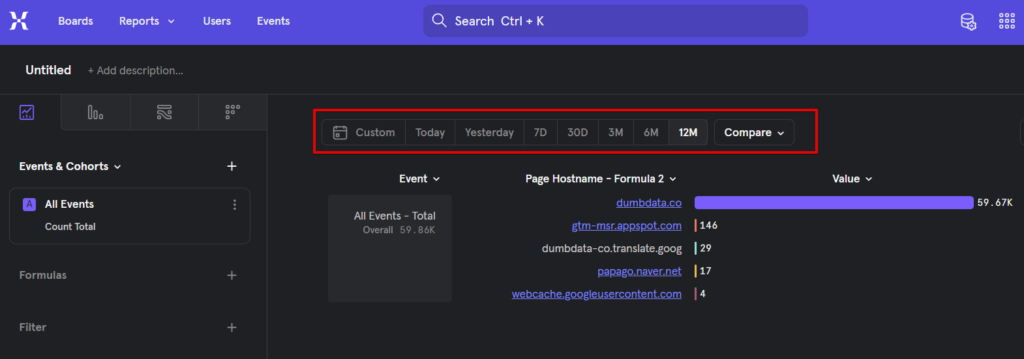
By following these steps, you will successfully identify the website domains from which you collect data in Mixpanel.
Using Event Properties
Please note that using this method is considerable if and only if you consistently include the website domain as a property in all your events. If you are indeed capturing this information, you can follow these steps:
1. Create a Report:
– Select “Insights” as the report type.
– Choose either the “Bar” or “Table” format for the report display type.
2. Configure the Report Section:
– Start by selecting the “All Events” value.
– In the “Event Breakdown” section, choose the event property that captures the website domain. And let’s also assume that you have included this property in all your events.
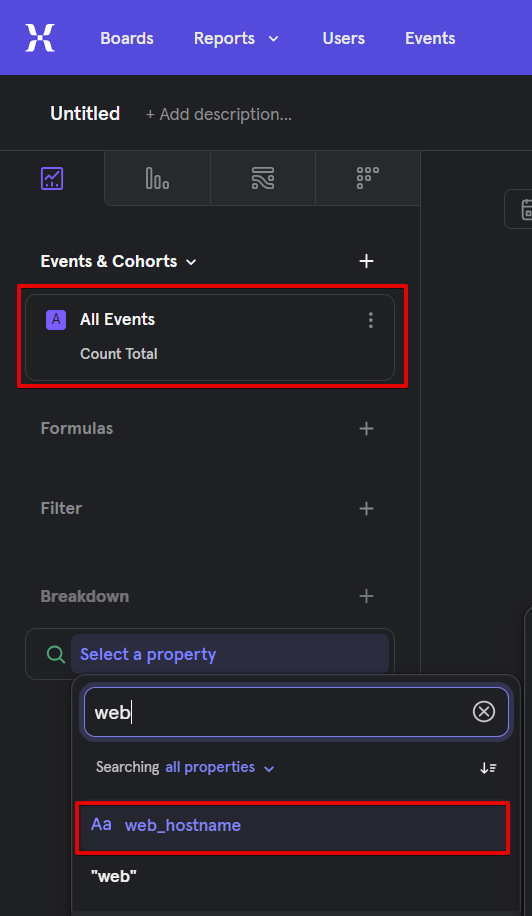
In my case, the property is named “web_hostname.” By selecting it, you will be able to see the domains associated with the events. It’s important to note that these domains will only appear if the “web_hostname” property is included in the tracked events. If any event is recorded in Mixpanel without this property, the corresponding domain will not be displayed in the table. This is why I personally prefer the first method over this approach.
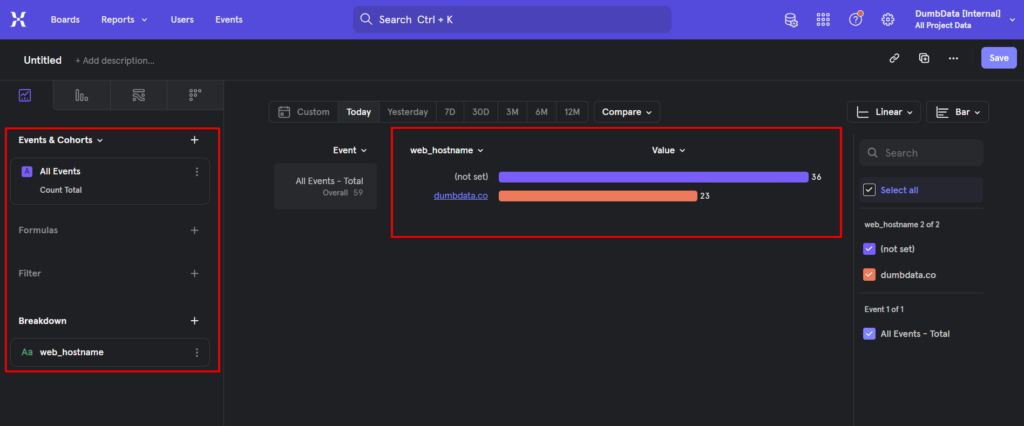
Remember to adjust the date range to cover the specific period you wish to analyze.
Please ensure that you consistently include the website domain in all your events for accurate results.
Conclusion
I must admit, I didn’t anticipate this article to become so lengthy. However, we will strive for concise and straightforward content in the upcoming episodes. This article explored various methodologies to determine the domains from which our Mixpanel property collects data. This knowledge will be valuable in identifying hostnames that are unnecessary for tracking in your business measurement strategy.
If you encounter any specific issues that could be transformed into bite-sized tips like this, please feel free to reach out to me on LinkedIn. Given the time availability, we can create dedicated content on those topics. Lastly, remember to obtain Alon’s Mixpanel Cheatsheet and subscribe to our newsletter for future updates.


