


This is a comprehensive guide to Piwik Pro’s “ALERTS,” including its purpose, where to locate it, and how to utilize its functionality.
This post centres around Piwik Pro’s “Alerts,” also known as “Piwik Pro Email Alerts.” I am always thrilled to discuss this feature within any analytics tool I normally use, and this is because it saves countless hours of human resources that could be lost when manually monitoring positive and negative shifts in business data.
In the DumbData community, we recommend this feature for every analytics steups. In fact, we have previously written about its utilization in Google Analytics (GA4) and how it enables proactive management of changes. However, today’s focus is on Piwik Pro analytics.
If you share a similar mindset with me, you understand the importance of adopting proactive measures, particularly when it comes to data collection and achieving your business KPIs using data. Alerts and monitoring are indispensable, as they empower us to take swift action in response to critical KPI changes.
Piwik Pro has an alert system that keeps you informed and proactive about significant changes happening on your website.
Using data gathered through Piwik Pro Analytics, you can identify these changes as they occur and receive positive or negative notifications to recognize and address such occurrences promptly.
If you have no intention of taking action upon these changes, consider not creating alerts at all. The purpose is not solely to be informed but rather to actively respond to these critical changes.
These changes in your business performance metrics can encompass positive or negative shifts in various aspects of your website, such as conversion rates, revenue, engagement metrics, acquisition efforts, data collection, website performance, e-commerce performance, and consent activity.
This blog post will delve into the proactive feature called “ALERTS” within Piwik Pro Analytics suites. Our exploration will cover the process of setting it up, the strategic considerations involved, and its limitations, and offer valuable ideas to maximize the benefits derived from this product.
Before we proceed, it is worth noting that we will regularly update this article to reflect any updates Piwik Pro introduces to the “Alerts” feature in their analytics suite. With that in mind, let us now dive into the article’s content.
Understanding the Piwik Pro Alerts Feature
The Piwik Pro Alerts feature is an integral part of the Piwik Pro Analytics suite. It empowers you to establish conditions that identify significant changes in your data. Once these conditions are met, you receive email notifications.
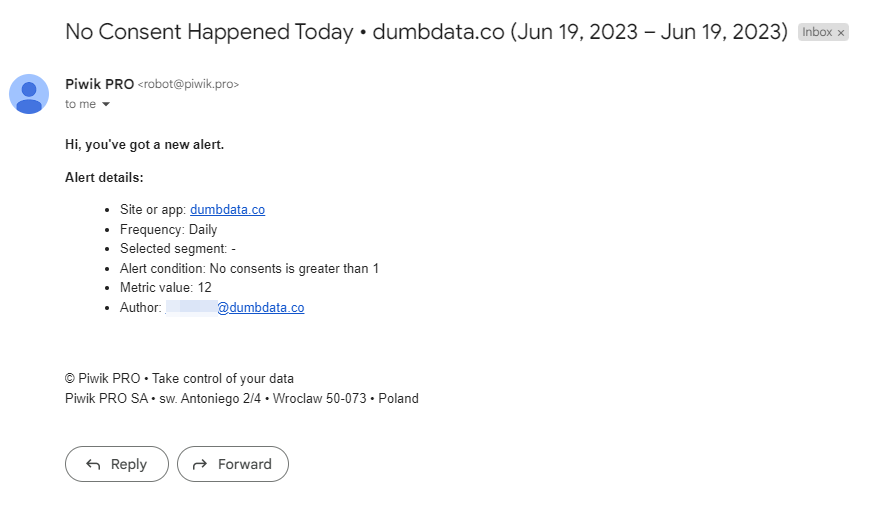
These notifications are delivered through email, informing you when a metric experiences a drop, increase, or reaches a specific threshold. You have the flexibility to send alerts to your team members and clients, adjust the frequency of notifications, and disable them by pausing or deleting the Piwik Pro alerts when they are no longer necessary.
This feature acts as a dedicated monitor for the specific changes you wish to proactively track, promptly notifying you or any designated recipients via email.
How to Locate Alerts in Piwik Pro
To find the Alerts feature in Piwik Pro Analytics, follow the steps outlined below:
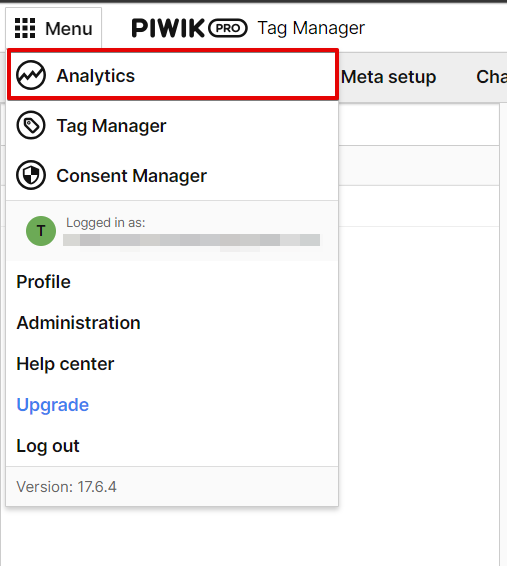
- If you are not already in the Analytics Suites section, navigate to Menu > Analytics.
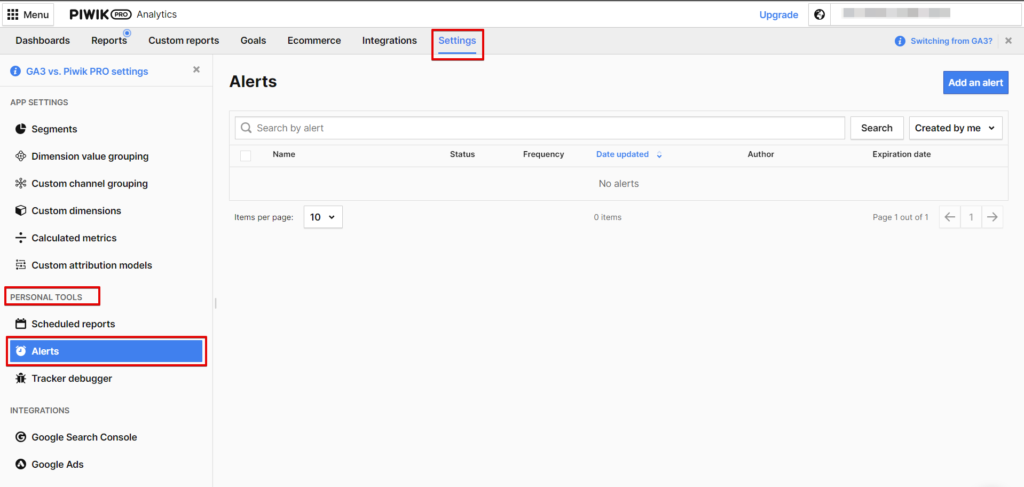
- Proceed to the Settings tab.
- On the left-hand side, scroll down to the Personal Tools section and click on Alerts.
Navigate to the Piwik Pro Analytics suite.
Navigate to “Alerts”.
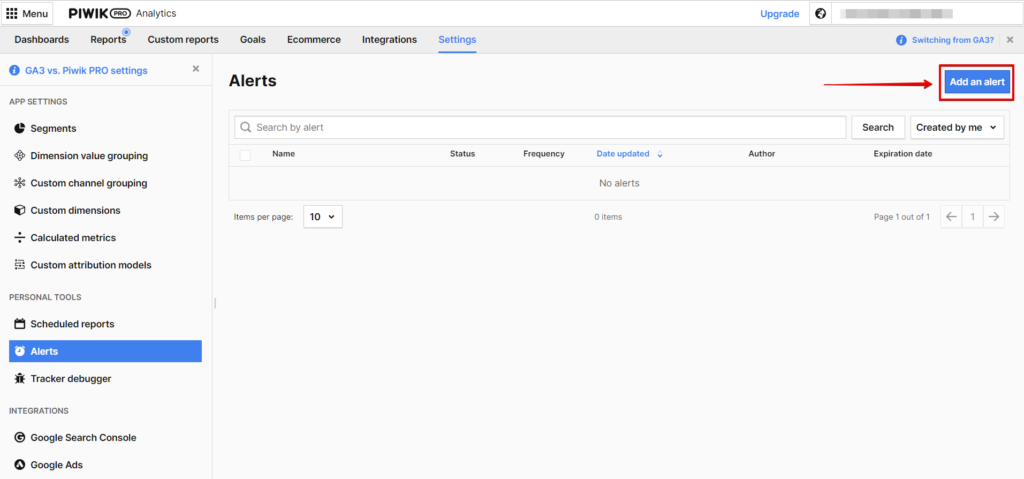
In the Alerts overview, you will find a list of all the alerts that have been created for your Piwik Pro Analytics property. If you are using this feature for the first time, the screen may be blank. To create a new alert, which is one of the main purposes of this article, click on the blue “Add an Alert” button.
One of the aspects I particularly appreciate about this feature is its ability to construct alerts based on metrics or aggregated dimension values. Additionally, you can create alerts specific to particular segments of your data.
However, it is important to note that this feature has some limitations, including the inability to add dimension-based conditions, create lifetime alerts, or generate hourly alerts for critical events. I will delve into these limitations in more detail in the limitations section of this blog post. But first, let’s go through the process of creating an alert.
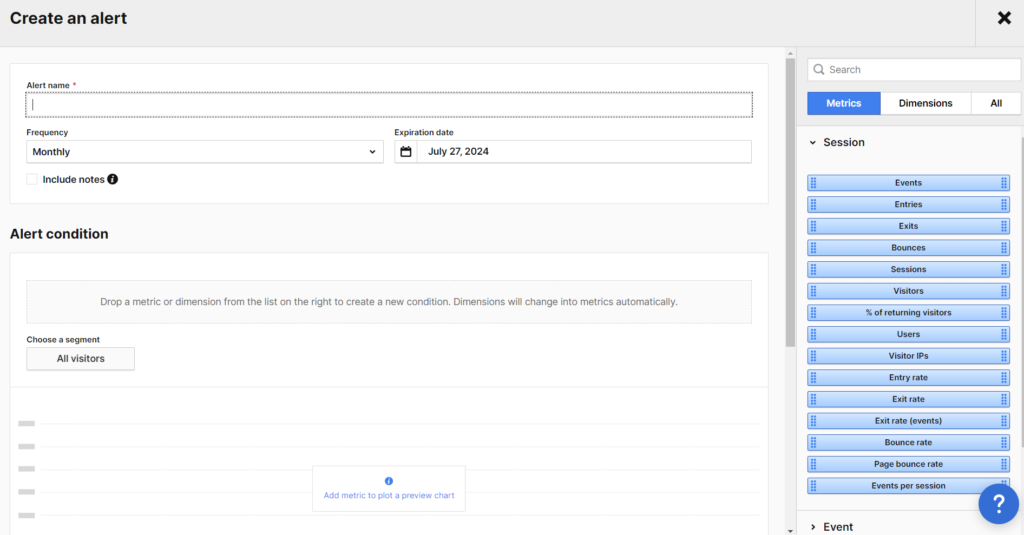
After clicking the “Add an Alert” button, you will be directed to a new screen where you can build your alert.
To create a Piwik Pro Email alert, you must have the following access permissions: owner, manage, edit & publish, or edit.
The alert screen is divided into three sections: the “Alert Configuration” (not the official Piwik Pro term, but a term I coined for clarification), the “Alert Condition,” and the “Recipient” section.
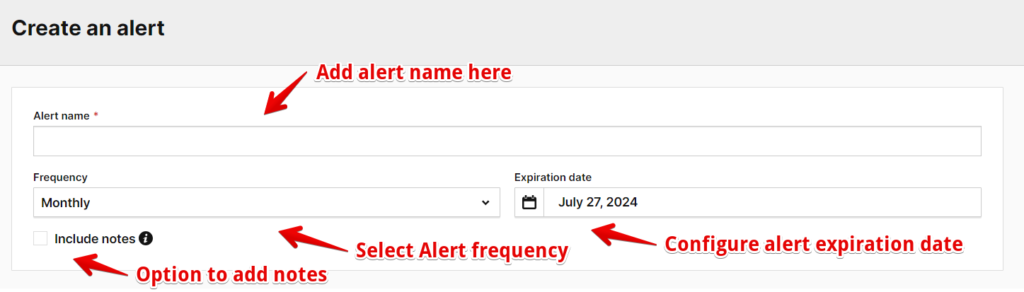
Alert Configuration
To begin, you need to assign a name to the alert and set an expiration date, which is limited to a maximum of one year from the creation date. Additionally, you have the option to determine the alert frequency by choosing from the following options:
- Daily
- Weekly
- Monthly
Furthermore, you can opt to include notes in the alert. These notes are comments you have previously added to your Analytics property.
Alert Condition
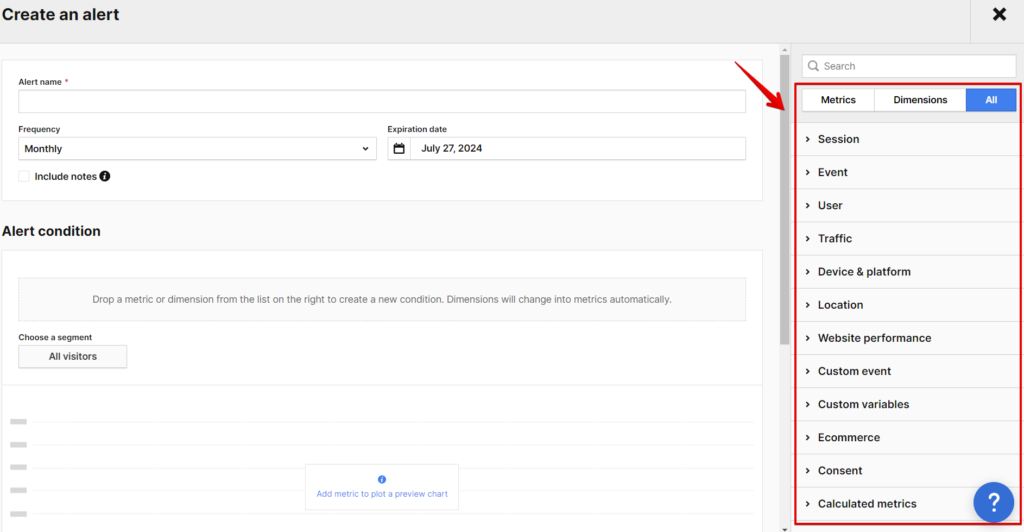
The available options for selecting dimensions or metrics in the Piwik Pro analytics alerts condition configuration will depend on your specific setup. You can choose from various categories, including:
- Session
- Event
- User
- Traffic
- Device & Platform
- Location
- Website Performance
- Custom Event
- Custom Dimension
- Custom Variables
- E-commerce
- Consent
- Calculated Metrics
Under the “Metrics” tab, you can select changes based on the alterations observed in a particular metric.
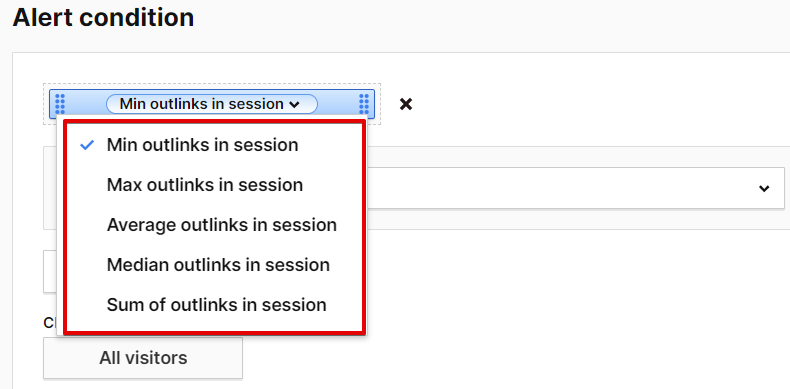
On the other hand, the “Dimensions” tab allows you to monitor changes using the aggregated value of the selected dimension. The specific aggregation function will depend on the Piwik Pro dimension applied and can include options such as:
- Unique count
- Minimum
- Maximum
- Average
- Median
- Sum
Here is an example using the “Outlinks in session” dimension.
The “All Tab” encompasses metrics and dimensions from the abovementioned categories.
To construct your alert system in Piwik Pro, you need to drag and drop the desired metric or dimension into the “Alert Condition” configuration field. It’s important to note that “dimensions” will automatically transform into metrics calculated based on the dimension values.
Upon dropping the metric or dimension, you will get an extra field for configuring the conditions that will trigger the alert. Keep in mind that you can add a maximum of two alert conditions for a specific Piwik Pro alert.
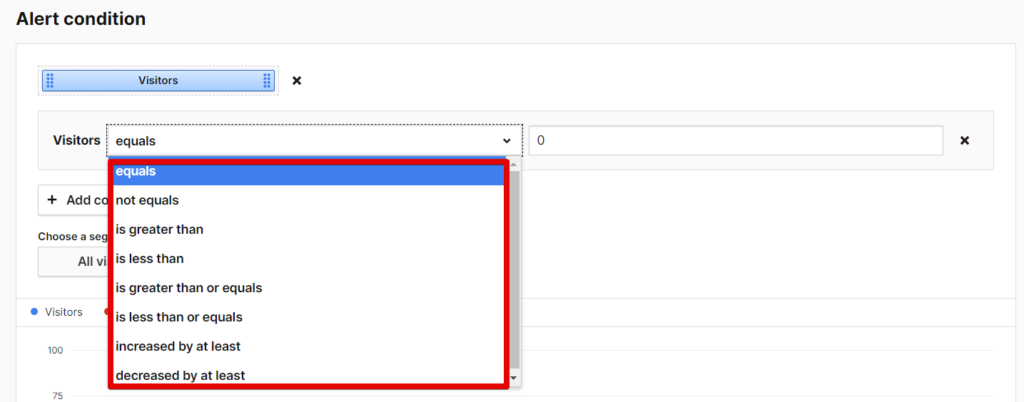
You have the following conditions to choose from:
- Equals
- Not Equals
- Is Greater Than
- Is Less Than or Equals
- Is Less Than or Equals
- Increased By At Least
- Decrease By At Least
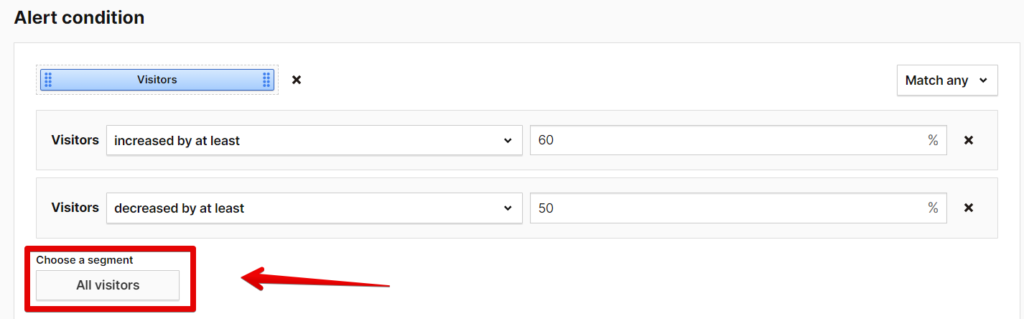
Additionally, you can specify whether all the added conditions should “Match All” or “Match Any”:
- Match All: All applied conditions must be satisfied for Piwik Pro to trigger an alert.
- Match Any: Only one of the conditions needs to be satisfied for Piwik Pro to notify you about the change occurrence.

In the “Alert Condition” section, you also have the option to listen for changes within a specific segment of your data. For example, you can monitor traffic or conversion drops specifically for US website visitors or paid traffic website visitors.
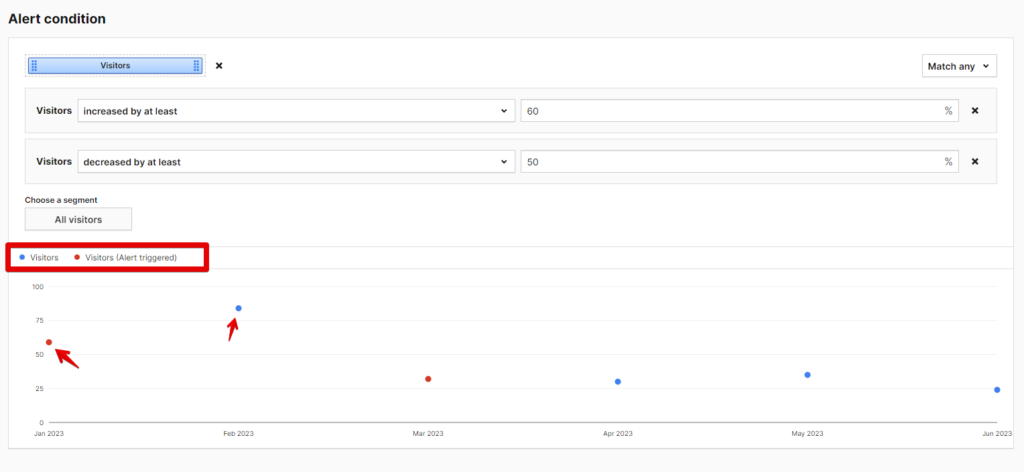
Furthermore, a chart is provided to visually represent the metric or dimension used in the alert condition. Blue dots represent the metric or dimension, while red dots indicate the instances when alerts would have been triggered in the past, assuming you had previously created the alert.
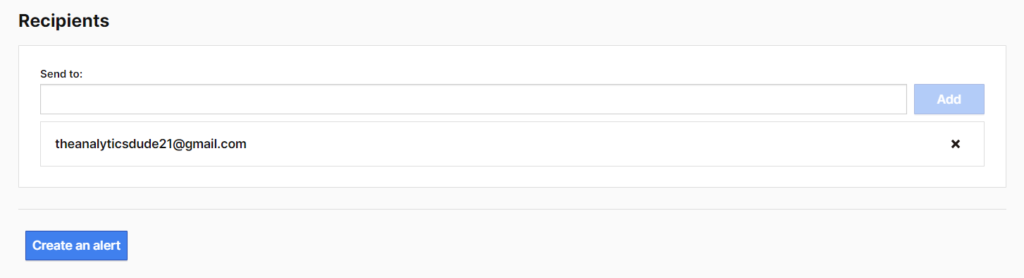
Recipients
In this segment of the “Create an Alert” interface, you can input the recipients’ email addresses who should receive the alerts when these changes occur.
It is important to note that recipients do not necessarily require access to the Piwik Pro property in order to receive the alerts.
To add multiple recipients, you need to manually enter their email addresses, as separating each recipient with a comma is impossible.
Valuable Strategic Tips for Utilizing Piwik Pro “Email Alerts” to Proactively Monitor Data Changes
Implementing a well-thought-out strategy is crucial for any analytics project, and the same applies when harnessing the power of Piwik Pro’s “email alerts” feature.
In this section, I will share strategic approaches to creating Piwik Pro email alerts, along with practical examples you can apply to your Piwik Pro project.
I will categorize my Piwik Pro email alerts into the following sections, providing detailed explanations for each category along with corresponding examples:
- Data Collection Monitoring
- KPI Change Monitoring
- Engagement Metric Changes Monitoring
- E-commerce Related Changes Monitoring
- Segment Targeted Changes Monitoring
- Privacy Performance Monitoring
By monitoring changes in these various categories, you can proactively utilize data to drive the growth of your business.
These changes may encompass positive and negative shifts, but the ultimate objective is to leverage these changes to benefit your business and its customers.
Now, let’s delve into real-life examples within each category mentioned above and explore the configurations for each Piwik Pro email alert.
Data Collection Monitoring:
These types of alerts are designed to keep us proactive in identifying issues within our data collection system. For instance, it could be when your website tracking is down due to various reasons, experiencing a drop or increase in website visitors, or encountering errors in your tracking setup. By utilizing these alerts, you can receive timely notifications and take proactive measures when such changes occur.
Let’s explore some real-life examples of these alerts:
Tracking Setup Down:
This alert notifies you when Piwik Pro fails to track any visits for an entire day, indicating a potential issue with your tracking. The configuration for this alert is as follows:
Frequency: Daily
Metric: Visitors
Condition: “Visitors” equal to zero (0).
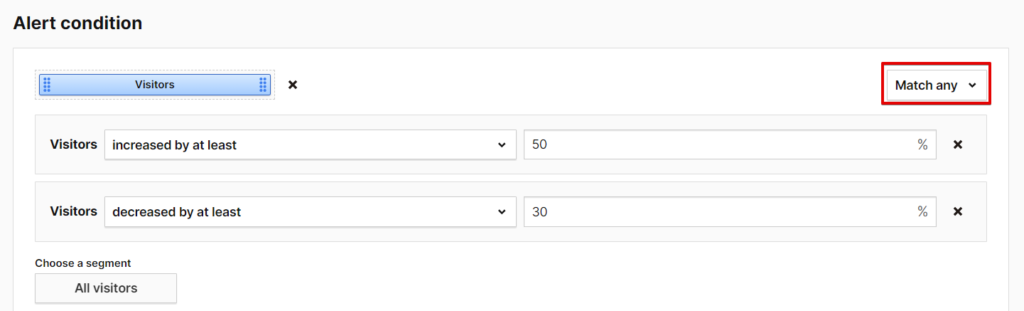
Changes in Website Visits (Weekly or Monthly Drops & Increases):
This alert prompts further investigation if there are any anomalies or drastic changes in your user acquisition strategy. It keeps you informed about increases or decreases in website visits weekly or monthly. You can set up this alert using the following configurations:
Frequency: Weekly or Monthly, based on your needs
Metric: Visitors
Alert Condition: Visitors increased by at least a specified percentage. For decreases, modify the condition to Visitors decreased by at least a certain rate.
*You have the option to utilize a single alert; however, make sure to employ the “Match Any” match type. Alternatively, you can create separate alerts, which will grant you greater control over the process.
Conversion Tracking Is Down:
This alert signals when your conversion tracking setup is either broken, indicating a need to review your current instrumentation. You can configure it as follows:
Frequency: Weekly or Monthly
Metric: Goal Conversion
Condition: Goal conversion equals zero (0).
You can also monitor a specific Piwik Pro Analytics Goal by clicking on the metric dropdown arrow and selecting “Specific Goal Conversion.” From there, you can choose the goal you would like to monitor.
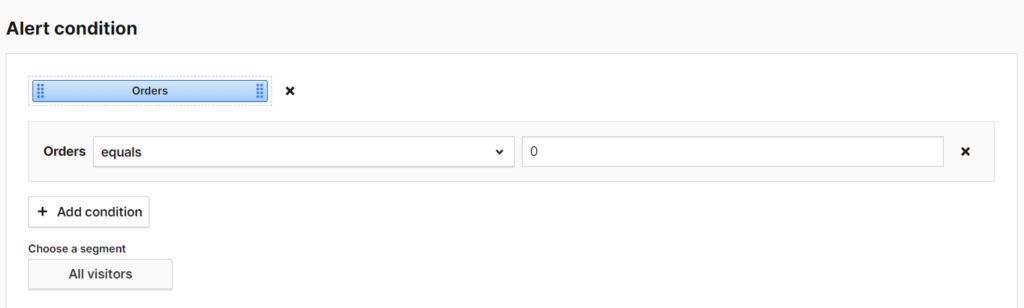
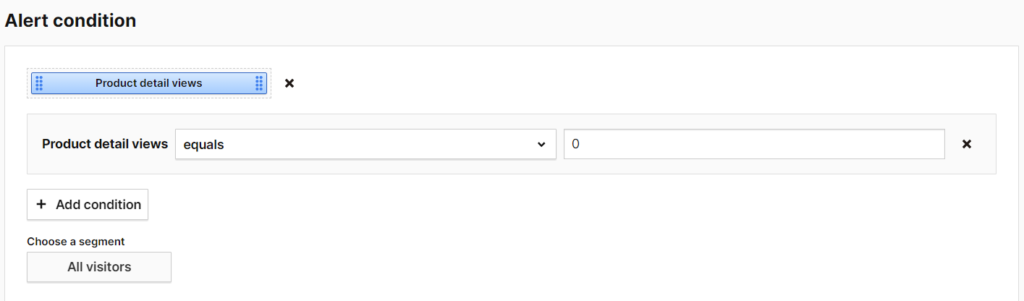
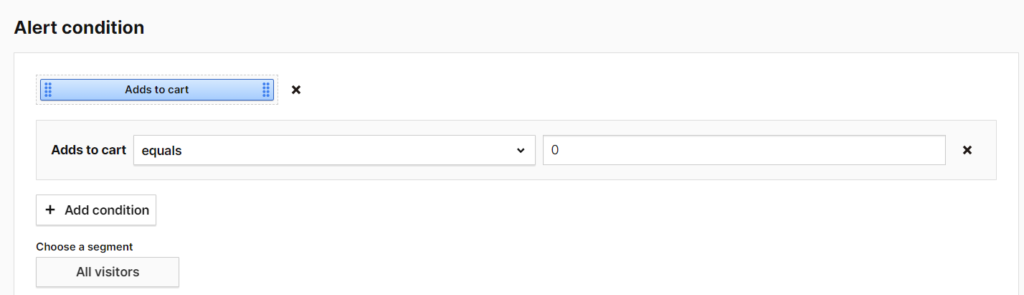
Monitoring eCommerce Tracking Instrumentation:
If Piwik Pro eCommerce tracking is implemented, this alert allows you to monitor if your e-commerce measurement instrumentation gets broken. It tracks the following eCommerce metrics and alerts you when they equal zero (0):
- Orders
- Product Detail Views
- Add to Carts
Talking about e-commerce, we have created a FREE Piwik Pro e-commerce instrumentation template that you can download here.
A typical example of monitoring broken e-commerce instrumentation is creating an alert system when “Orders” is zero in a month or week.
Another example of monitoring e-commerce broken instrumentation is checking when “Product Detail View” is zero.
An example of monitoring broken e-commerce implementation is an alert system for monitoring when “Add to cart” is zero “0”.
KPI Change Monitoring:
These alerts are essential for enabling you to take proactive actions when there are positive or negative changes in your business’s key performance indicators (KPIs), such as acquisition, retention, conversion rates and conversions, also known as goals in Piwik Pro. By receiving notifications through Piwik Pro email alerts that monitor KPI changes, you can investigate the reasons behind these changes and take appropriate measures. Let’s explore some real-life examples of such changes:
*For each Alerts type mentioned here, you have the option to utilize a single alert; however, make sure to employ the “Match Any” match type. Alternatively, you can create separate alerts, granting you greater control over the process.
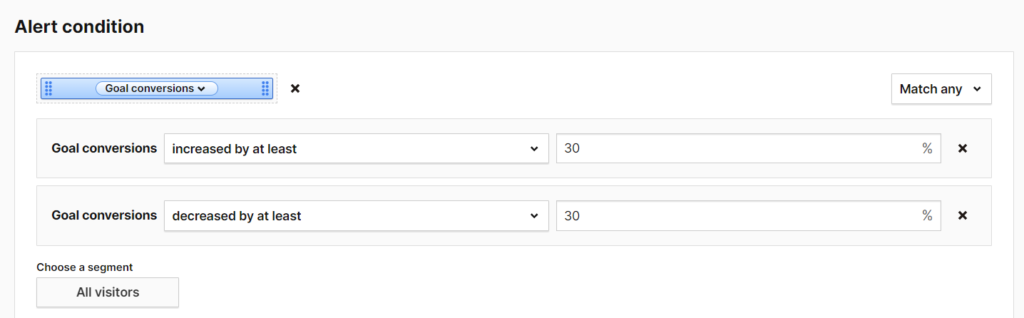
Changes in Conversion (Weekly or Monthly Increases or Drops):
This alert informs you of a weekly or monthly increase or decrease in website conversions based on the specific change in rate you wish to monitor. You should be able to configure the alert system with the following settings:
Frequency: Weekly or Monthly
Metric: Goal Conversion
Condition: “Increased by at least” or “Decreased by at least,” followed by your specified percentage.
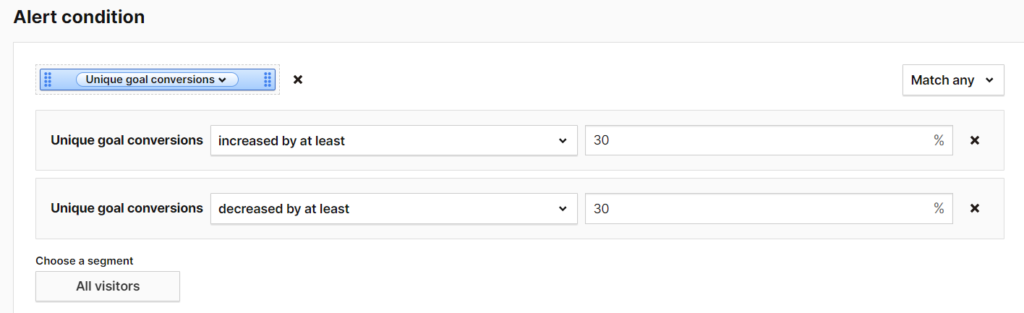
Changes in Unique Conversions (Weekly or Monthly Increases or Drops):
This alert notifies you when there are changes in the number of unique conversion actions website visitors take. These changes can be either positive (increase) or negative (decrease).
Frequency: Weekly or Monthly
Metric: Unique Goal Conversion
Condition: “Increased by at least” or “Decreased by at least,” followed by your specified percentage.
Changes in Goal Conversion Rate (Weekly or Monthly Increases or Drops):
Monitoring changes in your website’s conversion rate is crucial. With Piwik Pro alerts, you can track positive or negative changes in your conversion rate, allowing you to take action accordingly. Set up this alert using the following configuration:
Frequency: Weekly or Monthly
Metric: Goal Conversion Rate
Condition: “Increased by at least” or “Decreased by at least,” followed by your specified percentage.

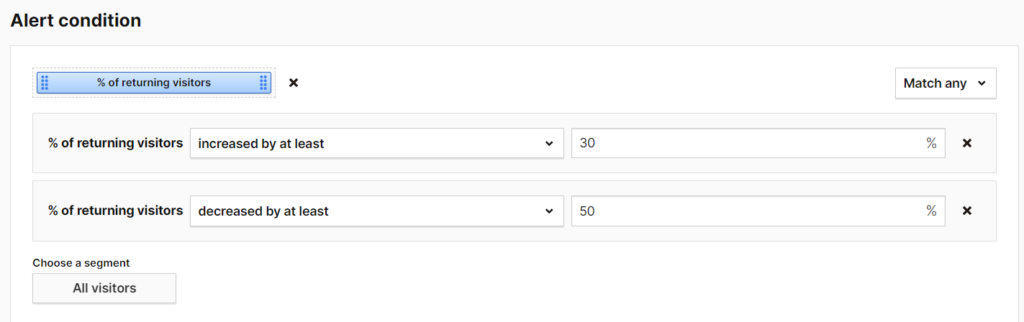
Monthly Changes in Website Return Visit Rate (Increases or Drops):
This example involves monitoring the percentage of return visitors to your website and alerts you when there are changes in the return rate. It helps you identify critical areas for improving website stickiness.
Frequency: Weekly or Monthly
Metric: % of Returning Visitors
Condition: “Increased by at least” or “Decreased by at least,” followed by your specified percentage.
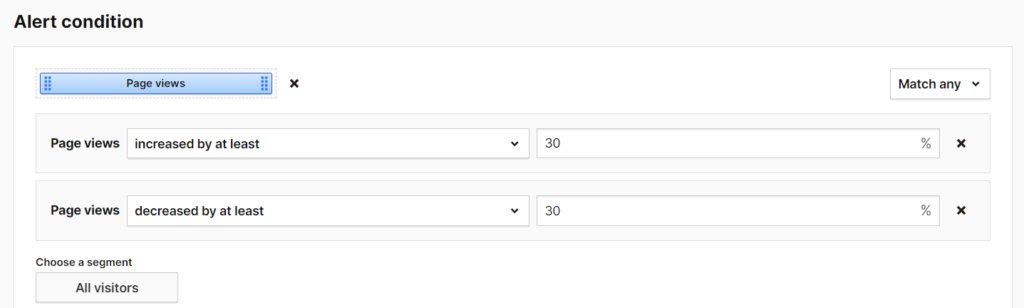
Changes in Page Consumption (Weekly or Monthly Increases or Drops):
You can also set up alerts to monitor increases or decreases in the number of page views on your website. Configure this alert as follows:
Frequency: Weekly or Monthly
Metric: Page Views
Condition: “Increased by at least” or “Decreased by at least,” followed by your specified percentage.
Engagement Change Monitoring:
In many cases, if your website lacks engagement, it can significantly impact your website conversion rates. For businesses that consider website engagement a valuable key performance indicator (KPI) for measuring business performance, such as educational websites, creating alerts in the engagement change monitoring category is highly beneficial.
Let’s explore some real-life examples of Piwik Pro alerts that you can create:
*For each Alerts type mentioned here, you have the option to utilize a single alert; however, make sure to employ the “Match Any” match type. Alternatively, you can create separate alerts, which will grant you greater control over the process.
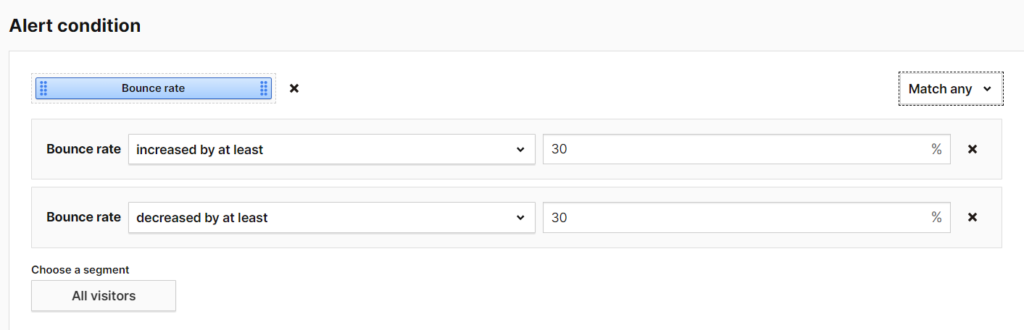
Changes in Website Bounce Rate (Weekly or Monthly Increases or Drops):
This alert allows you to assess the level of engagement and interactivity on your website. By monitoring positive and negative changes in the website bounce rate, you can be notified when the bounce rate exceeds a specific percentage that you consider extreme or too low.
Frequency: Weekly or Monthly
Metric: Bounce Rate
Conditions: “Increased by at least,” “Is greater than,” “Is less than,” “Decreased by at least,” followed by your specified percentage.
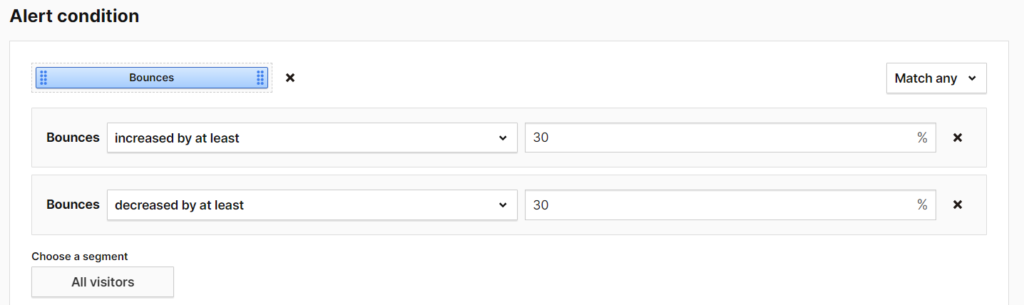
Changes in Bounces (Weekly or Monthly Increases or Drops):
Monitoring changes in website bounces helps you understand when visitors leave your website after visiting only one page and without further interaction. Being notified of these weekly or monthly changes enables you to investigate and take appropriate actions. Configure the alert in Piwik Pro as follows:
Frequency: Weekly or Monthly
Metric: Bounces
Conditions: Can be any of the following, “Increased by at least” or “Decreased by at least,” or indicating your specified percentage.
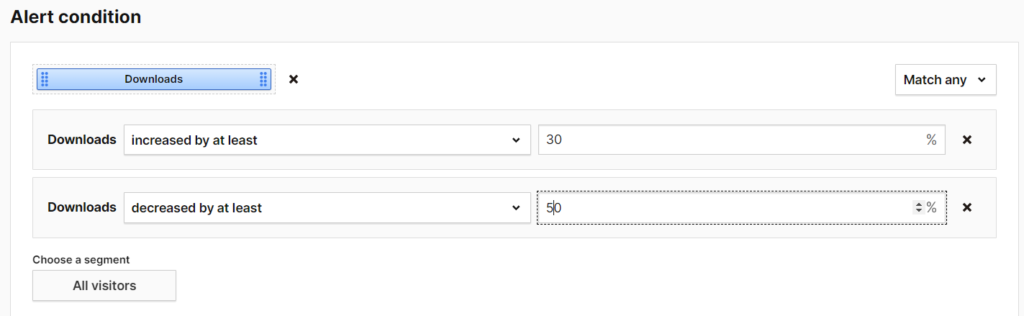
Changes in the Number of Website File Downloads (Weekly or Monthly Increases or Drops):
If your website tracks file downloads, this alert allows you to monitor the incremental or decreased change in the activity of file downloads and get notified of increases or decreases in this activity.
Frequency: Weekly or Monthly
Metric: Downloads
Conditions: “Increased by at least,” “Is greater than,” “Is less than,” “Decreased by at least,” followed by your specified percentage.
E-commerce Changes Monitoring:
Alerts in this category allow you to stay ahead of e-commerce-related changes that can significantly impact the bottom line. These alerts are particularly beneficial for businesses with e-commerce capabilities where website visitors can place orders. Proactively monitoring these positive or negative changes can greatly support business growth.
*For each Alerts type mentioned here, you have the option to utilize a single alert; however, make sure to employ the “Match Any” match type. Alternatively, you can create separate alerts, which will grant you greater control over the process.
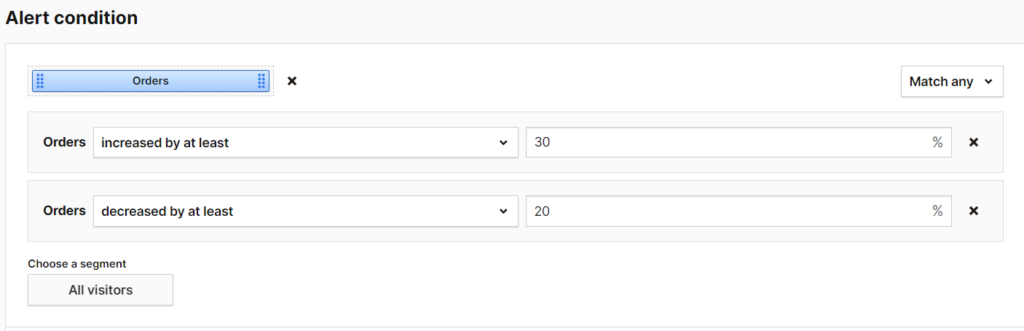
Orders Decline and Increase (Monthly or Weekly):
This alert notifies you when there is a specific percentage decrease or increase in website store orders within a week or month, depending on the frequency of changes you wish to monitor.
Frequency: Weekly or Monthly
Metric: Orders
Conditions: “Increased by at least,” “Is greater than,” “Is less than,” “Decreased by at least,” followed by your specified percentage.
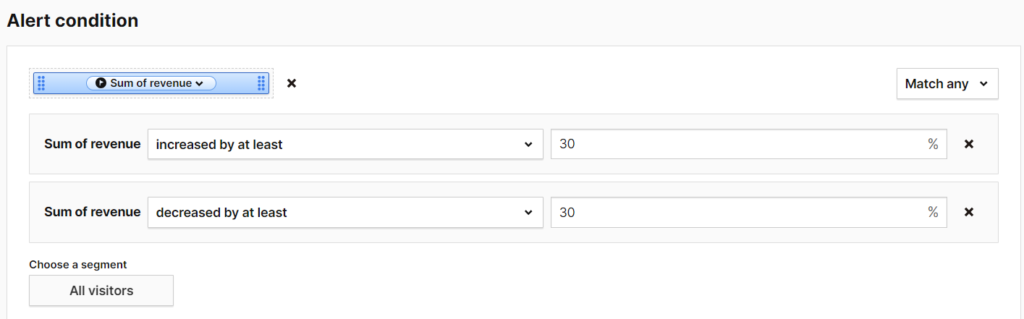
Monthly or Weekly Revenue Increase and Decrease:
For e-commerce businesses, monitoring negative and positive changes in store revenue is crucial. This alert allows you to specify the percentage change you wish to monitor, whether it’s a significant increase or decrease in the store purchase revenue.
Set up the alert using the following configuration:
Frequency: Weekly or Monthly
Metric: Revenue (sum or average)
Conditions: “Increased by at least,” “Is greater than,” “Is less than,” “Decreased by at least,” followed by your specified percentage.
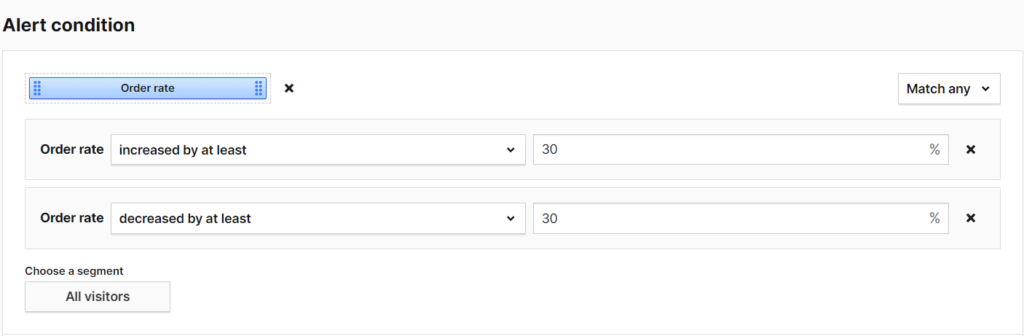
Order Rate Decline and Increase (Monthly or Weekly):
Similar to the purchase alert, this alert enables you to monitor the specific percentage decline or increase in the rate at which website visitors make purchases on your website.
Frequency: Weekly or Monthly
Metric: Order Rate
Conditions: “Increased by at least,” “Is greater than,” “Is less than,” “Decreased by at least,” followed by your specified percentage.
Order-to-Detail-Rate Decline and Increase (Monthly or Weekly):
Likewise, this alert allows you to monitor the percentage decline or increase in the rate at which website visitors view product pages and then convert.
Frequency: Weekly or Monthly
Metric: Order-to-Detail Rate
Conditions: “Increased by at least,” “Is greater than,” “Is less than,” “Decreased by at least,” followed by your specified percentage.

Segmented Target Changes Monitoring:
These types of alerts inform you when there are changes in key performance indicators (KPIs) that are specific to particular segments of users rather than to all website visitors.
Segmentation can be based on factors such as device type, geographic location, or user behaviour. With Piwik Pro Analytics, you can add this level of granularity to your alert configuration using the embedded segment feature.
Here are a few examples of alerts you can create for your business:
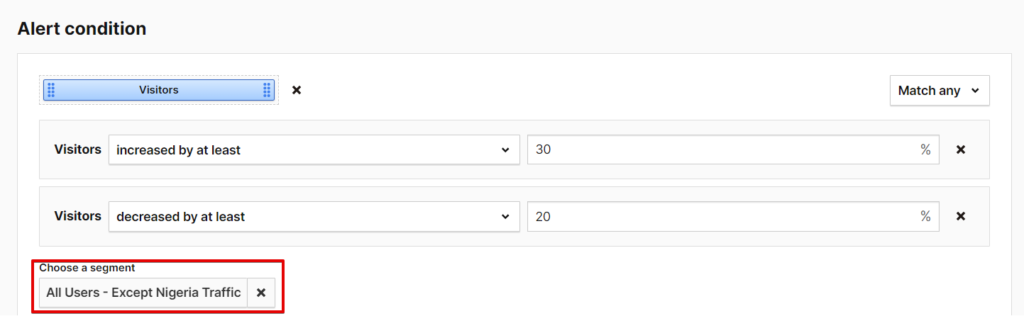
Country-Based Performance Drop and Rise (Weekly or Monthly):
Utilizing the “Segment” dropdown within the Piwik Pro alert configuration, you can create a segment for specific markets, such as visitors from the United States or a region-specific segment.
This allows you to monitor the performance metrics of website visitors from these markets, including metrics like website traffic (visitors), goal conversions, goal conversion rate, purchases (for e-commerce businesses), and revenue.
To set it up in Piwik Pro Analytics, follow these steps:
Frequency: Weekly or Monthly
Metric: Your preferred metric
Segment: The segment you created
Condition: “Increased by at least” or “Decreased by at least,” followed by your specified percentage.
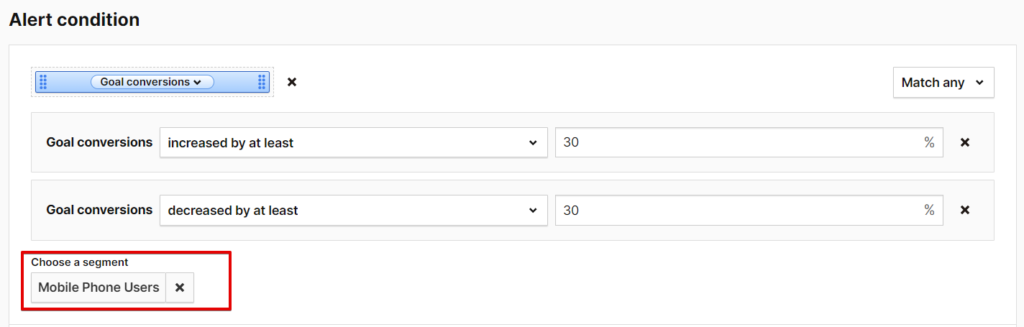
Conversion Decline or Increase in Mobile Devices (Weekly or Monthly):
This alert specifically targets conversions or other conversion-related KPIs for mobile devices. It notifies you when these metrics increase or decrease based on a specified percentage threshold.
Examples of conversion-based metrics include goal conversions, goal conversion rate, purchases (for e-commerce businesses), and revenue.
Set it up in Piwik Pro Analytics using the following configuration:
Frequency: Weekly or Monthly
Metric: Your preferred metric
Segment: The segment you created
Condition: “Increased by at least” or “Decreased by at least,” followed by your specified percentage.
You can also create a similar segment for desktop traffic.
The segment-based alert category has a wide range of possibilities, but I have covered these examples for now.
Privacy Performance Monitoring:
Please note that the alerts in this category will only function if you use the Piwik Pro consent form or have integrated it with a third-party consent platform.
Piwik Pro can be integrated with third-party consent management platforms using their consent API, and we have previously covered integration steps for Osano, CookieYes, and CookieFirst consent banners.
These alerts enable you to monitor changes in the performance of your consent banner. It is important to respect user privacy and not force them to accept the deployment of data collection technologies on their browsers. However, you can use these alerts to identify optimization opportunities, such as refining your copy, designs (without resorting to dark patterns), and placement.
Here are some alerts you can create for this purpose:
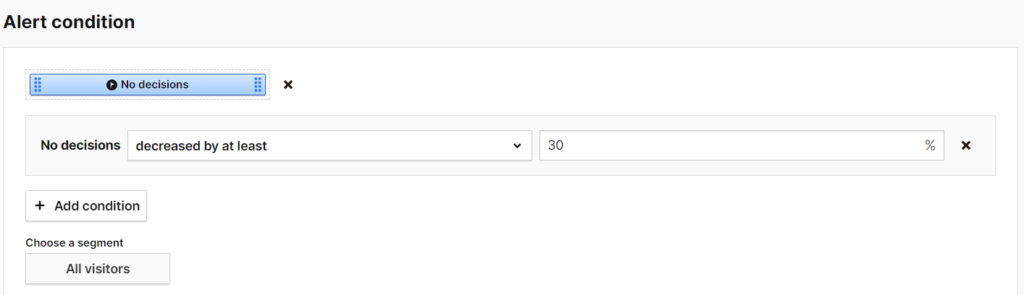
Weekly or Monthly Massive Increase in No Decision Made:
By creating this alert, you can monitor instances where your consent banner is not performing effectively. This could be attributed to factors like design, copy, or placement. The alert allows you to track a significant increase, expressed as a specific percentage, in the number of “No Decision” types of consent.
Frequency: Weekly or Monthly
Metric: No Decisions
Condition: “Decreased by at least,” followed by your specified percentage.
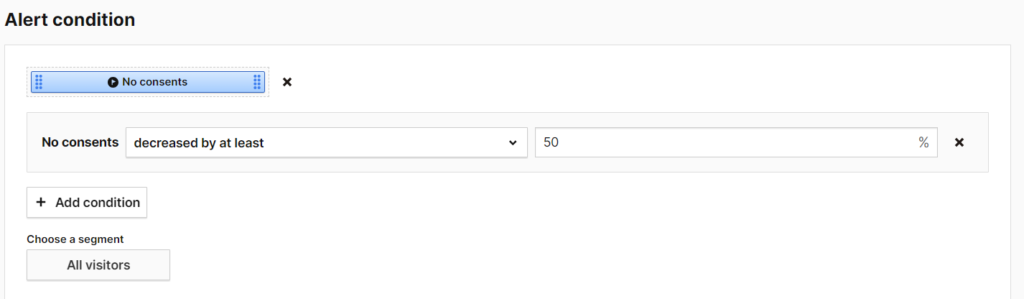
Weekly or Monthly Massive Decrease in Consents Granted:
Similar to the previous alert, this one tracks a significant decline, expressed as a specific percentage, in the number of consents granted by website visitors after viewing the consent banner.
Frequency: Weekly or Monthly
Metric: No Consent
Condition: “Decreased by at least,” followed by your specified percentage.
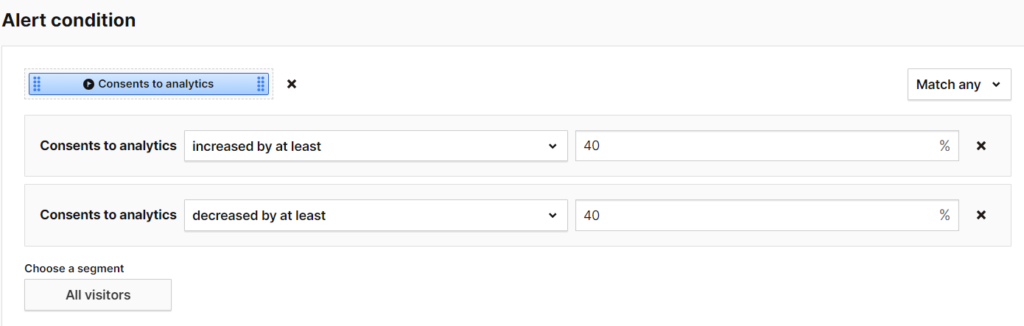
Weekly or Monthly Decrease in Analytics Consents Granted:
This alert specifically monitors a significant increase or decrease, expressed as a specific percentage, in the number of analytics consents given by website visitors after viewing the consent banner.
Frequency: Weekly or Monthly
Metric: Analytics Consent
Condition: “Increased by at least” and “Decreased by at least,” followed by your specified percentage.
I recommend exploring additional alert types that may be relevant to your specific needs. Remember, creating the alert may not be necessary if you do not plan to take any action when these changes occur.
Limitations of Piwik Pro Alerts
The Piwik Pro team has been commendable in continuously enhancing their analytics solution, introducing new features, and prioritizing privacy enhancements. However, there are certain areas where the “Alert system” capability in Piwik Pro could be improved. As we look to the future, I hope to see updates addressing the following limitations:
Anomalies Alert:
One limitation is the absence of an anomalies alert feature that leverages machine learning to identify anomalous data changes in metrics or aggregated dimension values. This would eliminate the need for manually setting a percentage value for specific increases or decreases.
Condition Filter Using Dimensions:
Currently, creating a condition filter based on dimensions is impossible. For instance, it would be useful to set up an alert specifically for certain types of events occurring on your business website, such as 404 errors or engagement-related events. Including this feature would enable marketers to closely monitor website interactions that directly impact their KPIs and conversions at a more granular level.
Unlimited Alert Expiration Date:
When creating a new “Email Alert” in Piwik Pro, you can select an expiration date, but the maximum duration is limited to one year from the creation date.
This means Piwik Pro won’t send email alerts for dates beyond this date range. Allowing an unlimited expiration date would provide more flexibility for long-term monitoring needs.
Limited Number of Conditions:
While it is generally true that more conditions do not always equate to better alerts, there may be certain cases where marketers require more than two conditions to monitor specific changes, especially when utilizing event-based information effectively. The current limitation of two conditions can pose challenges when achieving monitoring goals in such scenarios.
Hourly-Based Frequency:
Although not commonly used in most analytics projects, having the option for hourly frequency can be beneficial for monitoring critical changes in real time. This could include events like 404 errors, checkout errors, or other time-sensitive occurrences. While daily frequency alerts can be set up as an alternative, the absence of an “Hourly” frequency capability prevents extra proactive monitoring of these errors as they happen.
Addressing these limitations would further enhance the capabilities of the Piwik Pro Alerts system feature, providing users with more flexibility and advanced monitoring options.
In Conclusion:
Piwik Pro analytics “Alerts” feature enables proactive monitoring of critical changes in the data you collect, whether positive or negative. With this feature, you can effectively track these changes without requiring manual monitoring by dedicating human resources.
Throughout this article, we explored the concept of “Alerts,” discussing its purpose, benefits, how to access it in Piwik Pro, the process of creating alerts, the user interface, example alert ideas, and its limitations.
It is essential to note that only some of the ideas shared in this article may apply to your business. You should carefully select and adapt the ideas that align with your needs. Additionally, it is encouraged to be creative and innovative in developing unique Piwik Pro alert ideas that suit your business objectives.
Above all, the key takeaway is to take prompt action when these changes occur. By leveraging the automated notifications provided by Piwik Pro’s “Alerts” feature, you can stay one step ahead in seizing growth opportunities and mitigating potential crises.


