


Different advertising platforms and Martech tools often expect product data (commonly referred to as an “item array”) in specific formats. These structures vary across platforms like Google Analytics, Meta Pixel, TikTok Pixel, Google Dynamic Remarketing, etc.
Whether you’re using a web GTM container or a server container, transforming this product data to match the expected structure can be a hurdle, especially when dealing with a custom “non-GA4” array of objects with different naming conventions.
Typically, this kind of transformation requires writing JavaScript and using the Custom JavaScript variable in GTM. But JavaScript-based solutions come with a few drawbacks:
- They require technical expertise.
- They’re hard to maintain for complex requirements, making it hard to review when auditing your Google Tag Manager container or during a Google Analytics (GA4) audit project that includes reviewing your GTM setup, especially when multiple team members are involved.
- When best practices for collaboration (like proper documentation or code comments) aren’t followed, the logic can become a black box for other collaborators in the GTM container, especially when they don’t understand the code.
That’s where this guide comes in. I’ll walk you through a no-code solution using a powerful GTM custom variable template named the “Advanced Item Array Transformation“.
This method works in both web and server containers and requires zero JavaScript knowledge.
Real-World Example: GA4 Items Array → Meta or TikTok Format
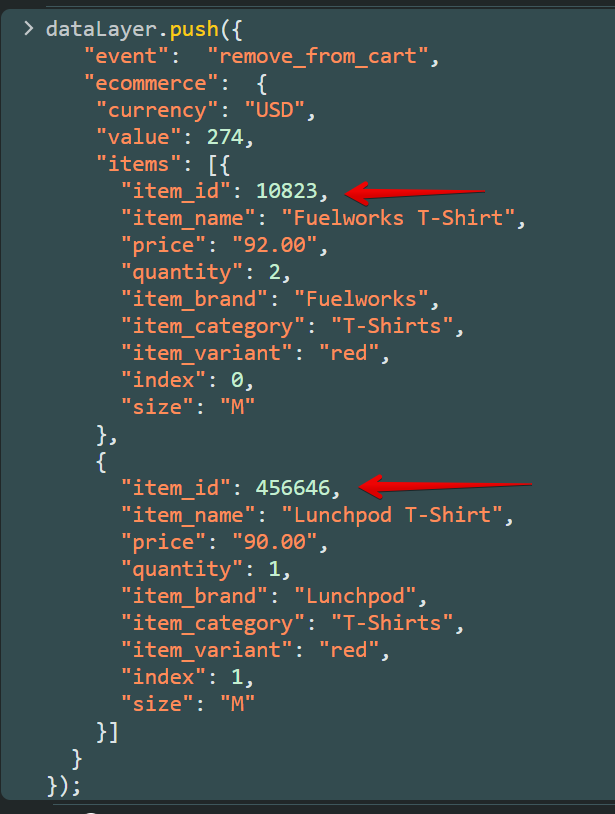
Let’s say you have a GA4 product item array like this:
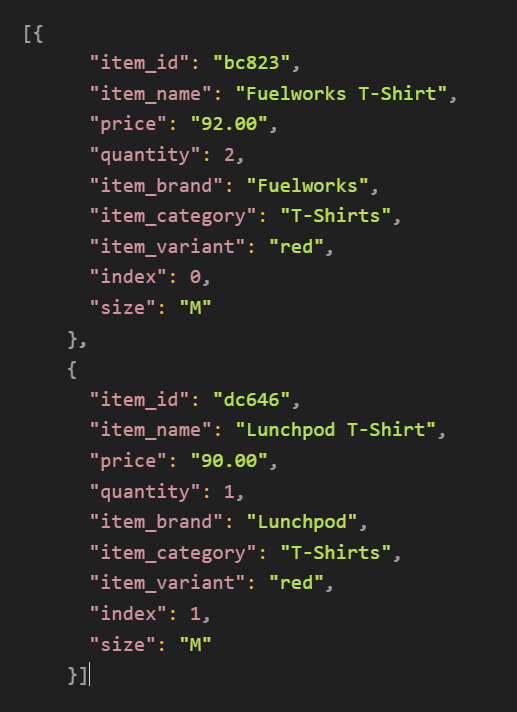
But you need to transform it to match Meta’s expected format:
Or TikTok’s pixel format:
This use case is quite popular for ecommerce tracking.
You might need the same array of product data formatted differently for each ad platform.
The solution? Use the “Advanced Item Array Transformation” custom variable template.
This custom variable template offers a user-friendly interface for transforming arrays of product objects by remapping attribute keys. Unlike traditional JavaScript solutions, it runs securely in GTM’s Sandboxed JavaScript environment, making it safe, efficient, and easy to maintain.
It’s also incredibly easy to understand what is happening, which means anyone on your team can understand the transformation just by viewing the UI. No need to dig through hard-to-read code.
How to Install the Template (Web & Server GTM)
Here is a step-by-step breakdown of installing the “Advanced Item Array Transformation” custom template in your Google Tag Manager container.
For Web GTM:
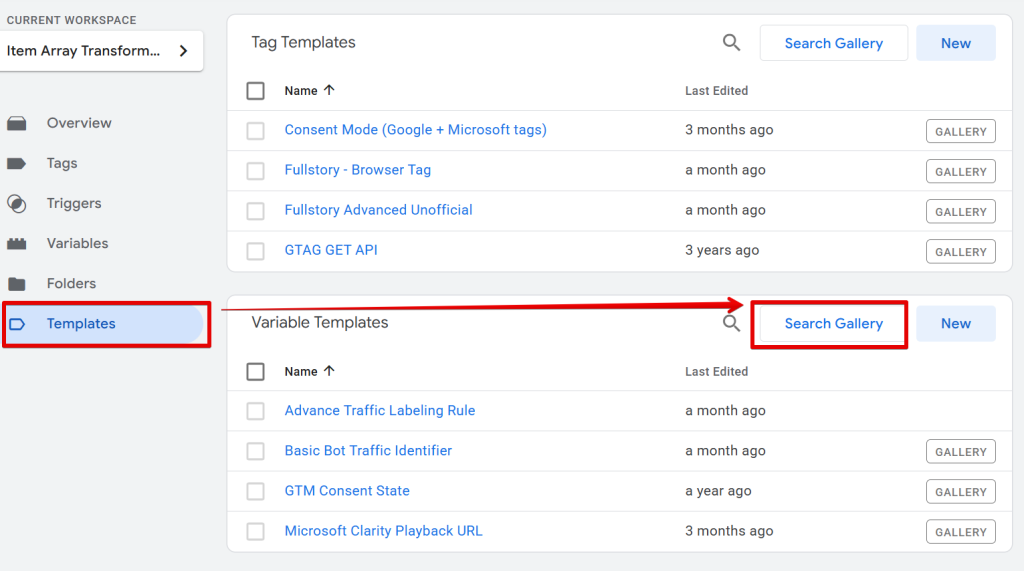
- Go to your Web GTM container UI.
- Navigate to Templates > Variables > Search Gallery.
- Search for “Advanced Item Array Transformation” and add it.
Click “Add to workspace” and follow the wizard.
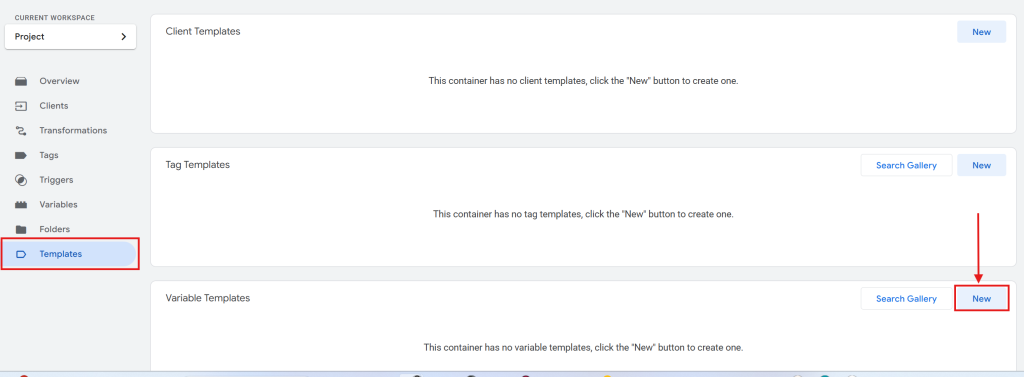
For Server GTM:
- Go to your Server GTM container UI.
- Navigate to Templates > Variables > Search Gallery.
- Add the same template as you would in the web container.
The server-side custom variable template can be useful when implementing a server-side tagging project request that involves transforming the product data array. Take, for example, a Meta CAPI, Reddit CAPI, or TikTok Events API.
Once you’ve installed the Advanced Item Array Transformation variable template, the next step is to configure it to meet your specific item array (product data) transformation needs.
But before we go through the setup process, let me quickly walk you through the key features of this template; then, I’ll show you how to configure it step by step.
The Google Tag Manager team did approve the template, but you can also find the web template in this Github repo linked here and the server template in the repo here.
Core Features of the “Advanced Item Array Transformation” Template
- Source Selection: Automatically pull from “ecommerce.items” data Layer key or use a custom variable.
- Attribute Mapping: Remap old keys to new keys with a simple table.
- Validation: Ensures that your array and mappings are structured properly.
- Data Formatting: Convert attribute values to numbers, integers, or strings.
- Static Attributes: Add fixed key-value pairs to every item (e.g., content_type: “product”).
Here is How to Configure This Template
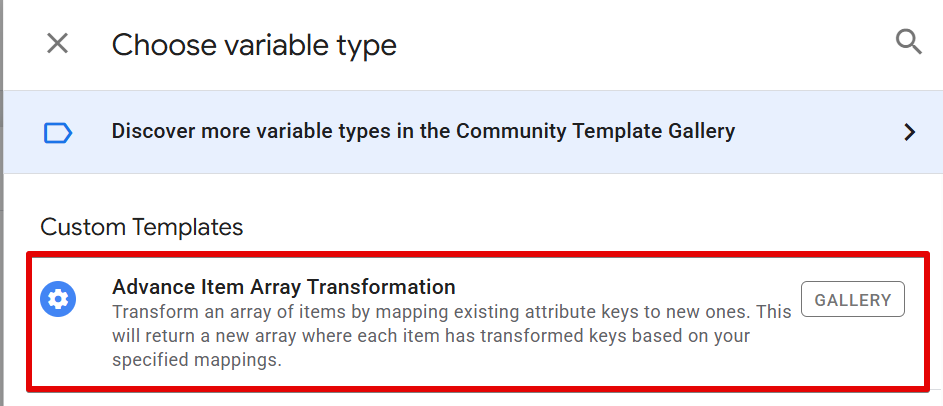
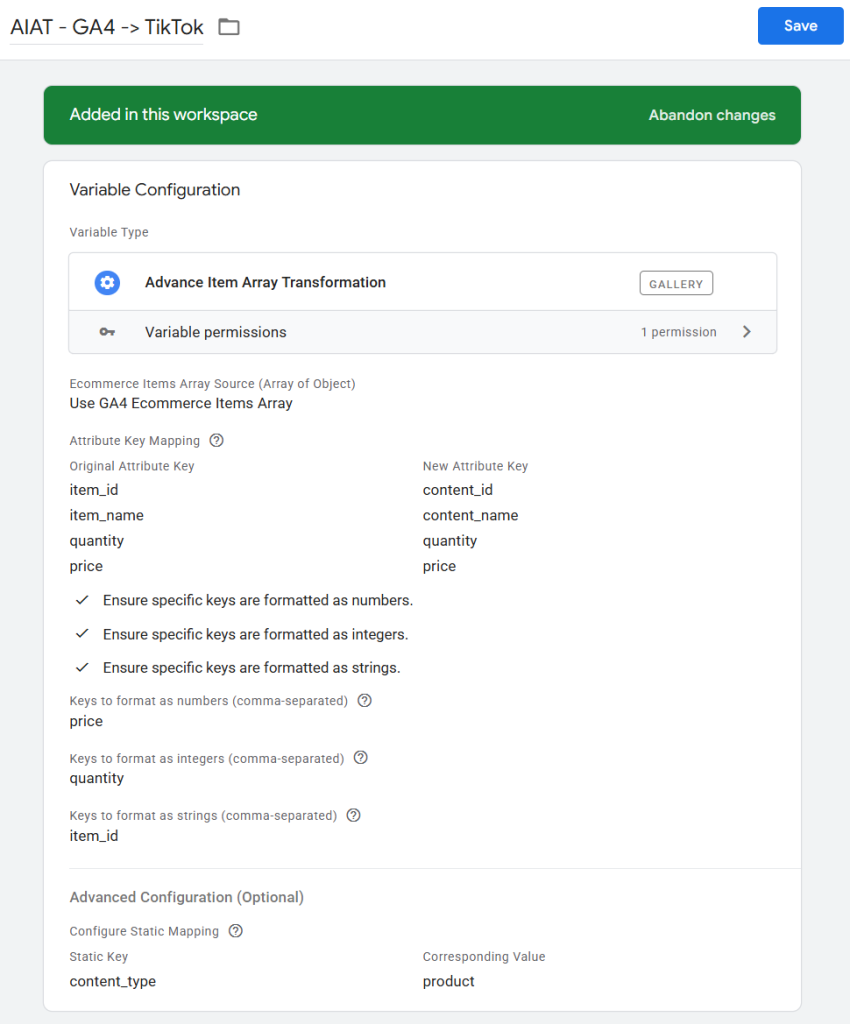
Once installed, select the “Advanced Item Array Transformation” variable.
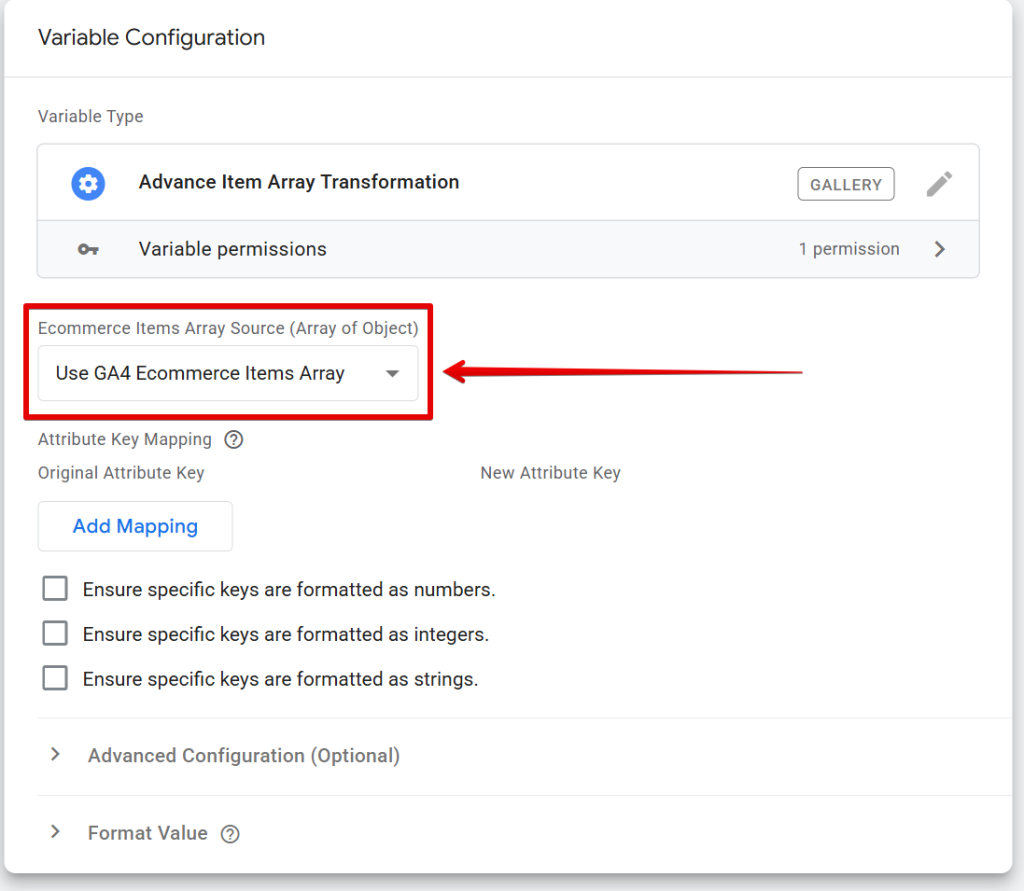
Step 1: Choose the “Array of Object” Source
If your item array comes from the standard GA4 ecommerce data layer structure, choose:
Use GA4 Ecommerce Items Array
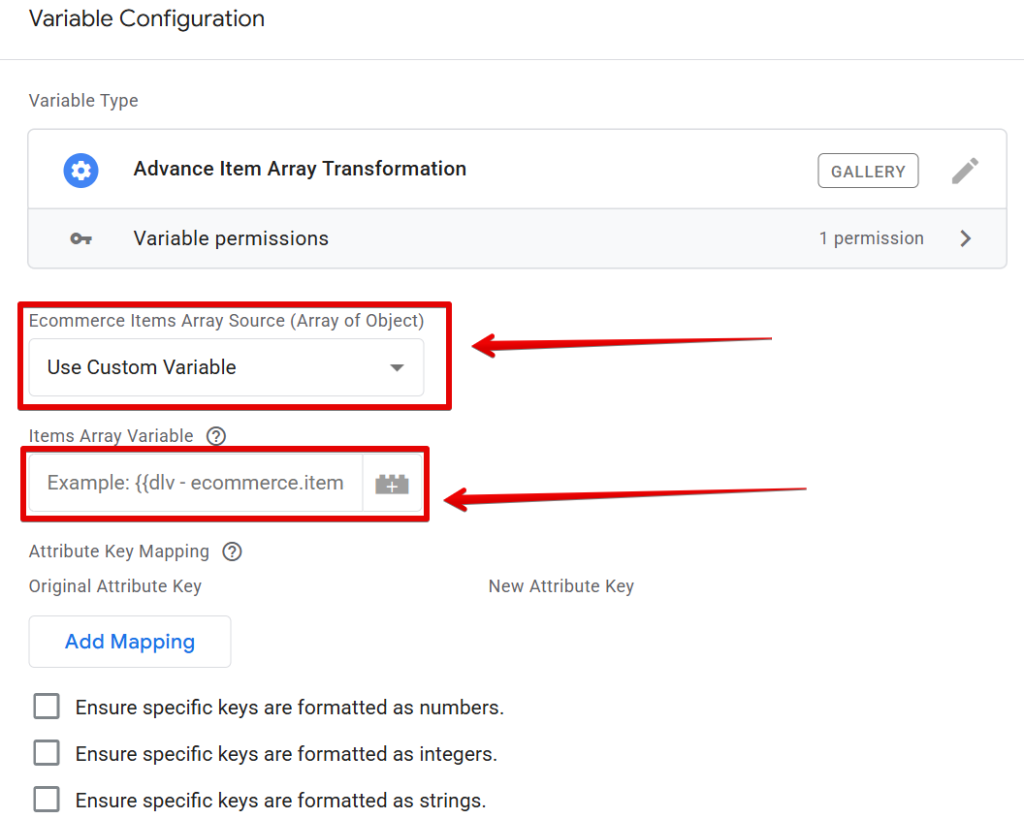
If you’re working with a non-GA4 ecommerce array of object, like a custom one (like from a UA data layer or JavaScript variable), choose:
Use Custom Variable
Then, specify the variable holding your array.
Tip: For better and more efficient use of the data layer in your measurement and analytics project, check out this guide on Data Layer Governance.
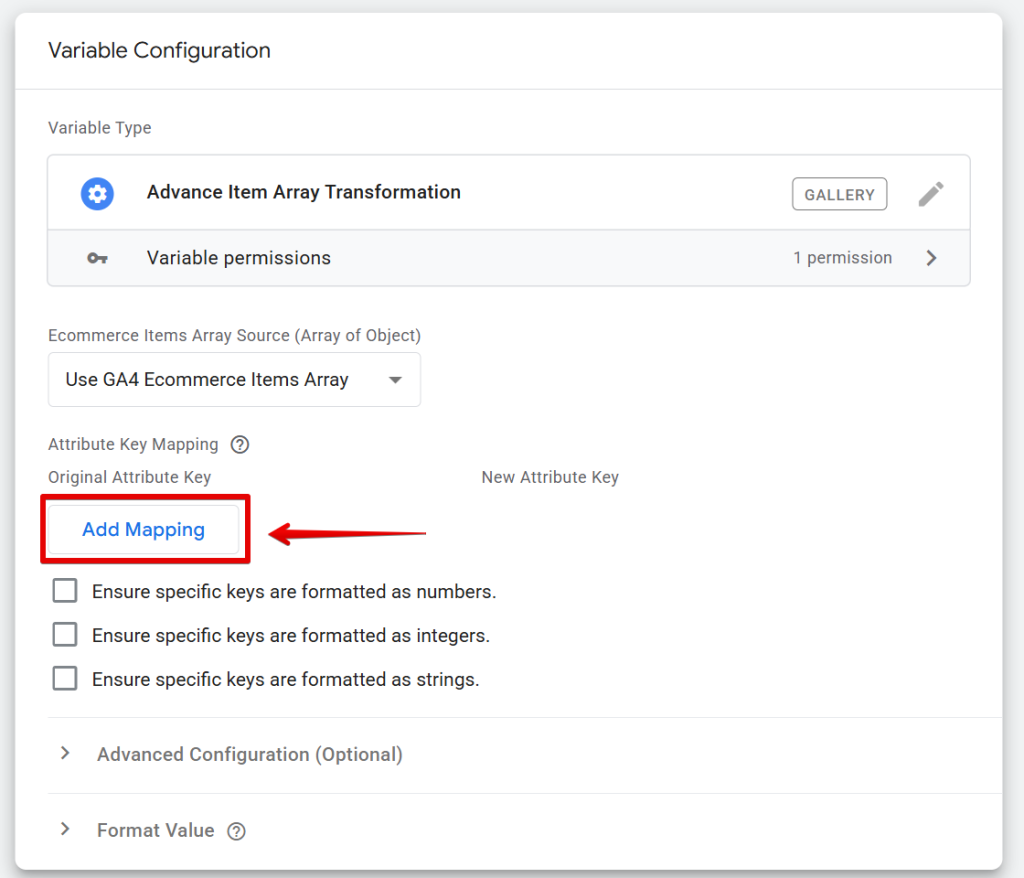
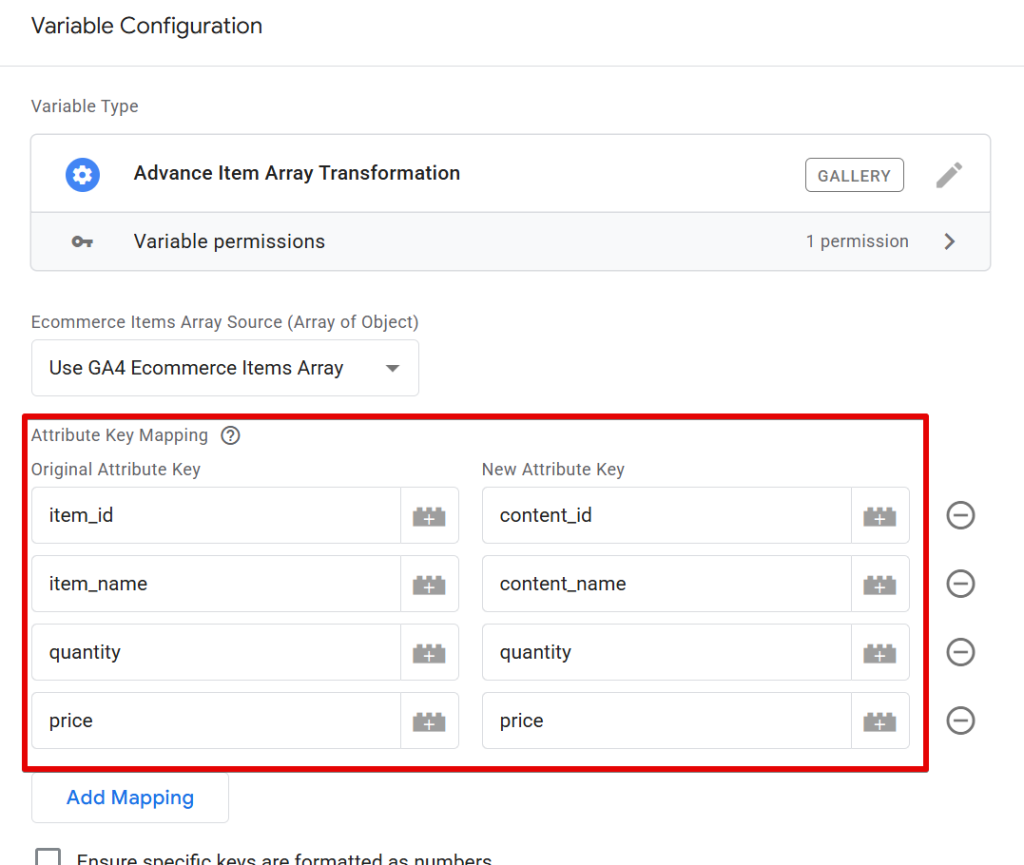
Step 2: Map Your Attribute Keys
Before you begin, list out:
- What keys do you need in your final array?
- What keys in the original array do they correspond to?
For example, let’s say I’m using this setup for TikTok, and the Data Layer contains a GA4 eCommerce items array. That means I need the transformed output to match TikTok’s required format.
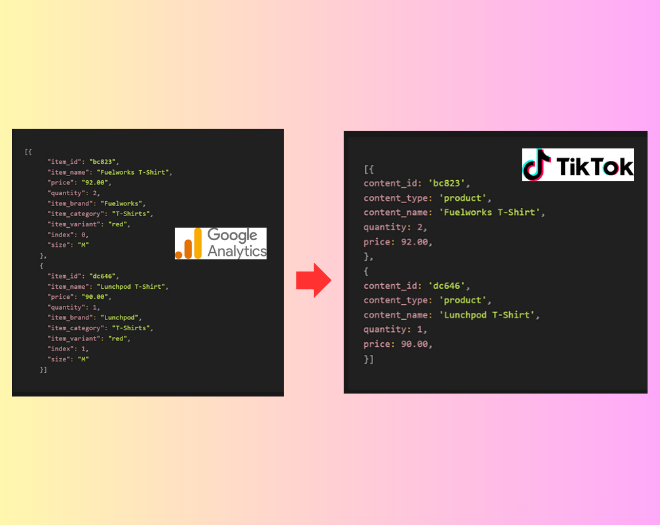
Here is what you should have if you are implementing a Meta Pixel.
In this case, I might map some of the original attribute keys to new ones to align with TikTok’s expectations.
Click “Add Mapping” and create rows like:
- item_id → content_id
- item_name → content_name
- quantity → quantity
- price → price
Before we get into how to include the content_type attribute, let me show you a few features that help format the data type of your new attribute values.
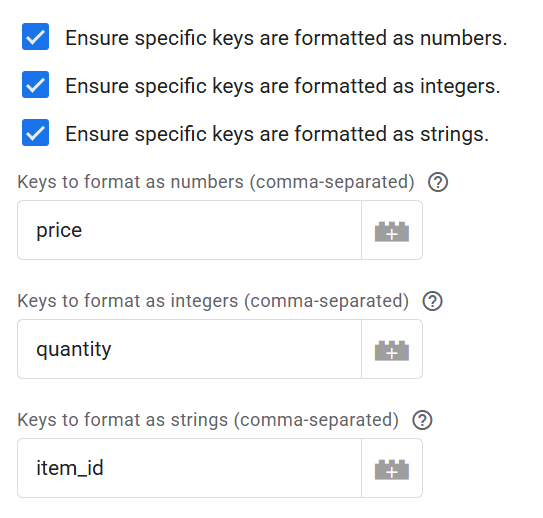
Step 3: Format Your Data (Optional but Recommended)
Let’s say TikTok requires:
- price as a number
- quantity as an integer
- item_id as a string
To do this, simply enable the relevant formatting options and specify the original attribute key. This ensures the value is consistently formatted to the data type you need.
Step 4: Add Static Key-Value Pairs
Now, to add the content_type attribute to your transformation, start by expanding the “Advanced Configuration (Optional)” section in the variable settings.

This will reveal an option where you can define additional static attributes you’d like to include in the transformed items array.
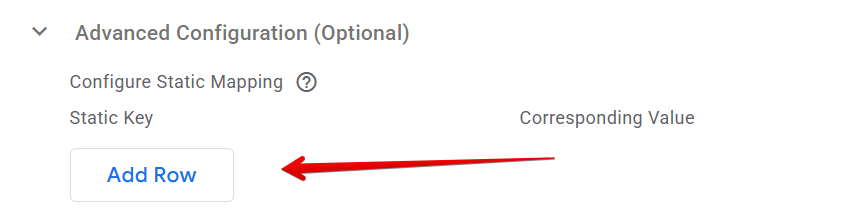
For example, to include content_type, click the “Add Row” button, enter “content_type” as the key, and then provide the value you want to assign. You can either enter a static value manually or reference a GTM variable if you prefer.
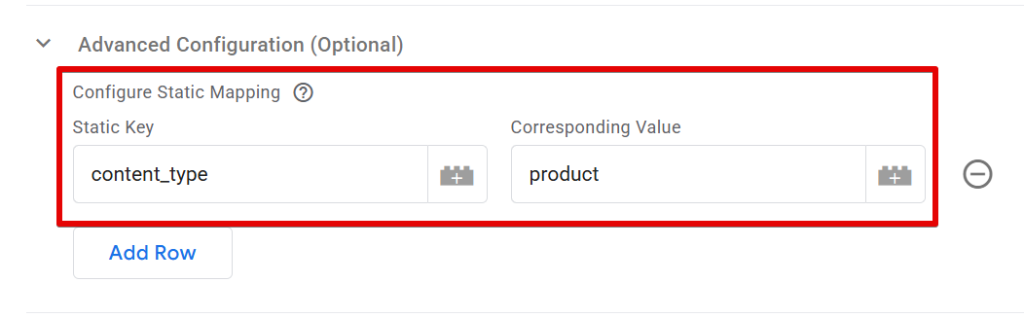
For the purpose of this guide, I’ll simply enter “product” as the value.
Another use case of this advanced configuration section is the “google_business_vertical” attribute in Google Dynamic Remarketing item data.
Debugging & Testing
Name and save your variable, and then preview your GTM workspace.
In the GTM tag assistant debug mode, navigate to a product page, trigger an event like add_to_cart, or begin checkout.
In the GTM Preview or browser console), navigate to the “Variable” tab, and you’ll see that the GA4 item array has been transformed into the array of objects (product data point) that TikTok understands.
You can even see how it helped to transform the item_id values into strings, even when they were in number format in the original data layer.
You can follow the same process for Meta or any other platform where you need to adapt the array of objects.
Bonus Use Case: Filling Gaps in Your Data Layer
Even if you’re not adapting your data for a third-party vendor, this template can help enrich your product data.
For instance, if your GA4 data layer doesn’t include a brand or item_category attribute when the data layer executes, using the “Advanced Item Array Transformation” template, you can:
- Use a static key-value.
- Or reference another variable to input the missing data.
This ensures that the final item data that you send to GA4 includes the complete set of product attributes that powers your GA4 ecommerce report, even if the source data is incomplete in the data layer.
Closing Comments
The Advanced Item Array Transformation variable template offers a powerful, no-code solution for transforming ecommerce item arrays in both Web and Server GTM containers.
Whether you’re working with Meta Pixel (browser or CAPI implementation), TikTok (browser and Events API), Google Analytics, or another tool, it simplifies the process dramatically.
Even better, it keeps your implementation collaborative, readable, and consistent across projects and teams. So that during an audit of your Google Tag Manager container or an extensive Google Analytics audit project (which extends beyond using GA4 audit tools), other collaborators understand its purpose when they see the variable.
If you need help with GTM setup, measurement strategy, or vendor integrations, please feel free to reach out to DumbData via our contact form or using the provided contact details. We’re always happy to help.
I’ll leave you with the following free resources that I recommend checking out:
- Google Analytics (GA4) Audit Tool
- UTM Audit Tool
- GTM Custom Templates
- Measurement Tools and Templates
Until next time, happy tagging!


