

If you’re considering Piwik Pro as an analytics tool for your business, client, or organization, you might be wondering whether Piwik Pro is a suitable choice, especially from a privacy and compliance standpoint.
Or perhaps you’re already using Piwik Pro but aren’t fully aware of the privacy features and settings it offers to help ensure compliance with regulations like GDPR, HIPAA, CNIL or others.
In this guide, I’ll walk you through the key privacy features and settings available in Piwik Pro so you can take advantage of them for your organization, clients, or business and ensure compliance with your measurement and data practices.
To be clear, I’m not a Piwik Pro employee, ambassador, salesperson, evangelist, or partner. This guide isn’t promotional or affiliated with Piwik Pro in any way. I’m simply a regular user, like you (I still use and write about measurement and other tools like GA4), who has supported businesses and organizations in both the U.S. and the U.K. with their Piwik Pro needs and challenges.
Also, this isn’t a comparison between Piwik Pro and other analytics tools, nor is it an argument for choosing Piwik Pro over your current platform. Rather, this is an informative guide to help shed light on the privacy features Piwik Pro offers (Which might also currently exist in the tool you use, probably not out of the box), whether you’re evaluating it or already using it and want to make better use of its privacy-focused capabilities.
Here is a list of the Piwik Pro privacy features we will look at in this guide.
- Fully Integrated Consent Manager (includes Tag Manager integration, native privacy banners, or third-party integrations; supports Consent Mode)
- Device Data Redacting
- Hosting Options (cloud, private cloud, or on-premises)
- Server-Side Data Collection
- IP Masking & Redaction
- Anonymous Tracking
- Business Associate Agreement (BAA) Support
- CNIL Compliance Settings
- PII Redaction
- Flexible Cookie Lifespan Customization
Now that you have a quick overview, let’s go over each of these privacy settings and features individually and highlight where to find them, how they work, and how to configure them effectively.
Ready? Let’s get started.
Fully Integrated & Functional Consent Manager:
One of the key ways Piwik Pro lowers the barrier to achieving analytics compliance is through its built-in Consent Manager, a privacy tool that offers much more than just a basic consent banner for your website.
By using the native Consent Manager, Piwik Pro eliminates the need for third-party Consent Management Platforms (CMPs), saving you both cost and complexity when managing consent preferences for your site visitors.
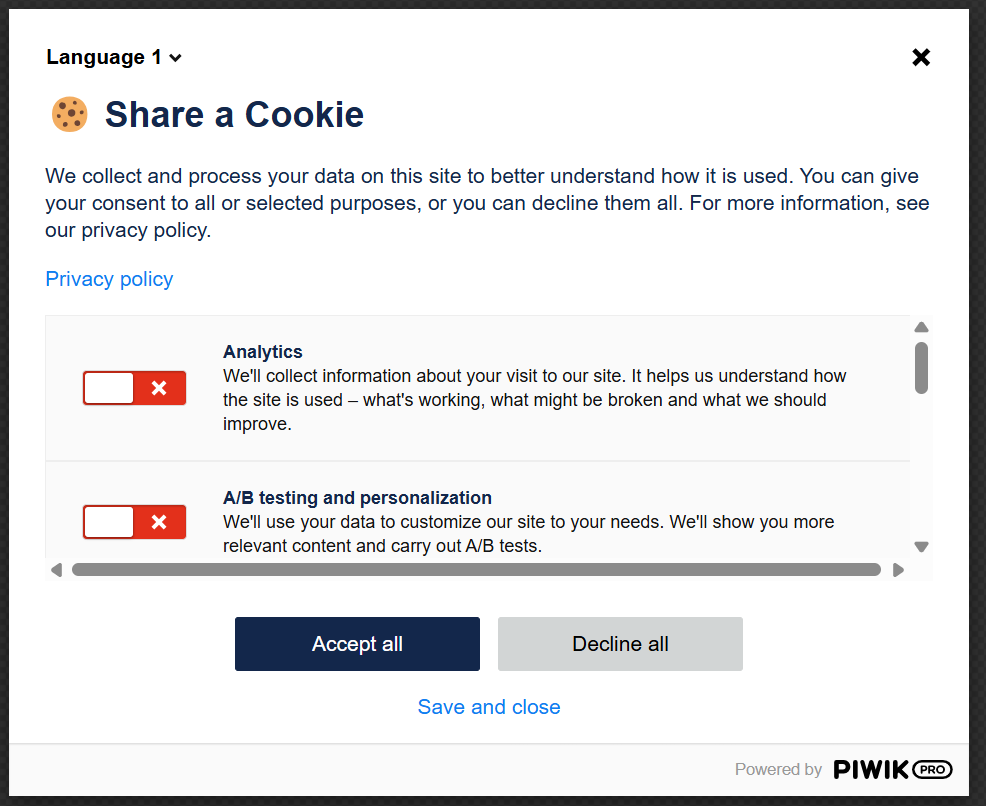
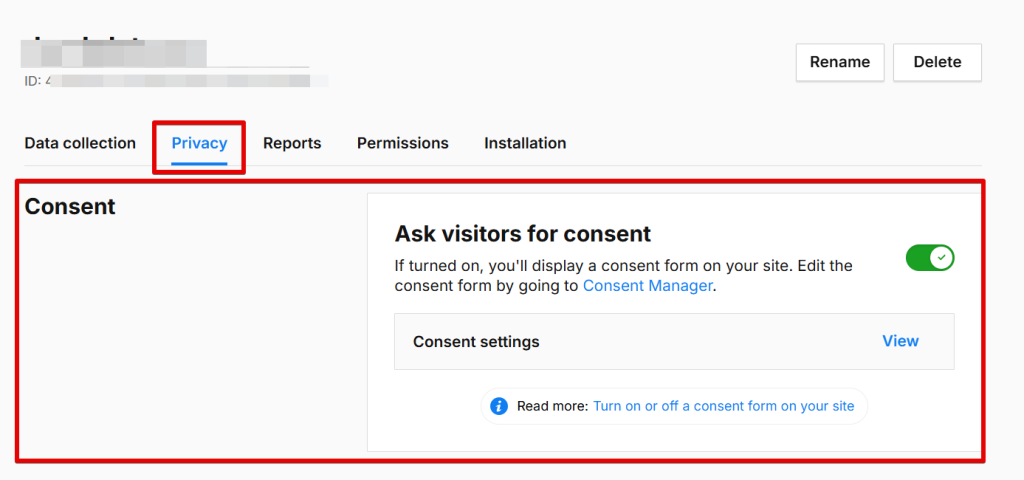
The Consent Manager is enabled by default within Piwik Pro, allowing you to easily display customizable privacy banners and consent forms to visitors and ensuring you obtain appropriate permissions before any data is collected.
Within the consent manager suite, you’ll find a wide range of configuration options that control how your consent banner looks, behaves, and manages privacy preferences. While I won’t go into every detail, I’ll highlight some standout features that I personally appreciate about the Piwik Pro Consent Manager.
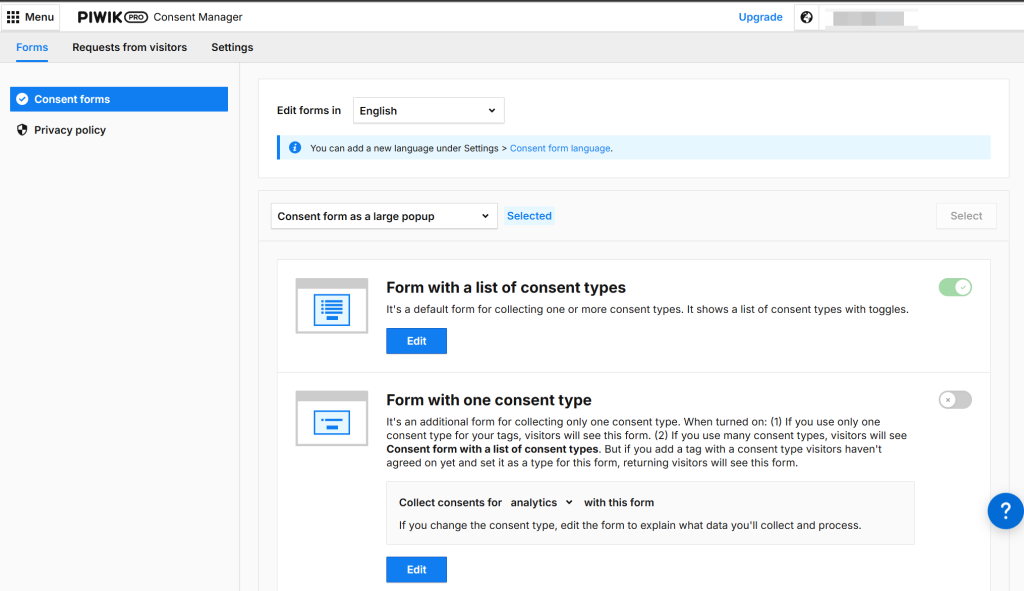
First and foremost, it’s deeply integrated with the Piwik Pro ecosystem, including both Tag Manager, Customer Data Platform (CDP), and Analytics. This seamless integration allows you to configure tags to fire based on user consent choices, making your tracking setup both privacy-compliant and highly flexible.
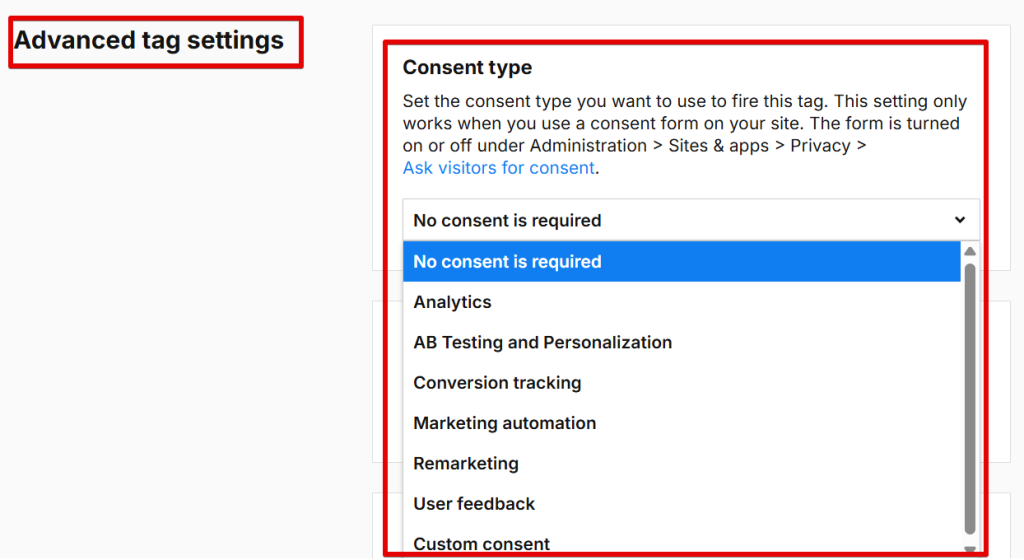
Here’s a list of the consent types supported in Piwik Pro’s Tag Manager:
- analytics
- ab_testing_and_personalization
- custom_consent
- user_feedback
- marketing_automation
- remarketing
- conversion_tracking
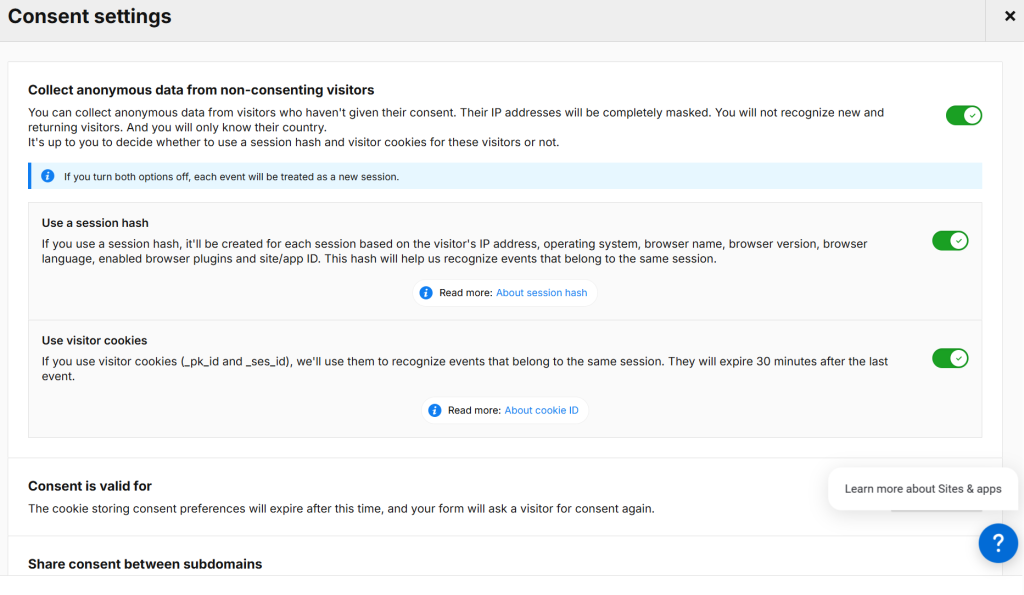
Additionally, you have granular control over whether and what type of data is collected from visitors who do not provide consent, another Piwik Pro privacy feature I’ll discuss later in this guide.
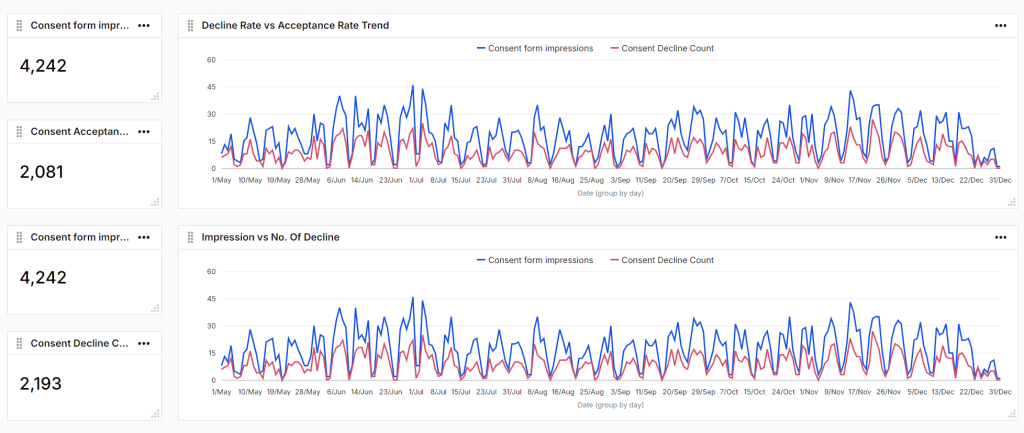
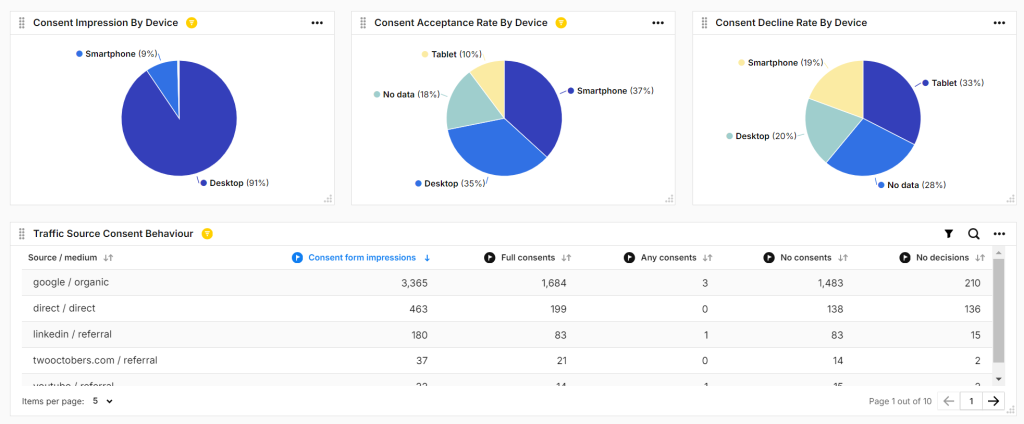
This capability opens the door to advanced consent reporting, which you can quickly build within the Piwik Pro dashboard (something I covered in this guide).
Beyond its built-in capabilities, the Piwik Pro consent banner is highly customizable and compatible with third-party CMPs like Cookie Information, CookieBot, OneTrust, and more.
You can also integrate Piwik Pro with third-party CMPs via the Consent Management API. I’ve personally used this API to build integration solutions with platforms such as Osano, CookieYes, CookieFirst, CookieScript, Termly, and Consent Manager.
Keep in mind that the default consent banner format used by the Piwik PRO consent manager suite is designed with GDPR and LGPD regulations in mind. So, if your objective is also to meet CCPA/CPRA requirements using a CCPA consent banner, consider integrating a third-party Consent Management Platform (CMP) instead.
In projects where your organization, business, or client uses Google advertising tags for conversion tracking or remarketing, you can also integrate Google Consent Mode with Piwik PRO.
I’ve detailed the steps for integrating Google Consent Mode v2 with Piwik PRO in this guide.
Device Data Redaction:
If your privacy requirements include redacting device data or if regulations applicable to your business prohibit the collection of device-specific information from website visitors, Piwik Pro provides a privacy solution that helps with implementing this.
Within its privacy settings, Piwik Pro offers an option labeled “Don’t collect visitor’s device data.” When enabled, this setting ensures that the tracking script does not collect screen resolution or browser plugin information from a visitor’s device without consent.
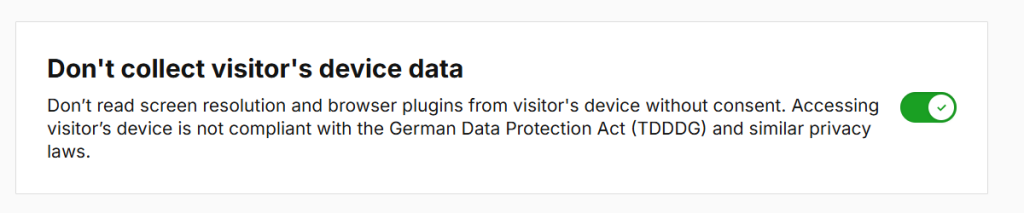
Enabling this feature is simple and requires no changes to your Piwik Pro tracking code unless you want to configure this setting for specific users. You can activate it directly within the Administration section by navigating to the Privacy tab and scrolling to the setting titled “Don’t collect visitor’s device data.”
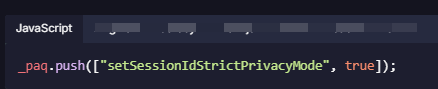
To configure this for specific users, you can leverage the Piwik Pro JavaScript API command “setSessionIdStrictPrivacyMode” (covered here) to programmatically enable or disable the feature for your website visitors based on any rule or condition you define.
Hosting Options:
Piwik Pro offers multiple hosting options to meet varying data storage and compliance needs. These options allow organizations to choose the best environment based on their privacy requirements, infrastructure preferences, and regulatory obligations.
Private Cloud:
Organizations can choose to deploy Piwik Pro in a dedicated cloud environment, which provides exclusive access to cloud resources. This option enhances the security and control of the data you collect, making it ideal for businesses with strict privacy or compliance requirements.
Public Cloud:
Piwik Pro is also available on secure public cloud servers hosted across 60+ Microsoft Azure regions worldwide. This setup is perfect for organizations seeking cost-effective scalability without the burden of managing infrastructure.
EU-Based Data Centers:
Piwik Pro provides EU-exclusive hosting options for businesses that require all data to be hosted within the European Union, either due to regulatory mandates like GDPR or internal company policy.
On-Premises Hosting:
For maximum control, Piwik Pro supports on-premises deployment, allowing organizations to store and manage data on their own servers or on infrastructure leased from third-party providers. This approach is particularly beneficial for businesses in highly regulated industries or with strict internal data policies.
Additionally, Piwik Pro supports server-side data collection, which can be configured via server-side tagging or tracking, which I’ll briefly cover in the next section.
Server-side Data Collection:
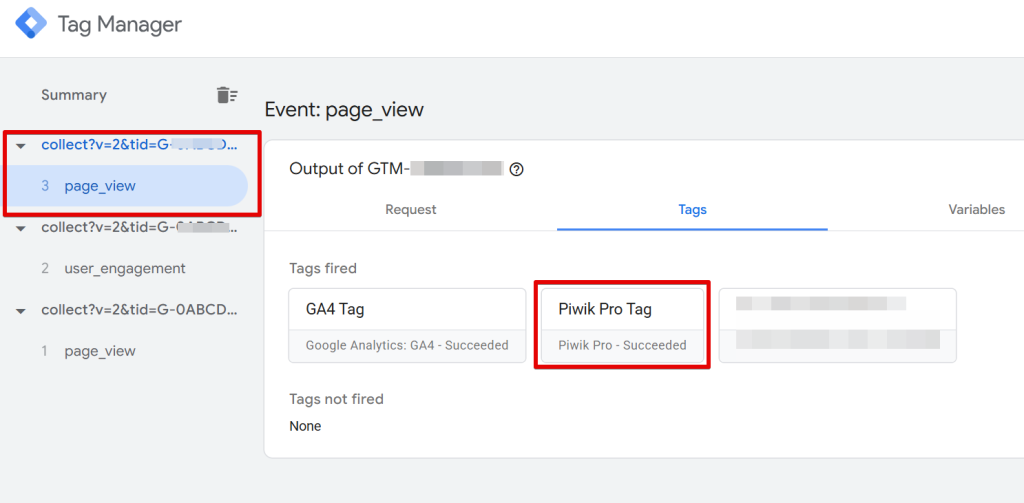
Piwik Pro supports server-side data collection, allowing you to track user interactions through direct server-side tracking or server-side tagging solutions like server Google Tag Manager (GTM).
You can easily integrate Piwik Pro into that pipeline if you’re already using GTM server-side tagging or a third-party Customer Data Platform (CDP) for server data collection.
In the guide linked here, I’ve previously covered options for Piwik Pro server-side tagging or server-side tracking.
You can check out this blog post on how to set up server-side tagging for Piwik Pro.
The process involves using either GA4 as the client for data transportation to your tagging server endpoint or using the Piwik Pro GTM template.
Using the Piwik Pro GTM Template
Using GA4
You can also refer to additional resources and articles on setting up server-side tagging for Piwik Pro.
IP Masking & Redacting:
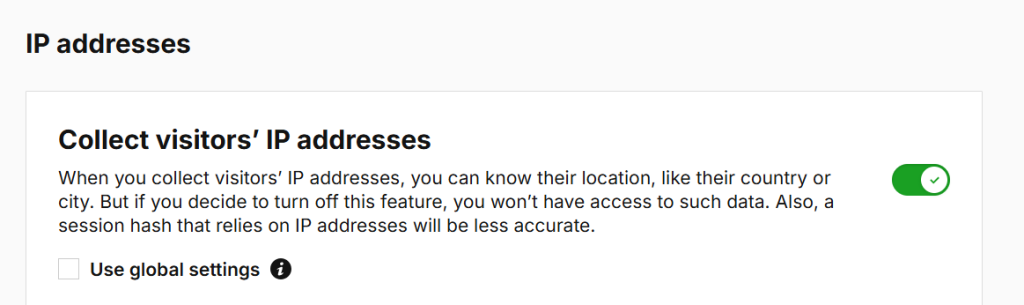
By default, Piwik Pro collects and displays the IP addresses of your website visitors in your analytics report, and it uses this information to determine their geographic location (country, city) and network information.
However, if your privacy policy or regional data protection laws restrict the collection of IP addresses, Piwik Pro allows you to disable IP collection entirely.
To do this, navigate to the Administration > Privacy section and disable the “Collect visitors’ IP addresses” option.
Disabling IP collection will remove access to location-based data in your reports. Additionally, session hashes used for anonymous tracking, which partly rely on IP addresses, may become less accurate.
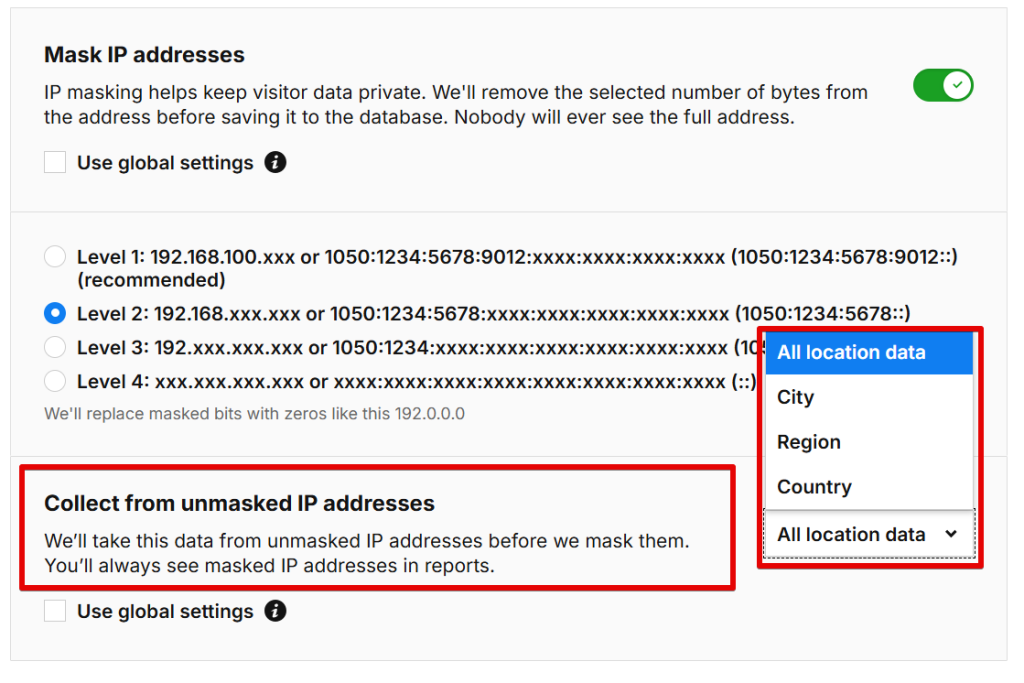
If you’d still like to collect location data from IPs but want to protect user privacy, Piwik Pro offers IP masking. This feature anonymizes IP addresses by removing a specified number of bytes before storing them in the database. You can enable this in the same Privacy settings under “Mask IP addresses”, with four levels of masking available:
- Level 1: Removes the last byte
- Level 2: Removes the last two bytes
- Level 3: Removes the last three bytes
- Level 4: Removes the full IP address
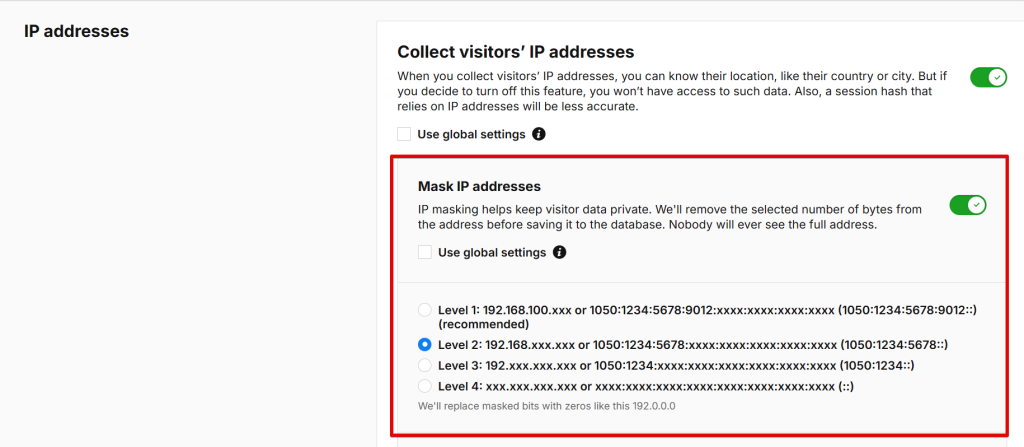
IP masking occurs after the tracker captures the IP but before it’s stored, ensuring that the full address is never visible or saved.
You can also choose the portion of the geolocation data Piwik Pro can extract before masking takes place. This is configurable under the “Collect from unmasked IP addresses” option, where you can specify:
- All location data
- Country only
- Region only
- City only
Anonymous Tracking:
Piwik Pro supports anonymous data collection, which is especially useful when:
- A visitor hasn’t consented to tracking
- Your organization wants to implement a privacy-first default approach
This feature allows you to still gather valuable marketing and behavioral insights without violating privacy regulations.
Piwik Pro offers three levels of anonymous tracking, each offering a different balance of compliance and data accuracy:
- Anonymous tracking with cookies and session data
- Anonymous tracking with session data but without cookies
- Anonymous tracking without cookies or session data
These options help you tailor your tracking setup according to your legal and ethical obligations while still extracting meaningful data.
Sign a Business Associate Agreement (BAA):
If you’re a HIPAA-covered entity in the United States, Piwik Pro is a HIPAA-compliant analytics platform that offers a customizable Business Associate Agreement (BAA).
This legal agreement allows you to collect Protected Health Information (PHI) in compliance with HIPAA regulations, regardless of your chosen hosting option (cloud or on-premise).
Keep in mind that Piwik Pro also provides additional privacy features, like anonymization, IP masking, and consent controls, to help prevent the accidental collection of sensitive PHI.
For more information about Piwik Pro’s HIPAA capabilities and how to request a BAA, I recommend visiting their official documentation or contacting their support team directly.
PII Redaction (Using a Custom Solution):
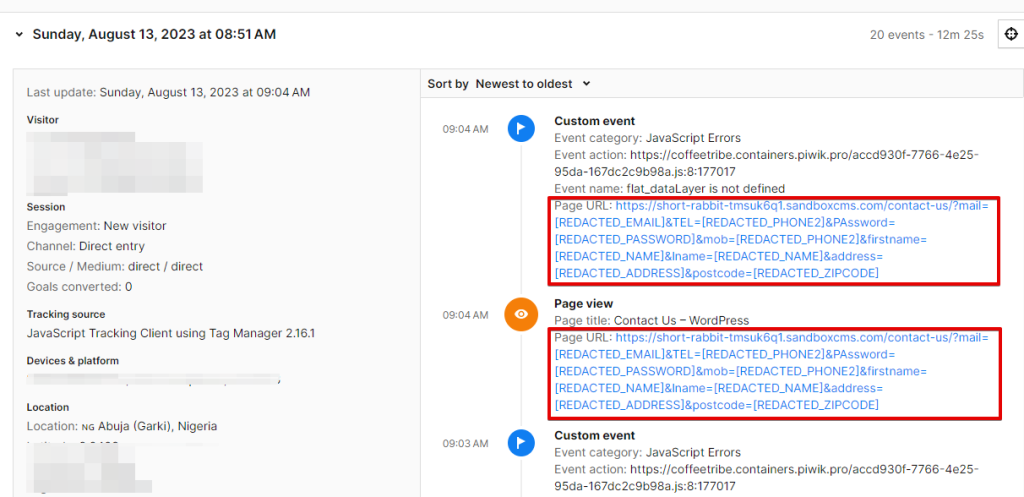
One privacy feature you might find particularly useful is the ability to redact or remove PII (Personally Identifiable Information) and/or PHI (Protected Health Information) so that such sensitive data doesn’t appear in your Piwik PRO analytics reports.
If you or your client prioritize data minimization and want to avoid capturing any visitor PII or PHI, redacting or filtering these data points is entirely possible with Piwik PRO.
However, this is not a built-in feature available directly in the Piwik PRO UI.
Instead, you’ll need to implement a custom solution using the Piwik PRO JavaScript API. In the guide linked here, I’ve outlined two different approaches you can use to programmatically redact or remove PII before it reaches your analytics reports.
CNIL Guidelines Configuration:
CNIL (Commission Nationale de l’Informatique et des Libertés) is France’s national data protection authority. It ensures that the collection, processing, and storage of personal data comply with French data protection laws.
It’s quite interesting that CNIL officially lists Piwik PRO as a compliant analytics solution that allows you to collect specific data without prior consent, which is especially valuable and saves you from customization headaches if you’re operating in France and want to benefit from this regulatory exemption.
To help with compliance, Piwik PRO provides a dedicated setting under Administration > Privacy > Comply with CNIL Guidelines. Enabling this setting automatically configures your platform to align with CNIL requirements.
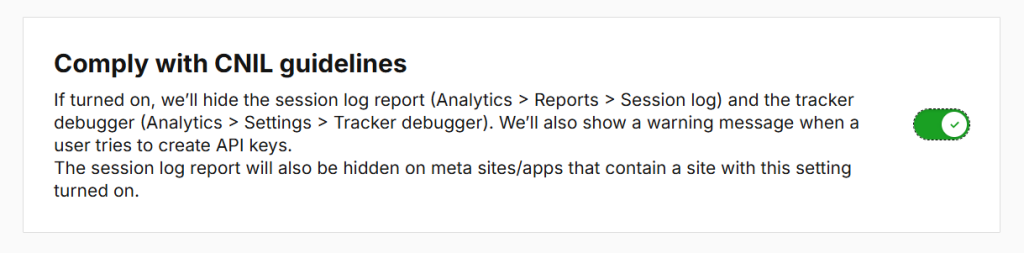
Once activated:
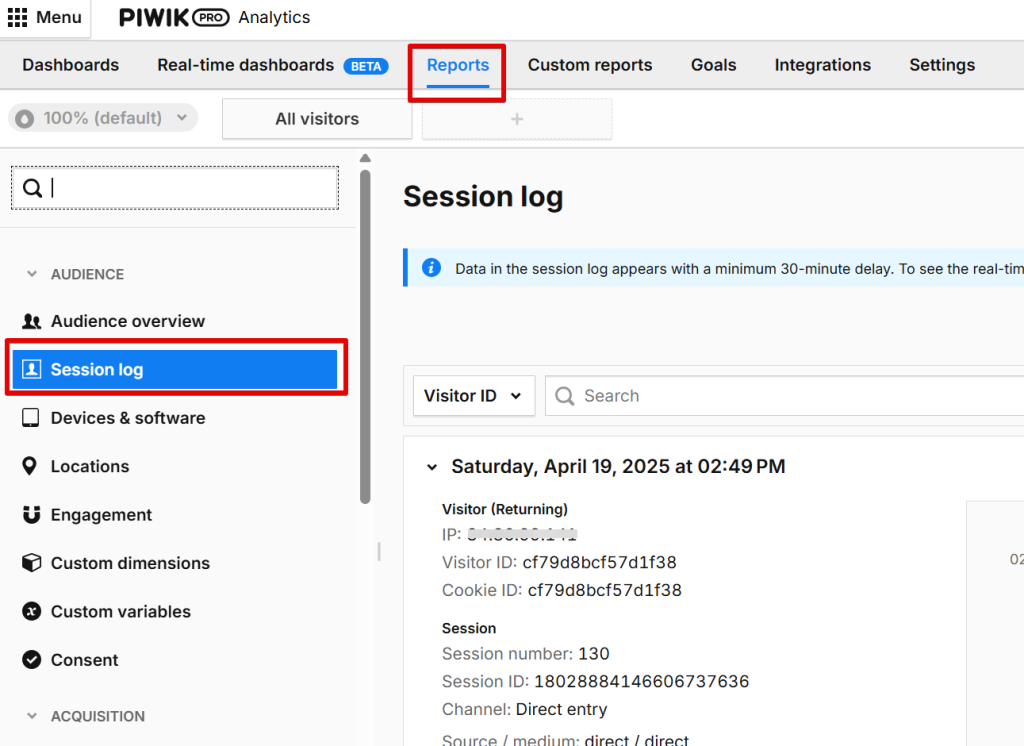
- The Session Log Report in Analytics > Reports > Session Log will be hidden to ensure session-level data isn’t accessible to comply with the requirements of CNIL.
- The Tracker Debugger in Analytics > Settings > Tracker Debugger will also be disabled, limiting real-time tracking diagnostics.
As a result, you’ll need to rely on alternative troubleshooting methods, which I’ve covered in this guide about Piwik Pro debugging and troubleshooting.
Additionally, when CNIL compliance is enabled, Piwik PRO will display a warning message any time someone tries to generate API keys.
This is to prevent data exports that require visitor consent, helping ensure your team remains compliant even when handling data programmatically.
Piwik PRO has also published a detailed walkthrough that explains how to fully configure and adhere to CNIL guidelines, which I recommend reviewing for a deeper understanding.
Flexible Cookie Lifespan Customization:
Piwik PRO offers great flexibility when it comes to customizing the lifespan of visitor and session cookies stored on a user’s device.
Suppose you’ve implemented the Piwik PRO tracking container, which includes the Tag Manager where your analytics tag is configured. In that case, you can directly adjust the Piwik Pro visitor and session cookie settings within the tag configuration.
Navigate to the Piwik PRO Analytics tag in the Tag Manager, scroll to the Privacy section, and find options to customize cookie lifespans.
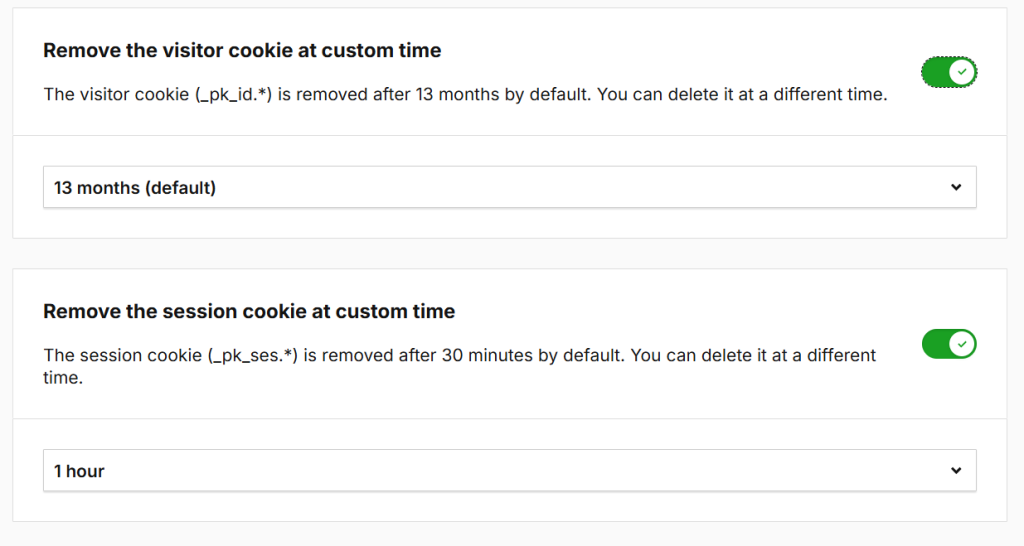
You’ll see two main options:
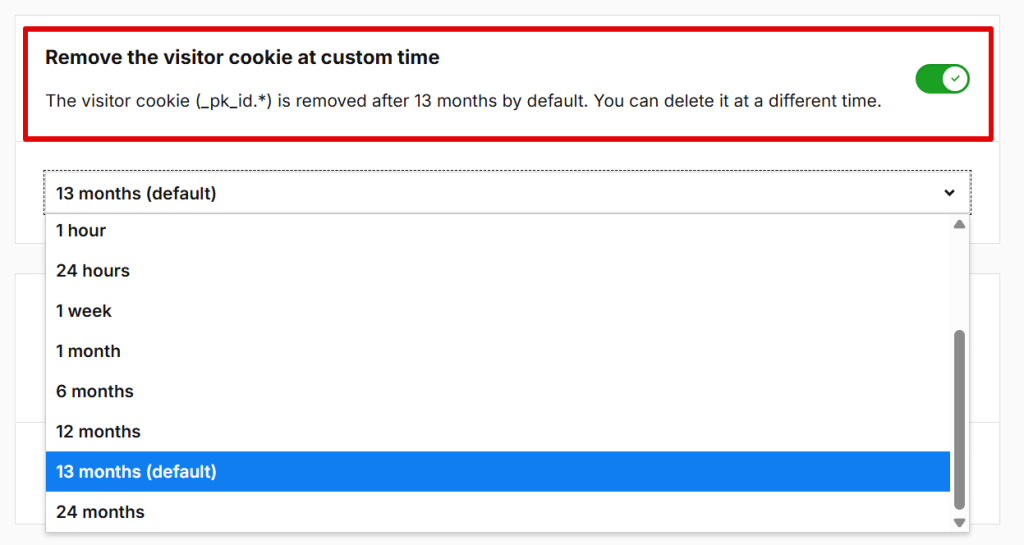
1. Customize Visitor Cookie Lifespan
The visitor cookie (_pk_id.*) is set to expire after 13 months by default. However, you can modify this duration to suit your specific needs.
After enabling this setting, you’ll be able to choose a custom expiration time, from a minimum of 5 minutes to a maximum of 24 months. Once the cookie expires, returning users will be treated as new visitors.
For Non-Tag Manager Implementations
If you haven’t implemented the Piwik PRO Analytics Suite using the Tag Manager, you can still customize the visitor cookie programmatically by using the Piwik PRO JavaScript API. Specifically, the setVisitorCookieTimeout() method allows you to adjust the lifespan of the Piwik PRO visitor cookie (_pk_id.*) directly in your code.
The Piwik PRO developer documentation linked here details the implementation process.
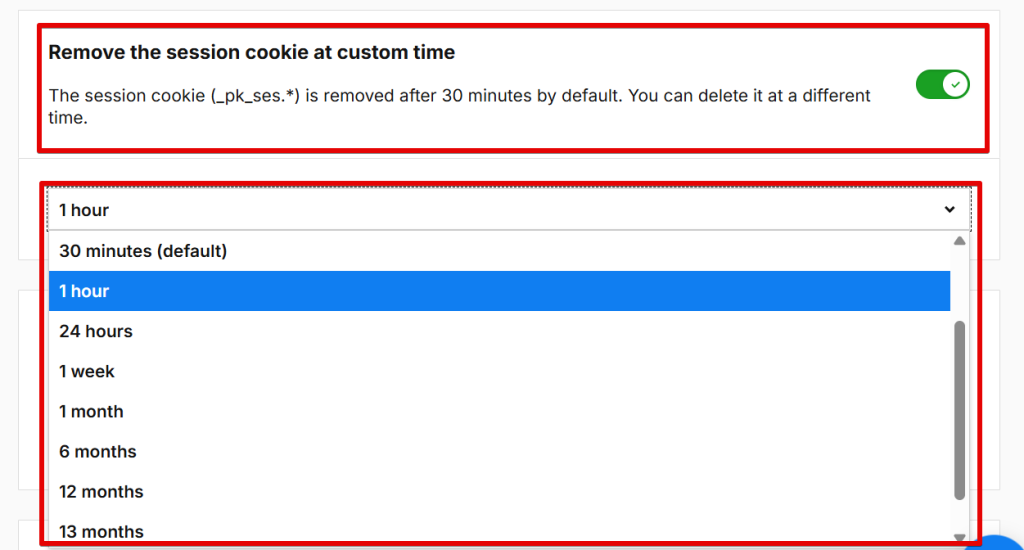
2. Customize Session Cookie Lifespan
The session cookie (_pk_ses.*) is removed by default after 30 minutes of inactivity. Similar to the visitor cookie, you can adjust its lifespan between 5 minutes and 24 months.
This allows for more tailored session handling, especially in scenarios where longer or shorter session tracking is required.
For Non-Tag Manager Implementations
If you’re not using Piwik PRO via the Tag Manager, you can still adjust the session cookie lifespan using the Piwik PRO JavaScript API. Specifically, you’ll want to use the setSessionCookieTimeout() method, as documented in the Piwik PRO Developer Documentation.
Note: This setting is different from the Session Inactivity Timeout in Piwik PRO, which determines how long a user stays logged in to the interface when inactive, not how long tracking cookies persist.
Final Thoughts:
I hope this guide has helped you better understand some of Piwik PRO’s powerful privacy controls and configurations.
As mentioned at the start, this article aims to help you understand the privacy features of Piwik PRO so you can better ensure compliance with your measurement.
If you have any questions, need assistance with implementing these configurations, or need help with Piwik Pro or analytics, feel free to reach out through the contact form or email address listed on the DumData Contact Us page. We’re always happy to help.