

Step-by-step guide on how to integrate 9+ session recording tools with Piwik Pro, Google Analytics (GA4), Mixpanel, Amplitude and CRM
In today’s digital world, users are trying to manage their time effectively as they try to complete an action on your website, and their behaviour is becoming complex.
Web analytics tools like Google Analytics (GA4), Piwik Pro, Mixpanel, etc., often present us with lots of actionable insights on actions users perform on our website. Still, they do not give you the front-row ticket to watch how the user interacted with your digital asset (website).
There are tools built for this purpose called heat mapping and Session recording tools, often called Digital experience analytics tools for UX optimisation. There are many of them, and they also offer valuable UX data on complex user behaviour.
As an analyst, when looking at specific web interaction data, we sometimes want to directly watch a session for the data segment you’re working on within our analytics tool. Therefore, communication between your web/product analytics tool and Session recording tools becomes valuable here.
Connecting both tools gives you more edge in debugging and understanding complex user journeys. Still, The unfortunate thing is that these web analytics tools, like GA4, Piwik Pro, Mixpanel, Amplitude, etc., do not have native integration with all Session recording tools.
That is the reason for this blog post, as in this article, we’ll explore how to connect your session recording tool with your web/product/marketing analytics stack.
Though we might be looking at integrating these tools with Piwik Pro, Google Analytics (GA4), Mixpanel, and Amplitude, the method should be the same for your organisation’s adopted web analytics tool.
At the end of the article, we’ll cover how you can also have this data in your CRM or ticketing software.
My preferred tag management solutions for achieving this setup in this implementation are Google Tag Manager and Piwik Pro tag manager. However, you can replicate all the steps in this article with a different TMS or even without one.
Session Recording Tools You Can Integrate With Piwik Pro, Google Analytics, Mixpanel, etc.
Here is a list of some of the session recording tools we’ll be looking at integrating with our web and product analytics tools.
- Fullstory
- Microsoft Clarity
- Inspectlet
- LogRocket
- Mouseflow
- Lucky Orange
- LiveSession
- Smartlook
- Hotjar
- Howuku
What is a Session Recording Tool?
For the sake of the audience who doesn’t know what a session recording tool is, I’ll take a step back to explain what it is and its uses.

A Session recording tool allows watching recordings and understanding how users interact with your product. It’s a digital analytics tool that helps you to see how users interact with your business website, including rage clicks, dead clicks, mouse movements, heatmaps, and scrolls.
This digital analytics tool can provide valuable insights into user behaviour and help identify and fix bad UX or conversion roadblocks in your website’s design or functionality.
It’s a digital analytics tool that UX and analytics specialists use to improve the customer and funnel experience, directly improving website engagement and increasing conversions.
Doing Some Home Work For The Integration
I’ll recommend you first check if there is an existing native integration that your web analytics has with the session recording tool you’re using. If non exist, then you can proceed with the approach explained in this post, but if there is an existing native integration, then you should ask the following questions;
- Does the integration provide you with what you’ll need for your analysis in your web analytics tool?
- Does it work the way you expect it to?
- Does the communication between both tools respect your privacy configuration? Because most times, the consent requirement for analytics is different for these tools. For instance, to implement GA4 on a user’s browser, one may need to obtain consent for ads and analytics. On the other hand, analytics or performance preference may be necessary for the session recording tool.
The Session recording tools sometimes offer these integrations, so it’s best to check with both digital analytics tools.
That said, let’s look at how the integration works in the next section.
How Will The Integration Between Session Recording Tools and Google Analytics, Piwik Pro and Other Web Analytics Tools Work?
So basically, to be able to watch a session recording of a user session from Piwik Pro, GA4, Mixpanel or your preferred web/product analytics tool, you need two things;
- The session recording playback URL
- Ensure it’s available as a session scope custom dimension or as an event parameter (or other means explored in this blog).
- Optionally the session id and user id of the session recording tool.
Use Cases for The Integration
When analytics and digital experience analytics tools communicate, we have much power with how we see data and flexibility with what we do with them.
One quick use case example can be being able to visually debug a session where users start a funnel and don’t complete their journey.
Another example is when an error event you track in Google Analytics or the Piwik Pro native Javascript happens in a critical conversion stage.
In tools like Mixpanel, Amplitude, Piwik Pro and Google Analytics (GA4), you can watch the sessions of users previously on a freemium plan and what steps they take to upgrade or watch recordings of how they experience specific errors you’re tracking on the website checkout funnel.
Getting the Session Recording Playback URL
Fullstory – Session Playback URL
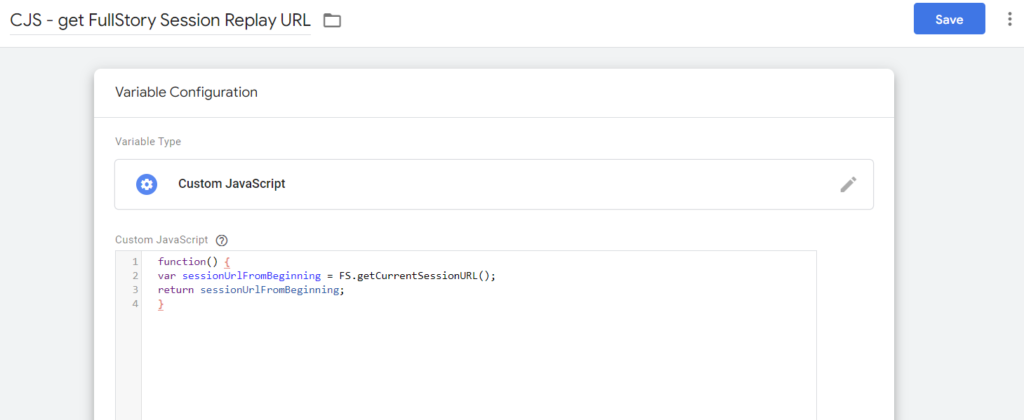
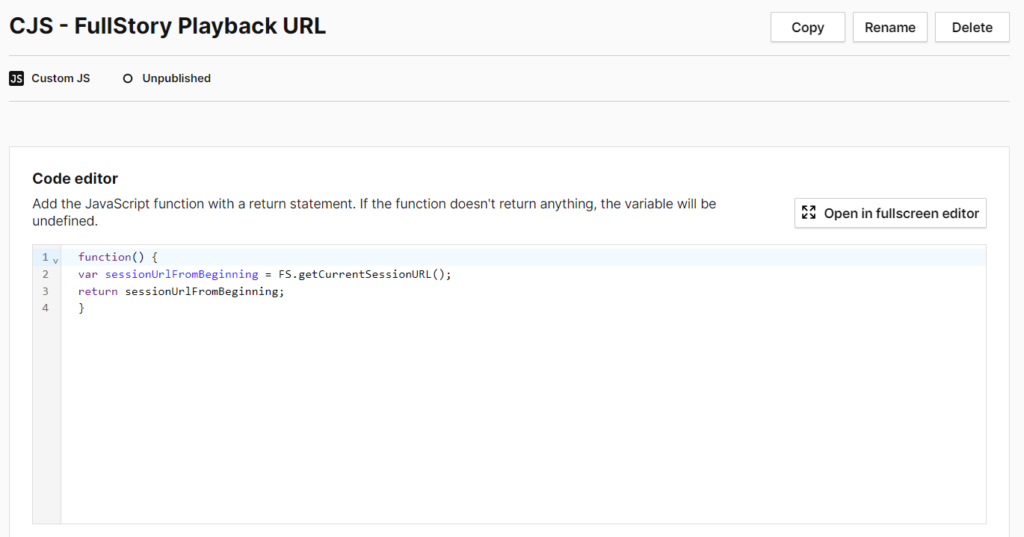
Getting the Fullstory session recording URL is the most straightforward of all tools. To obtain the session recording URL, use one of the codes below in the custom JavaScript variable type in either Google Tag Manager or Piwik Pro Tag Manager.
  function() {
  var sessionUrlFromBeginning = FS.getCurrentSessionURL();
  return sessionUrlFromBeginning;
  }
GTM setup example
Piwik Pro tag manager setup example
To test the code in the console, you can use the following code snippet:
FS.getCurrentSessionURL();Microsoft Clarity – Session Playback URL
There is a FREE Microsoft Clarity implementation template we created for Piwik Pro and GA4 users, and it’s linked below;
- Microsoft Clarity template for Piwik Pro
- Microsoft Clarity template for GA4 and other analytics stacks.
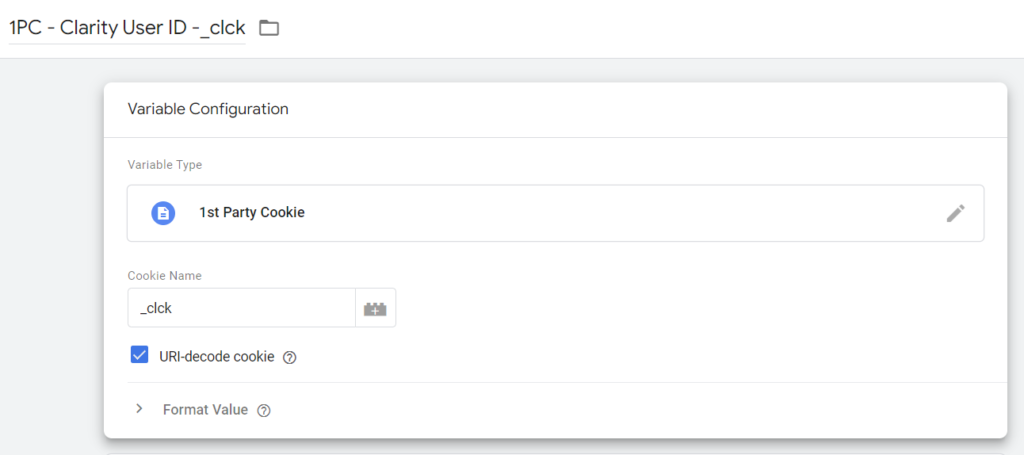
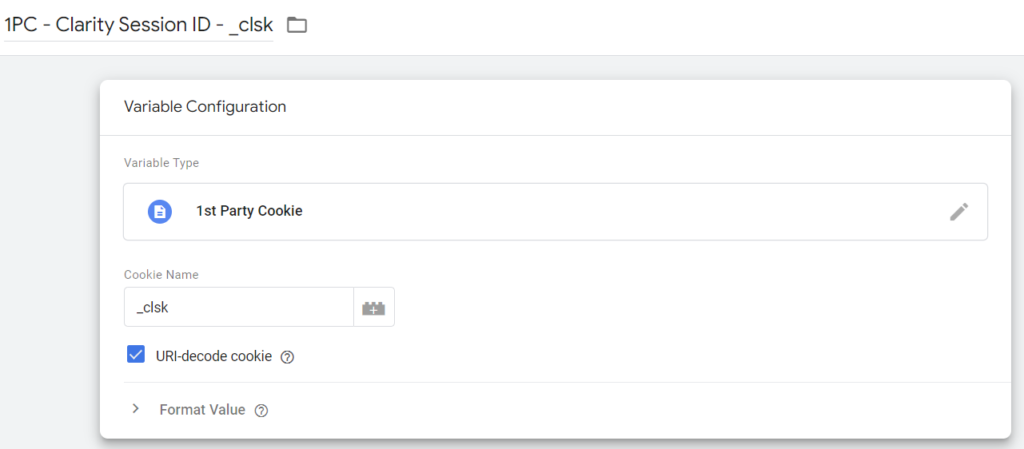
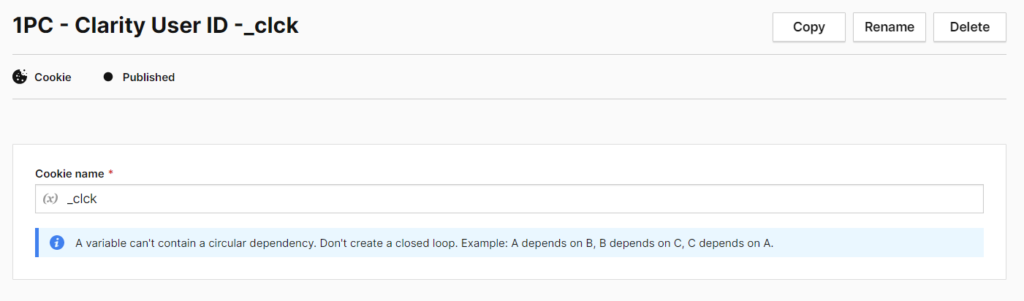
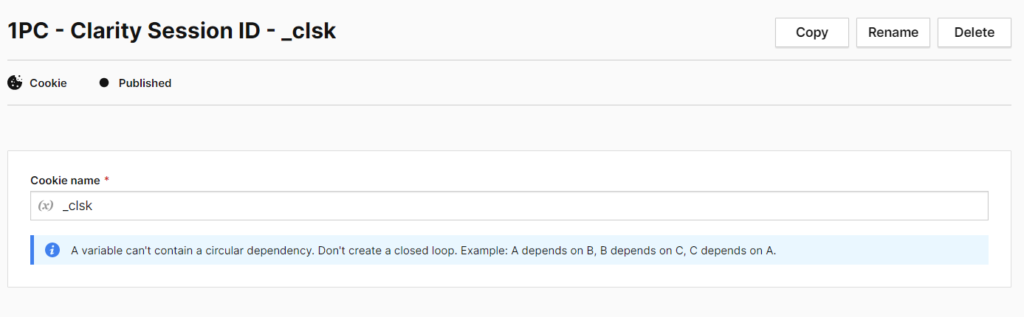
If you’re ready to start working with session recording URLs, here’s how to start. First, create two 1st Party Cookie variables for the session and user IDs. These variables should be named “_clsk” and “_clck”.
- _clsk is for Session ID
- _clck is for the user ID
Creating the variables in Google Tag Manager
- Navigate to the variables section in GTM.
- Under “User Defined Variables“, click the “New” button to create a new variable.
- Choose “1st Party Cookie” as the variable type.
- Input “_clsk” and “_clck” as the name of your cookie in the “Cookie Name” fields of the two variables.
- Please check mark the “URL-decode cookie” option.
- Lastly, click the “Save” button to save your new variable.
The Clarity “User ID” cookie in GTM.
The Clarity “Session ID” cookie variable in Google Tag Manager.
Creating first-party cookie variables in Piwik Pro
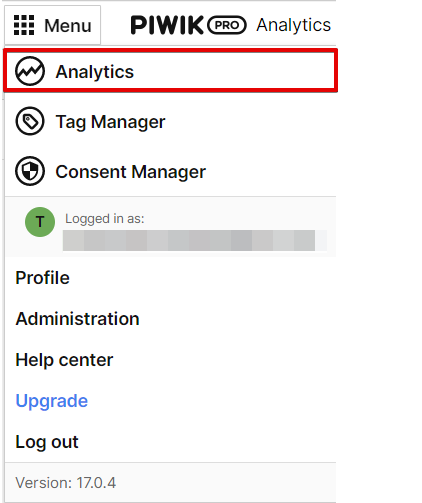
- In your Piwik Pro dashboard, navigate to the “Tag Manager” suites.
- Navigate to the “Variables” section.
- Click the green “Add a variable“ button.
- In the next screen, name your variable and select “Cookie” as your variable type.
- Input “_clck” and “_clsk” as the names of your cookie in the “Cookie Name” field.
- Click the “Add” button to save the variable.
How the Clarity “User ID” cookie is set up in Piwik Pro TMS.
The Clarity ‘Session ID” cookie variable in Piwik Pro tag manager.
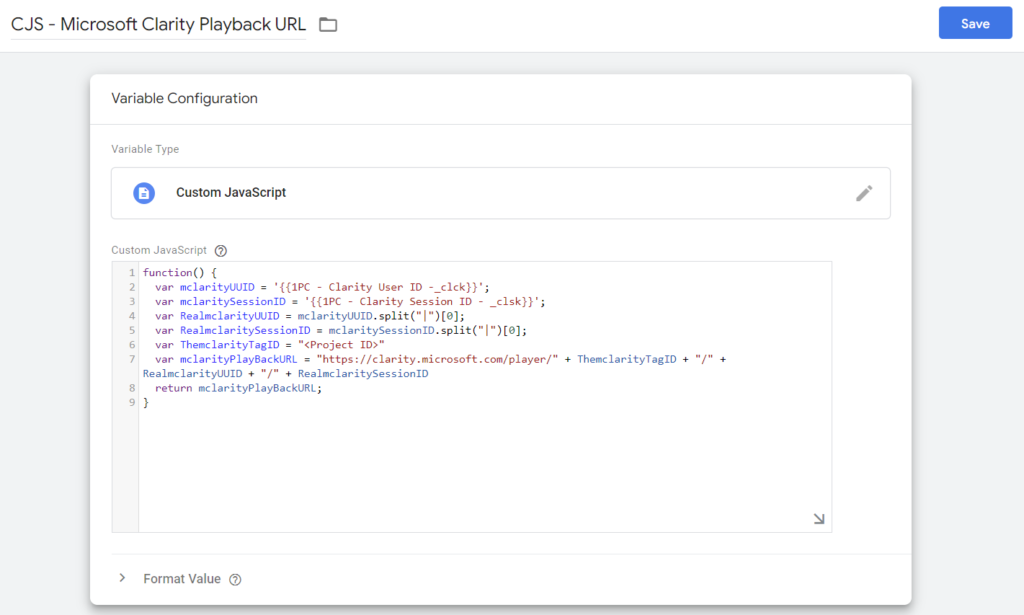
Microsoft Clarity session playback URL is in this format [https://clarity.microsoft.com/player/” + Clarity_Project_ID + “/” + Clarity_User_ID + “/” + Session_ID]
* The “player” can be substituted with “ga”, which will still work correctly.
We’ll use custom javascript and the first-party variable cookies we’ve created to obtain the recording for that user’s session.
Here is what both variables look like in Google Tag Manager and Piwik Pro TMS
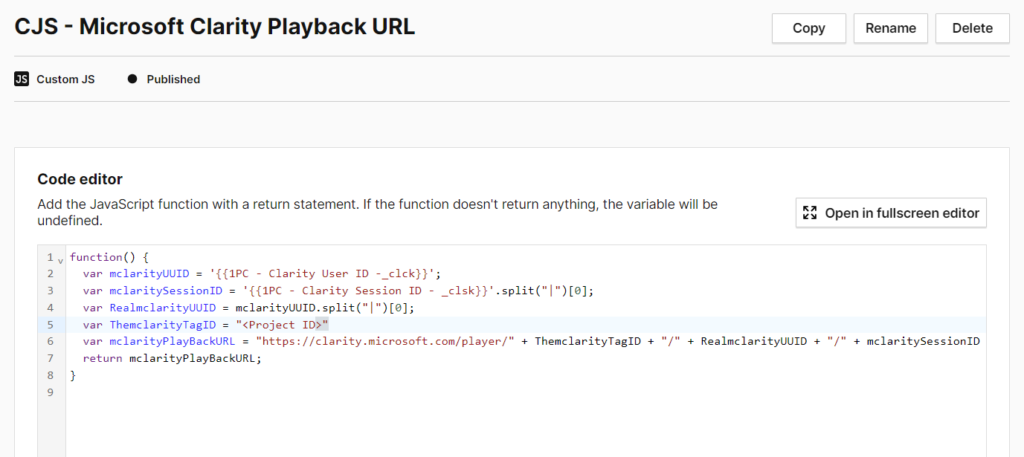
Here is the code to use in Google Tag Manager.
function() {
  var mclarityUUID = '{{1PC - Clarity User ID -_clck}}';
  var mclaritySessionID = '{{1PC - Clarity Session ID - _clsk}}';
  var RealmclarityUUID = mclarityUUID.split("^")[0];
  var RealmclaritySessionID = mclaritySessionID.split("^")[0];
  var ThemclarityTagID = "<Project ID>"
  var mclarityPlayBackURL = "https://clarity.microsoft.com/player/" + ThemclarityTagID + "/" + RealmclarityUUID + "/" + RealmclaritySessionID
  return mclarityPlayBackURL;
}
Here is the code to use in Piwik Pro.
function() {
  var mclarityUUID = '{{1PC - Clarity User ID -_clck}}';
  var mclaritySessionID = '{{1PC - Clarity Session ID - _clsk}}'.split("^")[0];
  var RealmclarityUUID = mclarityUUID.split("^")[0];
  var ThemclarityTagID = "<Project ID>"
  var mclarityPlayBackURL = "https://clarity.microsoft.com/player/" + ThemclarityTagID + "/" + RealmclarityUUID + "/" + mclaritySessionID
  return mclarityPlayBackURL;
}
* Ensure to change the “<Project ID>’ with your actual Clarity project ID.
Here is what your variable will look like in Piwik Pro TMS.
The codes below will help in obtaining the Clarity user id and session ID:
Use this code for retrieving the Microsoft Clarity user ID
function() {
  var mclarityUUID = '{{1PC - Clarity User ID -_clck}}';
  var RealmclarityUUID = mclarityUUID.split("|")[0];
  return RealmclarityUUID;
}
Use this code to capture the user’s Clarity session ID
function() {
  var mclaritySessionID = '{{1PC - Clarity Session ID - _clsk}}';
  var RealmclaritySessionID = mclaritySessionID.split("|")[0];
  return RealmclaritySessionID;

}
Inspectlet – Session Recording URL
Inspectlet session playback URL looks like this http(s)://www.inspectlet.com/dashboard/watchsession/{website-id}/{session-id}?pn=1
It compromises of two elements;
- Website ID
- Session ID
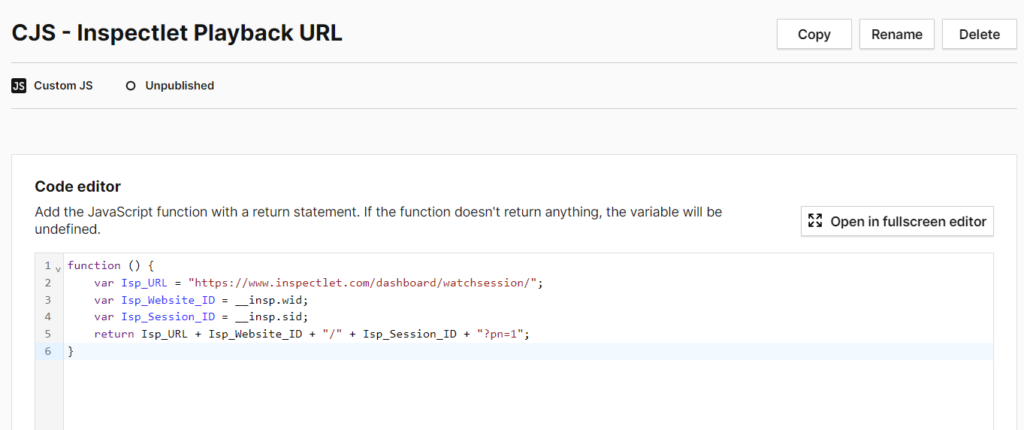
To obtain the complete URL, copy and paste the code below into your custom JavaScript variable within Google Tag Manager or Piwik Pro Tag Manager.
function () {
    var Isp_URL = "https://www.inspectlet.com/dashboard/watchsession/";
    var Isp_Website_ID = __insp.wid;
    var Isp_Session_ID = __insp.sid;
    return Isp_URL + Isp_Website_ID + "/" + Isp_Session_ID + "?pn=1";
}
Instrumentation using Google Tag Manager

Using Piwik Pro TMS
You can use the custom JavaScript below if you ever need to capture the session ID.
function () {
    var Isp_Session_ID = __insp.sid;
    return Isp_Session_ID;
}
Log Rocket – Session URL Playback
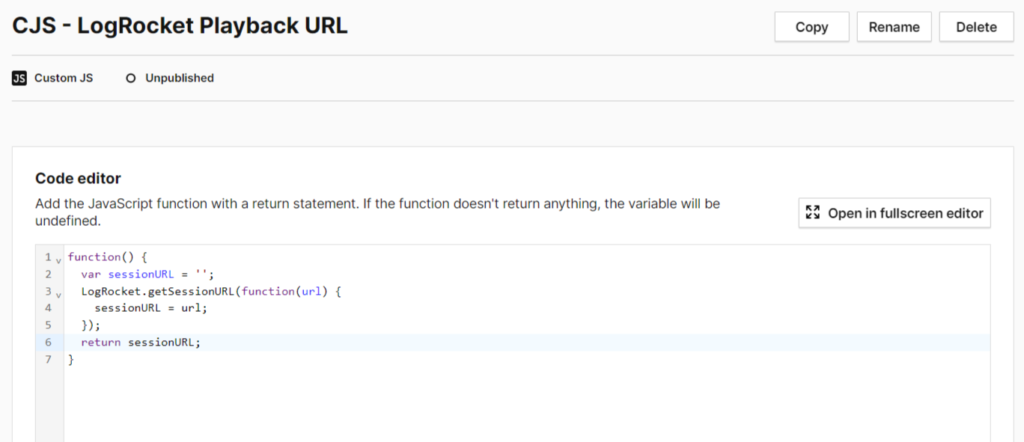
This process is also quite simple, much like Fullstory. To obtain the session recording URL for LogRocket, copy and paste the following code into a custom JavaScript variable within Piwik Pro Tag Manager or Google Tag Manager.
function() {
  var sessionURL = '';
  LogRocket.getSessionURL(function(url) {
    sessionURL = url;
  });
  return sessionURL;
}
GTM variable setup
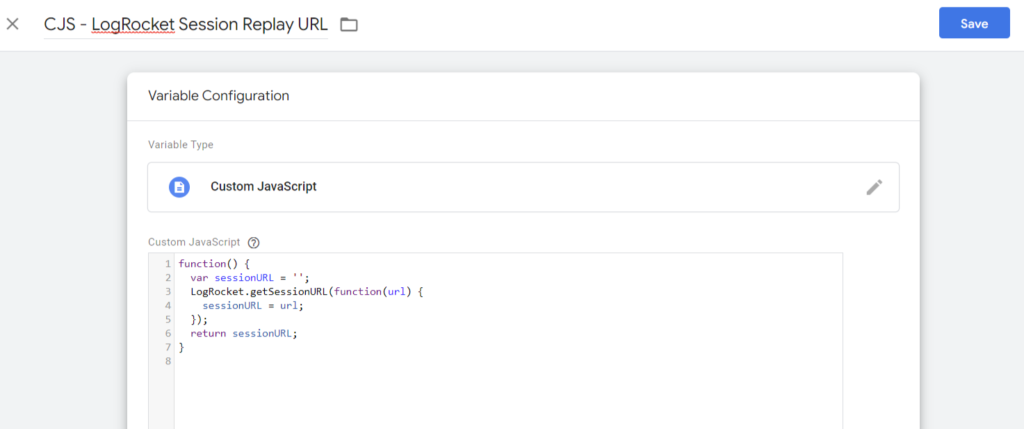
Piwik Pro variable setup in Piwik Por Tag Manager
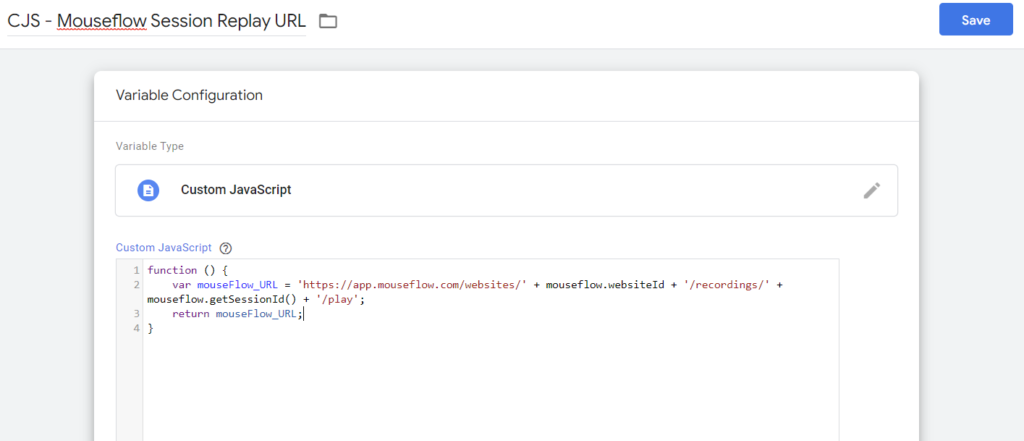
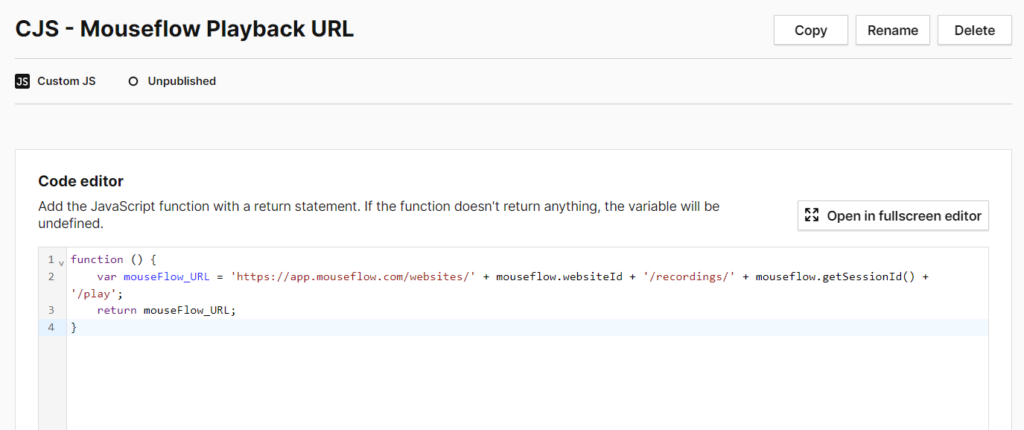
Mouseflow – Session URL Playback
Getting the recording URL of a user session in Mouseflow is easy. First, copy and paste the code below into your custom JavaScript variable in Piwik Pro or Google Tag Manager.
Additionally, if you need to capture the user session ID, the code below should you help you do that.
function () {
    var mouseFlow_URL = 'https://app.mouseflow.com/websites/' + mouseflow.websiteId + '/recordings/' + mouseflow.getSessionId() + '/play';
    return mouseFlow_URL;
}
Custom JavaScript setup in GTM
Custom JavaScript setup in Piwik Pro TMS
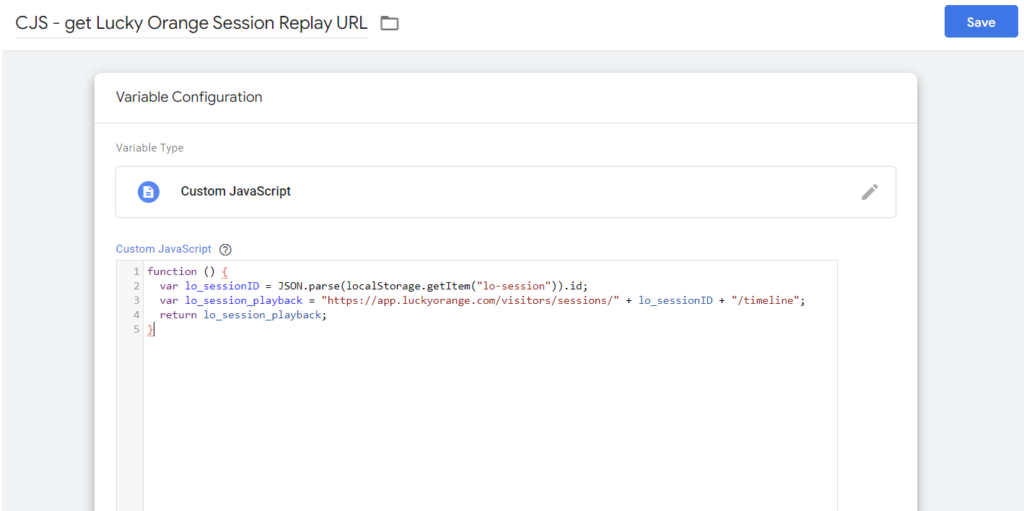
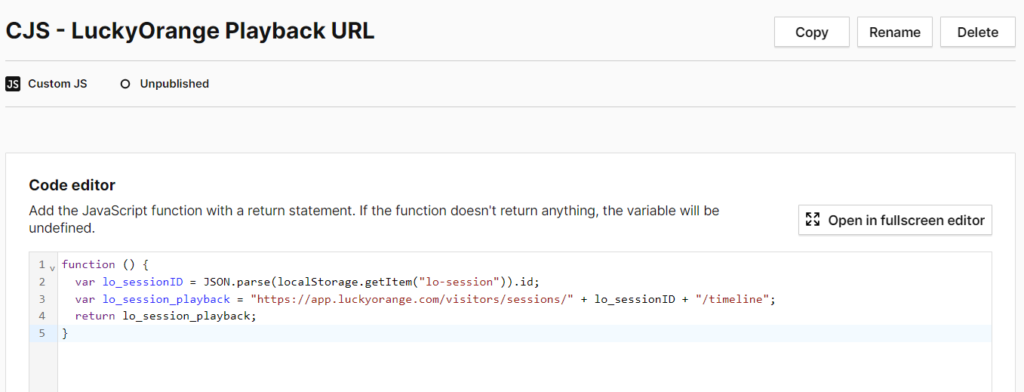
Lucky Orange – Session URL Playback
To obtain the user’s session recording playback URL in Lucky Orange, you’ll have to use the code below in your custom javascript variable in Piwik Pro or Google Tag Manager.
function () {
var lo_sessionID = JSON.parse(localStorage.getItem("lo-session")).id;
var lo_session_playback = "https://app.luckyorange.com/visitors/sessions/" + lo_sessionID + "/timeline";
return lo_session_playback;
}
Using Google Tag Manager
Using Piwik Pro TMS
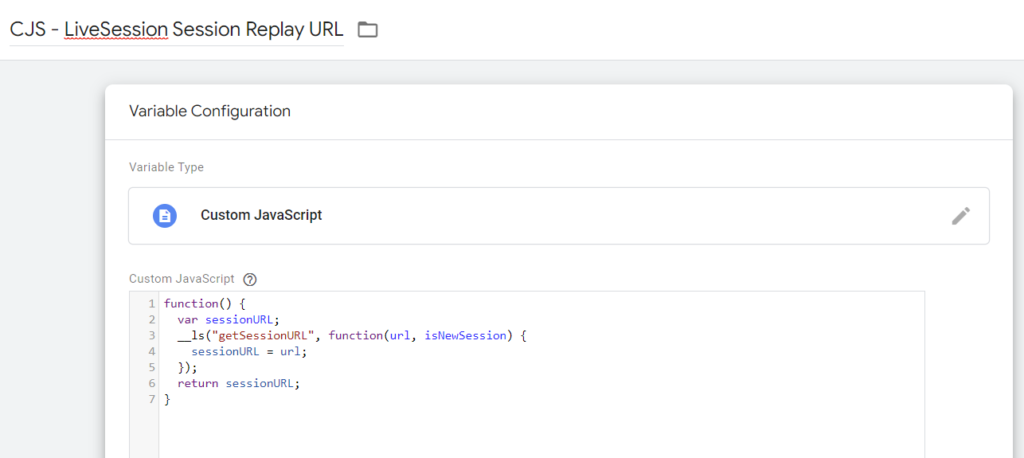
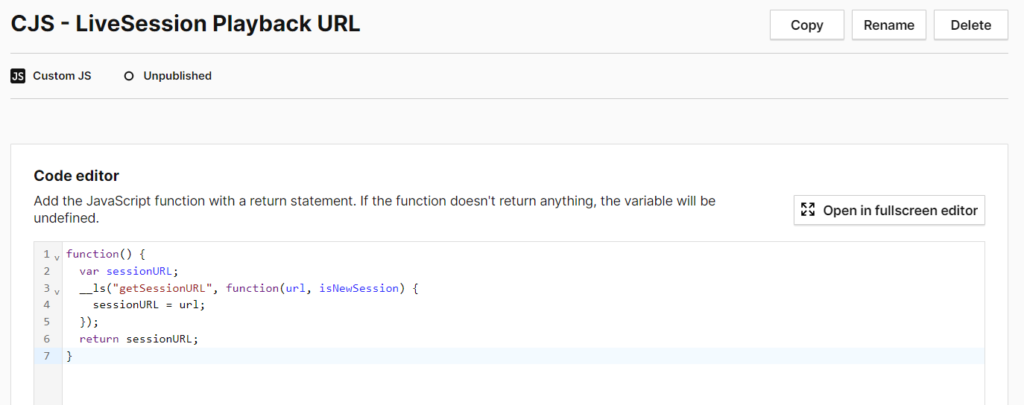
LiveSession – Session URL Playback
Obtaining the user’s session playback URL is easy in LiveSession analytics. You can do this with the help of the code below by copying and pasting it to your custom javascript variable in Piwik Pro or Google Tag Manager.
function() {
  var sessionURL;
  __ls("getSessionURL", function(url, isNewSession) {
    sessionURL = url;
  });
  return sessionURL;
}
Using the code in Google Tag Manager as a custom JavaScript variable.
Using the code in Piwik Pro TMS as a custom JavaScript variable.
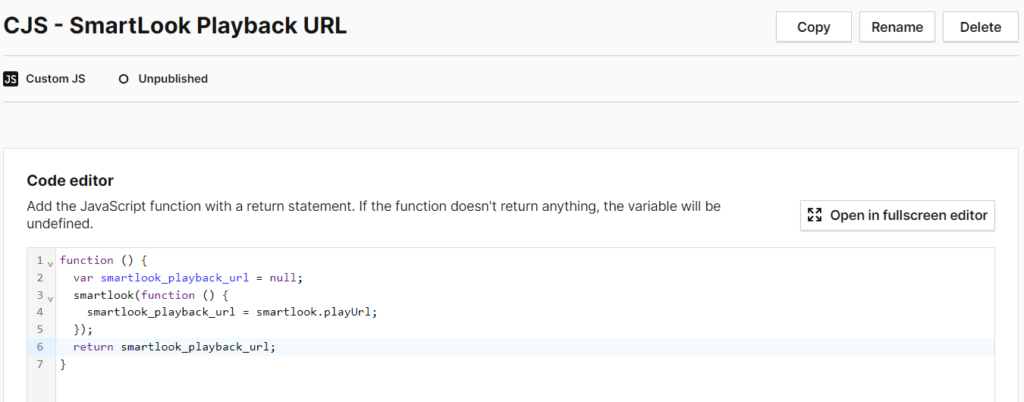
Smartlook – Session URL Playback
The JavaScript code below will help you obtain the user’s Smartlook session recording playback URL. You can use the code in Google Tag Manager or Piwik Pro TMS.
function () {
  var smartlook_playback_url = null;
  smartlook(function () {
    smartlook_playback_url = smartlook.playUrl;
  });
  return smartlook_playback_url;
}
Setup example in Google Tag Manager

Setup example in Piwik Pro tag manager
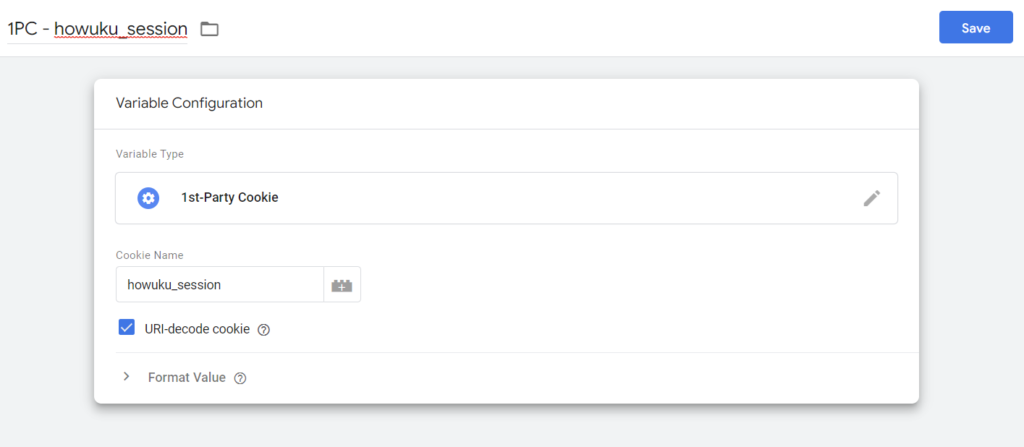
Howuku – Session URL Playback
The Howuku session recording URL is in this format “https://app.howuku.com/video/” + “howukuw_session_id” How do we get the URL?
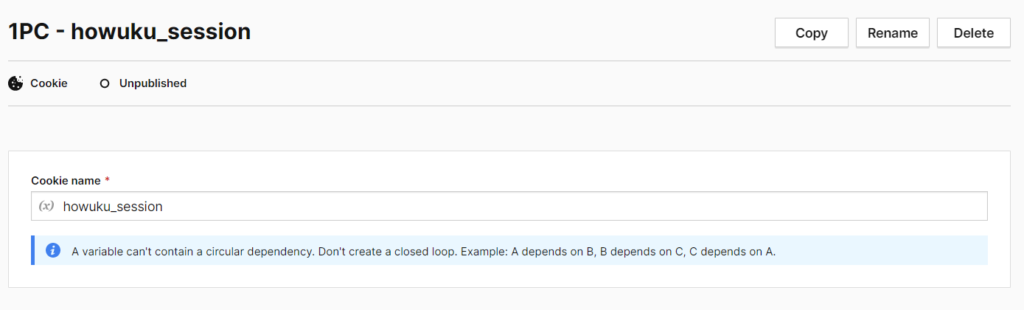
First, we create a first-party cookie variable in Google Tag Manager and Piwik Pro TMS with the cookie name “howuku_session“.
Creating the variable in Google Tag Manager
- Navigate to the variables section in GTM.
- Under “User Defined Variables“, click the “New” button to create a new variable.
- Choose “1st Party Cookie” as the variable type.
- Input “howuku_session” as the name of your cookie in the “Cookie Name” field.
- You can choose to mark the “URL-decode cookie” option.
- Lastly, click the “Save” button to save your new variable.
Creating a first-party cookie variable in Piwik Pro
- In your Piwik Pro dashboard, navigate to the “Tag Manager” suites.
- Navigate to the “Variables” section.
- Click the green “Add a variable“ button.
- In the next screen, name your variable and select “Cookie” as your variable type.
- Input “howuku_session” as the name of your cookie in the “Cookie Name” field.
- Click the “Add” button to save the variable.
Next, we’ll create a custom javascript variable, where you’ll copy and paste the code below.
function() {
    var howuku_session_id = "{{1PC - howuku_session}}";
    return "https://app.howuku.com/video/" + howuku_session_id;
  }
The variable setup in GTM
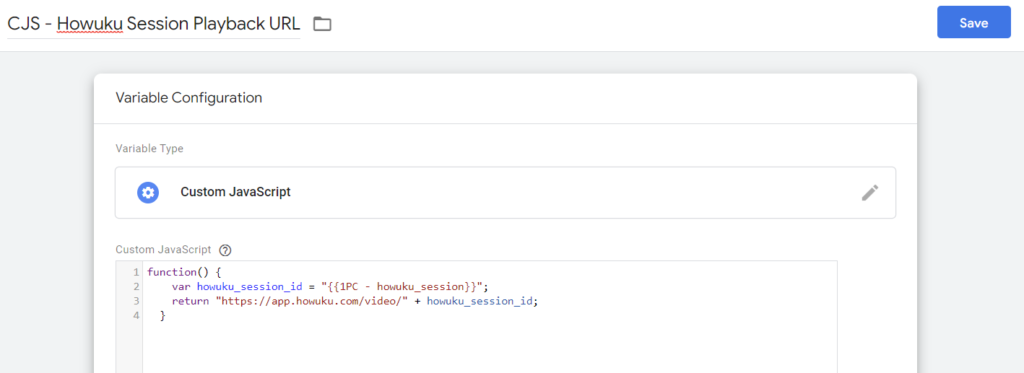
Using Piwik Pro TMS to set up the custom javascript variable

Hotjar – Session URL Playback
Hotjar does not provide a direct API or method to programmatically access the session recording playback URL, as it contains sensitive user data.
However, we can capture the user id and use it for data filtering when watching session recordings in Hotjar.
Matthew Zambon from Tag Manager Italia wrote a comprehensive article on obtaining the Hotjar USER ID and transmitting it to GA4. The user ID value can be further used in more in-depth analysis, such as session recording, by filtering in Hotjar.
Here is the code you can use in your Piwik Pro or Google Tag Manager custom JavaScript variable. (Matthew wrote the code)
function() {
  var hotjarUserId = hj.globals.get("userId").split("-");

  if(hotjarUserId[0] != undefined)
  {
    return hotjarUserId[0];
  }
  else
  {
    return 0;
  }
}
The variable in GTM.
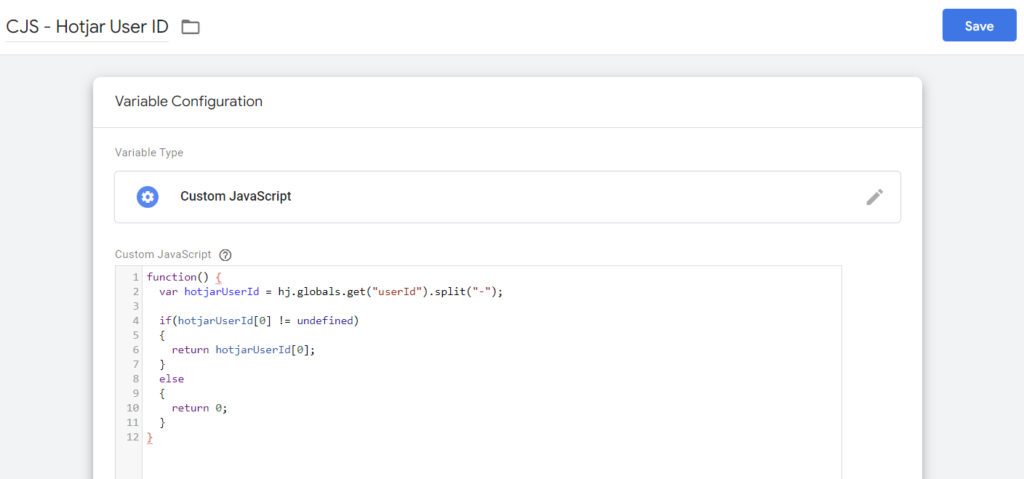
The variable in Piwik Pro tag manager.

Sending & Accessing The Session URL Playback URL in Piwik Pro Analytics
Capturing the data in Piwik Pro is easy; you must use session scope custom dimensions.
Follow these easy steps to create them;
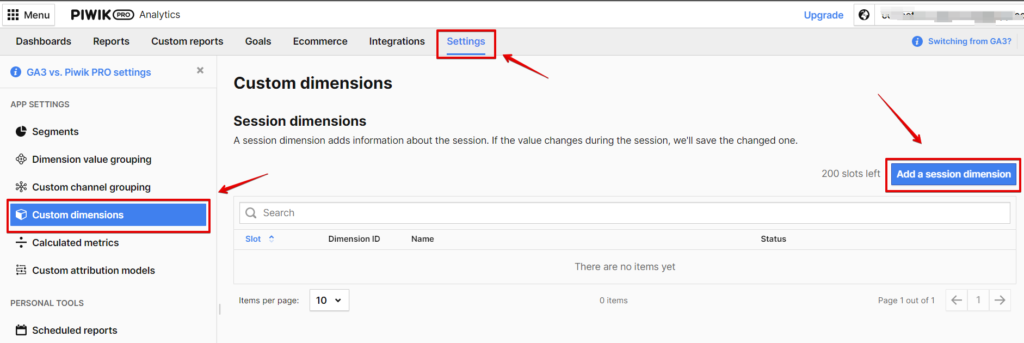
- Navigate to the “Settings” tab in the analytics module.
- Under “App Settings“, click the “custom dimensions” tab.
- In the “Session Dimension” section, click the “Add a session dimension” button to create one for the session playback URL.
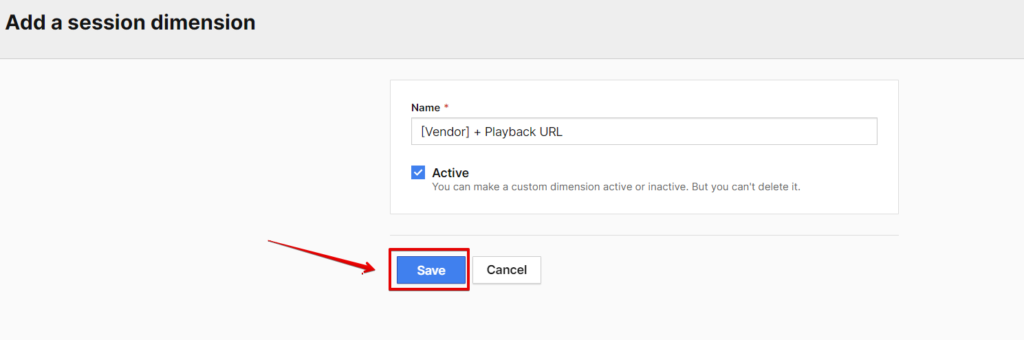
- A new screen pops up, where you give it a name which is editable later after you’ve clicked the save button.
- You will see the dimension appear with its dimension ID number.
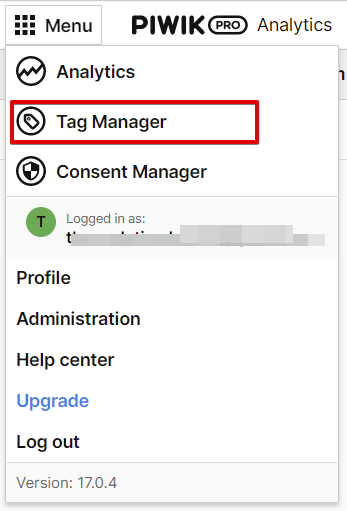
Navigate to Piwik Por’s Analytics suites.
Navigate to the “Settings” section, and click the “Custom Dimensions” settings, where you’ll get the option to create a new session scope dimension by clicking the blue “Add a session dimension” button.
Give your custom dimension a name and ensure it’s active before clicking the “Save” button.
A session scope custom dimension provides additional insight into a unique user session. Piwik Pro will record and save the new value when the values change during the session after its initial application.
How do we apply the custom dimension using the value of the playback URL?
There are numerous ways of doing this, but I’ll focus on how to do it in the Piwik Pro tag manager and Google Tag Manager.
Implementing Custom Dimensions In Piwik Pro Tag Manager:
With Piwik Pro Tag Manager being the easiest, here is the implementation step to follow;
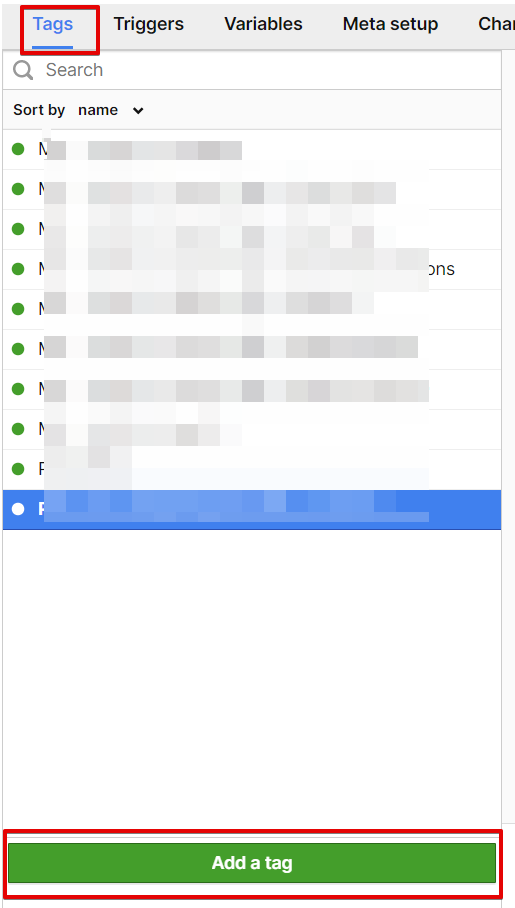
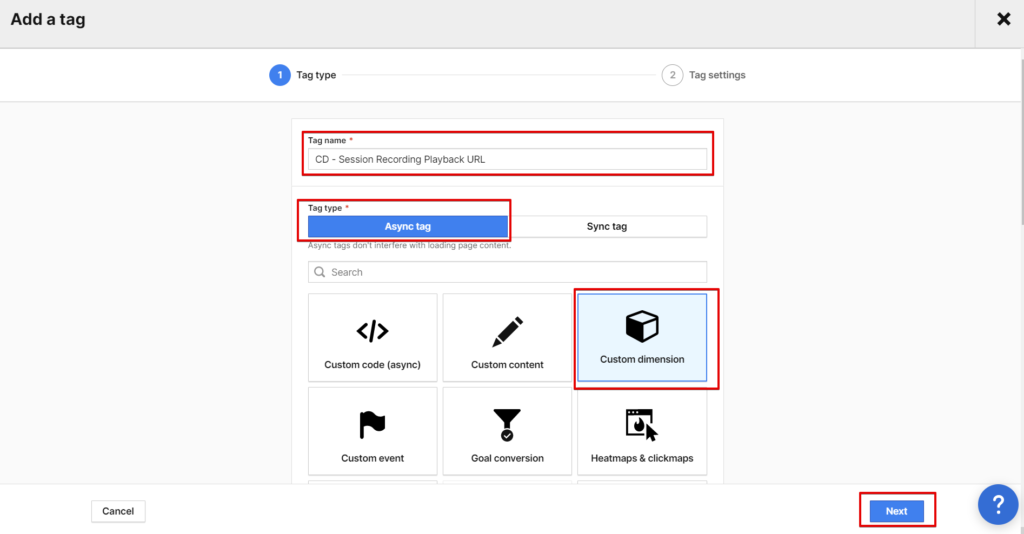
Navigate to the Piwik Pro tag manager module. Under the “tags” section, click the green “Add a Tag” button.
Click the “Add a tag” button.
Select the “Custom Dimension” tag under the “Async tag types” and give it a name.
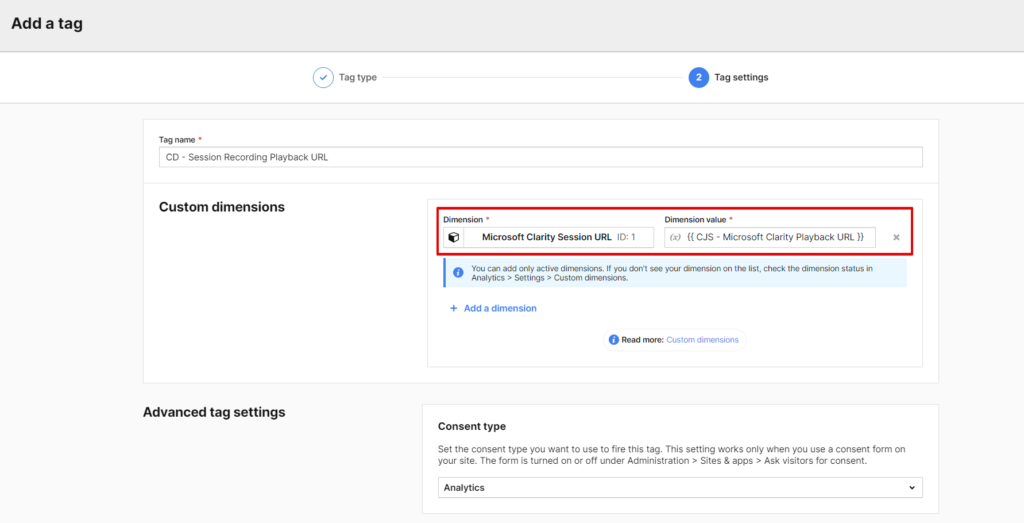
In the next screen, you should see a screen where you can select the session scope custom dimension created earlier (the session recording playback URL).
Then, in the value field, you should choose the appropriate variable that returns the session recording URL as its value.
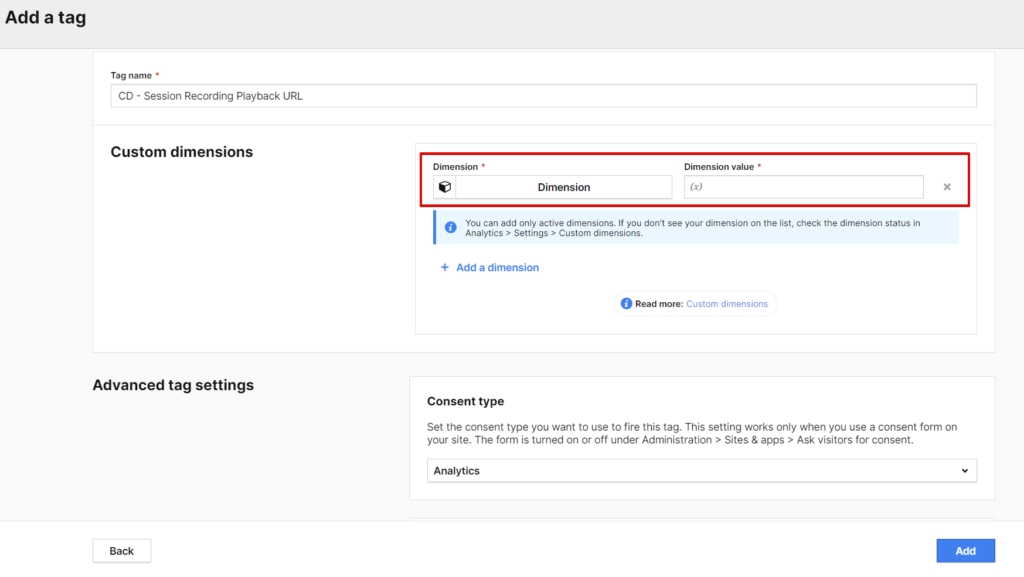
The custom dimension you created should appear in the dropdown, and you should be able to select your session recording playback URL by clicking the “Dimension value” field.

Here is what your setup should look like. (Ensure you add the necessary privacy settings that apply to your business)
It is advisable to fire the tag on either DOM ready or window loaded (my preferred).
Here is how to create one;
You can create one in the triggers section by clicking the “add a trigger” button.
Select the “Page View” trigger type, give your trigger a name and hit the next button.
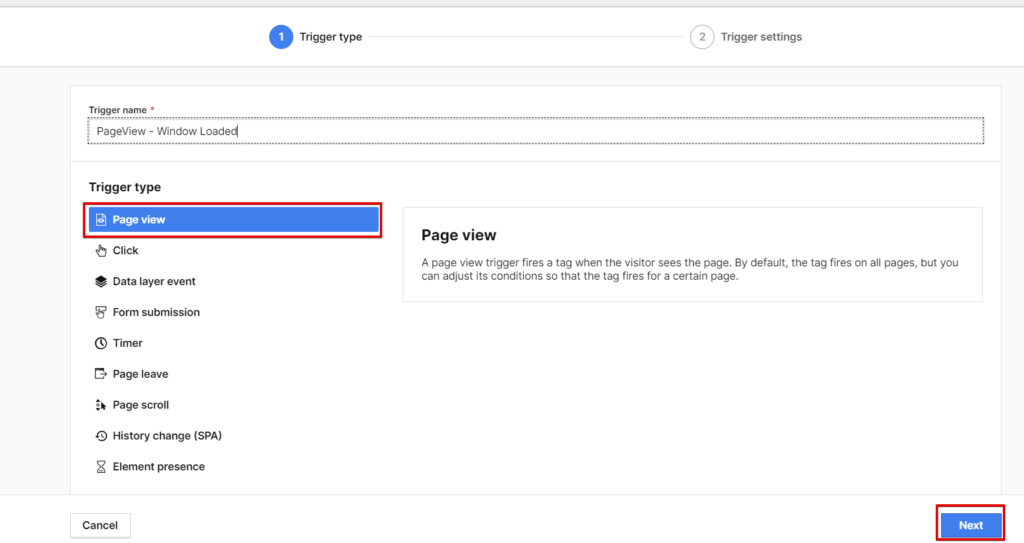
On the next screen, you should be able to select the page load type under the configuration options under the “Load this tag right after the browser”.
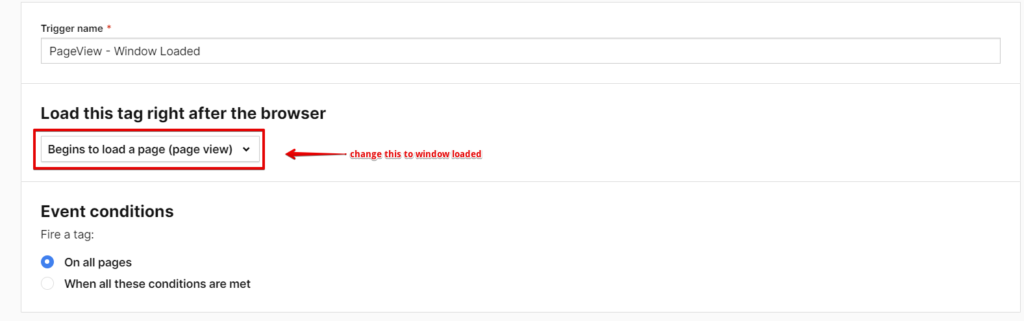
Three options exist, and these are;
- Page load
- DOM ready
- Window Loaded
In our scenario, you can choose DOM or Window loaded (recommended), and you should be good to go.

Ensure to debug using the Piwik Pro tag manager debug mode and the analytics “Tracker debugger” feature in Piwik Pro.
The tracker debugger is in the settings tab under “Personal Tools“.
Publish once everything is okay.
Implementing Piwik Pro Custom Dimensions In Google Tag Manager:
We’ll have to use the custom HTML tag type to send the session recording URL as a custom dimension to Piwik Pro through Google Tag Manager.
Below is the code you’ll use, and you’ll have to substitute the number to the correct dimension ID in Piwik Pro and the “{{playback URL value}}” with the custom javascript, which retrieves the session recording of that user session.
<script type="text/javascript">

  // Piwik Pro custom dimension for sending playback URL to Piwik Pro
  //substitue 6 with the correct dimension number in Piwik Pro

  _paq.push(["setCustomDimensionValue", 6, "{{{playback URL value}}"]);

</script>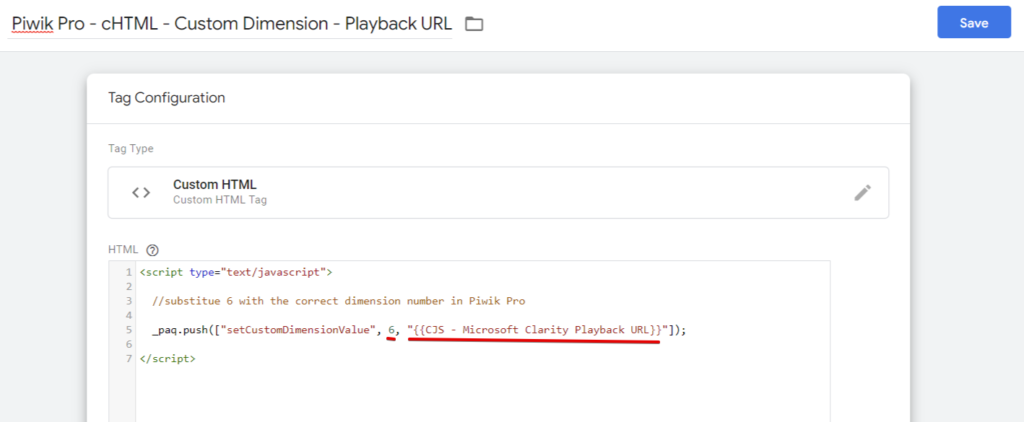
Fire the tag on DOM Ready or Window Loaded, debug, and publish.
Accessing The Session Recording PlayBack URL
You can access the playback URL mainly from these three places;
- Custom dimension reports
- Session log
- Custom reports
- As a secondary dimension applied to standard reports
Accessing it via the custom dimension reports.
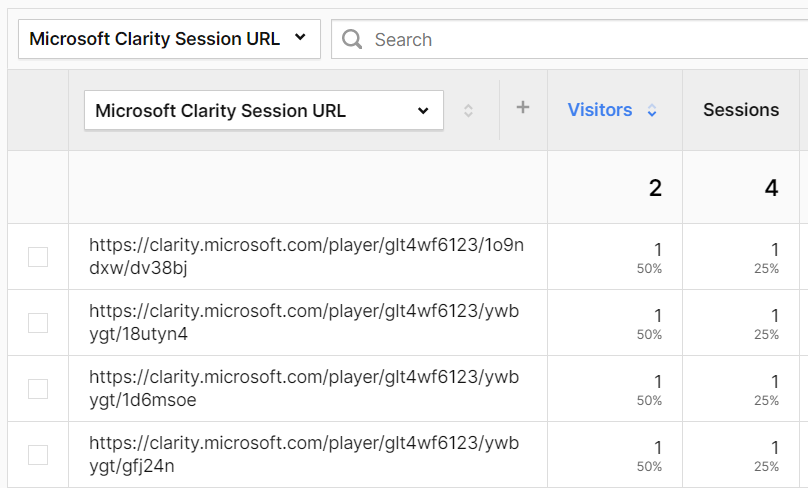
Accessing the playback URL as a secondary dimension in Piwik Pro reports.

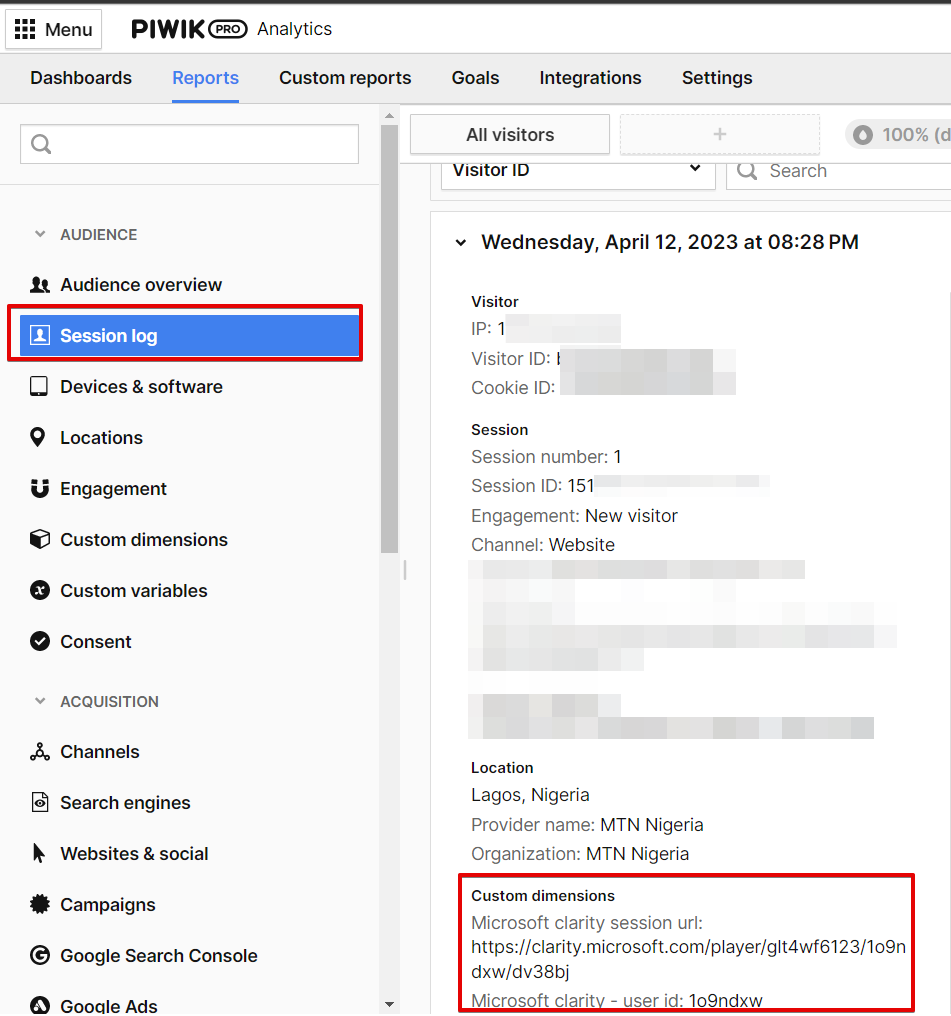
You can also access the session recording URL in Piwik Pro session log reports.
Sending & Accessing The Session URL Playback URL in Google Analytics (GA4)
Google Tag Manager will be my go-to TMS to accomplish this, which is “my” preferred tag management solution.
Since GA4 doesn’t have a session scope dimension and uses an event-based measurement model, we’ll have to send the session playback URL as an event parameter using any of the two approaches below;
- An event parameter that is sent with all GA4 events except page_view events since the session recording playback URL might not be ready at the time of initialisation (this is my most preferred, as accessing it in GA4 or BigQuery is easy)
- Another option is to send it once as a parameter of a custom event triggered on every page load after the page_view event has happened.
I recommend using both approaches because the session playback URL may be unavailable for events such as page views or 404 error events which happen on page load. In such cases, you can use the session ID and playback URL of the once-per-page-load event as the playback URL for these events.
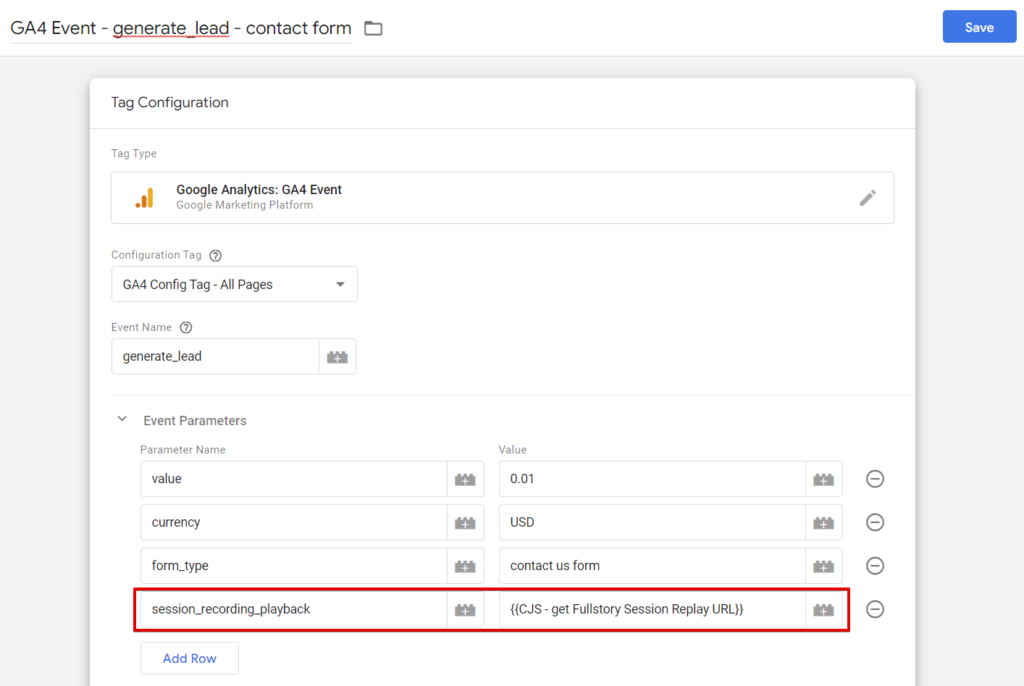
On Every Event
Please do not do this on the config tag because you might want to use it. The config tag field doesn’t work as the old Google Analytics Settings Variable, and the parameter may not be available in all GTM GA4 event tags.
So it’s best it’s manually applied to your GA4 event tags.
Once Per Page Load
You’ve to create a GA4 event tag, give the event name field a custom event [“session_recording_tool_name”_event], and in the parameter, give it the name “session_playback_url”.

*Please use Window loaded (recommended) or DOM-ready trigger type
Due to possible cardinality issues, I recommend you not register the event as an event scope custom dimension in Google Analytics but instead access it from BigQuery. However, you can still create it as an event scope custom dimension in the GA4 UI.
Once you have registered the playback URL event parameter in GA4, it will be available in your standard and exploration reports.
If you want to access it in Big Query, the simple, unnest SQL query can be included in your SQL queries used in querying your GA4 data in Big Query.
For example, the SQL code below can be used to see session ids and the recording playback URL.
SELECT
DISTINCT(CONCAT((SELECT value.int_value FROM UNNEST(event_params) WHERE KEY = "ga_session_id"), user_pseudo_id)) as sessionId,
(SELECT value.string_value FROM UNNEST(event_params) WHERE KEY = "claritydimension") as session_playback_url
FROM `dumbdata-sample-project.analytics_416197632.events_*`
WHERE (SELECT value.string_value FROM UNNEST(event_params) WHERE KEY = "claritydimension") IS NOT NULL
*Remember to update the table name and dimension name with yours.

For example, the SQL query below gives us the 404 pages with our session recording URL to see what happened in that sessions.
* The query works for implementations where the session recording playback URL gets sent on all event hits.
SELECT
DISTINCT(CONCAT((SELECT value.int_value FROM UNNEST(event_params) WHERE KEY = "ga_session_id"), user_pseudo_id)) as sessionId,
event_name,
(SELECT value.string_value FROM UNNEST(event_params) WHERE KEY = "claritydimension") as session_playback_url
FROM `dumbdata-gcp-project.analytics_316185782.events_*`
WHERE event_name = "404_error"
The SQL query below is designed for a setup where an event is fired only once on page load and not as a parameter on all events. Now you see why using “ONLY” this approach makes it complex to retrieve the data in BigQuery. However, it can be helpful when mixed with the first approach of sending the parameter on all events.
SELECT
event_table.sessionId,
event_name,
session_playback_url
FROM
(
SELECT
DISTINCT(CONCAT((SELECT value.int_value FROM UNNEST(event_params) WHERE KEY = "ga_session_id"), user_pseudo_id)) as sessionId,
event_name
FROM `dumbdata-sample-gcp-project.analytics_316908982.events_*`
WHERE event_name = "404_error"
) as event_table
INNER JOIN
(
SELECT
DISTINCT(CONCAT((SELECT value.int_value FROM UNNEST(event_params) WHERE KEY = "ga_session_id"), user_pseudo_id)) as sessionId,
(SELECT value.string_value FROM UNNEST(event_params) WHERE KEY = "claritydimension") as session_playback_url
FROM `dumbdata-gcp-project.analytics_316185782.events_*`
WHERE (SELECT value.string_value FROM UNNEST(event_params) WHERE KEY = "claritydimension") IS NOT NULL
) as playback_url
ON event_table.sessionID = playback_url.sessionID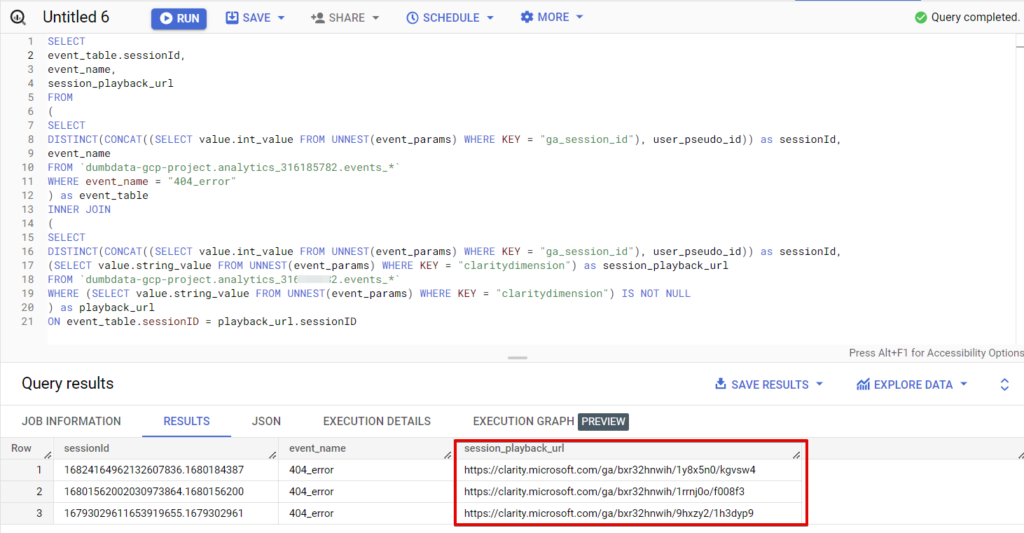
*Remember to update the table name and session playback URL dimension in the SQL code.
You can also use it to understand what sessions where a user performed critical UX or activation events.
Sending & Accessing The Session URL Playback URL in Mixpanel, Amplitude and Other Analytics
When using event-based product analytics tools like Mixpanel or Amplitude, we’ll adopt a similar approach to GA4 by including the session recording playback URL as an event parameter for our events.
Unlike GA4, we won’t encounter cardinality issues, and there’s no need to add the parameter as a custom dimension in our analytics UI.
Watching Session Recording In Mixpanel and Amplitude
Below are some ways to make the playback URL available in Mixpanel and Amplitude. You can also adopt all methods or just one.
On Every Event
I prefer this method, but it’s strenuous as it requires you to manually send the session recording playback URL as an event parameter in all your events.
By using this method, it becomes effortless to access the session recording as an event breakdown.
If you’re using Mixpanel, you don’t have to do this manually, as you can look at Mixpanel’s “Super Property“, which I explained as a third option, which makes the process super easy.
Instrumentation In Mixpanel
Here is how you send the data in Mixpanel using the JavaScipt SDK. (this is an example event “form_submitted”).
<script>
mixpanel.track(
    "form_submitted",
    {
     "form_type": "newsletter form",
     "fullstoryURL": "{{CJS - get Fullstory Session Replay URL}}",
     "traffic_type": "{{CJS - User Traffic Type}}"
  }
);
</script>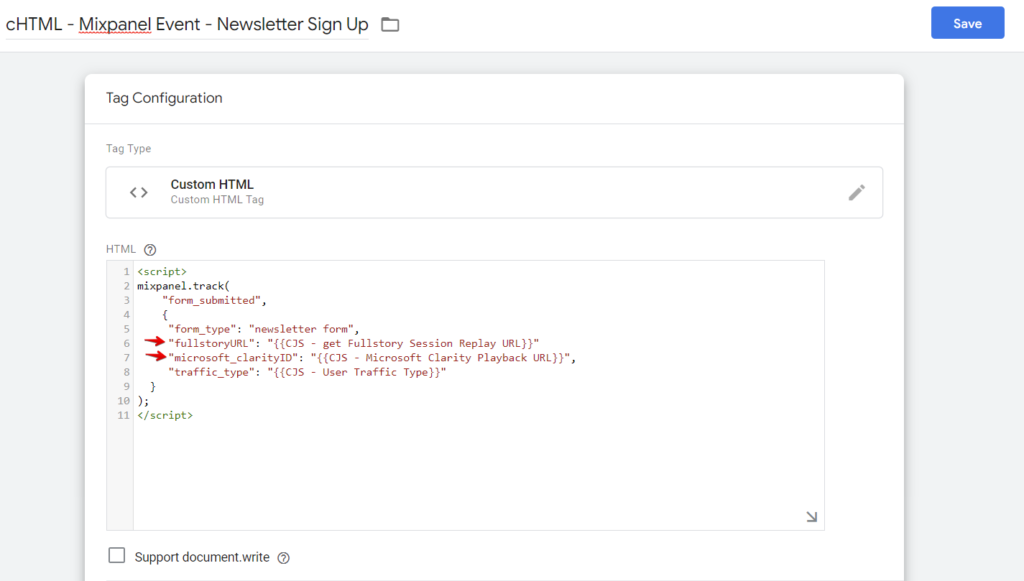
Alternatively, you can use Google Tag Manager and the Mixpanel Template.
Instrumentation In Amplitude
If you’re using Amplitude JavaScript SDK, you’re setup should be something like this.
<script>
amplitude.getInstance().logEvent('generate_lead', {
'lead_type': 'sales demo enquiry',
'lead_value': 30,
'playback_url': '<session playback url value>'
});
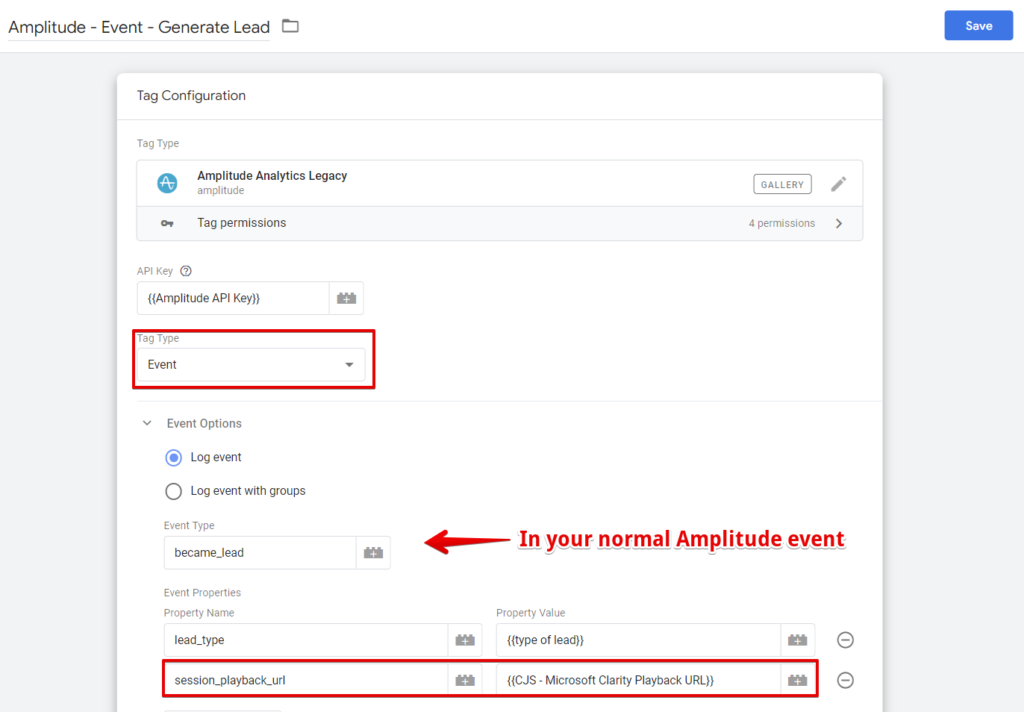
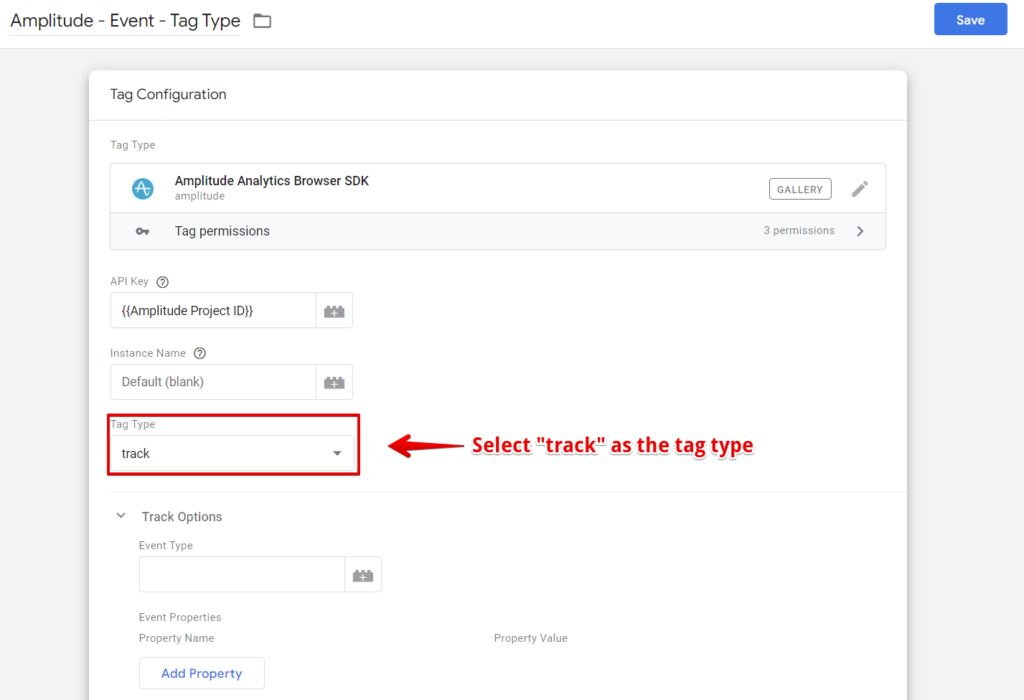
</script>For implementations using the Amplitude GTM template, here is how to include the session playback URL as an event property to all your events instrumentation.
In the setup below, I used “Event” as the tag type, and this is because I’m using the “Amplitude Analytics Legacy” tag template. If you’re using the “Amplitude Analytics Browser SDK” template type, you’ll select “Track” as your tag type.
Once On Page Load Event
To implement this method, you must send an event on page load after the session recording tool has fired. The event name can be anything, but you’ll have to add the session recording URL as an event property of that event.
Although this approach is simple, accessing the playback URL for visual debugging or understanding the data you’re looking at can be challenging.
Instrumentation In Mixpanel
Here is an event with the event property as the URL of the recording of the user’s session. (you should replace the “fullstory_event” with something that describes your vendor).
<script>
mixpanel.track(
    "fullstory_event",
    {
     "session_playback_url": "{{The Session Replay URL}}",
     "traffic_type": "{{CJS - User Traffic Type}}"
  }
);
</script>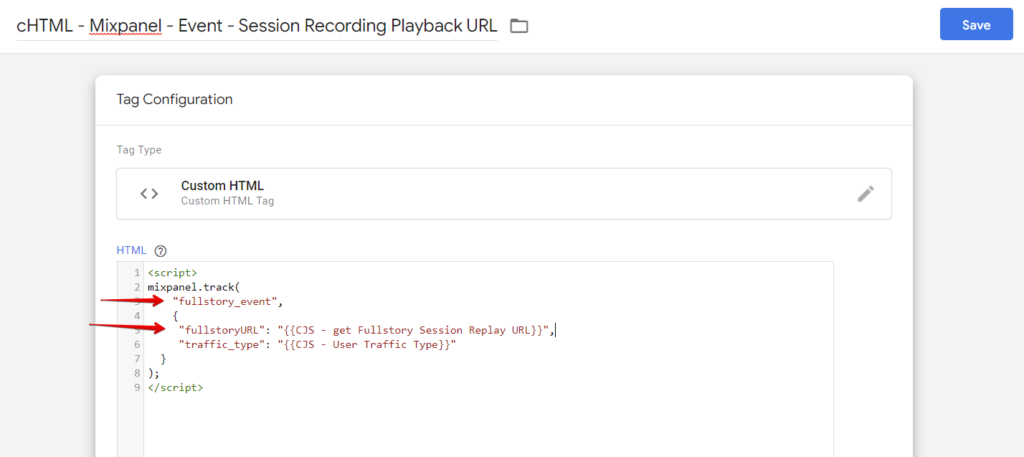
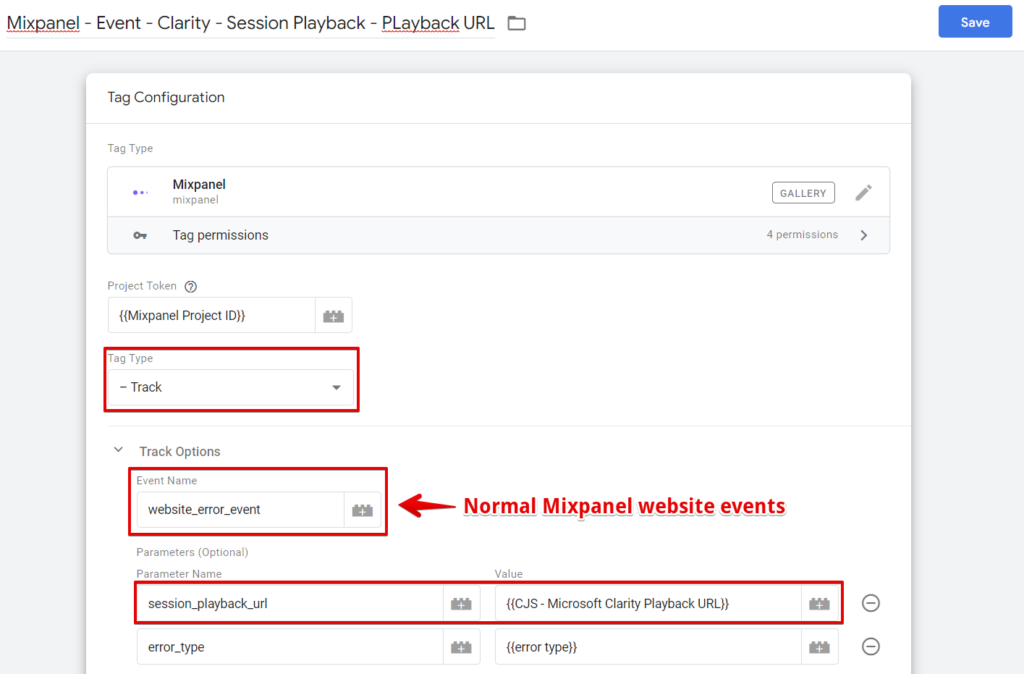
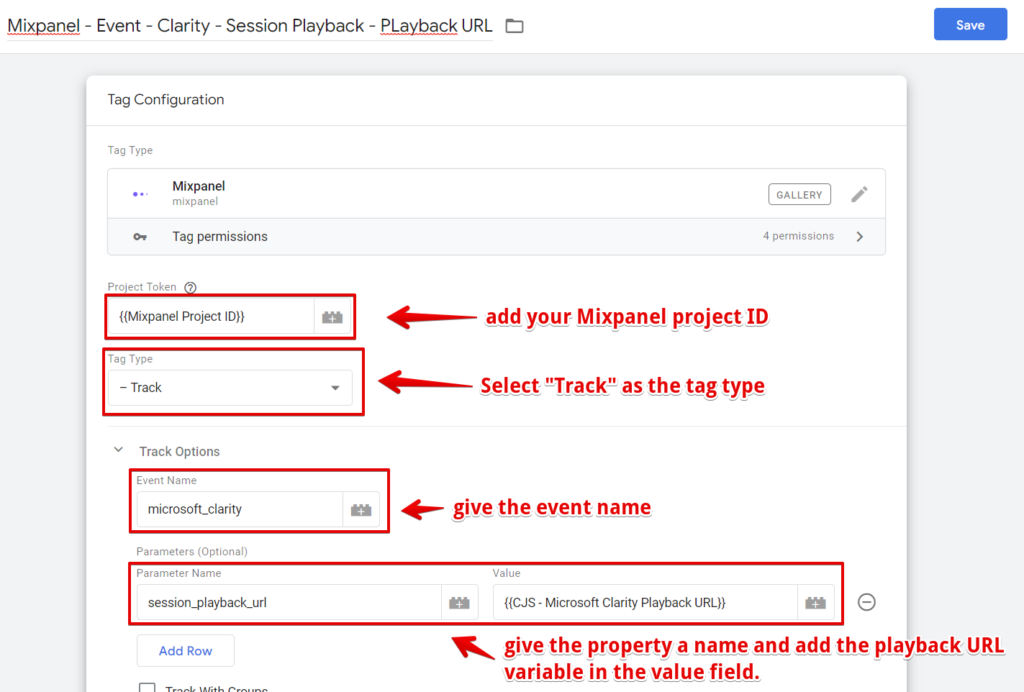
For instrumentations done using Mixpanel’s Google Tag Manager template, here is what you’re setup should look like.
Instrumentation In Amplitude
It’s similar for Amplitude when using their JavaScript SDK.
<script>
amplitude.getInstance().logEvent('lucky_orange_event', {'playback_url': '<session playback url value>'});
</script>
Alternatively, setups using the Amplitude GTM template can set up an event with the playback URL as an event property, as shown below.
Here is what your setup should look like if your Amplitude instrumentation in Google Tag Manager uses the “Amplitude Analytics Legacy” tag template.
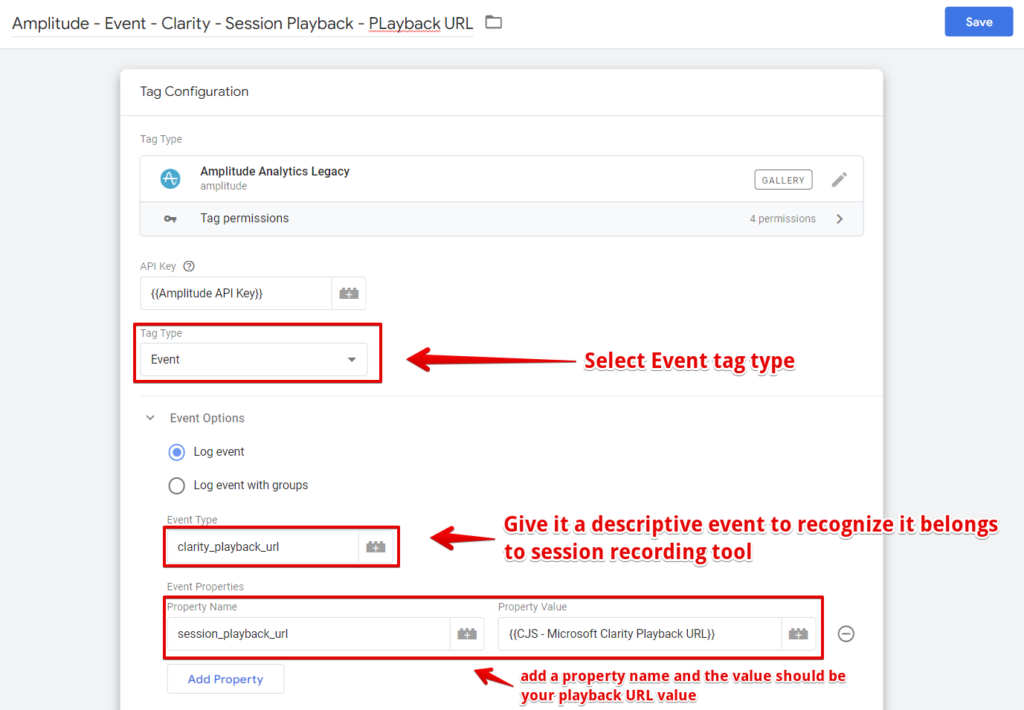
Select the “Track” tag type if your Amplitude instrumentation in GTM uses the “Amplitude Analytics Browser SDK“.
Using Super Properties (Supported majorly in Mixpanel)
Mixpanel users can consider using the super property feature if they don’t want to manually add the user’s session recording playback URL as an event property to all events. This feature may be available in your organisation’s analytics stack, allowing for automatically including specific properties with each event.
Please don’t use the “register once” call; we’ll like it updated as it changes in the user’s session.
This a sample of what your call should be;
<script>
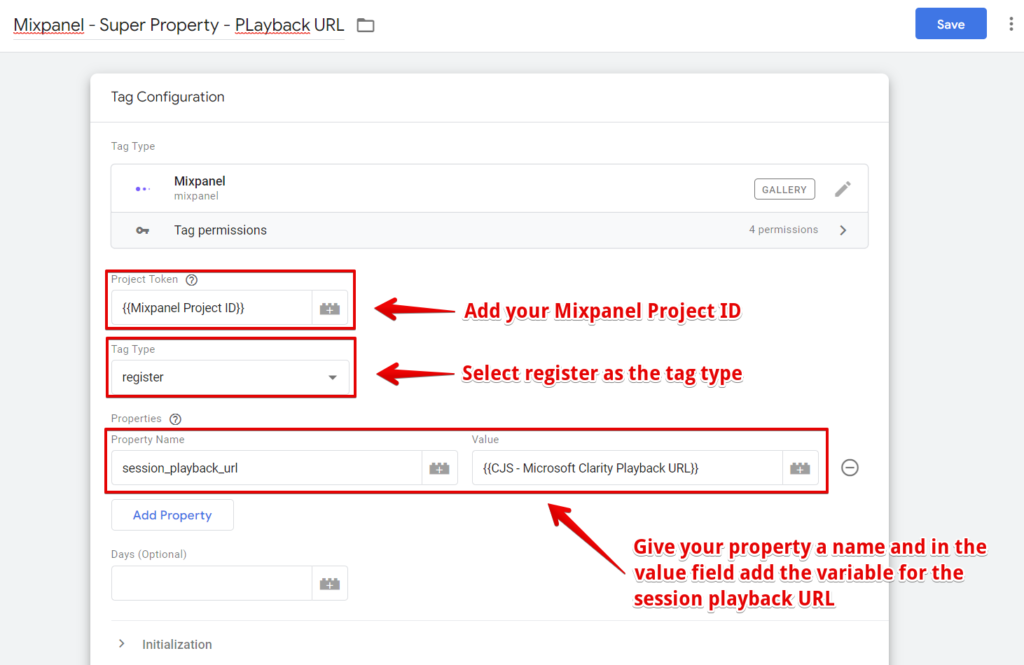
mixpanel.register({
"session_playback_url": "{{Session_playback_url}}"
});
</script>Here is what it looks like for me in GTM.
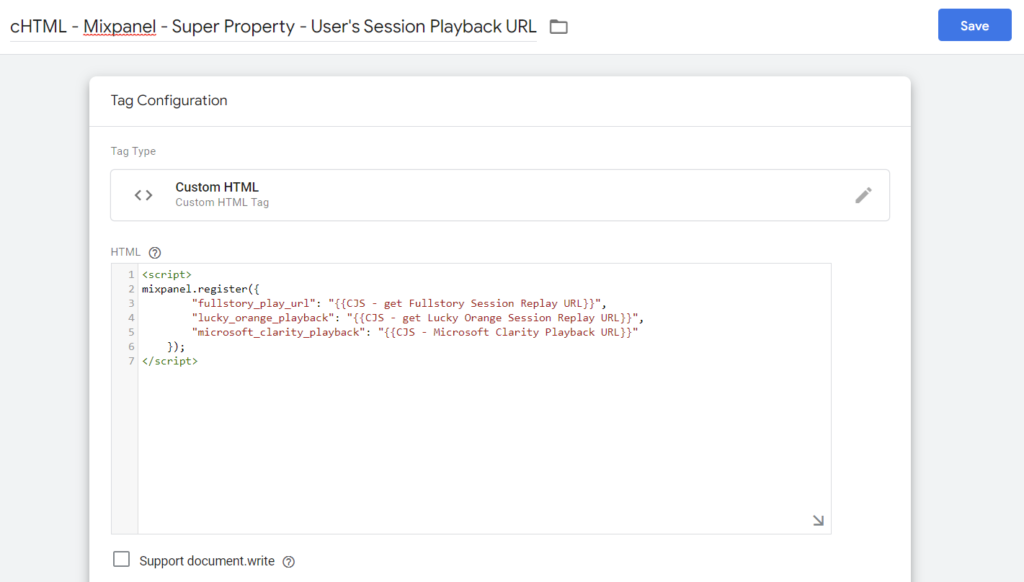
Here is what Mixpanel setups in Google Tag Manager using the Mixpanel custom template instrumentation of “Super Property” will look like.
Key Takeaways When Using Mixpanel/Amplitude;
You can employ any of the methods mentioned above or even use them together and not encounter any issues.
Sending the session recording URL as a user property is an option, though I don’t recommend this. However, it can be adopted in rare cases with a solid reason and strategy for doing so.
The main reason for not recommending this method is that the value of the session recording URL changes with each new session. It can cause difficulty in accurately accessing the session playback URL where the user’s performed actions are being analysed, making it challenging to obtain the desired data.
If your business analytics stack isn’t Google Analytics, Piwik Pro, Mixpanel or Amplitude, you can still leverage some of the abovementioned options.
Capturing The Data In Your Support Ticket or CRM:
Apart from sending the data to your analytics stack, another innovative way is to have it available for your support team or in your CRM to help sales understand what key pages customers visit before a conversion.
To make this possible, you’ll need to have a hidden field in your support ticket or conversion form, and then JavaScript in the custom HTML tag type Google Tag Manager or Piwik Pro TMS will help you to fill this form field.
Below are different ways to use JavaScript to fill the hidden form field automatically.
// using the hidden form field ID
document.getElementById('hidden_form_field_id').value = '{{session recording URL value}}';

//using the hidden form field CSS selector
document.querySelector('<your css selector>').value = '{{session recording URL value}}';

// using the form field tag name attribute, which will be mostly "input", you'll also have to update the number
document.getElementsByTagName("input")[0].value =  '{{session recording URL value}}';

//using the name attribute
document.getElementsByName('name of the elements')[0].value =  '{{session recording URL value}}';
Drawing The Curtains;
Yay! We have now reached a point where we can review what we have covered about improving communication between our digital experience analytics tools and Piwik Pro, GA4, Mixpanel, or Amplitude setups.
I hope you now understand how you can seamlessly integrate Piwik Pro, GA4 and Mixpanel with the session recording tools we covered.
We dissected what is needed to accomplish this and the prerequisite steps before syncing both tools.
Also, we got the opportunity to take a deep dive into how to get the session recording playback URL for Fullstory, Microsoft Clarity, Inspectlet, Mouseflow, Smartlook, LiveSession, LogRocket, Lucky Orange, Hotjar and how to send that data to Piwik Pro, Google Analytics (GA4), Mixpanel, etc.
Lastly, we took a ride outside the scope of this blog post to understand some of the innovative ways to collect and send the playback URL, like sending it to our CRM or ticketing platform.
Content Author:
I Love watching magic videos and documentaries and googling tourism destinations I end up not visiting. I write about measurement topics in my free time and love helping non-technical marketers succeed in the ever-changing measurement space. I’m a marketing analytics specialist with Hedy and Hopp (a Healthcare marketing agency based in St Louis, US) and DumbData’s co-founder.


