

A step-by-step guide on using CookieScript Consent Manager with Piwik Pro
In this episode, I will explore how to integrate the “Piwik Pro” suite with Cookie-Script, continuing our series on how to integrate Piwik Pro with various consent management platforms (CMPs).
Last week, we discussed the integration of Piwik Pro and Termly; today, I will guide you through the steps involved in integrating Piwik Pro with CookieScript.
This privacy-focused series began in 2023 on the DumbData blog, where I detailed the integration of CMPs like Osano, CookieFirst, and CookieYes with the Piwik Pro suite using the Piwik Pro “Consent Manager JavaScript API.” Please review those posts if you find them interesting.
Since our conversation concerns privacy, I recommend you read my article on integrating Google Consent Mode v2 with Piwik Pro.
The Piwik Pro website’s integration page shows that Piwik Pro is compatible with various CMPs and reporting tools. However, Piwik Pro does not integrate with all CMP vendors. This challenge inspired me to create solutions that enable seamless integration of your organisation’s chosen CMP vendor with Piwik Pro. This guide will focus on the “CookieScript” CMP for your privacy and consent solution.
You’ll also get to understand the prerequisite steps involved, the implementation hierarchy and the role it plays in the success of your integration; first, I will briefly highlight the benefits of this integration:
1) Using CookieScript for your consent banner allows you to maintain the advanced privacy controls, settings, and consent banner designs available in its CMP solution alongside Piwik Pro Analytics, thereby enabling compliant data collection from website interactions.
2) Integrating Cookie-Script with Piwik Pro permits the use of privacy controls and settings available in the Piwik Pro tag manager suite when implementing Piwik Pro-related tags or third-party pixels/tags on your website.
3) Analysts without direct access to the Cookie-Script CMP can still view consent reports in Piwik Pro Analytics, providing valuable insights into users’ privacy choices and interactions with the consent banner, thereby understanding the specific types of consent granted.
4) This integration removes barriers to using Piwik Pro on your website while adopting CookieScript as your preferred CMP.
Now, let’s examine the steps for integrating both tools (Piwik Pro and Cookie-Script.com):
Steps Involved in Integrating Piwik Pro and CookieScript:
The process involves several key steps to ensure effective communication between the two tools:
- First, ensure that consent banner settings are enabled and the option to use a custom consent banner is selected.
- Determine the implementation hierarchy you will use, which I will discuss in more detail shortly.
- The integration implementation phase, with testing and QA.
- Deploy the changes to the live website.
It is crucial to remember that this solution is applicable in all scenarios, whether or not you use Google Tag Manager. Successful implementation fundamentally relies on maintaining the proper hierarchy of instrumentation.
Let’s now look deeper into each of these listed steps.
Step 1: Enabling Consent and Selecting a Custom Consent Banner
To integrate Cookie-Script with Piwik Pro, you first navigate to the Piwik Pro “Administration” panel to enable the use of a consent banner.
Click on the hamburger menu and select “Administration.”
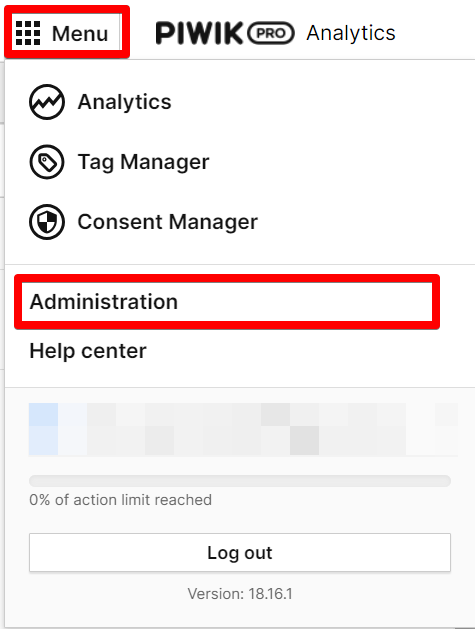
This action will display a screen listing all the projects (also known as “Sites”) associated with your account. Select the relevant project and navigate to the “Privacy” tab. Ensure that the “Ask visitors for consent” option is activated here. If it’s not yet enabled, you should have it enabled.
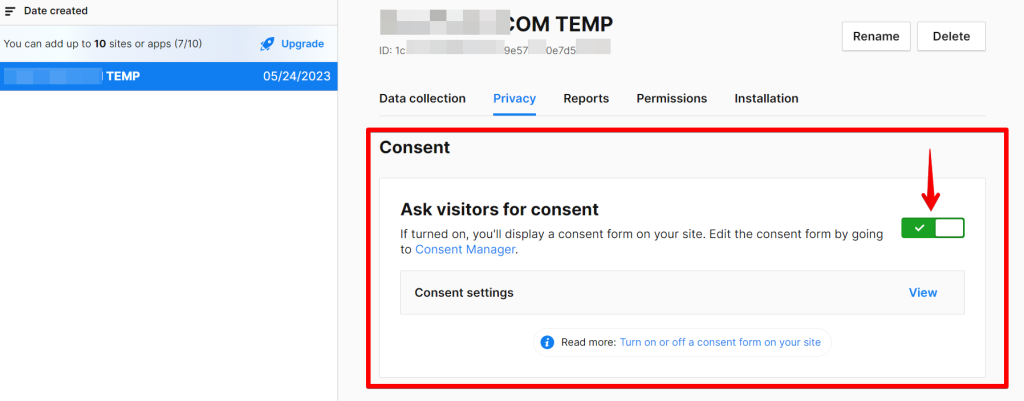
Next, adjust the necessary configuration settings. Enable the “Use a custom consent form” option to allow the use of the Termly consent banner.

Step 2: Hierarchy of Implementation (What Does This Mean?)
Choosing the correct hierarchy of implementing the solution for integrating the CookieScript consent banner and Piwik Pro integration is critical to ensure the code provided in this guide functions efficiently.
To assist you in making an informed decision, I have outlined the possible implementation approaches you can adopt based on your existing tech stack and the method you have chosen for deploying Piwik Pro on your website.
Two primary instances (with and without Google Tag Manager) are covered, but instances have three hierarchical methods, which I will discuss shortly.
Instances Where You’ve Not Used Google Tag Manager To Implement CookieScript or Piwik Pro Tracking Code
I recommend following the hierarchical methodology outlined below, which facilitates a seamless integration of both tools without complications. This approach applies to scenarios where you didn’t use Google Tag Manager (GTM) for your Piwik Pro and CookieScript implementation:
- Place the “Cookie-Script” consent banner script above the Piwik Pro tracking script.
- Immediately following the Piwik Pro tracking script, insert the JavaScript integration code provided in this guide.
Here is a visual to help illustrate this methodology.
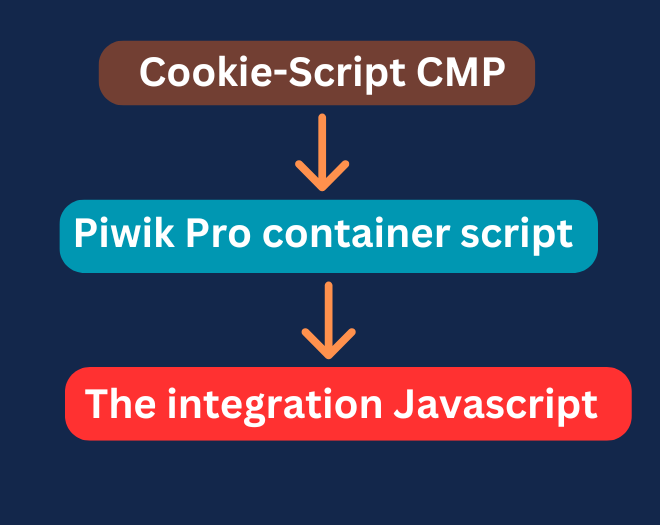
Adhering to this order in your implementation will ensure a smooth and issue-free integration of both tools, allowing for error-free communication between the Cookie-Script.com consent banner and Piwik Pro scripts on your website.
Instances Where You’ve Used Google Tag Manager To Implement Cookie-Script or/and Piwik Pro
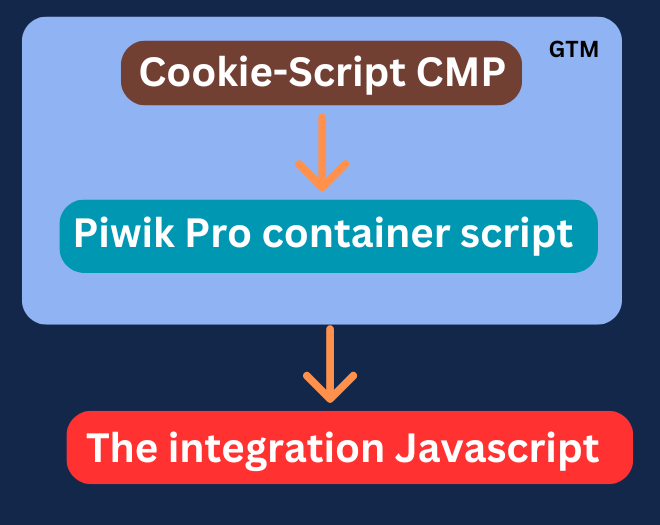
Here is an alternative hierarchy for scenarios involving Google Tag Manager (GTM) at any point in the CookieScript consent banner script and Piwik Pro instrumentation. This structure ensures proper instrumentation and seamless integration between the two tools:
- Place the GTM container script at the top of your website’s code to ensure it loads first.
- If you’ve implemented the Piwik Pro container through GTM, configure the Termly script to fire before it. To do this, you can use GTM tag sequencing or the tag priority feature.
- Install the JavaScript code I’ve provided in this guide immediately after the GTM container code. This code will facilitate the integration between Termly and Piwik Pro.
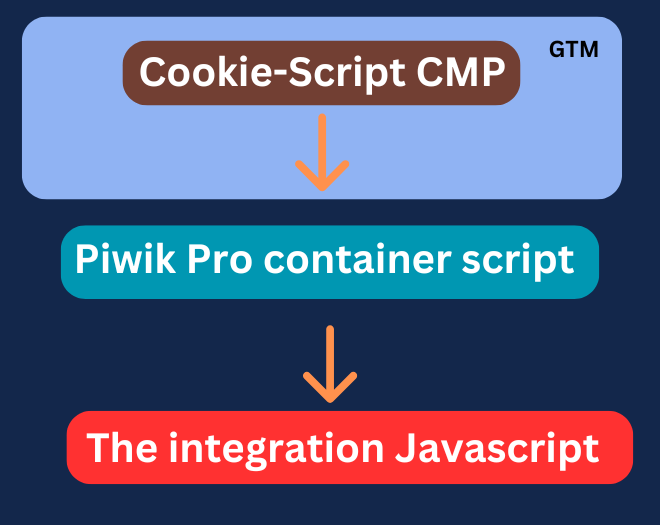
- If Piwik Pro is installed directly on your website without GTM, it should be deployed first. Then, place the JavaScript code shared in this guide below the Piwik Pro tracking script.
Here are visual explanations of the hierarchy where the “CookieScript” CMP script and Piwik Pro got implemented inside Google Tag Manager.
Here is another visual illustration of scenarios where only the Cookie-Script consent banner was deployed using Google Tag Manager.
Depending on your setup, choose a hierarchy that fits your current structure. This will help ensure that your integration of both tools works efficiently without any issues, thereby enabling effective data collection management and privacy control on your website.
Step 3: Implementing the JavaScript Code for CookieScript and Piwik Pro Integration
Assistance from ChatGPT significantly aided the development of this JavaScript code. However, I guarantee that I tested the code by dedicating hours to debugging it on a test environment where I installed Piwik Pro and Cookie-Script. Through this test, I improved the code to its final form, allowing you to integrate both tools flawlessly without any errors.
Here is the JavaScript code you’ll use to effectively integrate Piwik Pro and CookieScript.
<script>
// Function to update settings based on user consent
function updatePiwikProCookieScriptConsent() {
// Retrieve current consent state from CookieScript
var consentState = CookieScript.instance.currentState();
// Mapping of internal settings keys to CookieScript categories
var categoryMapping = {
analytics: 'performance',
conversion_tracking: 'targeting',
remarketing: 'targeting',
ab_testing_and_personalization: 'performance',
user_feedback: 'functionality',
marketing_automation: 'functionality'
};
// Initialize settings object
var settings = {
consents: {
analytics: { status: 0 },
ab_testing_and_personalization: { status: 0 },
custom_consent: { status: 0 },
user_feedback: { status: 0 },
marketing_automation: { status: 0 },
remarketing: { status: 0 },
conversion_tracking: { status: 0 }
}
};
// Check each consent category and update the settings object
for (var key in settings.consents) {
if (settings.consents.hasOwnProperty(key)) {
// Check if the key has a mapping and then check if that category is accepted
if (categoryMapping[key] && consentState.categories.indexOf(categoryMapping[key]) !== -1) {
settings.consents[key].status = 1;
}
}
}
// Log the available categories and settings
console.log('Available categories:', consentState.categories);
console.log('Updated settings based on user consent:', settings);
// Check if Piwik Pro API is available and then set compliance settings
if (typeof ppms !== "undefined" && ppms.cm && typeof ppms.cm.api === "function") {
ppms.cm.api('setComplianceSettings', settings,
function() {
console.log('Piwik Pro consent has been set');
},
function(error) {
console.error('Error setting Piwik Pro consent settings:', error);
}
);
} else {
console.log("Piwik Pro API is not available.");
}
}
// Call the function to execute the consent check and settings update
updatePiwikProCookieScriptConsent();
// Event listener for 'CookieScriptAcceptAll'
window.addEventListener('CookieScriptAcceptAll', function() {
updatePiwikProCookieScriptConsent();
});
// Event listener for 'CookieScriptAccept'
window.addEventListener('CookieScriptAccept', function(e) {
updatePiwikProCookieScriptConsent();
});
// Event listener for 'CookieScriptReject'
window.addEventListener('CookieScriptReject', function(e) {
updatePiwikProCookieScriptConsent();
});
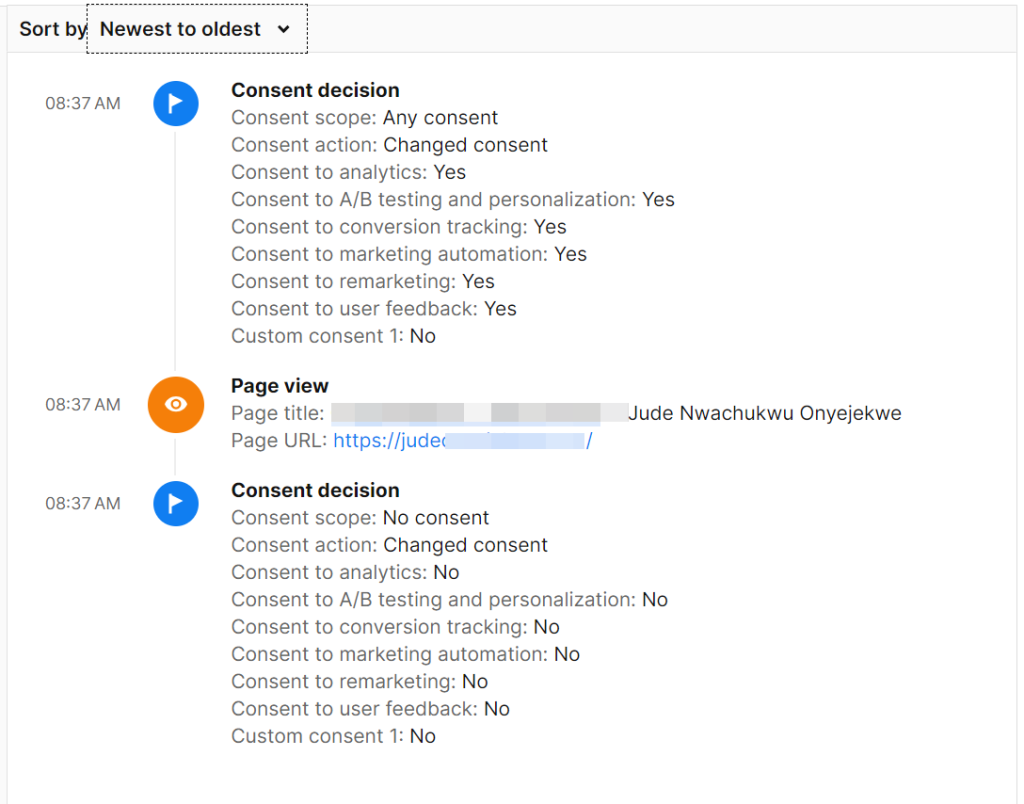
</script>After implementing the JavaScript code provided above, you can conveniently test your setup using the “Tracker Debugger” in Piwik Pro. I have extensively covered this feature in a guide dedicated to debugging in Piwik Pro Analytics.
Step 4: Deploy Your Changes On The Live Website
After the implementation, testing, and QAing of your setup, the next and final step will be to deploy your instrumentation to the live audience visiting your website.
Closing Thoughts
If you have any questions, encounter difficulties with this process, or need assistance with Piwik Pro, please feel free to contact me via LinkedIn, email on the contact page, or the contact form on that page.