


This guide will help you understand how to share a Piwik Pro dashboard, standard reports and custom reports with colleagues in another business unit or with a client.
In this guide, I’ll explain seven methods for sharing your Piwik Pro analytics data with stakeholders, clients, and other collaborators.
First, I will begin by outlining the available options:
- Copy and share the report URL from the browser.
- Utilising the report’s share feature.
- Exploring the Public Share Option.
- Setting up scheduled reports.
- Exporting & Downloading the data (PDF, Image, CSV, etc).
- Using Looker Studio.
- Using the Reporting API call Option.
Let’s examine each option in detail.
Copy and Share the Report URL from the Browser
While this might seem exclusive to Google Analytics, it is also possible in Piwik Pro. While viewing the report, simply copy the browser URL and share it with those who need to view the Piwik Pro dashboard or report.

Once the recipients load the URL, they will be asked to log into the Piwik Pro instance. Once they’ve supplied the correct login credentials and successfully logged in, they get taken directly to the report or dashboard.
However, you should also be aware that using this method will cause you to lose any report configuration you’ve applied to the report or dashboard.
This method works for all Piwik Pro dashboards and reports (both standard and custom) as long as the visibility status setting is “All Users.”
Utilising The Report’s Share Feature
This method is easy and enables you to share any Piwik Pro dashboard or report, whether standard or custom, with your colleagues or clients without losing any configurations you have applied to the report.
Also, remember that to use the share option, you need to have one of the following access permissions: owner, manage, edit & publish, edit, or view.
Now, let’s look at where you can find this feature in Piwik Pro and how to use it.
Using the Share Option in Piwik Pro Reports:
To share a report, including any custom reports you have created, navigate to the desired report and click the “Share” button in the upper right corner of the interface.
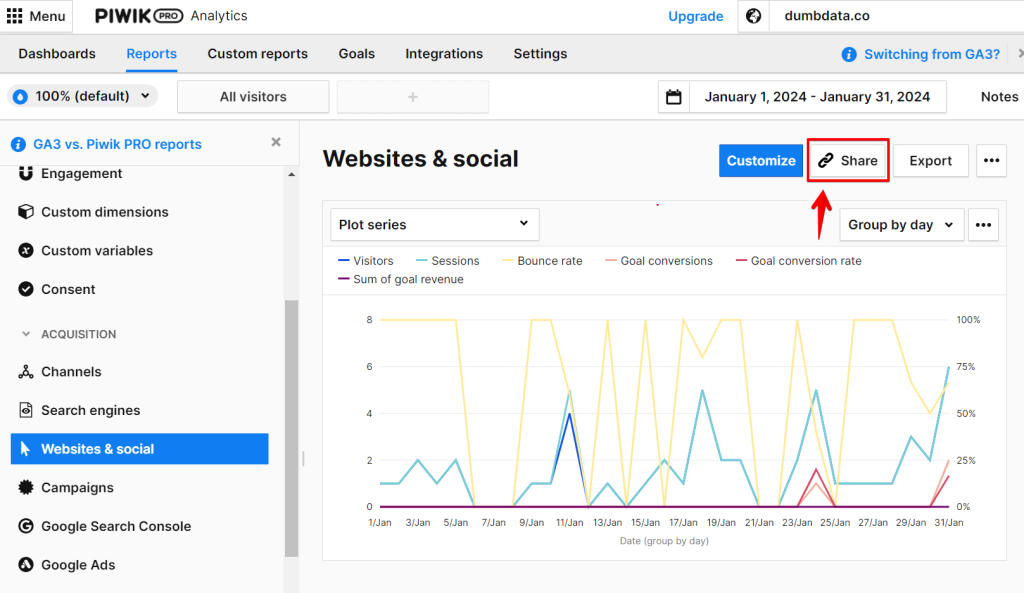
Clicking the share option will open a new view. The report link is under the “Only Users” tab. You can copy this link and send it to the necessary recipient.
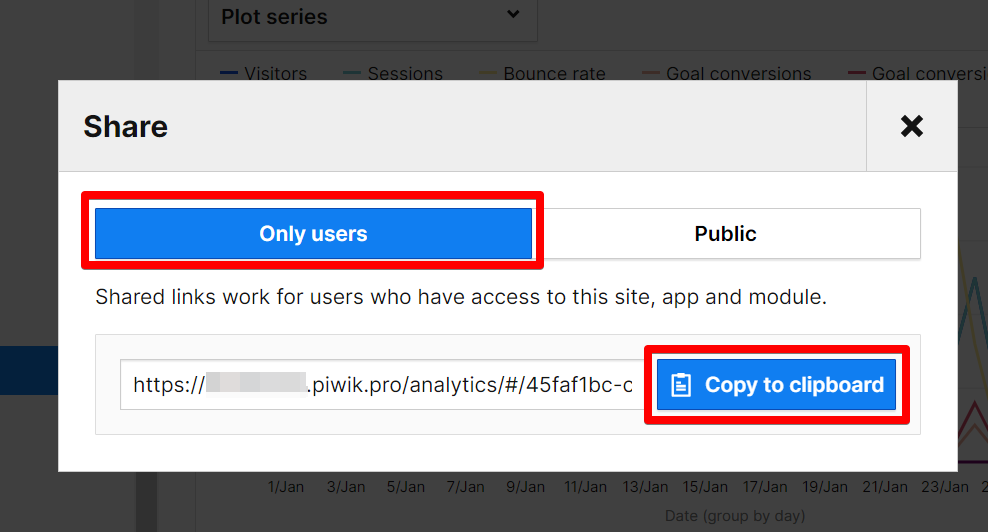
If you share a “Custom Report,” ensure that the report’s visibility settings are adjusted to allow all collaborators in the account to view the report.
Additionally, confirm that the recipient of the link has the required access permissions to view the report. And in a situation where they do not, consider the third sharing option discussed in this guide. But first, let’s discuss using the share option for Piwik Pro dashboards.
Using the Share Option in Piwik Pro Dashboards:
To share a dashboard, follow a similar process. First, navigate to the dashboard you wish to share. Click on the share option and copy the link to forward to your colleague or client who needs access.
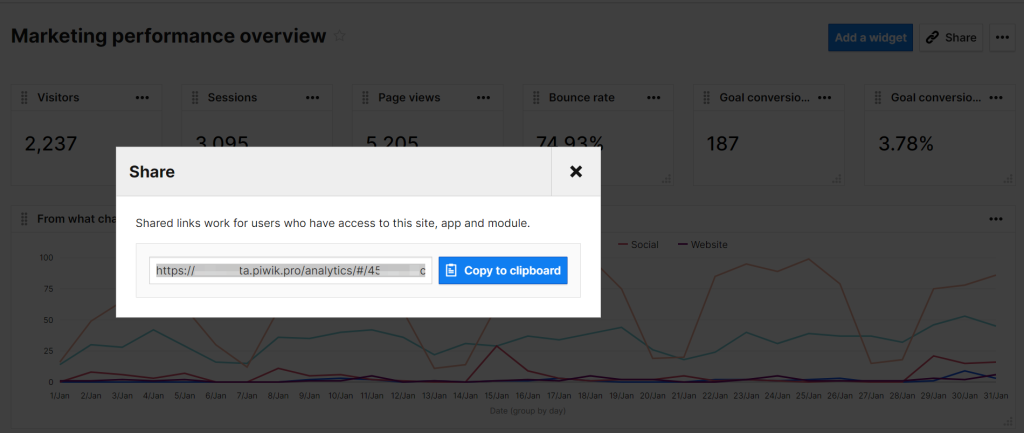
Ensure that you’ve set the dashboard’s visibility to be accessible to all users and that the recipient of the link has the necessary access to the Piwik Pro site.
Exploring the Public Share Option
If the intended recipient cannot access the Piwik Pro project, you can opt for the “Share to Public” option. However, this option only supports Piwik reports and it makes your report publicly accessible to anyone with the link.
Select the “Public” option as you would in the previously discussed share method.
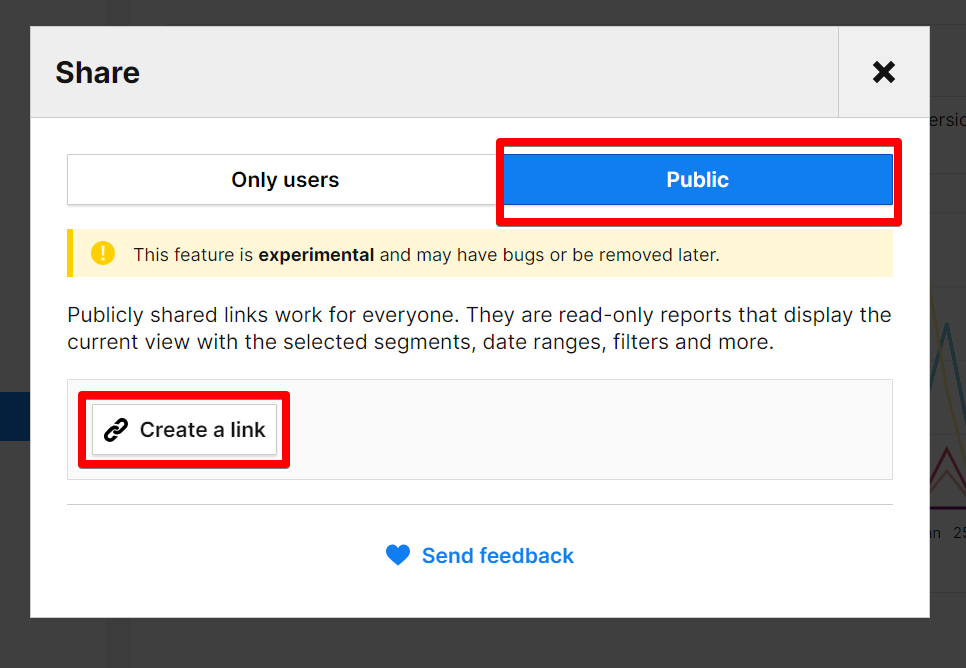
It is important to note that the Public option is considered experimental and may contain bugs or be discontinued, as Piwik Pro indicates.
Additionally, a link shared publicly is valid for 90 days, after which it expires. Publicly shared links also grant read-only access to the reports, displaying the current view with selected segments, date ranges, filters, and more.
Using the Scheduled Report Feature
The “Schedule Report” feature in Piwik Pro offers another effective way to share your analytics reports or data with colleagues or clients.
This function allows you to automate and tailor the delivery of Piwik Pro reports and dashboards, ensuring that relevant data reaches your stakeholders in a timely manner.
This feature supports sharing Piwik Pro data in either PDF or CSV format, applicable to both standard and custom reports and dashboards.
To schedule a report, you must possess one of the following access levels: owner, manage, edit & publish, or edit.
There are two ways to access this feature:
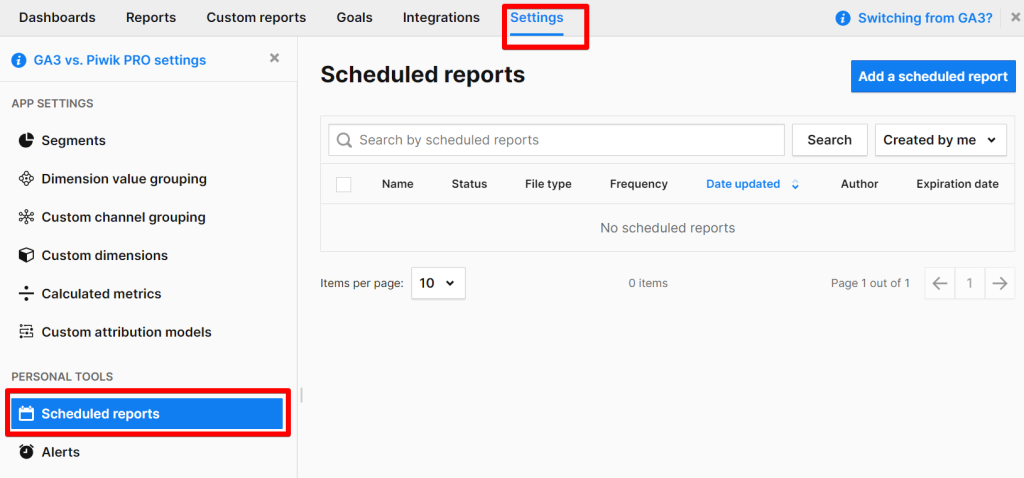
1. Navigate to the “Settings” tab and locate the “Scheduled Reports” option under the “Personal Tools” category. Here, you can manage existing schedules or create a new one.
2. Alternatively, from the report or dashboard you wish to share, click on the three-dot icon next to the “Export” button and select “Create a scheduled report” in either PDF or CSV format.
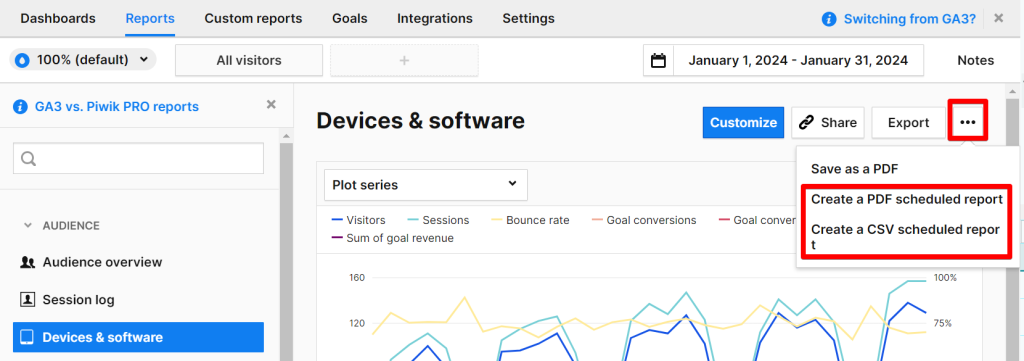
One limitation is that CSV format is unavailable for dashboards, funnel reports, user flow reports, and attribution reports.
Setting Up a Scheduled Report:
After you have clicked to create a Piwik Pro schedule report and selected your format, you must name your report and include any accompanying message to be added to the email when the report is delivered.
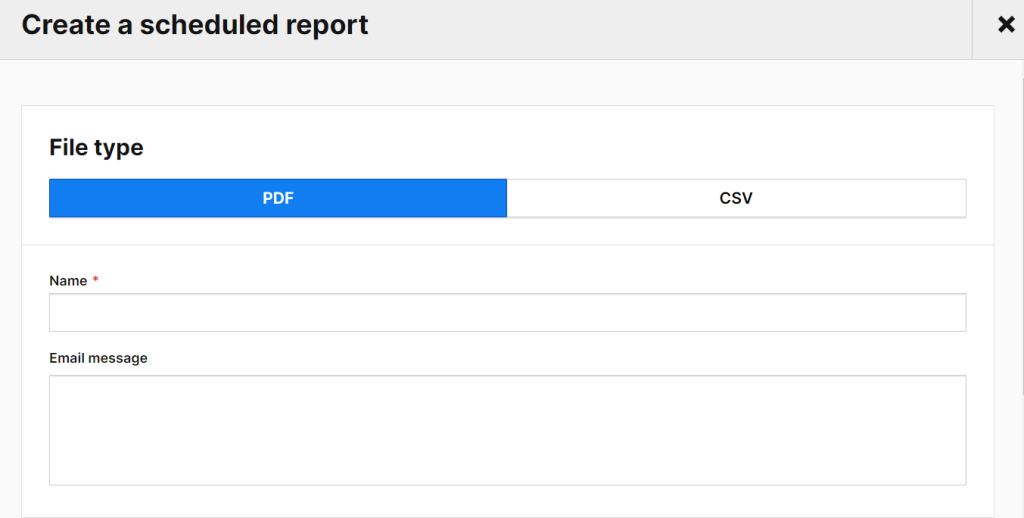
Note that schedule and report settings for PDF and CSV are pretty similar, with only a few differences in the settings are;
- Format and Orientation (PDFs only)
- Hide date range and segment information (PDFs only)
- Hide filter information (PDFs only)
- Row limits: 100 for PDFs and 1000 for CSVs

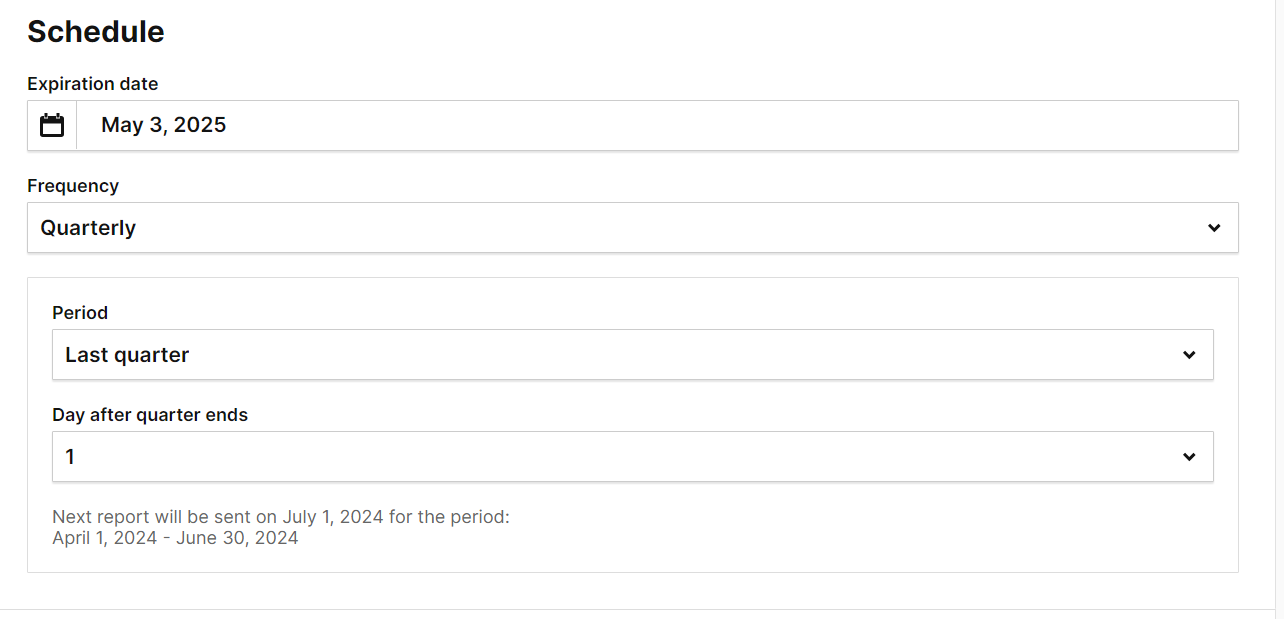
The Schedule Configuration:
- Expiration Date: The report will cease getting sent after this date.
- Frequency: Options include quarterly, monthly, weekly, or daily.
- Period: Adjust according to the frequency, e.g., last month, previous 30 days, last week, past seven (7) days.
- Day of Delivery: Choose a specific day based on the selected frequency.
Source Selection:
Next in the schedule configuration is the “Source Selection.” In Source selection, select a report or dashboard and click Add.
In reports, you can set:
Type: Here, you can select either a standard report, an e-commerce report, or a custom report from your Piwik Pro analytics project.
Name: Here, you can select the report you’ve created in your Piwik Pro analytics project.
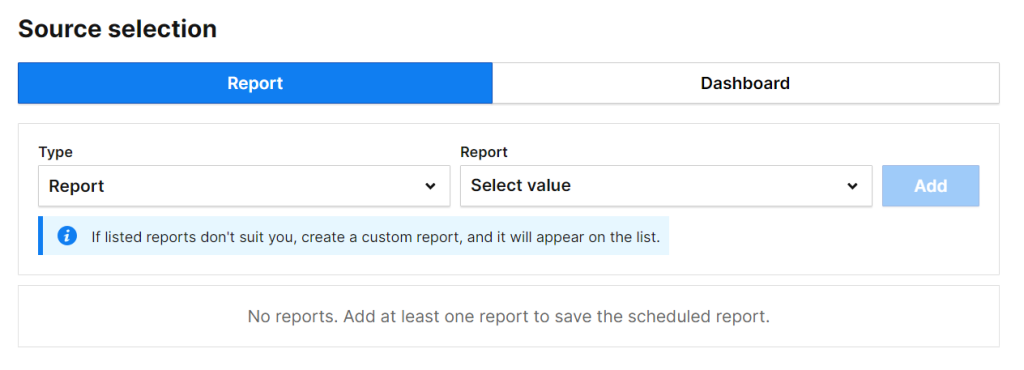
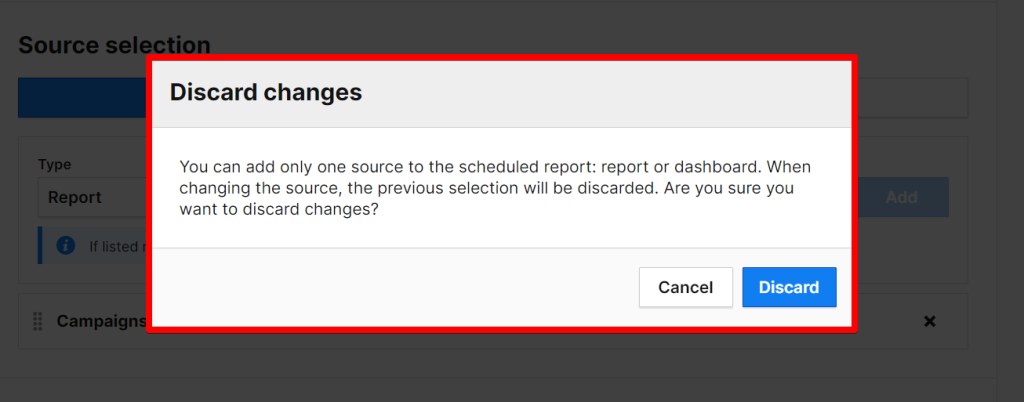
Note that you can include only one source in a scheduled report (report or a dashboard). Separate reports are needed to send multiple types of content.
If you try scheduling for both reports and the dashboard, you should get an error screen similar to the one below.
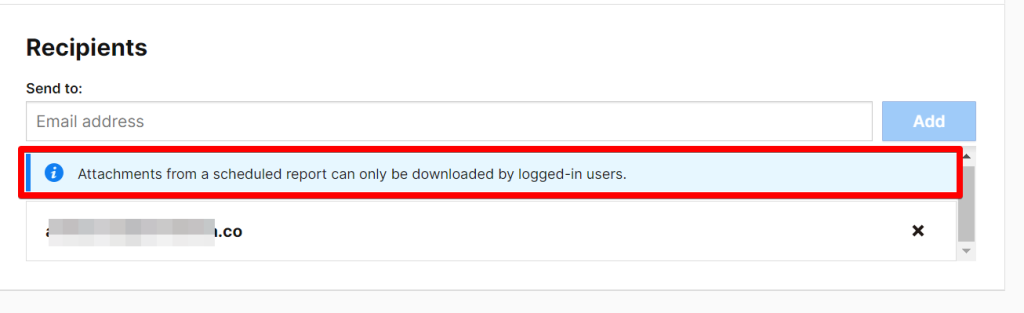
Recipients:
In the “Recipients” section, enter the email addresses of those you want to receive the report. Recipients must have a Piwik PRO account with at least view permissions to open CSV reports. PDF reports, sent as attachments, do not require an account.
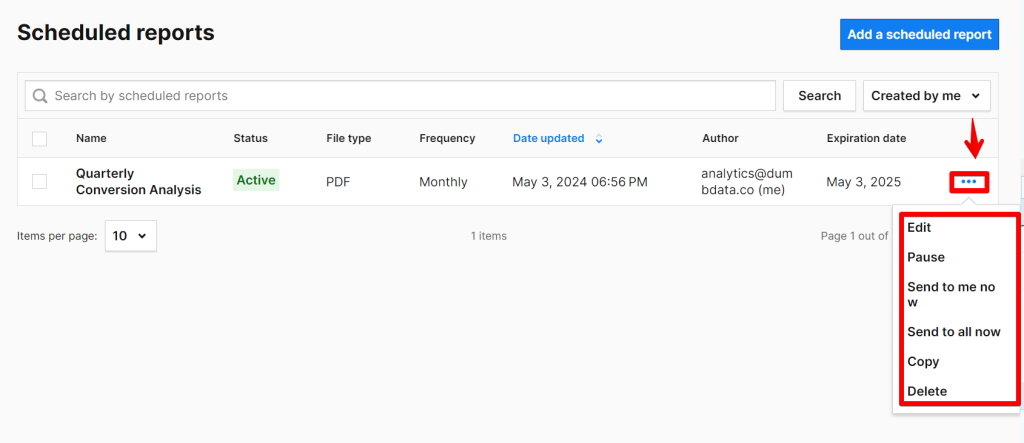
Once you have configured the settings, click the “Save Option.” For quality assurance, consider sending a test report by clicking the three-dot icon next to the scheduled report and selecting “Send to me now” or “Send to all now” if you feel the client should also review your work.
Note: A scheduled report sent on demand will include only data up to the current period. For instance, a monthly report requested mid-month will contain only the data for that half of the month.
Once a “scheduled report” is created, you can pause, delete, or edit its settings or duplicate it to create a new one.
Leveraging the Data Export and Download Option
Piwik Pro offers a flexible data export feature that allows you to download your analytics data in various formats. This functionality is handy for sharing data with colleagues or clients who require access to specific analytics insights but might not have access to your Piwik Pro project.
To utilise the data export feature in Piwik Pro Analytics, you must have one of the following permissions: owner, manage, edit & publish, edit, or view. This feature’s flexibility also extends to exporting data for use with other Business Intelligence tools.
Export as PDF or Image:
Interestingly, the option to download a report as a PDF or image is located separately from the general “Export” button. To access this, navigate to your report or dashboard within Piwik Pro, click on the three-dotted icon in the top right corner, and select the “Save as PDF” option.

While PDF downloads are supported across Piwik Pro dashboards, custom reports, and standard reports, please note that not all reports can be converted into PDF format.
When exporting a report with multiple chart types as a PDF, the download will include only the chart directly associated with the three-dotted icon clicked.
In addition to PDFs, reports can also be downloaded as images in either PNG or JPG format. This option is typically available for table charts within standard and custom reports.

Export in Other Formats:
The capability to export data in formats other than PDF or image is exclusive to Piwik Reports (both standard and custom reports) and is not available for dashboards.
To export data in other formats, locate the “Export” button at the top right corner of the report view and click it.

For certain Piwik Pro reports, the options include:
- Export chart data
- Export table data
Upon selecting an export function, you will encounter several configurable options:
- Report Type: Choose from CSV, XML, JSON, or JSON (Key-Value).
- Column Names: Opt to use column names instead of IDs.
- Nested Table Level: Export only the specified level of a nested table (applicable only to nested table reports).
- Row Limit: Set a maximum number of rows to include in the export.
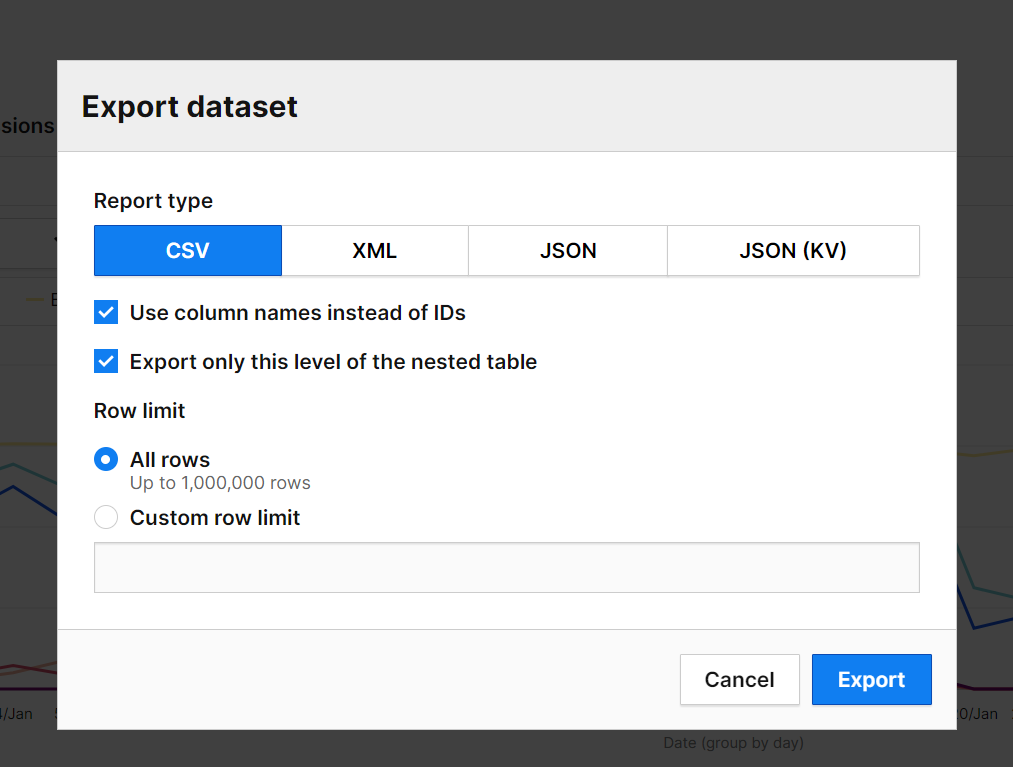
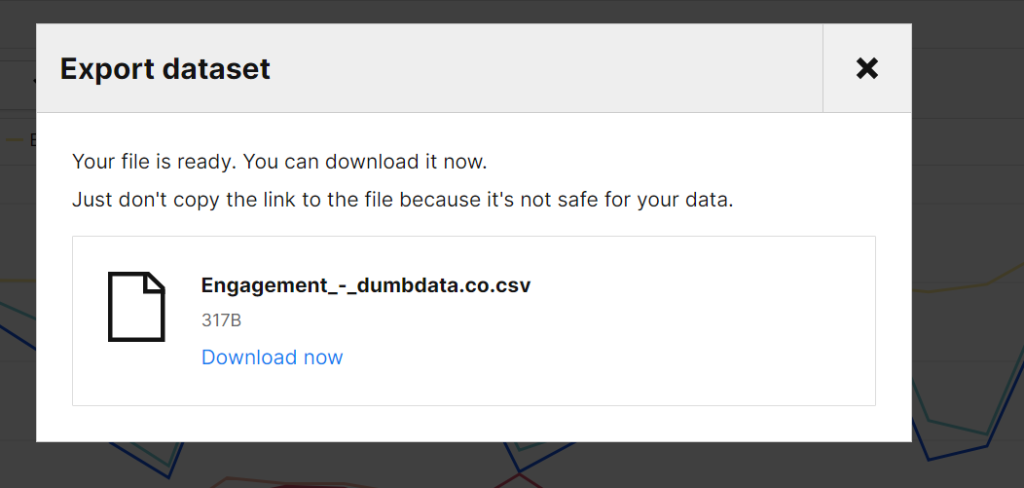
To proceed with the export, click the “OK” button and then “Download now” once the file is prepared. Then, you can share the data with whoever needs it; the advantage of this approach is that the recipient doesn’t need access to your Piwik Pro project to view the report.
Using Looker Studio
You can connect your Piwik Pro data to Looker Studio, where you can blend this data with other sources and create customised dashboards.
After creating the Looker Studio dashboard, you can share it with clients or other departments, such as marketing, that need to use the data.
For detailed instructions on integrating Piwik Pro Analytics as a data source in Looker Studio, refer to my comprehensive guide that outlines each step and the various options available.
Using Reporting API Calls
Piwik Pro Analytics also offers advanced data export capabilities through API calls. This method allows you to export data to different reporting interfaces, which should facilitate sharing reports with clients or relevant stakeholders who need access to this data internally.
To utilise this feature, click on the three dots and select the “View API call definition” option.
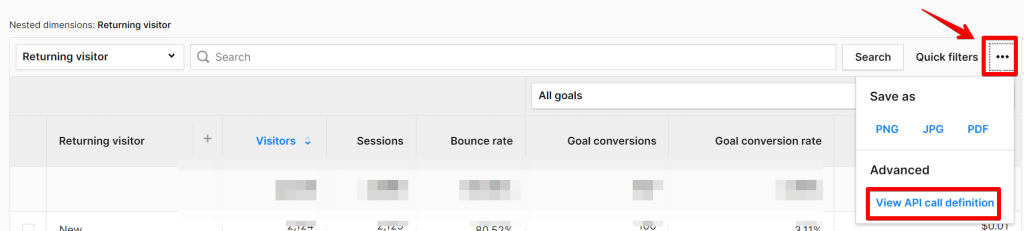
Please note that this functionality is limited to “table charts” within Piwik Pro reports (which includes standard and custom reports) and does not support dashboards.
Selecting “View API call definition” will open a view similar to the one in the image below.
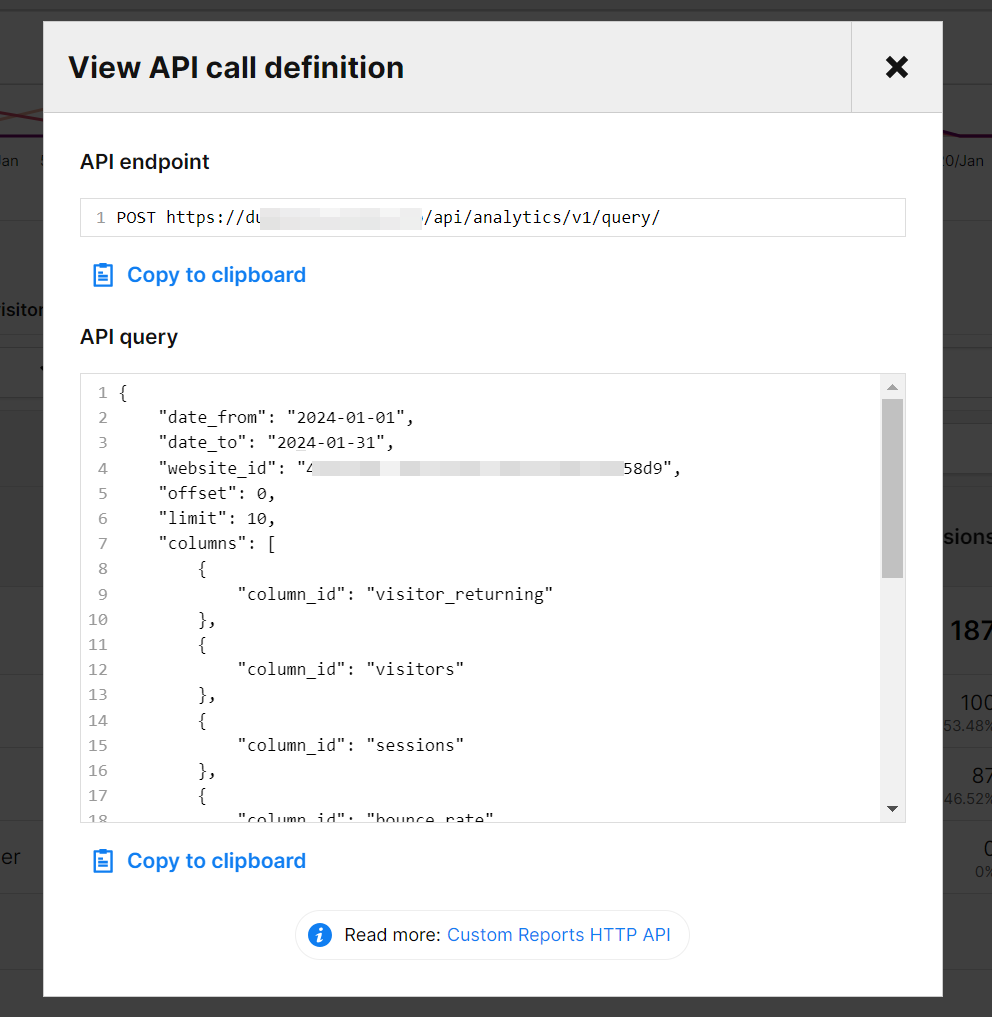
It’s important to understand that this is merely the initial step; most of the setup process will occur outside the Piwik Pro Analytics interface.
One practical application is exporting data to Google Sheets. I have also provided a detailed guide on connecting Piwik Pro to Google Sheets, which includes step-by-step instructions, available through the linked resource here.
The Piwik Pro developer documentation provides further information on utilising the reporting HTTP API.
Conclusion
I have previously written content similar to this guide on sharing Google Analytics reports.
Suppose you are still getting familiar with the reporting capabilities available to Piwik Pro analytics users. In that case, I recommend reading my comprehensive guide that explores the various reporting options within Piwik Pro, including integrations with other BI and reporting tools.
As you can see, Piwik Pro offers a range of options for sharing your data dashboards and reports with clients and team members.
I would love to hear about the methods you are currently using or plan to use in the future. If you encounter any issues with these methods, please feel free to share your feedback with me via LinkedIn or reach out through the email listed on the DumbData contact page. Until then, happy measuring!


