

As a tracking specialist, marketer or analyst working with tools like Google Analytics or ad platforms, part of your role may involve setting cookies in users’ browsers to track sessions, user preferences, or campaign performance.
In this guide, I’ll show you how to set and manage cookies in Google Tag Manager (GTM) using a no-code approach, meaning no JavaScript or custom HTML tags are required.
This method utilizes a custom GTM tag template that provides advanced (what I call smart) cookie configuration settings.
The best part? Google has approved the tag templates covered in this article and is now listed in the GTM Template Gallery, making it easy to access and use within your web GTM container community listing.
Additionally, be sure to check out the robust method I shared for retrieving cookie values, which is a bonus in this guide.
⚠️ Note: In this article, I’ll assume you already understand what cookies are. If you’re new to the concept, I recommend reading a separate guide on browser cookies to get up to speed. Although I still touched on the basics a little. There are different types of cookies, but this guide will focus specifically on first-party cookies.
So, what Are First-Party Cookies?
A simplified explanation is that it is the type of cookie with which you are most commonly familiar in marketing and analytics. These are cookies that the domain sets for the user’s current visit (on your website), and they are typically used for storing session data, user IDs, and preference settings.
How to View Cookies in Your Browser:
To inspect and see the first-party cookies that are currently stored in your browser for a website you are currently on, follow the steps below:
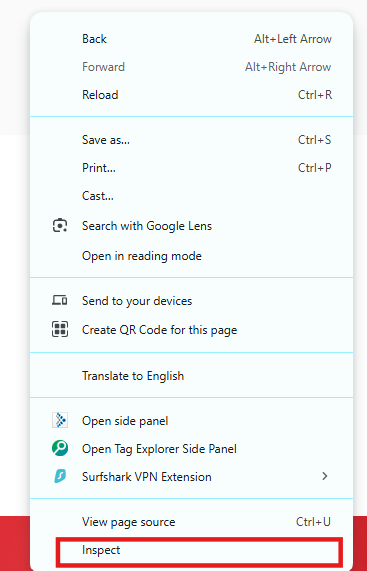
1. Open your Browser’s Developer Tools
- On Chrome, Edge, or Firefox:
- Windows: Press Ctrl + Shift + I
- Mac: Press Command + Option + I
- Or right-click anywhere on the page and select Inspect.
2. Navigate to the “Application” tab
- Under the Storage section, expand the Cookies dropdown.
- Select the domain (your website) to view the cookies stored.
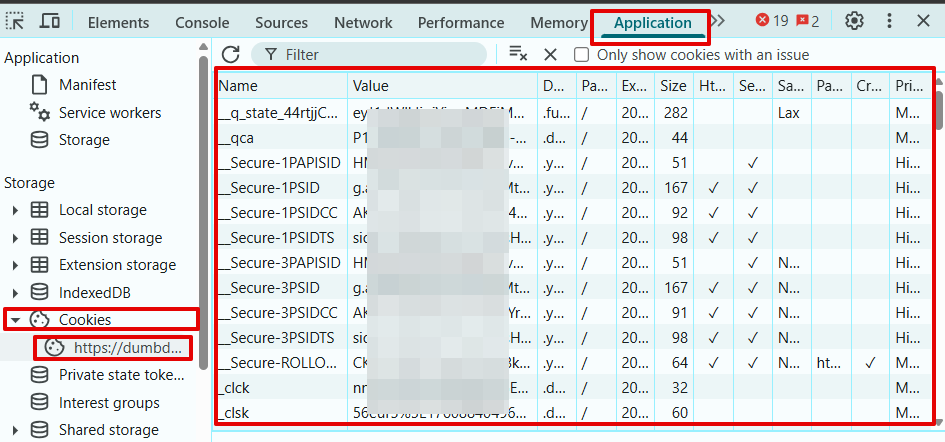
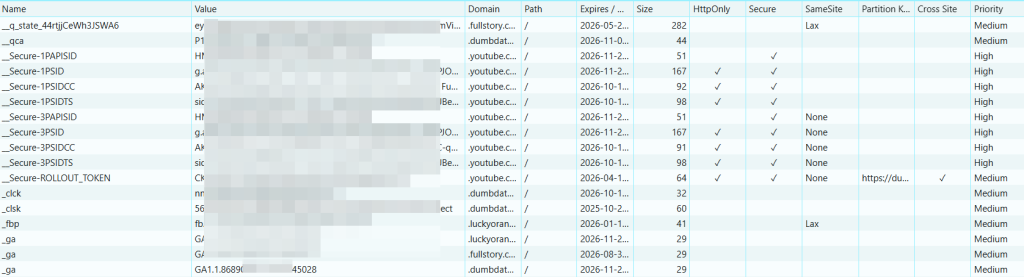
3. You’ll see all cookies associated with the domain, including important details such as:
- Cookie Name
- Value
- Domain
- Path
- Expiration date
- Security flags (e.g., Secure, HttpOnly)
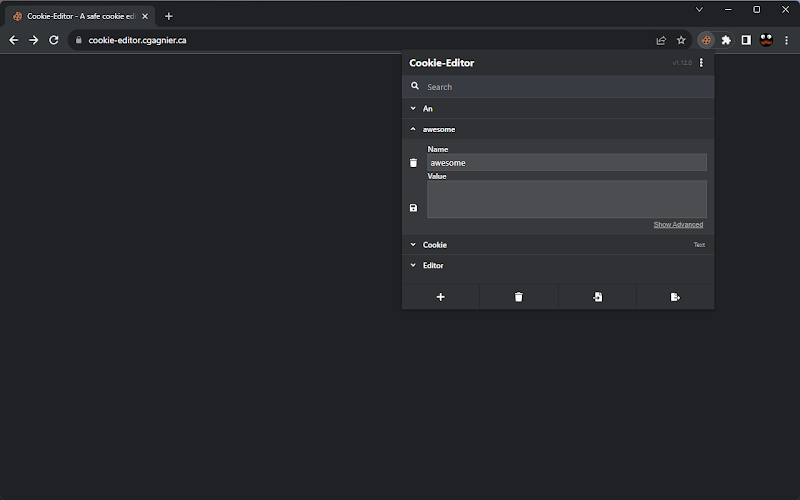
You can also inspect these cookies using a Chrome browser extension like “Cookie-Editor“ to view the cookies stored on your browser.
Here is an Anatomy of a Cookie:
To fully understand the individual components that make up a browser cookie, let’s break down its key elements.
Although the explanation here might not be extensive enough, it should help you grasp the purpose of each part and how they contribute to the overall configuration.
1. Cookie Name
This is the unique identifier for the cookie. It comes in handy when retrieving the data the cookie holds.
Think of it as the cookie’s label.
Example: user_id, session_token, consent_choices
2. Cookie Value
This is the actual data stored inside the cookie. It could be anything from a user ID to session information or user preferences.
It is the information you can retrieve about the user’s browser by reading the cookie name.
Example: DumbDataUser123, logged-in, granted
3. Cookie Domain
The domain indicates which website the cookie belongs to. It defines which domains are allowed to access the cookie.
Typically, for first-party cookies, it matches the site the user is visiting, but it can also include subdomains if you intend to limit access to just subdomains.
Example: example.com, subdomain.example.com
4. Cookie Path
The path defines the specific part of the website where the cookie is valid.
It restricts access to certain pages or sections of the site.
For example, a cookie could be accessible on the login page but not on the homepage.
Example: /, /login
5. Cookie Expiry / Max-Age
This determines how long the cookie remains stored in the browser.
- Expires sets a specific date and time when the cookie should be deleted.
- Max-Age sets the lifespan of the cookie in seconds.
If neither is set, the cookie is considered a session cookie and will be deleted when the browser is closed.
Example:
Expires=Mon, 20 Oct 2025 00:00:00 GMT
Max-Age=3600 (cookie expires in 1 hour)
6. Secure Flag
When this flag is enabled, the cookie will only be sent over secure HTTPS connections.
This flag helps protect sensitive information from being exposed over insecure (HTTP) connections.
Example: Secure (cookie only sent over HTTPS)
7. HttpOnly Flag
If set, the cookie cannot be accessed via JavaScript on the page.
This provides an added layer of security, especially for cookies that store sensitive data.
Example: HttpOnly (cookie cannot be accessed using JavaScript)
8. SameSite Attribute
This attribute controls whether a cookie can be sent along with cross-site requests, helping to prevent Cross-Site Request Forgery (CSRF) attacks.
Possible values:
- Strict: The cookie is only sent if the request originates from the same domain.
- Lax: The cookie is sent during top-level navigations (e.g., clicking a link).
- None: The cookie is sent with all requests, including cross-site. (Must be used with Secure)
Example: SameSite=Lax, SameSite=Strict
9. Cookie Size
This refers to the amount of space the cookie occupies in the browser.
Most browsers limit:
- Cookie size to around 4 KB
- The total number of cookies per domain
Example: ~4096 bytes (4 KB)
10. Cookie Creation Time
This is the timestamp of when the cookie was first set.
It can be useful for tracking session history or diagnosing cookie issues related to expiration.
Example: Created=Mon, 18 Nov 2025 07:45:30 GMT
Creating and Setting Cookies in Google Tag Manager (GTM)
Now that you understand the structure and anatomy of cookies, let’s walk through how to create and set cookies in Google Tag Manager, all without writing any code.
You’ll be able to do all this from a user-friendly custom tag template interface.
⚠️ Important: If you’re operating in the EU or other regions with privacy regulations, make sure the user has explicitly granted consent before setting any cookies on their browser.
The two tag templates that make this possible, which I’ll be using in this guide, are;
While both templates are used to set cookies in the browser, they serve slightly different purposes based on your specific use case.
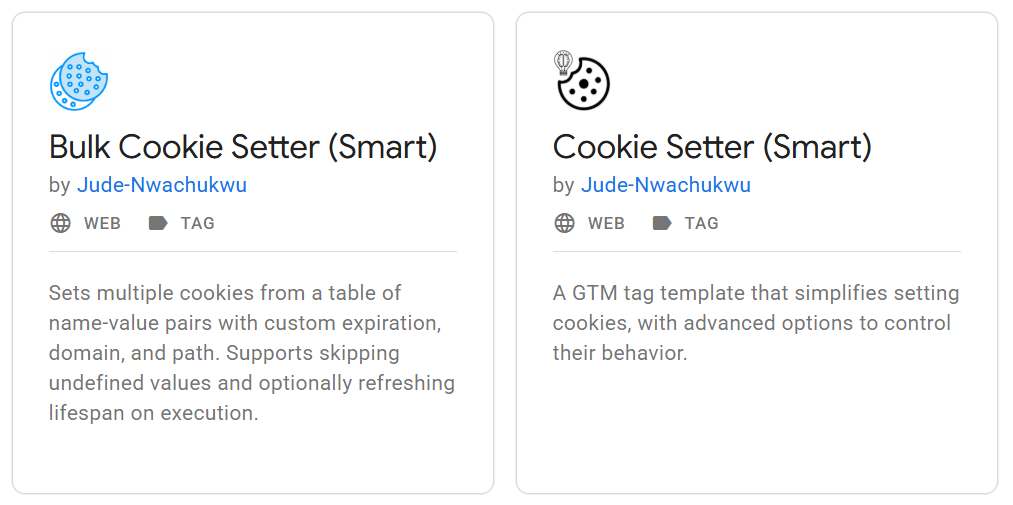
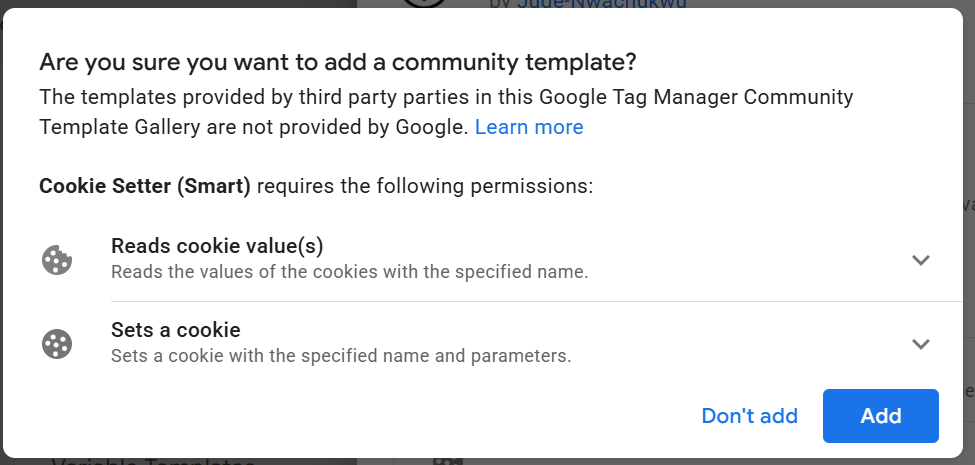
1. Cookie Setter (Smart)
Use this template when you need to set a single cookie with a specific name, value, and additional configurations such as expiration time, domain, and path.
Ideal for:
- Setting one cookie at a time
- Simple use cases (e.g., saving a session ID or user preference)
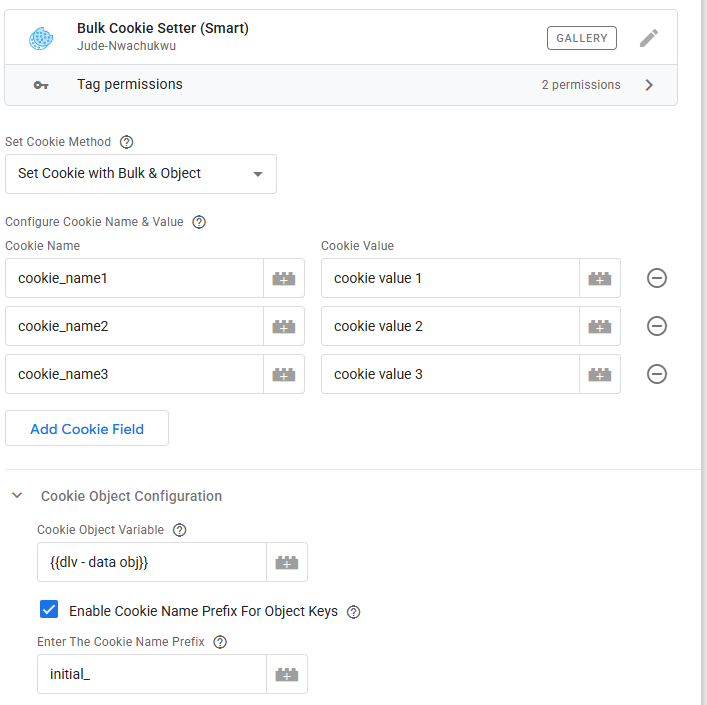
2. Bulk Cookie Setter (Smart)
This template is designed for situations where you need to set multiple cookies at once during a single tag execution.
Example use case:
Let’s say you collect user-provided data (like first name, last name, and email address) during the first step of a form submission. If this data is not available in the data layer or accessible later in the conversion funnel, you can immediately store it as cookies. That way, when the form is fully submitted (e.g., for enhanced conversions), the cookie values can be retrieved and used for tracking or attribution purposes before being cleared.
Ideal for:
- Capturing multiple pieces of user data and storing them in different cookies in one tag execution
- Scenarios where data needs to be persisted across form steps or pages
How to Add the Tag Template to Your GTM Container
To use the Cookie Setter (Smart) or Bulk Cookie Setter (Smart) tag templates in your Google Tag Manager container, you can either:
- Add them via the GTM Community Template Gallery (recommended)
- Manually import them from GitHub
GitHub Repositories:
Option 1: Adding from the GTM Template Gallery (Recommended)
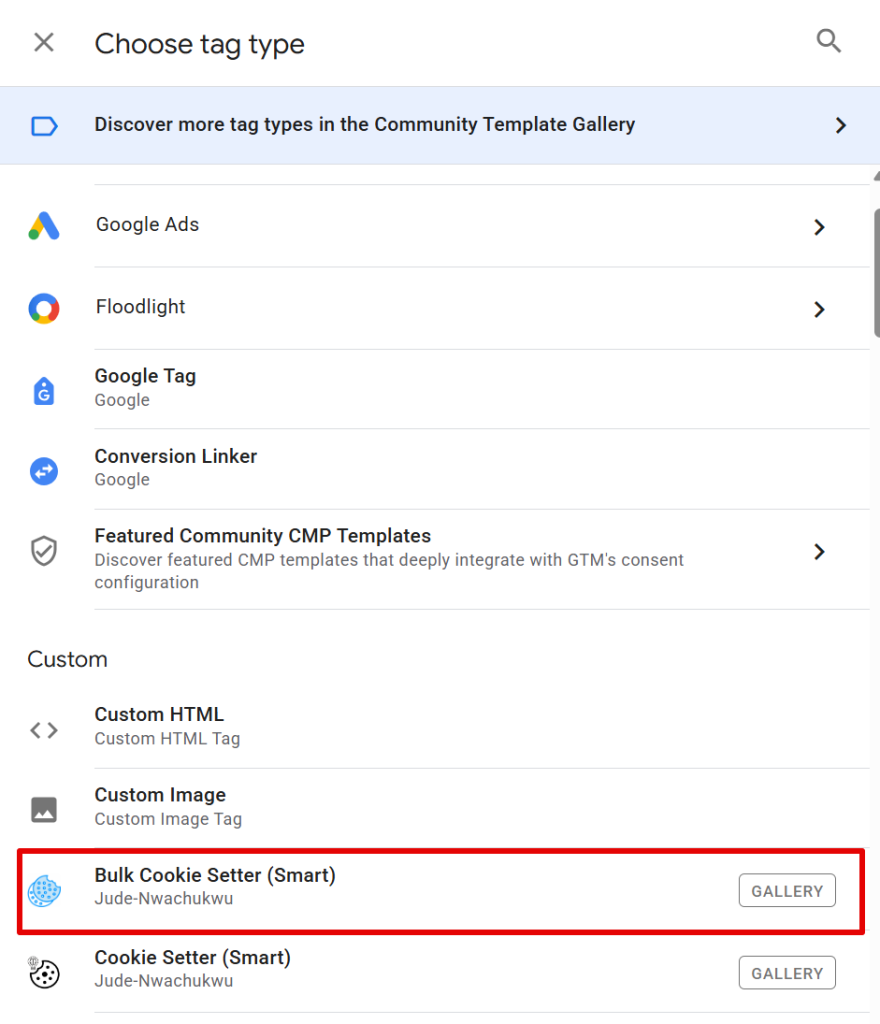
1. In your GTM workspace, go to the Templates section.
2. Click the “Search Gallery” button.
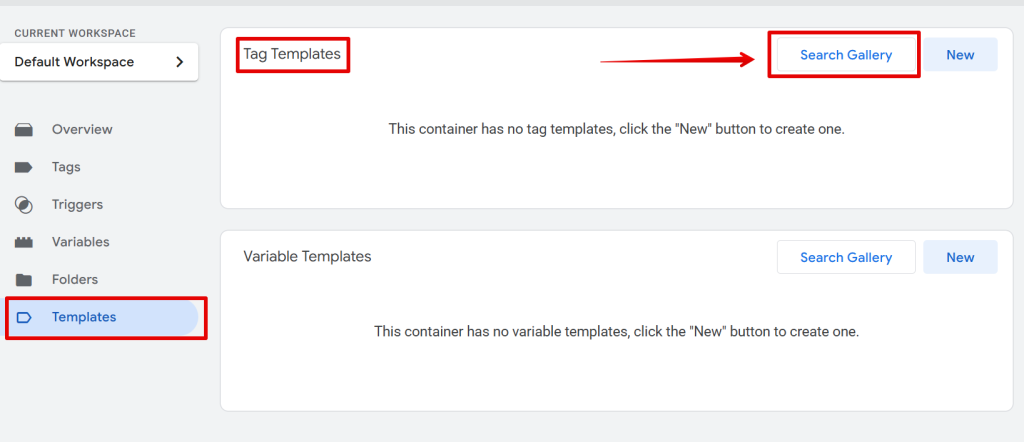
3. In the search bar, type “Cookie Setter (Smart)” or “Bulk Cookie Setter (Smart)”, depending on which one you want to install.
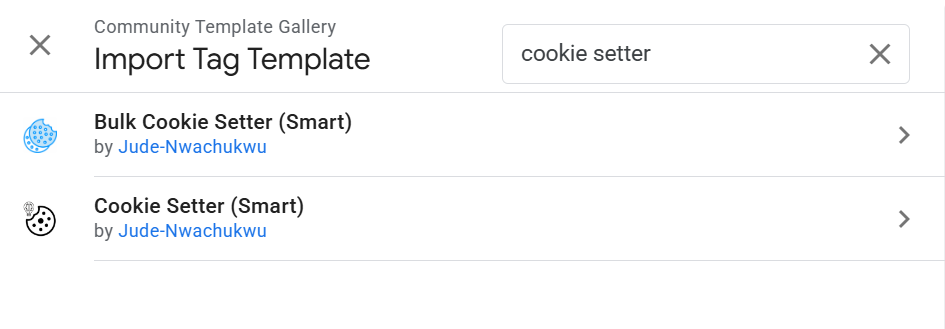
4. Click the template from the search results to open the installation wizard.
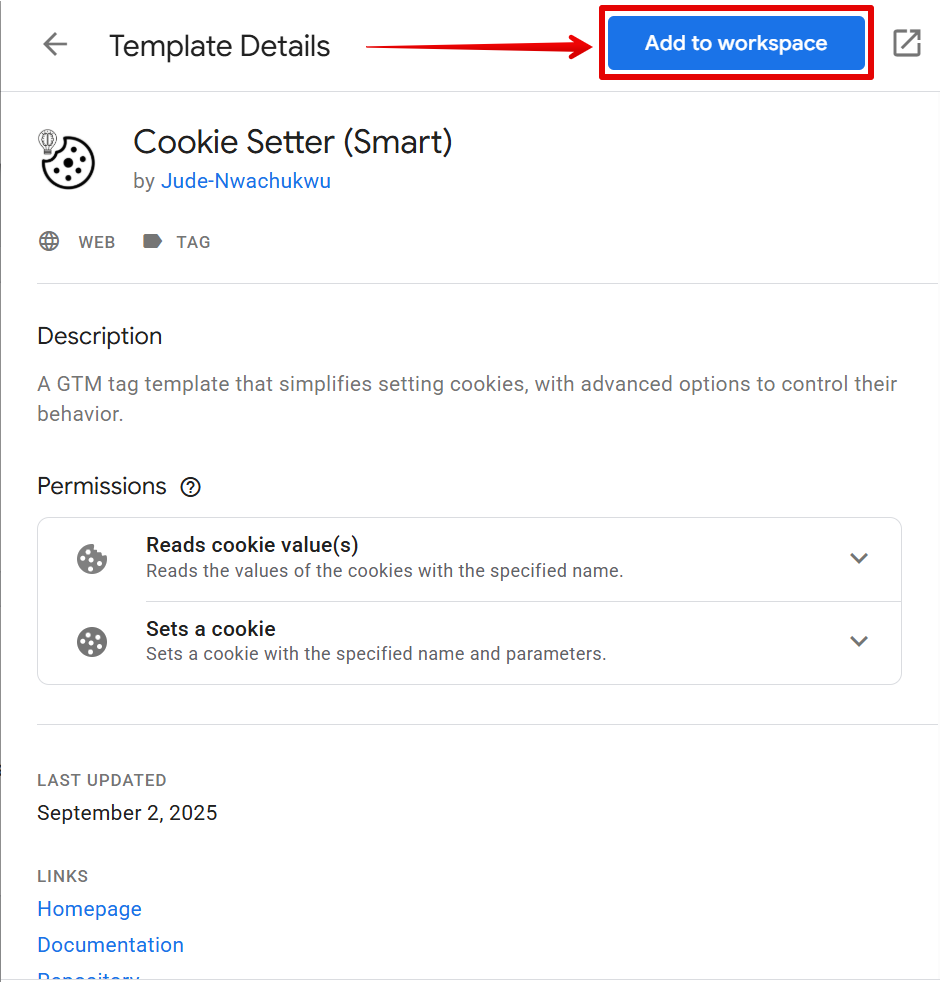
5. Follow the displayed instructions to add the template to your container.
Once installation is complete, go back to the Tags section in your GTM workspace.
Creating and Configuring a Cookie Tag in GTM
After installing the tag template, follow these steps to set up your cookie tag:
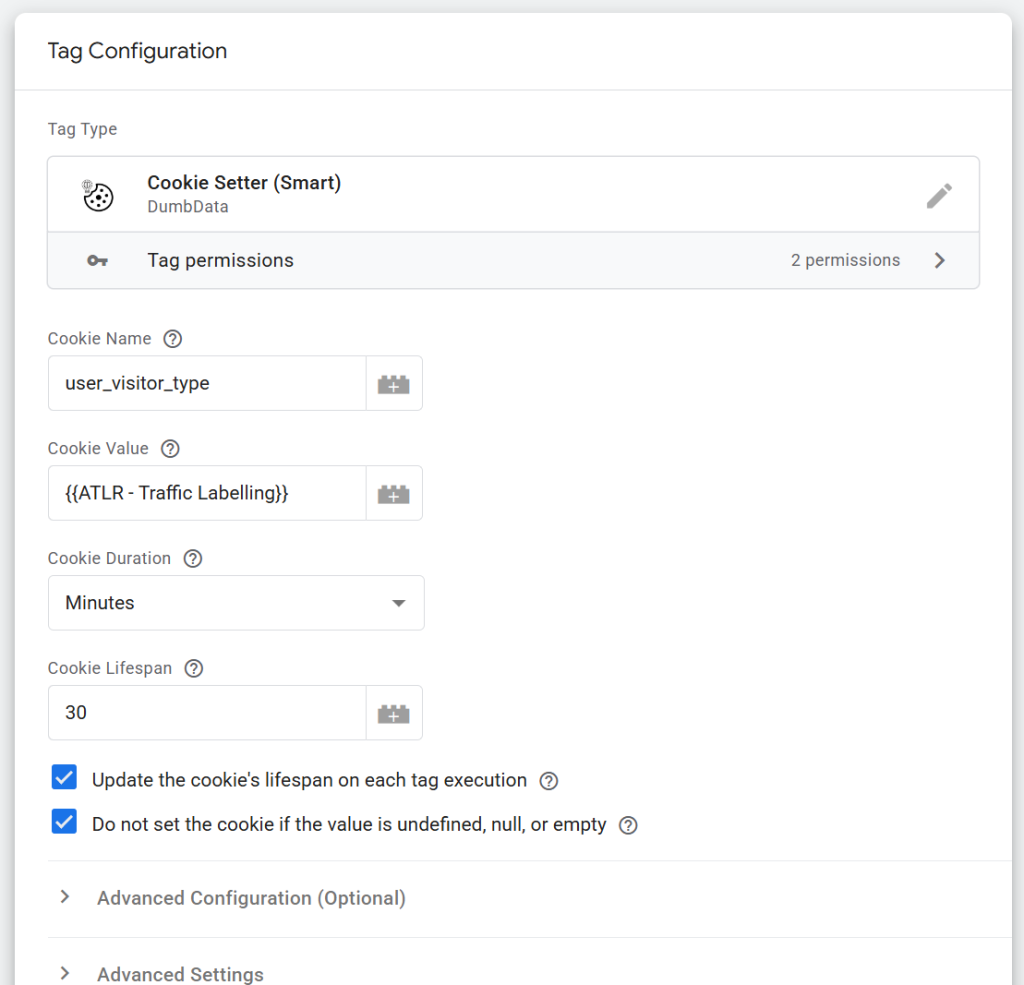
Cookie Setter (Smart) Tag:
Here is what the process looks like if you’ve decided to use the Cookie Setter (Smart) Google Tag Manager tag template for cookie creation and management.
Step 1: Create a New Tag
- Navigate to the Tags section in your GTM container.
- Click “New” to create a new tag.
- Choose the Cookie Setter (Smart) template from the list of available custom templates.
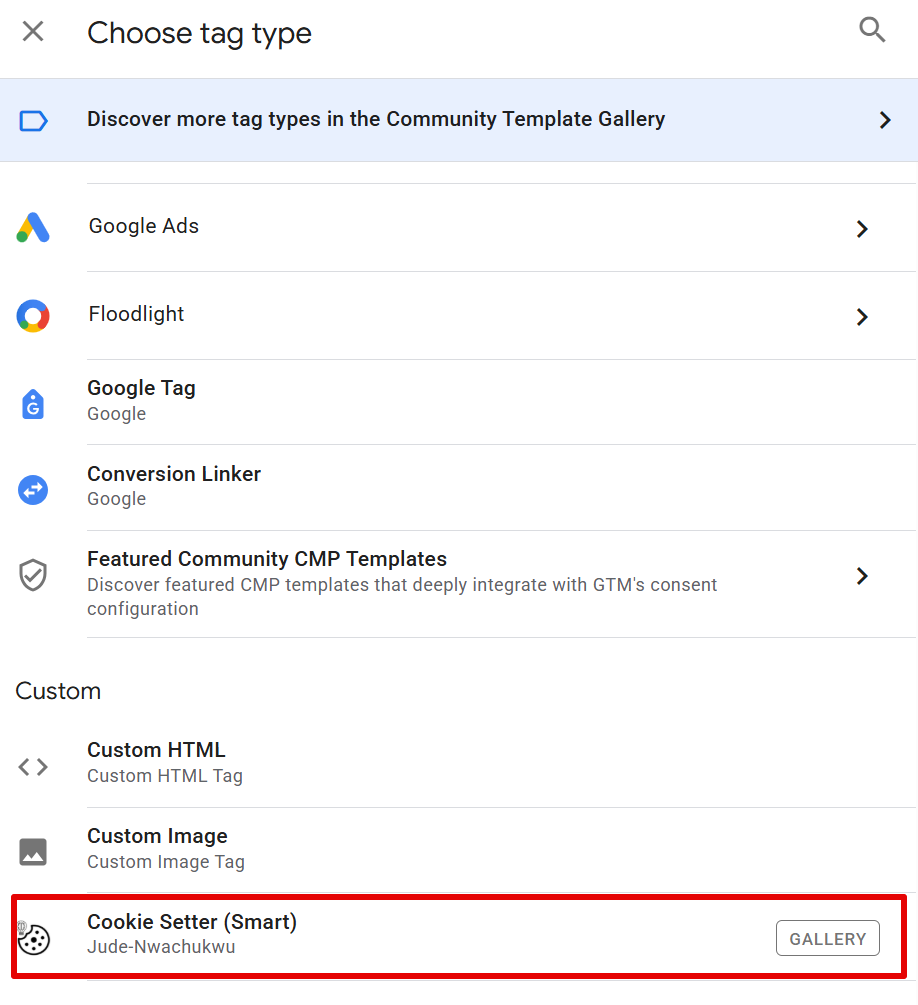
Cookie Setter (Smart) Configuration:
Use the Cookie Setter (Smart) tag when you want to set a single cookie in the user’s browser.
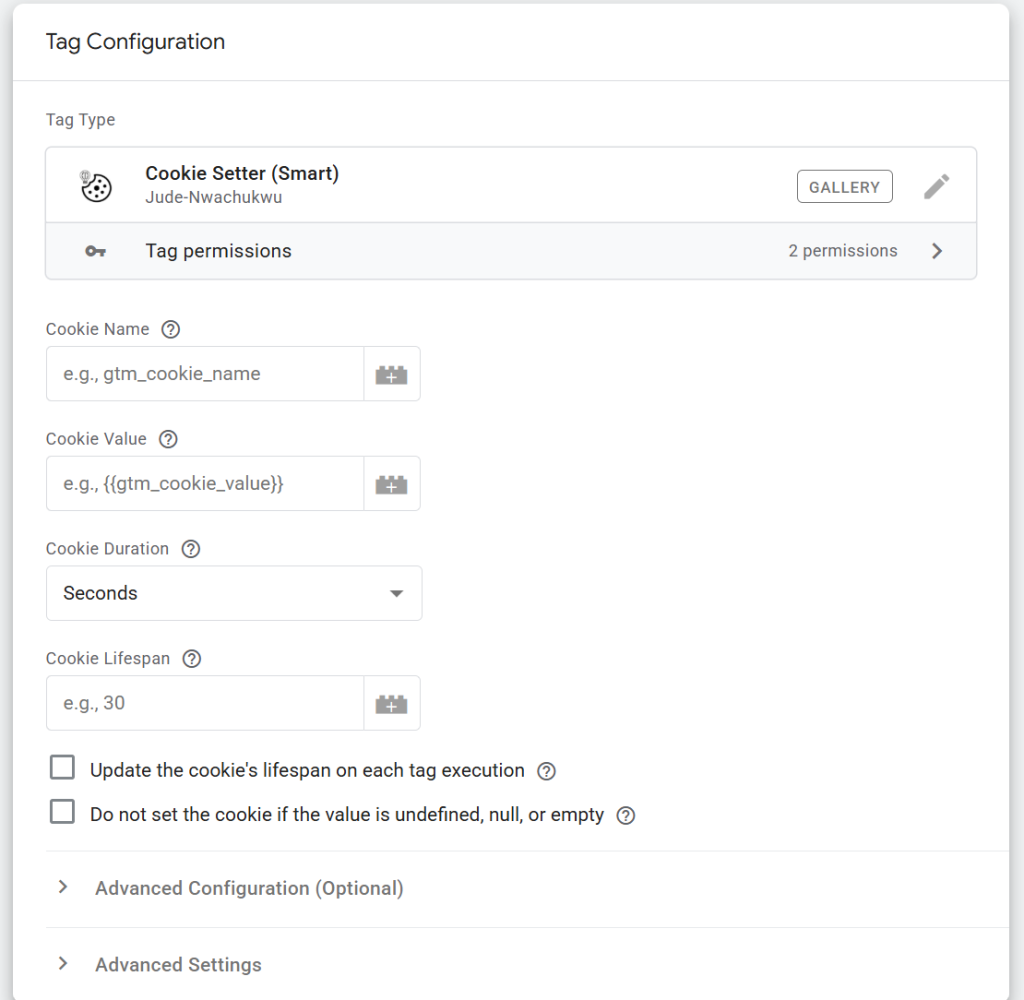
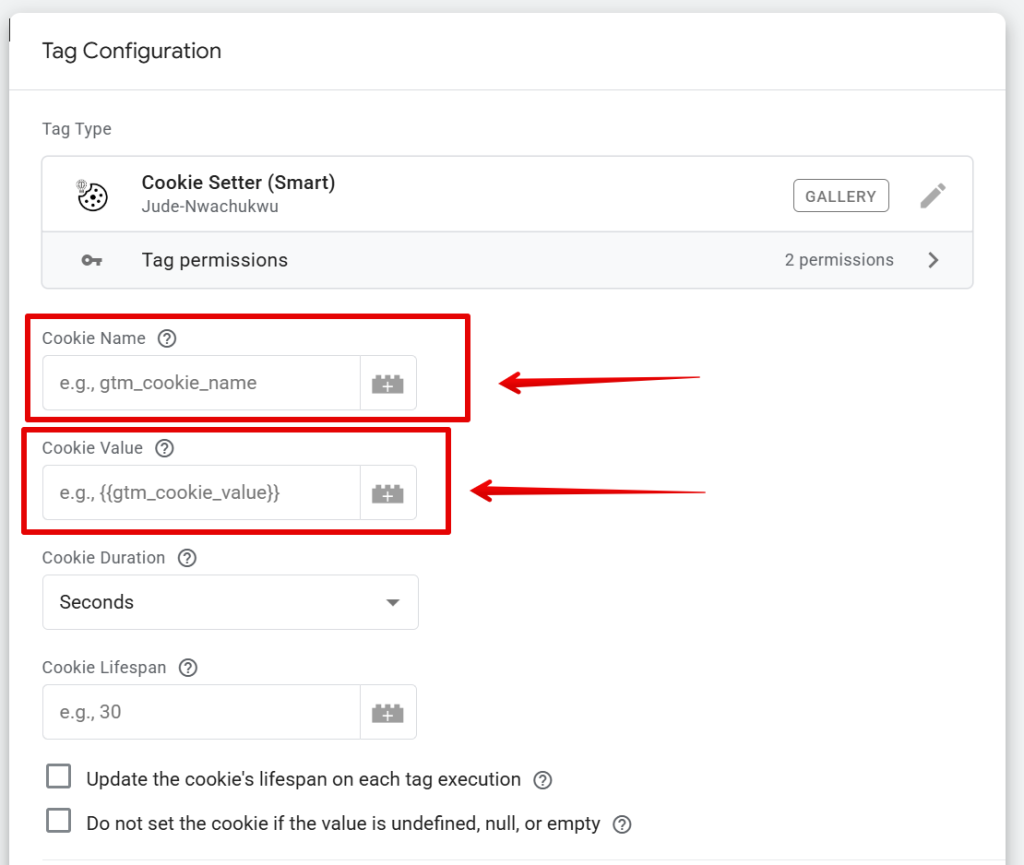
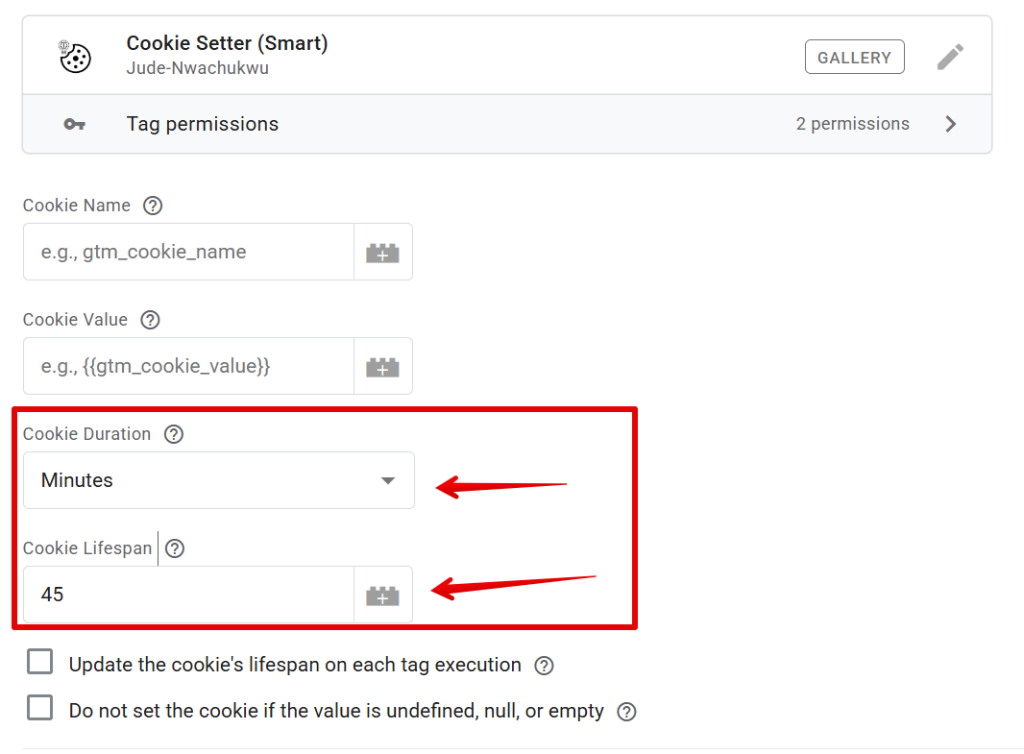
Key Configuration Fields:
- Cookie Name
Enter the name you want to assign to the cookie.
- Cookie Value
Enter a fixed value or use a GTM variable to populate the value dynamically.
Setting Cookie Expiration
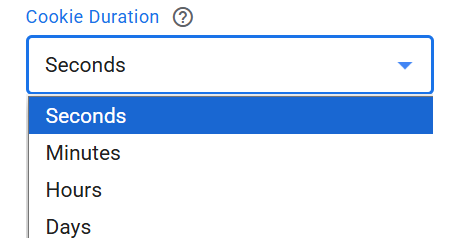
- Choose the time unit in the “Cookie Duration Unit” field:
- Seconds
- Minutes
- Hours
- Days
- Enter the duration value in the “Cookie Lifespan” field.
For example:
If you enter 45 as the lifespan and select Minutes, the cookie will expire 45 minutes after it is set.
Additional Smart Configuration Options
These configurations are features of this tag template that make it smart.
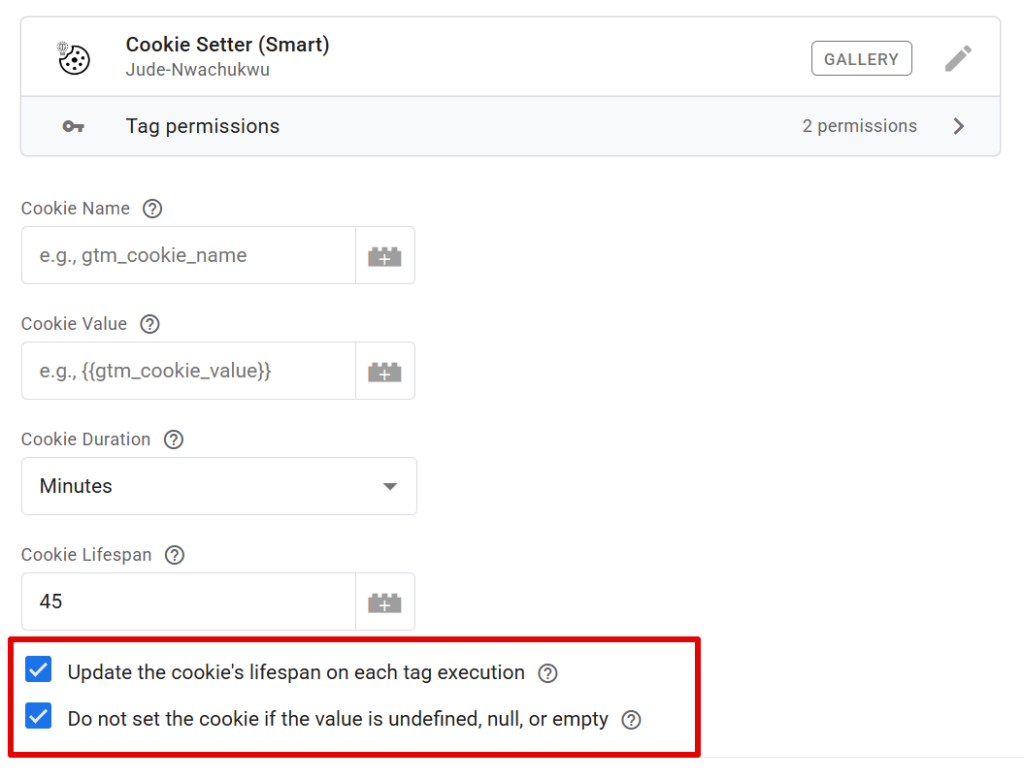
“Do Not Set Cookie on Invalid Values”:
Enable this checkbox to prevent cookies from being set if the value is:
- null
- undefined (data type or string)
- Empty (“”)

This helps eliminate the need for additional triggers that check for valid values, simplifying your implementation and improving reliability.
Example Use Case:
Let’s say you want to set a cookie from the gclid query parameter in the page URL.
Instead of creating a separate trigger to check if gclid exists, you can use the default All Pages trigger and enable this option.
The tag will automatically skip the execution process of cookie creation if the value is not present.
Cookie Lifespan Extension on Repeat Execution:
This option resets and extends the cookie’s expiration time every time the tag is executed and the cookie already exists.

Example:
If the cookie is set to expire in 30 minutes, and the tag fires again after 20 minutes, the expiry will be reset to another full 30 minutes.
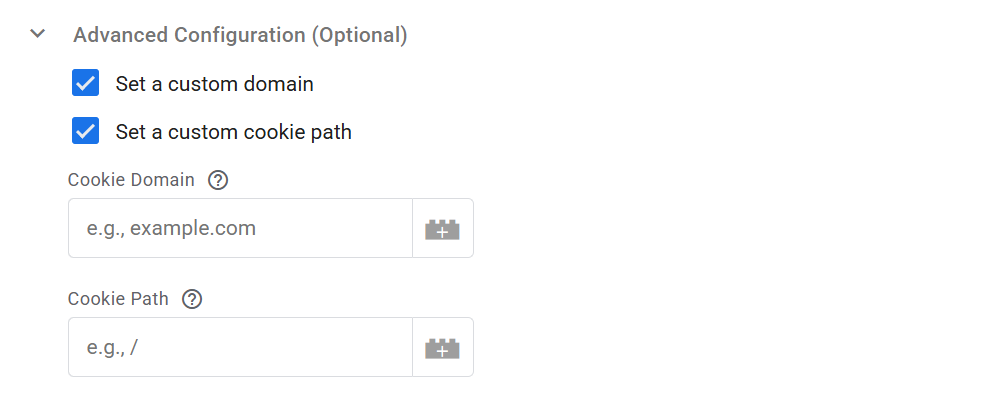
Advanced Cookie Settings (Optional)
By default:
- Cookie Domain is set to the top-level domain.
- Cookie Path is set to /.
You can customize these by expanding the Advanced Cookie Settings section.
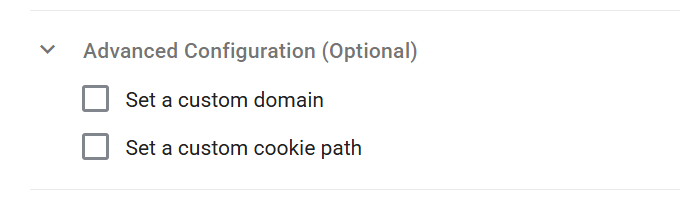
- Set a custom cookie domain
- Define a specific cookie path
Once configured, your tag should look something like this (based on your specific use case):
However, if you need to set multiple cookies at once, it’s more efficient to use the Bulk Cookie Setter (Smart) template instead of creating numerous single-cookie tags.
This scenario is covered in detail in the next section.
Bulk Cookie Setter (Smart) Tag:
As previously mentioned, the Bulk Cookie Setter (Smart) tag template is designed for scenarios where you need to set multiple cookies during a single tag execution.
This helps eliminate the need to create multiple individual cookie tags, saving you time and simplifying your setup.
How to Configure the Bulk Cookie Setter (Smart) Tag:
Once you’ve added the Bulk Cookie Setter (Smart) tag template to your GTM container (via the Template Gallery or GitHub), follow these steps to configure it:
- Go to the Tags section in your GTM workspace.
- Click the “New” button to create a new tag.
- Select the Bulk Cookie Setter (Smart) template from the list.
You will now see a user interface similar to the Cookie Setter (Smart) tag, but with a few key differences that I’ll explain shortly.
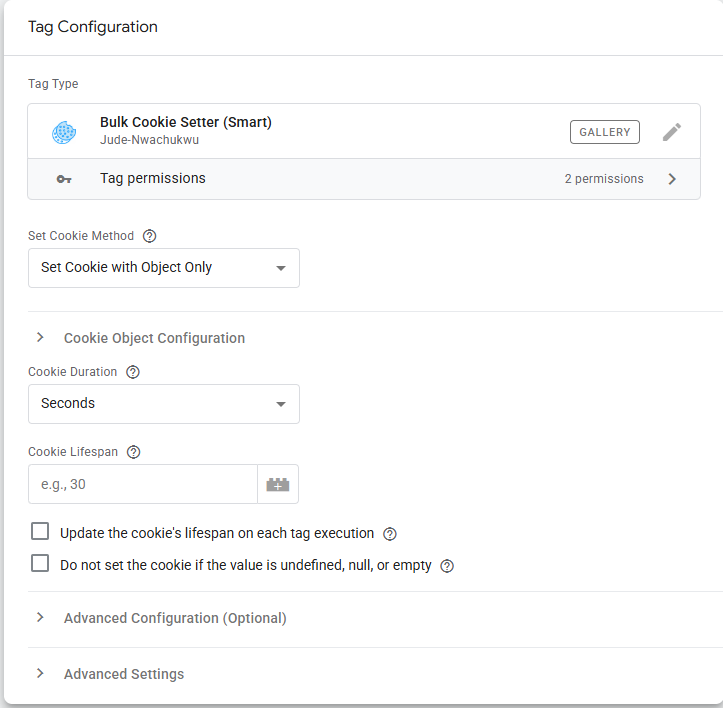
The first step in configuring the Bulk Cookie Setter (Smart) Google Tag Manager custom template is selecting the cookie method, which determines the source of the bulk cookies.
In the Settings dropdown, you can choose from the following options:
- Set Cookie With Bulk Only
- Set Cookie With Object Only
- Set Cookie With Bulk and Object
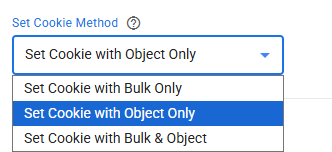
I’ll briefly explain what each method does below.
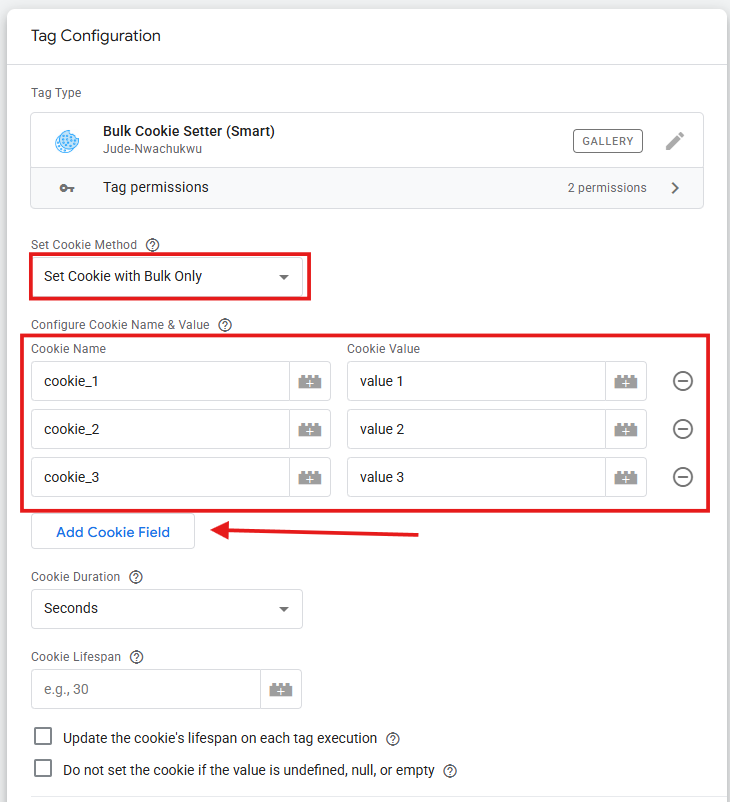
1. Set Cookie With Bulk Only
With this option, the interface is the same as the Cookie Setter (Smart) tag template.
You can add multiple rows, where each row represents a cookie name and its corresponding value. Both the cookie name and value are entered manually for each row.
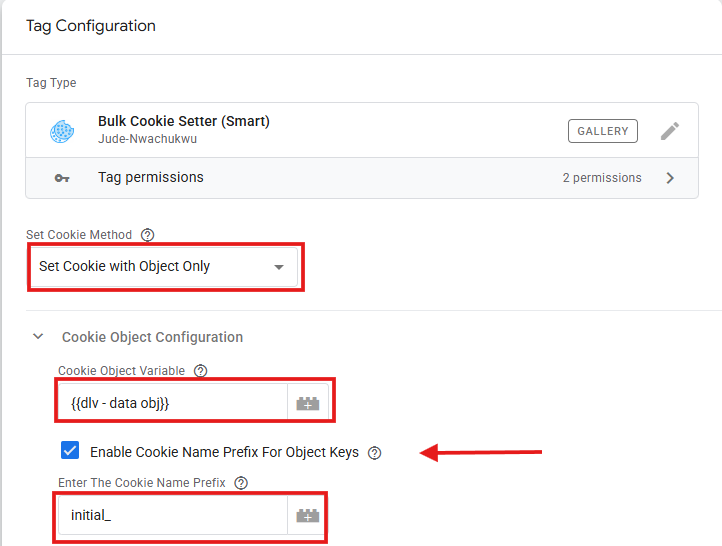
2. Set Cookie With Object Only
When you select this option, you do not need to enter each cookie name and value manually.
Instead, you use a variable that contains object data. The template will automatically create a cookie for each attribute in the object, using the attribute name as the cookie name and the attribute value as the cookie value.
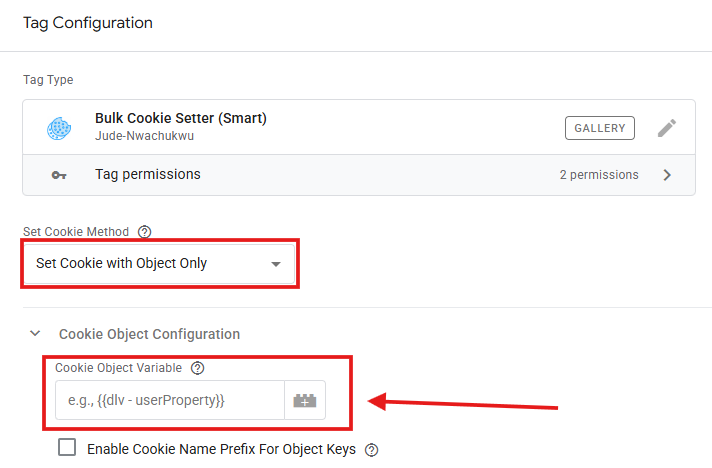
You can also choose to add a prefix to each cookie name generated from the object’s attributes. To do this, enable the “Enable Cookie Name Prefix for Object Keys” setting and then specify the desired prefix.
3. Set Cookie With Bulk and Object
This option allows you to use both methods together, manual bulk input and object-based cookie creation.
Shared and Unique Configuration Options
Aside from the ability to add multiple cookies, most of the configuration settings are the same as those in the single cookie template.
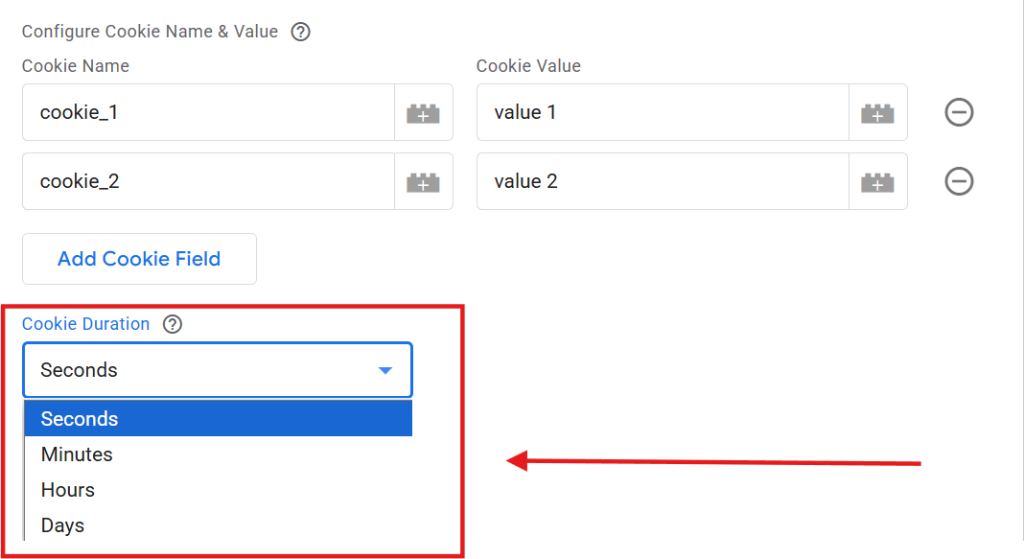
1. Cookie Expiration
Set a common expiration time for all the cookies created by this tag. Choose your preferred time unit:
- Seconds
- Minutes
- Hours
- Days
Then specify the lifespan value. This setting will be applied uniformly to all cookies defined in the list.
Optional Smart Settings (I recommend)
Skip Invalid Cookie Values
You can enable a setting to prevent cookies from being set if their values are:
- null
- undefined (either as a value or data type)
- Empty (“”)
This setting only skips creating cookies with invalid values; all other valid cookies in the list will still be set as expected.
Example:
If you’re setting five (5) cookies and only 1 has an invalid value, the other four (4) will still be created successfully.
Cookie Lifespan Extension
Enable this option to automatically extend the expiration time of cookies every time the tag fires, and those cookies already exist.
Example:
If the expiration is set to 45 minutes, and the tag fires again after 30 minutes, the expiration will reset, giving the cookie another 45 minutes from that point.
Final Thoughts on Setting Cookies in Google Tag Manager (Bonus Included)
Before implementing any cookie-setting functionality, always ensure that you have obtained proper user consent, especially if you’re operating in the EU, EEA, or any region with strict privacy regulations, such as GDPR or similar.
As I mentioned earlier in this article, I have a bonus tip related to working with cookies.
The bonus tip is this: if you need to retrieve the value of a cookie from the browser, the best and simplest option is to use Google Tag Manager’s built-in “1st Party Cookie” variable. Just enter the name of the cookie in the designated field, as shown in the image below.
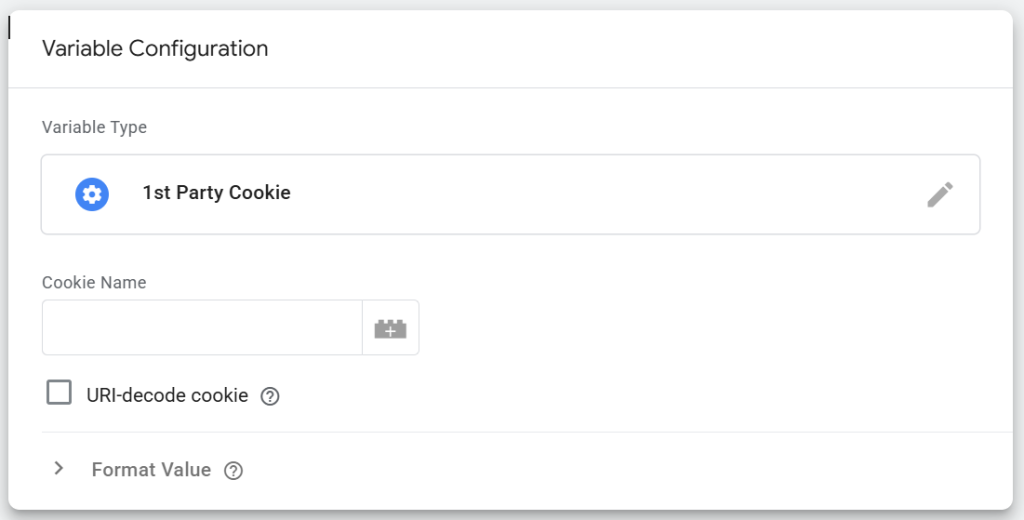
However, this method is suitable only when you want to retrieve the cookie value as-is, without any further transformation.
For instance, if you need not just to encode or decode the retrieved cookie value, but you also need to:
- Split the value using a delimiter
- Perform data type conversions
- Apply conditional logic (if-else)
- Extract a specific attribute from a cookie stored as an object
Then the default “1st Party Cookie” variable won’t be sufficient. It only supports basic encoding and decoding.
In such cases, you have two options:
- Write a custom JavaScript variable in GTM with your desired logic
- Use DumbData’s GTM Custom Variable Template, which makes the entire process much easier
The template is:
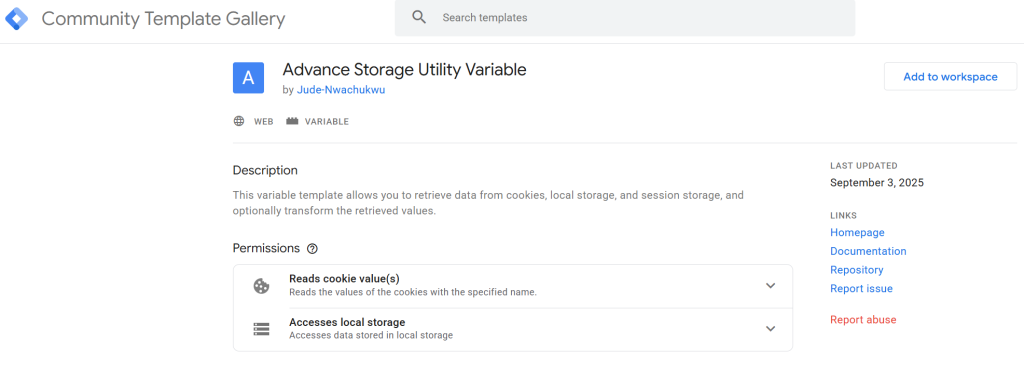
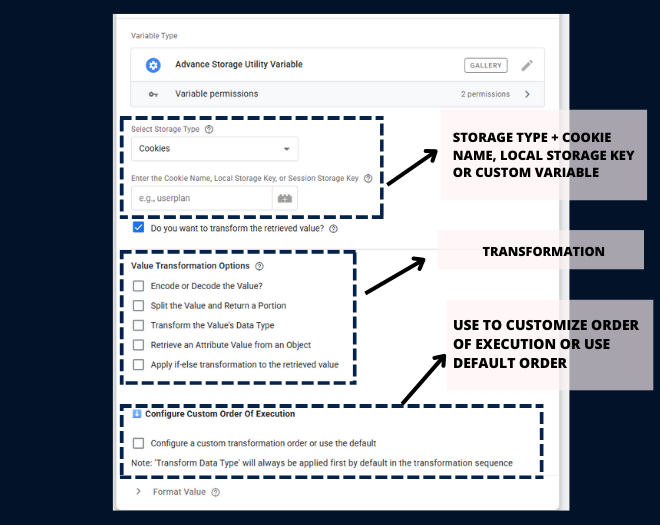
“Advance Storage Utility Variable“
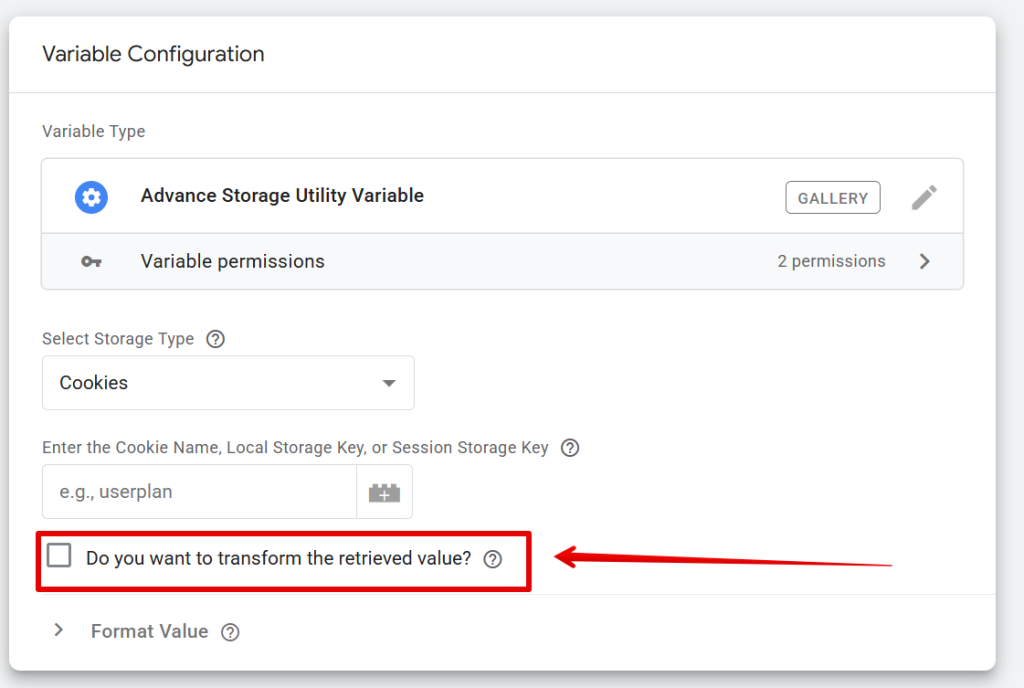
It supports all the advanced transformations mentioned above.
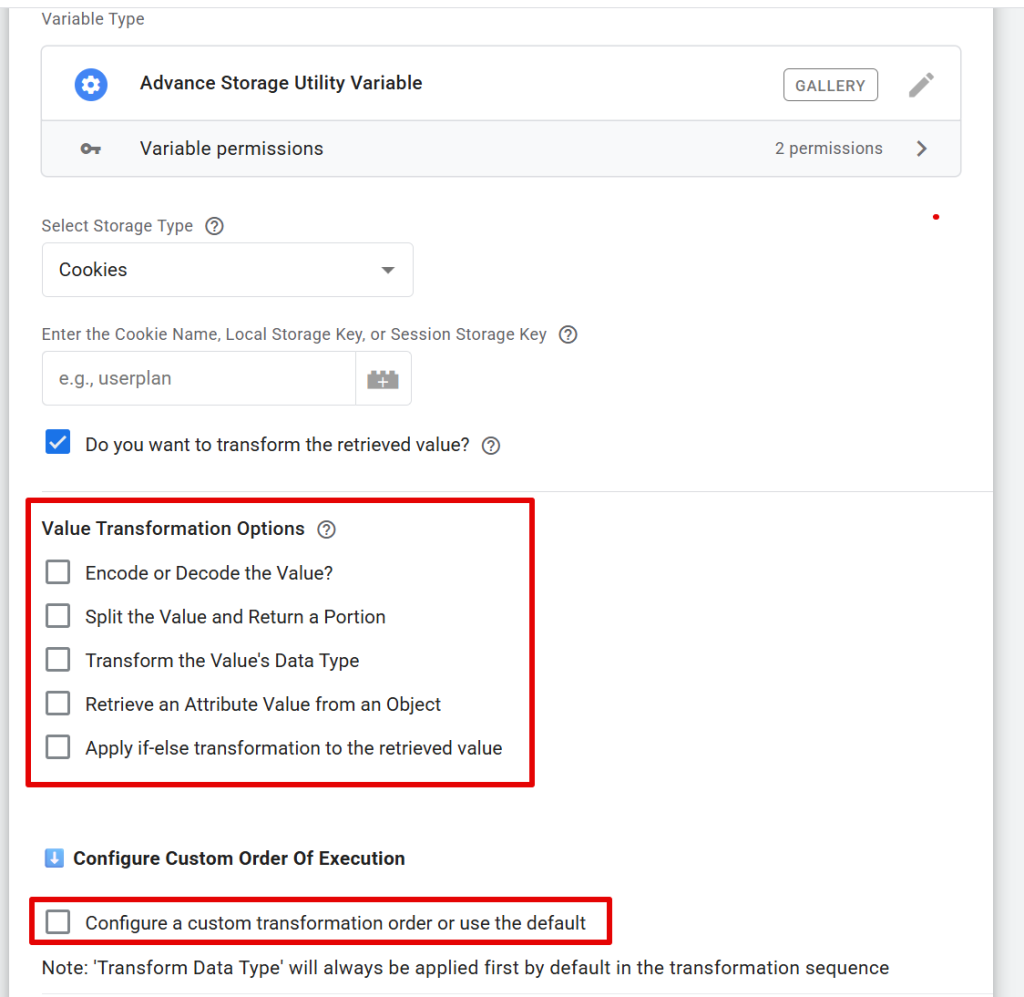
You can either apply the built-in transformation logic in its default sequence or customize the transformation flow to suit your needs.
This template is also officially approved by the Google Tag Manager team, which means you can find it in the GTM Community Gallery and easily add it to your GTM container.
Now that you’ve learned how to both set and retrieve cookies along with handling advanced use cases, it’s time to wrap things up!
If you need help with measurement or analytics implementation, feel free to get in touch via the contact form or details provided on the DumbData website. You can also check out other helpful articles and guides there.